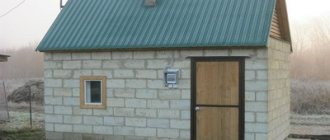
To fence the area, you will need to install a fence; this will determine the size of the area and hide the yard from prying eyes. Whatever material is chosen for installing the fence, all types will require concreting of pillars; we will discuss how to do this and what is required for this in the article. To carry out installation work and install a fence with your own hands, you do not need special builder skills, but you will have to follow the instructions and follow the rules.
Do you often work with concrete?
Not really
Materials and tools
Before starting work, you need to prepare the equipment and the site itself. Excess debris, tree rhizomes, bushes, grass and other obstacles that may interfere with work must be removed from the area.
The following tools will be useful:
- wheelbarrow for garbage disposal;
- bags;
- roulette;
- level;
- extension;
- scrap;
- Boer;
- shovel;
- drill;
- concrete mixer;
- Bulgarian.
And you need to purchase the following materials: water, cement, sand, crushed stone.
Expert opinion
Vladimir Ulyanov
I have been involved in fences for over 10 years, answering questions and helping people cope with the installation task on their own.
Ask a question to an expert
Good cement is marked M 500 or M 400; it is better not to take anything lower. The sand must be clean and free of clay and black soil. Crushed stone is suitable for small and medium fractions.
Preparatory work
First, you should measure your future fence. Once you know the total length, you can calculate the number of supports needed. If you use wave or flat slate as a fence, the distance between the posts should be less than 2 meters. If you use corrugated sheeting, 2 meters will be enough. Lightweight structures like chain-link mesh can be installed on supports that are located at a distance of 3 meters from each other or even more!
After this, markings should be made. We measure the area, divide its length by the length of the fence sections and add one - the resulting number means the number of columns. If the result is a non-integer number, the flight distance should be corrected.
Please note that when measuring and marking, you should note exactly where the structure will be installed. Do not forget to take into account the fact of installing a gate or gate.
Typically, the length of these elements does not correspond to the section markings, so the number of supports will not be determined accurately. An ordinary entrance gate is about 3 m wide, and the gate is only 1 m. Now you can start drilling or digging a recess for installation. If the site is located in a humid area where severe frosts are typical, it is better to abandon partial concreting and replace it with strip installation.
Partial fill
Using a mobile motor drill, you can make a neat hole or use a hoe. The hole should have a diameter 2 times larger than the size of the support, and lie to a depth of 30% more than the entire height of the structure. It turns out that if the height is 2 m, then the depth of the pit should be 1.3 m.
We insert a post into the finished hole, check the accuracy of the installation using a plumb line or level, then fill it with earth and compact it well. Then take the fence post grout and fill the surface. You need to install a cap on top so that when it rains, water does not get inside and cause destruction of the structure.
Point method
Dig a hole using a similar method. The bottom should be covered with crushed stone and sand mixture. On one side, weld a heel to the post to make it more stable. This time, as a support, you can use a flat sheet that will be wider in diameter than the pillars, or a lattice made of reinforcement.
Important! The structure should be lowered into the hole all the way, leveled and filled with concrete to the top. When pouring, compact the mixture using a steel rod.
If the site is located in an area with high humidity, the base of the post must be sealed (you can use roofing felt). The roofing material should be twisted into a ring, 0.2 meters larger than the size of the pit. This will prevent water from entering the concrete during the pouring process. Next, one edge should be closed in the “glass” using a plastic bag, and secured with tape. We place the structure in the meow and then do everything according to the usual scheme.
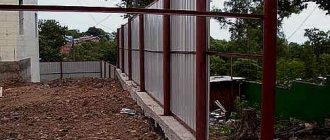
Tape mounting
Installing and pouring fence posts using the tape method includes the following steps:
First you need to dig holes for the pillars and an additional trench (0.4 meters deep, 0.15-0.4 m wide) around the entire perimeter where the structure will be installed. If you are installing a fence made of corrugated board or slate, then the width of the ditch can be made small, but for brick supports you should try hard. The main support cannot be immersed deeply, since thanks to such a foundation, weight and wind will not be able to damage anything and will not weaken the structure.- We make formwork, pour 10 cm of crushed stone and sand into the bottom of the ditch and into the hole. Drive in steel rods in a checkerboard pattern every half meter. The length should be chosen so that the rods are stable after being lowered into the ditch, and the ends are not visible after pouring.
- We lay a metal frame on the pillow. The frame jumpers that are in contact with the main post should be welded or wrapped with wire. The next frame should be installed perpendicular and 0.2 meters higher.
- Fill everything with concrete. You will get a multi-layer base for pillars that can withstand even a lot of weight.
Dry concreting
First, we drill a hole, make a glass from roofing felt, but without bottom insulation. Such a cylinder should be placed in a hole, and then the pole should be immersed, the heel should be lowered down. Everything should be leveled using a level, pour sand, gravel or other material between the glass and the supporting structure, and add water from time to time to thoroughly compact the layer.
Please note that, regardless of the type of concreting, first of all you need to install the outer pillars, stretch a rope between them, which will make it possible to evenly set the remaining gaps between the fences.
How to properly concrete pillars
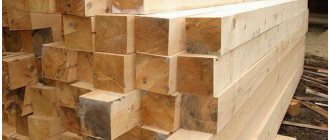
When the work site has been cleared, you can begin preparing for the installation of fence posts. It is important to purchase good and high-quality supports; you cannot skimp on them. A profile pipe with a thickness of 3 mm or more is suitable.
In order for the structure to last a long time and not deform over time, you need to calculate the correct depth of the wells and make the hole deeper than the top layer freezes. It depends on the quality of the soil. The standard option is a depth of 150 cm.
Useful Advantages of a fence on screw piles, types of posts and installation features
Preparing the columns. The pillars are cut into equal sections according to size; calculating the length is simple: you need to add 150 cm to the height of the fence, this is the depth of the well. Below on the pipe, for reliable fixation, you will need to make a hook.
For convenience, it is better to mark the part of the pipe that goes underground. At a height of 80 cm, leave a bright mark using adhesive tape or a white marker.
Drill a well. The diameter of the pit must exceed the volume of the pipe, usually 250 mm. If water begins to collect at the bottom, you need to remove it with a ladle or make a cushion of sand.
The solution must be poured in small parts and constantly compacted with a stick or other method. To fill, use a watering can or tin groove, which is easy to make yourself. Concrete needs from 1 to 4 hours for complete shrinkage, so the final work with the solution, namely the last pouring to the required volume, should be carried out after this time.
Marking
For correct marking, you need to install corner posts and stretch a string between them. Often builders make markings along the bottom - this is not entirely correct; it is better to pull the guide string along the top. With this arrangement, you just need to mark the distance between the pillars and make pendulums. This way, the markings are even, and it’s easy to install the supporting fence posts correctly and evenly.
Drilling holes
The well is made wider than the support pillar. If you take a profile pipe measuring 50 by 50, then the hole is made 250 mm. The holes are made with a drill. It is better to immediately remove the soil from the well from the site so that it does not interfere.
Choosing the Right Depth
The recommended depth is 150 cm. Depending on the soil, it can be less, but this will require knowledge of the composition of the soil, the depth of underground currents, etc. For regions characterized by severe frosts and winds, it is recommended to make the depth larger.
Installation of supports
If water collects in the well, you will need to make a drainage pad. It is simply made from sand, which is poured onto the bottom, with a layer thickness not exceeding 10 cm and carefully compacted.
In order to install the fence supports evenly, it is recommended to glue two bubble levels to the pipe.
Reinforcement
To increase the strength of the structure and increase the service life of the fence, reinforcement will be required. The easiest way to do this is to use reinforcement along the perimeter; before concreting, a reinforcing structure made of rods is installed.
To reduce the influence of groundwater on the fence post, it is recommended to make a layer of roofing felt between the concrete and the soil. This simple method will protect the cement from cracking.
Will you use roofing felt?
Not really
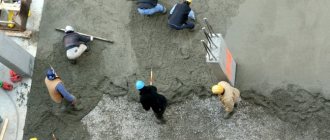
Concreting
You will need to make a solution. To do this you need:
- cement grade 400 and higher;
- crushed stone;
- sand;
- water.
Useful Which metal profile pipe to choose for installing a fence
You can knead in several ways, and adjust the thickness of the solution yourself. It is better to make the mixture thicker on the bottom of the structure, and fill the top with a thinner solution. The components must be of high quality and meet deadlines, this applies to cement. You can mix by hand or in a concrete mixer.
Expert opinion
Vladimir Ulyanov
I have been involved in fences for over 10 years, answering questions and helping people cope with the installation task on their own.
Ask a question to an expert
When pouring, you must follow the instructions and pour the solution in small portions, compacting each layer. It is important to mix the correct amount and use the solution at a time. It is better to throw away the excess immediately.
Calculation of concrete composition.
Universal mortar composition: three parts sand and one part cement. Water is added to the desired consistency. The volumes depend on the capacity of the concrete mixer and the amount of solution required. To correctly calculate the required amount of materials for the proposed work, it is recommended to use a calculator on the Internet. Such a calculation will be accurate and will allow you to purchase the required number of components for installing the fence.
Removing air
Can be done manually using fittings. To do this, each poured layer is pierced with reinforcement, slightly deflecting the reinforcement to the sides with sharp movements. This process is tedious; it is recommended to use a hammer drill, which will simplify the task and speed up the work. For the strength of the fence, it is important to remove air.
Composition of mortar mixture for fence posts
The mortar for fence posts consists not only of cement, sand and water are also added to it. In some cases, for example, to prepare a mortar that is used to build brick fence posts, any brand of detergent is also added to it. According to experts, this increases the elasticity of the finished solution.
READ ALSO: How to Make a Lattice Fence with Your Hands
Sand without clay impurities is used for the solution. The fact is that clay greatly reduces the quality of the finished solution, since it is gradually washed out under the influence of precipitation. Such fence posts will not last long.
The water should also be free of impurities: do not take it from nearby bodies of water, use water from the tap. In reservoirs, it may also contain sand, clay, small stones and other impurities that reduce the quality of the solution. If there is no other option than water from a lake or river, then at least filter it.
There are no special requirements for the detergent - it can be anything: for dishes, regular shampoo or washing powder, etc. The only condition: the detergent must dissolve completely in water
If you want to make pillars from concrete that is not the standard gray color, you can add dyes to the solution. The material will turn out to be a darker, contrasting shade. Color the solution with soot or graphite. But keep in mind that these additives will affect the quality of the finished mixture: the concrete will be brittle after hardening.
The second way to make the solution dark is to use more cement, and there are also special dark grades of material.