Restoration tasks
The term “restoration” means the most accurate restoration of the original types and shapes of products. In addition, such work allows you to extend the life of the structure.
There are three main tasks when carrying out the restoration of a wooden staircase:
- Restore the original shape, color, surface quality, finish, functionality and operational features of the product;
- Antifungal and antiseptic treatment of wood, protecting it from moisture, fire, ultraviolet radiation;
- If necessary, perform a partial or thorough reconstruction of the entire staircase.
Staircase reconstruction
Flight of stairs after restoration
What determines the cost of services?
Are you planning to renovate a staircase in a private home or any other property?
Interested in the cost of services?
Check out the price list with prices.
Table
Restoration of a wooden staircase: price for work
Please keep in mind that prices for sanding, sanding and other operations to restore stairs depend on:
- size of the structure;
- type of stairs;
- current condition and other factors.
We adhere to a loyal pricing policy. Restoration of wooden stairs is a service available to all our regular and new clients.
Causes of possible defects and ways to prevent them
The main reasons why restoration of wooden stairs is required are presented in the table:
| Design defect | Remedy |
| The geometric dimensions of the staircase changed, which led to the settling of the structure. | To prevent the formation of such a defect, the ladder should be non-rigidly fastened in its upper part, which will ensure that the structure slides along the wall. The sediment can reach up to eight centimeters. |
| The creaking of stairs. | This phenomenon occurs due to an imbalance in the joints; with increased humidity, the wood swells, and with low humidity, the wood dries out. To eliminate this defect, you need to re-glue the elements in the nodes. |
| Mechanical damage to steps. | Careful operation of the structure. |
| Damage due to thermal effects. For example, from a hot cup, teapot, curling iron. | Do not place hot objects on stairs. |
| Staircase elements are destroyed by fungal flora and harmful insects. | It is necessary to use specific compositions and impregnations that protect against the development of fungus and the interest of harmful insects in the tree. |
Damage to the staircase surface from exposure to chemical compounds. It can be:
| To eliminate defects caused by exposure to chemical compounds, it is better to invite a professional. |
Relevance of the services offered
Wood is a strong, wear-resistant and durable material. However, it also needs repairs over time. This is due to the fact that wood can lose its properties under the influence of moisture, temperature changes and other aggressive influences. The steps gradually wear out and become unattractive, handrails and other elements also become unusable.
Don't rush to replace the design! Just trust us to repair your stairs!
Of course, restoring a wooden staircase is not an easy task.
Specialists need:
- estimate the scope of work and determine its cost;
- think through all the stages of repairing your staircase;
- perform operations while maintaining the strength of the base.
That is why we strongly recommend trusting professionals for the repair of wooden stairs in a private house or other facility!
Main stages of restoration
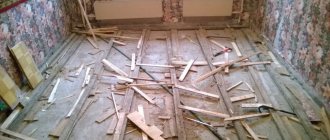
To correct the listed unpleasant defects, wooden stairs must be restored. In this case, damaged steps will need to be removed, and some will need to be completely replaced.
Preparations for the restoration of wooden railings and stairs are shown in this video.
- After dismantling the damaged parts, they are cleaned of the old paintwork. To do this, the surfaces should be coated with a special washing gel;
Tip: Gel is a solvent, so you should take care in advance about the safety of other surfaces surrounding the stairs. For example, cover floors and other structures with thick paper or plastic film.
- After applying the solution, the old coating softens, and you can perform the most labor-intensive stage of restoration - scraping. At the same time, you carefully clean the wooden surfaces from paint and varnish with your own hands. This can be done with a special machine or a hand scraper;
- The maximum effect after sanding wood is achieved by additional processing with sandpapers of different grain sizes;
- Elements can be made more original by bleaching. This is the process of treating wood with hard brushes that penetrate the fibers and refresh its texture;
- A mandatory step is sanitizing all parts. They are thoroughly covered with an antiseptic solution. This allows you to protect the wood from the effects of harmful insects, from the appearance of fungus and mold;
- The final stage is decorating the surfaces with paint or varnish.
Advice: When processing wood, you should use special wood coatings that additionally protect it from fluctuations in humidity and other negative influences.
Surface scraping
How is restoration done?
To begin with, experts assess the condition of the stairs. The list of defects includes:
- Presence of rotten areas;
- Strong creaks when moving along the marches;
- Worn surfaces of steps;
- Broken risers;
- Presence of gaps between stair elements;
- The presence of strong backlash;
- Damaged paintwork;
- Presence of traces of mold;
- Changed color of wood.
These defects are eliminated by carrying out restoration work.
To begin with, specialists eliminate defects such as play and squeaks. The presence of play is dangerous due to the complete destruction of the stairs. As for squeaks, they plague households with unpleasant, irritating sounds. The problem of creaking is solved simply - you need to find the creaking places, determining the place of origin of the sound, after which specialists immobilize the elements that cause the creaking.
As for the backlash, in most cases it is evidence of loose balusters and damaged supporting structures. Repair specialists check the integrity of structures, assessing their technical condition. Damaged elements must be replaced, which risks dismantling the entire staircase. Accommodation of people on the upper floors during renovation is not allowed.
Restoration of stairs includes the following types of work:
- Removing old paintwork;
- Grinding of degrees and their leveling with the help of overlays;
- Elimination of gaps between the parts of stairs;
- Plastering areas with chipped concrete;
- Removing rust followed by priming and painting;
- Replacement of individual steps and balusters;
- Application of anti-slip pads;
- Coating sanded and restored areas with varnish;
- Removing traces of mold with antiseptic treatment;
- Replacement of risers.
The final list of works is approved after a detailed inspection of the entire staircase structure.
Methods for repairing steps of wooden stairs
In principle, when repairing the steps of wooden stairs, it is possible to use several options for approaching the issue at hand:
Old wooden steps
The first option is to repair the installed stair steps.
Of course, this is the most optimal and least expensive method, but it can be used if the steps are made of solid wood (there is something to remove and grind down), and there are no deep and wide dents and scratches. Of course, if you have the desire, the appropriate tools, time and experience, the first option - repairing the steps of the stairs - can be used in most cases.
Do not forget that when repairing old steps, when sanding, the appearance of wood dust throughout the house is inevitable (no matter how hard you try to avoid it).
The second option is the use of special stair overlays.
Special stair overlays can be replaced with laminate. The laminate option is of course cheaper, but special stair overlays are more reliable.
The third option is a complete replacement of all steps of the staircase.
When choosing the third option, that is, you purchase and install completely new wooden steps for the stairs. Of course, you can buy steps for the stairs, but this is the most extreme option, since the price of such staircase repairs immediately skyrockets.
It was decided to carry out the repair of the stairs with one's own hands by installing stair overlays on the steps.
Repair of wooden stairs
Wooden staircases used in multi-storey private houses can wear out over time, especially if they are used intensively. After some time of operation, creaks, wobbly handrails or other problems may appear in the structure. Restoration of lifting mechanisms should not be postponed, as this may lead to unsafe ascent or descent. Repairing wooden stairs will take a little time, but after it the structure will again reliably serve its owners.
Installing stair nosings on stair treads
In fact, installing stair overlays on steps is quite a simple matter, but with a small BUT. All this is simple if the base for installation, that is, the old steps, is smooth and straight. The set of linings consists of two parts: an upper wooden laminated lining (the main part) and a side one made of laminated moisture-resistant plywood.
During the test installation of the kit, it turned out that the side part of the staircase steps was initially made at a large angle to the top of the step, which did not look very nice. Therefore, it was necessary to solve the question: how to install the side parts of the linings perpendicular to the top ones.
Trying on stair overlays for old steps
A pattern was made from a scrap of board (essentially a small wedge-shaped stick) to adjust the vertical installation of the side pads.
Calculation of vertical side panel fastening
Through practical measurements, a strip with the required thickness was selected, again in order to give a vertical position to the side staircase trim.
Calculation of the vertical level of inclination of the linings
Universal mounting adhesive was applied to the rail. This is done to achieve two goals. Due to the fact that the old steps are far from ideal, the glue makes it possible to ensure that there are no gaps between the rail and the side of the step, and also ensures complete reliability of the fastening.
Treating the additional slats with glue
Next, the rail is attached to the center of the side of the step using a pneumatic gun, but if you don’t have one, you can use a regular screwdriver for these purposes, although a pneumatic gun significantly speeds up the work process itself.
Additional fastening of the side rail using an air gun
The next step is to install the side trim itself. We secure it to the side of the stair step using a pneumatic gun. But, before attaching it, we apply mounting adhesive to the upper part of the lining and the place where it connects with the previously installed rail. Naturally, we attach the side pad using a pneumatic gun only in its upper part (which will later be covered by the top pad).
Installation of a side trim for a stair step
It's time to install the top trim on the wooden steps for the stairs. We proceed as follows: apply mounting adhesive to the upper part of the step,
Applying glue to old steps
Place the top cover in its place. We ensure its tight fit to the surface of the stair step, pressing it firmly to the base.
Installation of the top lining on a stair step
We fasten the top cover using a pneumatic gun. The fastening is made in the place where it adjoins the side of the step. This part will be covered by the end of the side trim and, as a result, the attachment points will be invisible.
Attaching the last top trim to the stair step
In a similar way, we continue to install and assemble the side and top overlays on the next steps of the staircase. At this point, the repair of a wooden staircase with your own hands can be considered almost complete.
Installing a side trim on a stair step
How to update stair steps?
Over time, all sorts of cracks and scratches appear on a wooden staircase from practical use. If you purchased a wooden staircase made from soft pine wood, then you can update the steps using hard bamboo.
To do this you need to do the following:
- take a regular tape measure and measure the width of the steps. Measurements must be taken both from the inside and outside;
- using a measuring ruler, take measurements on the bamboo parquet panel;
- then use a crosscut saw to cut the panel to the appropriate dimensions. This work can be done using a hacksaw.
- The next step is to adjust the tool so that you end up with a cut at an angle of 45 degrees. This is important because the outer side of the step end is beveled.
- After that, start applying parquet glue to the surface using spatulas. Apply the mixture evenly so as to completely cover the top of the step and the end;
Over the next 30 minutes, carefully lay the panel on the prepared area and press it to the surface to ensure maximum contact with the adhesive layer.
- Place the panel with a beveled end with the groove on the ridge and press it to the adhesive layer. For better fixation, use adhesive tape;
- to install the top panel, use pre-prepared supports made of wooden sticks of appropriate height and spread the surface with wood glue on an oblique cut;
- when the step is ready, you should get rid of the excess layer of glue, which dries in about 30 minutes, and start updating the other step;
- When all the steps are done, remove the adhesive tape and use sandpaper to sand the corner.
You can use the ladder for its intended purpose within a day. When using this method, the staircase will acquire a solid and attractive appearance.
How to restore a wooden staircase with your own hands
Like any natural material, wood is subject to environmental influences. Therefore, products made from this material require special care. Take, for example, a wooden staircase. Constant walking up and down does not leave its mark: scratches, abrasions remain, and dents appear. We will show and tell you how to restore your staircase to its former shine.
The most important thing is to choose the right grinding machine. Belt sander. Orbital sander, delta sander or random orbital sander? From our point of view, an eccentric sander allows you to get the best and fastest result when processing the surface of a staircase.
And although a belt sander has a higher productivity in removing the top damaged layer, it requires some skill when working with it. For processing corners we recommend
To obtain the best result, the surface of the wood should be moistened before applying varnish. As a result, the thin wood fibers pressed down by sanding will rise again. Another final sanding will remove them, leaving the surface mirror-smooth.
Stages of work:
Basically, the restoration of steps involves sanding (removing the old coating) and repainting them.
- Stage 1.
Typically, for this type of work, a grinding machine with an eccentric wheel is used. A coarse grinding wheel will help remove old coating, eliminate scratches and minor flat dents. Grinding wheels with a finer grit will help level out traces of rough grinding. And abrasive sponges will prepare the surface for varnishing, help remove the remnants of old varnish after using the sander, and allow you to reach hard-to-reach places in corners and on risers.
- Stage 2.
After all stages of sanding and dust removal, a coating is applied. This can be wood wax, oil, varnish, impregnation, tinting oil. See types of finishing agents and their differences here.
In general, a complete restoration of a wooden staircase is recommended every 10 years. This will make it look like new.
In some cases, instead of sanding and painting, the steps are covered with facing materials, gluing them to a special wood glue.
Staircase restoration - master class
1. An orbital sander is best for removing varnish residue. You should start processing with 40 grit.
2. The sanding discs must always be positioned very precisely on the pad. Otherwise, the edges of the grinding wheel will quickly become unusable.
3. The grinder should be moved evenly over the surface with light pressure.
4. Remaining varnish on the edges can be removed using a sanding block and sandpaper of the same grit.
5. The posts are sanded with a sanding pad, especially the edges. Always work in the direction of the wood grain.
6. After work, the stairs should be cleaned of dust. For the areas between the tread and the string, it is best to use cotton fabric.
Sequence of work
When working, it is important to observe certain nuances:
- First you need to use a disk with P40 paper. This will remove the old varnish from the surface. In this case, the grinding disc must be exactly on the sole. Otherwise, its edges will become unusable.
- The tool must be guided evenly along the stairs. The pressure should be light.
- The racks are sanded using a sanding block. Attention is also paid to the edges. You should always work in the direction of the grain.
- At the next stage of restoration of wooden stairs, they are cleaned of dust. For the areas between the bowstring and the tread, it is recommended to use cotton fabric.
Varnishing the steps of the stairs - progress of work
1. To finish sand the edges of the stairs before varnishing, use a sanding cloth to avoid rounding the edges too much.
2. Once again, thoroughly clean the stairs from dust with a rag. In this case, you should start from the top step.
3. Moisten the treads with a rag - the entire surface should be damp. Allow the surface to dry and sand with 240 grit sandpaper.
4. The varnish for covering the stairs must be mixed well before application, then poured into the paint tray.
5 Applying varnish should begin with the edges, which are thoroughly treated with a brush. The varnish should be distributed in the direction of the wood grain.
6. When applying varnish with a brush to the edges of the treads, the strings should be covered with a wide spatula.
7. Apply varnish to the surface with a velor roller. In this case, you should work in two directions; you need to roll out the varnish in the direction of the fibers.
Oil treatment of staircase railings
For parts of the stairs that are not subject to significant loads, a hard oil surface treatment is best. It will make the wood more pleasant to the touch.
We cover the steps with varnish
As mentioned earlier, it is better to pre-treat the fibers with water. Which varnish is better to use? Experts recommend using matte, as it is more resistant to abrasion and reliably protects steps from dampness. As for the number of layers, it is better to varnish the steps in two or three passes.
- For final sanding of the edges (this work is done before applying the varnish), a sanding cloth is used.
- Then the stairs are cleaned of dust with a clean cloth. Cleaning begins from the topmost stage.
- Next, moisten the surface with a rag. Afterwards sanding is done with P240 paper.
- The varnish itself is thoroughly mixed before application. After this, pour it into a paint tray.
- Apply the composition first to the edges. They are thoroughly treated with a brush. The matte varnish is distributed in the direction of the wood grain. If the composition is applied to the edges of the treads, the bowstrings are covered with a wide spatula. The steps themselves are varnished using a velor roller. They need to work in two directions.
Treating the stairs with oil
1. Treat the handrails with hard oil. To do this, use a brush, it’s better to start from the top side.
2. Then move on to the side ones. The oil should be applied in a very thin layer so that an even film forms on the surface of the wood.
3. It is necessary to ensure that drops and drips do not collect on the edges. They should be smoothed with a brush.
4. After about 10-15 minutes, completely remove with a lint-free cloth any remaining oil that has not been absorbed into the wood.
5. Using the same rag, rub the oil into the surface of the wood until a solid matte shine is obtained. Then let the surfaces dry. After intermediate sanding with 240 grit paper, apply oil again.
What's next?
The restoration of wooden stairs does not end there. After the above work, proceed to the railings:
- They are treated with special oil. If the stairs are not subject to high loads, you can use solid oil. It will make the material more pleasant to the touch. To apply the composition to the handrails, use a brush. Processing begins from the top side.
- After this, move on to the side railings. Apply the oil in a thin layer. In this case, a uniform film should form on the surface of the railing, without gaps. Make sure there are no drips or drips on the edges. If such defects are found, they need to be smoothed out with a brush. This is done immediately, while the varnish has not yet set.
- After 15 minutes, completely remove any remaining oil that has not been absorbed into the wood using a rag. The latter should also rub the oil into the surface. Rub until a solid matte shine appears.
- Next, you need to wait until the surface dries and sand it again with P240 paper, and then re-treat it with oil using the same technology.
Functions and structure of balusters
In a staircase structure, wooden supports perform three main functions:
- ensuring safety of movement on steps;
- supporting the handrail and ensuring the rigidity of the railing;
- wooden balusters are the main decorative element of the staircase.
The baluster stand can be divided into three parts:
- Base. The lower part of the baluster, designed for fastening to the floor and steps.
- Body. The middle of the counter is where all the decorative elements and carved decorations are located.
- Support. The upper part of the post on which the stair handrails are held and secured.
Useful little things
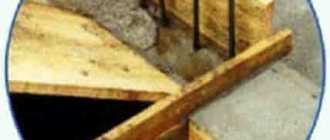
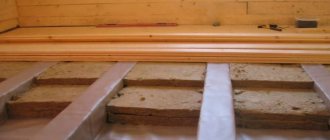
- In many Stalinist buildings built in the 30s and 40s, the landings and steps were made of wood. Where there are any signs of disrepair, the renovation of stairwells should be accompanied by a complete replacement of the entire flooring. Ideally, larch: it resists rotting better than other types of wood.
- Repair of external fire escapes, regardless of whether they are vertical or marching, is carried out only with steel and only using welding. Repairing fire escapes using any flammable materials is an incredibly stupid idea that goes against current fire safety regulations.
- The safest, most effective and cheapest impregnation for protecting steps from moisture during the restoration of a wooden staircase is ordinary drying oil . Its only serious drawback is the long (2-5 days) drying of each layer.
Restoration of a wooden staircase: nuances of work in detail
Varieties of wood carving techniques
Power tools, and even special equipment and machines, can come to the aid of a modern woodcarver.
However, carving is still an ancient art that requires the master to have a certain talent, patience and a great desire to create beautiful things.
Through (openwork) thread
This carving method involves creating a carving ornament or pattern without a background. The openwork carving technique is used both to create small overlay elements and to make independent products. Using through carving, wooden flat balusters with lace patterns on the canvas are made.
Through threads are divided into:
- for slotting - knives and chisels are used to create a design;
- for sawing - a cutting technique using a hacksaw or jigsaw.
If you do not choose very complex ornaments, openwork carving is considered the most accessible for doing it yourself.
Even a beginner can decorate products with through carvings and this does not require complex equipment.
Blind thread
This wood carving technique is characterized by the complete absence of slots.
Varieties of blind carving are relief and flat-notched techniques.
Flat-notch carving, as the name implies, is characterized by a flat background, and the pattern on it is created using notches and recesses. Flat groove threads are divided into the following subtypes:
- Contour carving. The pattern consists only of grooves cut along the contour, made with a triangular or semicircular chisel.
- Stapled. The pattern is formed by semicircular notches-brackets, which are cut in two steps - first, the notch is applied perpendicular to the surface, and then at an angle. Different locations and sizes of notches form a specific pattern.
- Geometric. The pattern is formed from various combinations of geometric shapes. Usually, beginners begin their training with geometric carving.
- Black-lacquered. A very interesting type of blind carving is created on a darker background of wood coated with varnish, stain or paint.
Relief and sculpture carving
These carving methods require a lot of experience and skill from the carver; they come in the following types:
- Flat relief carving. Carved grooves, applied at different angles, are located almost at the same level with the main background, but at the same time form a visible relief.
- Relief carving. The drawing rises significantly above the background. It is considered one of the most complex and labor-intensive types of carving.
Also, when decorating stairs, sculptural carvings can be used, which are characterized by the presence of three-dimensional images of figures of people, animals or other objects. Mostly sculptural elements decorate the massive posts of the first baluster.
Stage four: painting
Before painting, the workpieces are cleaned of dust and then lightly moistened with water. This allows the wood fibers to straighten out after sanding. It is better to use matte varnish; it more reliably protects the steps from abrasion and dampness. I didn't skimp on the varnish and applied it in five layers.
The drying process took a long time, it took almost a week to dry. But the coating turned out durable and beautiful.
Stage five: installation of steps and baseboards
I placed the completely dry steps on glue. To make the stairs easier to use, I glued them one step at a time, then in reverse order.
To complete the restoration, I decorated the entire structure with white skirting boards. Small gaps between the stairs and the wall were filled with color-matched silicone sealant.
Looking at the results of my work, I realized that it turned out quite beautiful and neat.
Do-it-yourself repairs took a little time, but at the same time saved money. And this is always nice!
Source: B0S from yaplakal.com forum
Types of carved wood balusters
Carved supports for stairs can be classified depending on the shape:
- Curly. They are created from wooden blanks of round and square cross-section. On a milling machine, the products are given the desired decorative shape.
- Carved. Carved wood staircase stands are the most beautiful and valuable. Various techniques can be used for carving - contour carving, geometric carving, relief carving or black-glazed carving. Since this decoration option is the most complex, the price of carved balusters is high.
- Flat. This type of balusters is the most affordable to make yourself. Most often, flat racks are made using the slotted carving technique. According to the decoration method, flat wooden balusters can be patterned and identical.
In the first case, the subsequent carved support is a continuation of the previous one, and the racks are connected into a single canvas using glue. On identical balusters the pattern is repeated.
Sources
- https://oLestnicah.ru/stroitelstvo-montag/remont-stroitelstvo/restavraciya-lestnicy-derevyannoj-152
- https://remont-shkola.ru/raznoje/remont-derevyannoj-lestnicy-svoimi-rukami/
- https://lestnica-mpl.ru/restavratsiya-derevyannoj-lestnitsy-svoimi-rukami.html
- https://postupenkam.ru/lestnitsa-iz-dereva/shlifovka-balyasin-dlya-lestnitsy-iz-dere.html
[collapse]
Wooden staircase repair: additional work
Practically yes, but there is a small nuance left. Theoretically, it is possible to select the length of the overlays exactly to the required size, but in practice this is difficult to achieve. There remains a small gap at the junction of the linings with the walls.
Seams between steps and wall
Use neutral silicone wood sealant or acrylic wood sealant to seal these seams. Select the color based on the color of the walls. Even before the installation of the stair caps began, the walls along the flight of stairs were repainted from pink to the purest white. Proper painting of the walls was done with matte latex paint. A little expensive, but reliable.
Filled joints between steps and wall
The installation process itself took about three hours. If you decide to repair a wooden staircase by installing special overlays for the first time, then do not expect an ideal result. Upon completion of the work, you may notice some minor imperfections here and there. But take a closer look at the stairs that professionals have worked on. To your surprise, a careful, meticulous, new look will also help you identify minor flaws.
General view of the staircase before and after renovation
Now take a look at your stairs and don’t specifically look for defects. Everything turned out really beautiful. Think about how much money you saved when renovating your stairs yourself. Moreover, you have acquired new practical experience and practical knowledge. And the price for work on stairs from specialized organizations is really not small at all.