After purchasing a washing machine, we have one concern left - to correctly install and connect the device to make the work of our housewives easier. Today we will look at how to install a washing machine in the bathroom.
Installing a washing machine does not require serious skills , you just need to follow a few basic nuances. The machine can be installed in the kitchen, in a special laundry room, or, as we are used to, in the bathroom. The problem can only be a small area of the room, but today we are not considering such an option, but are simply talking about how to properly install a washing machine in the bathroom.
Preparation for installation
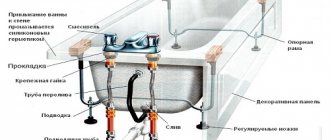
Washing machine components diagram
A new washing machine is unpacked
Having determined the place for the machine, you should check the condition of the walls and floor covering. All surfaces must be strong, dry and level to ensure normal operating conditions for household appliances. If the floor is uneven, vibrations during operation of the washing machine will increase significantly, which will lead to rapid wear of the elements of the device. And dampness from the walls will contribute to corrosion of metal parts in the machine, which also affects the service life.
Place where the machine will be installed
Socket layout
So, you need to carefully inspect the walls and floor, check the plane using a level, and make sure there are no cracks or voids. If mold is found in the seams, you need to treat them with a chlorine-containing agent or a special antifungal agent. At the same stage, you should consider ways to connect to the water supply and sewerage systems, inspect the pipes, and take accurate measurements so that the washing machine immediately fits exactly into place.
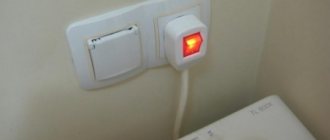
You need to prepare an electrical outlet in advance. The wiring must be stationary; it is highly undesirable to use extension cords. For safety reasons, the outlet must be a three-wire 16 ampere, ceramic, with mandatory grounding. It must be connected directly to the panel, at the same time installing a circuit breaker. Before connecting, make sure that the ground wire is thoroughly insulated.
Ceramic socket with grounding and cover
Connecting the washing machine to the mains
The next stage is preparing communication outputs. It all depends on the connection method, so first familiarize yourself with all the options and choose the most suitable one for your bathroom.
Kitchen
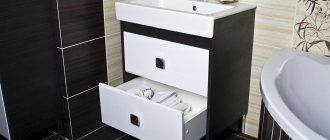
Here communications are also nearby, and there is more free space. In this case, the automatic machine is installed under the countertop, and for this it is not even necessary to select a built-in model. Please note that a washing machine installed under a countertop must be placed on the floor, and not on the base of the furniture, and the back of the box in which it will be located must be absent.
Methods for connecting to the water supply system
Several different methods are used to connect to the water supply. The choice of the most suitable option depends, first of all, on the experience and skills of the person doing the connection.
Connection to a metal pipe
This method involves inserting directly into the water supply and is carried out using a mortise clamp or crimp coupling. At the top of this device there is a threaded hole through which a hose is attached to draw water from the plumbing system.
Pipeline tapping
Along with the coupling there is a guide sleeve and a rectangular rubber gasket. How the insert itself is performed:
- close the mixers and turn off the valve on the riser;
- the section of pipe under the gasket is cleared of paint in any convenient way and sanded until smooth;
- insert a sleeve into the clamp and fix it in the cutout of the gasket;
- attach the clamp to the pipe with four bolts and begin to tighten them one by one until the gasket is tightly pressed to the pipe;
- The pipe wall is drilled through the hole in the clamp, the drill diameter is 6-8 mm.
Now you need to place something, any container, under the clamp, and very slowly turn the valve on the mixer. After this, the water that was in the pipe will flow out of the hole. If you open the tap abruptly, water can shoot out and flood everything around. When the water has drained, you need to carefully clean the hole in the pipe from shavings, fix the new tap and check for leaks.
Advice. If the pipes are not metal, but metal-plastic, a special tee - fitting - is used instead of a clamp. Installation is quite simple: turn off the water, apply a fitting and mark the cut locations, cut out a piece of pipe. A fitting with sealing gaskets is inserted into the resulting opening and a ball valve is connected.
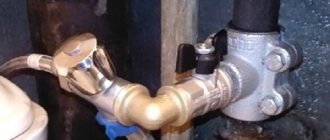
Connection to mixer
This option involves installation between the mixer and the eccentric of the walk-through valve. As a rule, the faucet is equipped with a special hose extension for hot water. This connection method is quite popular because it does not require much effort and time, however, due to the fact that the structure with the outgoing hose is in plain sight, it does not look very aesthetically pleasing.
If the mixer is of a European type, connection will take a few minutes: disconnect the cold water supply hose, screw the tee tap onto the eccentric, connect the mixer hose to one hole, and the hose from the washing machine to the other. If the mixer is of domestic production, then after disconnecting it you need to unscrew the eccentrics and install a walk-through valve with an extension.
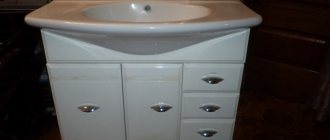
In this case, a pipe under the sink leading to the mixer was used.
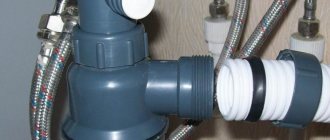
Connection to taps to a tank or mixer
Connecting the washing machine to the mixer (photo)
The most practical and convenient way. The taps are mounted on pipe-hose connections used to supply water to the flush tank, water heater or mixer. The faucet for the machine is usually installed between the water pipe and the faucet for the tank or mixer, although here its position does not play a special role, and can be placed on any side. But if the connection is made in the area of the water heater, the pass-through tap is mounted only between the pipe and the tap, otherwise, when the hot water is turned off, there will be no opportunity to wash clothes.
How to connect:
- shut off the water;
- unscrew the cold water supply tap;
- take a tee tap, wrap FUM tape around the external thread and screw it in place of the removed tap;
- The mixer hose is connected to one hole of the walk-through tap, and the hose from the washing machine is connected to the other.
The washing machine can also be connected to a separate outlet from the riser, if it was provided for it in advance
Tools for work
To independently connect the machine to metal pipes, you will need a set of tools for cutting lines and installing valves. Threaded connections are sealed with flax tow or special sealing tape. If a plastic pipeline is used in the room, then equipment for soldering polypropylene pipes is needed.
Additionally, you will need fittings, valves, adapter and corner bushings, flexible hoses with threaded couplings (the list of components depends on the distance of the washing machine from the switching point).
It is recommended to purchase high-quality components; when installing low-cost products, there is a risk of parts being destroyed during installation or operation.
Methods for connecting to the drain pipe
Draining the washing machine
Connecting to a sewer system is not much more difficult than connecting to a water supply system; the main thing is to follow the instructions exactly. There are also three different methods here, and which one you choose is up to you.
Plumbing drain
Flushing the toilet
Not the most convenient, but the simplest option. The machine always comes with a plastic hose holder, shaped like a horseshoe. After the washing machine is installed, this element is attached to the side of the plumbing fixtures, and the free end of the hose is threaded into it. Dirty water is directed through a hose either into the bathtub or into the toilet, depending on where the holder is attached, and drains through the drain hole.
Draining the sink
There is one plus here - you don’t need to waste time and effort connecting the drain. But there are many more disadvantages:
- if the holder is loosely secured, the hose will fall under the pressure of water and flood the floor;
- While the water is draining, there is no way to use the plumbing;
- the choice of location for a household appliance is limited by the length of the hose and the distance from the bathtub or toilet;
- The plumbing will have to be cleaned much more often due to sediment containing tiny lint, grains of sand and other impurities.
Draining over the edge of a bathtub or sink
Draining through a siphon
Using a siphon to connect a washing machine to the sewer
If the machine is located next to a washbasin, you can connect the drain to a siphon. To do this, you will need to buy a siphon with an additional pipe and install it instead of the usual one. After this, all that remains is to connect the hose tip to the nozzle. Since the inlet is located at the top of the siphon and at an angle, wastewater from the washbasin cannot flow into the drain hose.
As for the cons:
- the smell of sewage can penetrate through the hose, so when connecting it is advisable to use a system with a water seal;
- with strong pressure, water from the washing machine may not go down the drain, but rise through the pipe into the sink and overflow.
Drain into the sewer
Arranging a drain directly into a sewer pipe is the most reliable, although quite labor-intensive. To connect, you will need a tee of the appropriate diameter with an oblique outlet and a check valve for the washing machine (anti-siphon). One side of the check valve is attached to the drain hose, the other is connected through a tee to the sewer pipe.
How to install a washing machine
Connecting the drain hose
Advice. The drain hose entry must be angled from top to bottom. If it is made horizontally, drains from the sink and bathtub will definitely fall into the hose, spreading an unpleasant odor.
Bathroom
The simplest solution is to install an automatic washing machine in the bathroom. Very often washing machines are placed in it. The advantages are obvious: all communications are close, the drain hose can simply be directed to the bathroom. But there are also plenty of disadvantages to such placement.
- Due to high humidity, a regular outlet cannot be installed in the bathroom; it must only be moisture-proof.
- All parts and assemblies of the automatic machine will have to work in conditions of excess humidity, which will not extend their service life.
- Most bathrooms in apartment buildings have more than modest dimensions. You will have to sacrifice something to put a washing machine there. Sometimes in such cases the sink is removed, which does not add convenience.
Washing machine installation
Before installation, the washing machine is freed from packaging, inspected to check its integrity, and the locking bolts are removed. They are installed by the manufacturer at the factory and are intended to secure the drum during transportation. But you cannot leave them in the car after installation, as this leads to damage to the chassis. The bolts are twisted with an open-end wrench and removed from the body along with the plastic bushings, and the plugs included in the kit are inserted into the holes.
On a new machine you need to unscrew the transport screws and remove the plugs
Transport bolts hold the entire drum suspension in a fixed state, so as not to damage it during transportation
Stub
Now you can start installation.
Advice. It is recommended to keep the shipping bolts for the duration of the warranty period, as well as in case of transporting the machine in case of moving to another apartment.
Step 1. Place the washing machine in the chosen place, place a level on the top cover, and adjust the height using the legs. The machine should stand level, without distortions, and not too close to the wall. There should also be at least small gaps on the sides between the walls of the machine and the furniture or plumbing fixtures.
The machine needs to be leveled
Machine legs
Step 2. After making sure that the placement is correct, the machine is pushed forward a little to facilitate access to communications.
Step 3. Connect to the water supply. Take a water supply hose, insert a filter on one side (usually it is included), screw it to the fitting on the back wall of the machine, and screw the other end to the inlet tap on the water pipe, after inserting the gasket.
The filter can be installed in the form of a mesh in the hose or in the body of the washing machine
Filling hose
One end of the hose is screwed to the machine
Connecting the inlet hose
Step 4. Next, connect the drain hose: insert its end into the drain hole and screw the nut tightly. The length of this hose should not exceed 4 m to ensure normal drainage of used water.
Connecting the drain hose
If it is necessary to extend the water supply hose, use a second hose and adapter coupling
Step 5. Both hoses are tucked into the corresponding recesses on the back wall of the machine to avoid kinks. After this, the washing machine is installed in a permanent place and the location is again checked for level. Now all that remains is to connect the washing machine to the outlet and check its operation in test mode.
Plug in the machine
Trial run
Trial run
First, you need to take the device passport and place it in front of you to check the data during the verification process. A test run is performed without loading laundry, only with water and a small amount of powder. So, they turn on the water supply to the machine’s tank, while simultaneously timing the filling time to the specified mark. Immediately after this, all connections are inspected, and if a leak is detected, the water is drained and the problematic connection is resealed. If no leaks are visible, you can turn on the machine.
The water should heat up to the desired temperature within 5-7 minutes, so note the time and check the device data sheet. While the water is heating up, listen carefully: the device should operate almost silently, and any rustles, creaks, or knocks indicate a malfunction. If there are no extraneous sounds, check the operation of other functions, including the drain. After turning off the machine, once again inspect the hoses, connections, and the floor around the body. Everything should be dry and clean. Read the drain in the bathroom on the website.
Watch the video on how to connect a washing machine to a water pipe.
Where to install the machine
When choosing a location for installing the machine, you need to consider the following factors:
- there should be a hard floor under the equipment without carpeting;
- the product should not be exposed to sunlight;
- the room temperature should be above 0°C;
- there should be gaps around the body for ventilation and removal of moisture vapor;
- Taps should be provided on water supply pipelines to limit water supply.
When installing the automatic machine, it is necessary to take into account the location of the power outlet. Since the equipment consumes power up to 2-2.2 kW, it is not recommended to use extension cords. The floor covering must be level, but the equipment design includes adjustable supports.
When installing, take into account the way the laundry is loaded, since walls and plumbing may prevent the lid from opening.
The equipment is placed in bathrooms, kitchens or corridors of apartments located next to water mains and sewer drains.
Where else can you organize a drain?
It is possible to organize drainage without using a siphon; the technique is used with a sewer pipe diameter of 50 or 100 mm. An adapter sleeve or tee is installed at the end of the plastic sewer pipeline, in which the drain hose is located. The transition elements are equipped with rubber sealing rings that ensure the tightness of the drain line.
When arranging the drain line, the length of the hose should be taken into account, since an increased load on the pump leads to overheating and breakdown of the electric motor.
Some equipment manufacturers install a check valve in the drain design, which prevents the flow of dirty water from the sewer into the tank of the machine. In this case, there are no restrictions on the installation height of the flexible hose; information about the design features of the machine is indicated in the operating instructions.
Corridor
The least common option for placing a washing machine. It's an interesting idea, though. Additional meters will be required in the corridor: the installed equipment must be invisible and not create interference. It is imperative to take into account the door opening radius and the length of the corridor. The best option is to hide the equipment. Thanks to the inexhaustible, bold entrepreneurship and imagination of designers, you can find an option that suits you individually. There are several ways to disguise the “main assistant” of the housewife.
For example, you can beautifully hide washing equipment in a closet. In a “pencil case” type product it will be located especially advantageously. Here you can also make shelves for washing supplies.
You can use a built-in wardrobe with sliding doors. It will completely “hide” the washing equipment.
When there is enough space, it is recommended to place the machine in a corner. A regular cabinet can be used to install equipment.
The most budget option is to purchase a curtain to hide your equipment. For this you will need a cornice and a curtain. You can buy them at the Ikea hypermarket. Now there is a wide selection of textiles of different quality and composition.