Tile is a traditional material for tiling bathroom floors and walls, and many home craftsmen prefer to forego the services of a professional tiler in order to complete all stages of the work themselves. In the process, many questions arise, one of which is: where to start laying tiles in the bathroom from the floor or walls? Today’s article is about this and how to properly organize the process of tiling a room.
Where to start laying tiles in the bathroom from the floor or walls?
Advantages and disadvantages of laying tiles in the bathroom
Ceramic finishing has many advantages over other materials - wood, wallpaper, plastic. Advantages of tiles:
- moisture resistance - tiles are not afraid of steam and moisture. It is successfully used in finishing swimming pools;
- strength and resistance to damage and abrasion;
- easy care and hygiene - contaminants are not absorbed into the material, its surface can be easily washed with water or using household chemicals;
- long service life - high-quality laid tiles can be used for decades;
- environmentally friendly - does not contain toxic substances;
- safety – does not burn and does not contribute to the formation of static;
- a wide field for design - on sale you can find materials of various colors, with a wide variety of prints and textures.
There is only one drawback - the high cost of both the material itself and its installation. High-quality installation is only possible with careful preparation of the walls and possession of special knowledge. There are many nuances that must be observed - the sequence of installation, proper preparation and application of glue, the location of the tiles on the wall so that they look harmonious and impressive. If the cost of a specialist’s services is not included in the budget, carefully study the issue and carry out the facing work yourself.
The disadvantages include the difficulty of replacing individual elements. If there are no tiles left in stock and the store no longer sells them, you will have to select an alternative or completely change the covering.
Slitting
Trimming the tiles may be necessary to fill corner areas of the wall. In a single case, a regular glass cutter could be used for this purpose. However, if you regularly repeat this work, you will need a special manual tile cutter. It will allow you to make the cut carefully, avoid chipping the edges of the coating and minimize the number of broken tiles.
To perform the cut, the tile is clamped into the device body. The cutting roller should be at the level of the marked cutting line. It should be moved along the entire length of the product. The cut edge is separated independently under the influence of its own weight or with a special separator.
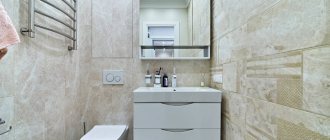
Tile selection
Appearance – color, pattern, texture – are the determining criteria when choosing tiles. And this is natural - first of all, everyone wants to create an attractive interior. The size of the individual fragments is important - large ones allow you to minimize the number of seams. And the most important thing is the quality of the material. Cheap tiles will become covered with cracks and become unusable after a couple of years of use. You shouldn't skimp on this option. There are many nuances in choosing the right material that will help create a stylish, modern, and most importantly, durable bathroom interior.
Color, pattern and texture
The trend for tiles with various patterns, flowers and abstract prints is becoming a thing of the past. Increasingly, designers are giving preference to materials that imitate natural textures - stone, wood, leather or concrete. Layering tile patterns in contrasting colors also looks dated. Transitions from one shade to another should be done in the inner corners, or on multi-level surfaces.
The area around the bathtub or inside the shower stall should not be tiled with a pronounced relief. Protrusions and crevices are quite difficult to clean, and they will become dirty faster in these areas.
For the bathroom, choose matte tile options. On such a surface, fingerprints and traces of water are not visible. It will not create annoying glare. Lovers of glitter should limit themselves to glossy walls. Rough tiles on the floor give you confidence in your own safety - the risk of slipping is almost zero.
Size, shape and type of tiles
To choose the right tile size, consider the dimensions of the room. Owners of a spacious bathroom can not limit their imagination and choose tiles of various sizes - from mosaics to large slabs. A variety of compositions and combinations are appropriate.
Approach the finishing of small bathrooms with greater caution. Too small with a variegated pattern, or vice versa - large tiles with a pronounced decor will narrow the space even more. The same effect will be achieved when breaking up large square or rectangular segments with a contrasting fugue. In a small bathroom, use medium-sized tiles - 20x20 or 20x30. Rectangular details will adjust the space - moving the ceiling back or expanding the walls. Laying diagonally “breaks” and visually expands the space.
Large format tiles without chamfers look ideal in any room. Trimmed edges hide seams and provide a uniform surface.
Popular ways to lay tiles on floors and walls
There are various ceramic coating schemes. They are designed to demonstrate the beauty of the tiles, highlight the advantages of the room, and neutralize its shortcomings. Let's look at the most popular installation methods.
Tile placement options:
- Direct laying - allows you to avoid unnecessary costs for materials and difficulties in work. The tiles are placed in even rows parallel to the lines of the floor and walls. Square and rectangular tiles are suitable for this method. With the help of the latter you can also adjust the space. This layout method is popular among beginners and is optimal for doing it yourself.
- Scattered - each row is shifted by half a tile. This type of masonry resembles brick. A design made of rectangular segments, such as a “hog”, looks advantageous. Disadvantages include an increase in the amount of waste and the difficulty of maintaining symmetry relative to the center of the wall.
- Diagonal is an effective and at the same time complex laying pattern. The tiles are located at an angle of 45 degrees relative to the line of intersection of the floor and the wall. The disadvantages also include an increase in the number of trimmings and an increase in the cost of repairs. Installation requires serious knowledge and experience.
- Modular - tiles of different formats with multiple sides are used. This method gives a spectacular and original pattern. The scheme often finds its application in floor design. It requires accurate calculations of the amount of material. A scale diagram of the future layout will help.
Features in choosing a solution/glue
When choosing glue, preference should be given to materials with:
- moderate ductility - the glue should be applied in a layer of sufficient thickness and not spread excessively;
- sufficient spreadability - should be able to fill existing voids for better adhesion to the wall;
- increased adhesion ability - especially important when installing large-format, heavy tiles;
- lack of accelerated water release - makes it possible to correct the position of incorrectly fixed tiles.
Glue options by composition
- Cement-based - affordable, hypoallergenic, sold in the form of dry mixtures. They contain polymer components that enhance their plasticity, water resistance and adhesive properties.
- Dispersive - have increased adhesion force, excellent for working with non-standard surfaces - plastic, wood, metal, plasterboard. They are characterized by low consumption, but their cost is much higher.
- Epoxy is a super-resistant composition that must be handled very carefully - it is practically impossible to remove. Indispensable in rooms with high humidity and is not destroyed when exposed to chemicals.
The question often arises - which material to give preference to - a dry mixture or a ready-made composition.
The former are more affordable, but the latter provide increased traction. Is it worth overpaying if the dry mixtures have sufficient properties to hold even large-format tiles on the wall? When using ready-made polyurethane glue, it is necessary to level the surface with special care, which will entail additional costs. The composition, prepared independently, can also be used as plaster. The increased stability of the finished glue has a downside - dismantling the tiles glued to it is extremely difficult. The process requires the use of a hammer drill and many hours of breaking the tiles into individual fragments.
How to calculate the number of tiles
It is not so easy to accurately calculate the number of tiles required. Inexperienced builders often return to rent out or buy more material. It is especially difficult to calculate the required amount of tiles if the design plans to use different colors and decorative elements. And if handing over the surplus is a small problem, then purchasing additional tiles is quite difficult. Identical products from different batches may differ in color. And if you don’t notice this in the store, then at home the difference will immediately catch your eye.
To determine the exact amount of material, make a preliminary measurement of the area of the walls and floor, and find out in the store whether there is a sufficient amount of the product in stock. Find out the size of the tile and start calculating. Draw a diagram on the detailed plan of your bathroom. It will help you calculate the exact number of whole and trimmed elements, and calculate the required number of products of different colors.
Finishing work
The outer corner is either cut at 45 degrees on a special machine, or hidden with a decorative corner. The tile joints are grouted with a special grout, selected according to color.
Excess is removed immediately. Additionally, the seams are treated with sealant.
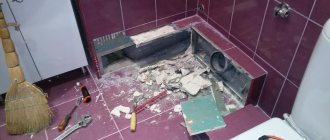
How to prepare a bathroom before installation
The first stage of work is preliminary preparation of the premises. Take out furniture, remove shelves, heated towel rails, hangers, hooks and other wall fittings. Remove faucets, sink, bathtub, toilet - if the room is combined with a toilet.
Required materials and tools
The next stage involves removing the old tiles, leveling the surfaces, installing waterproofing, marking, and laying new material. These works require the use of special tools.
You will need:
- building level;
- perforator;
- nozzle for mixing solutions;
- tile cutter;
- roulette;
- ruler;
- pencil;
- container for mixing glue;
- notched spatula;
- sponge or microfiber cloth to remove excess glue;
- a corundum sharpening stone for smoothing the cut edges of the tiles;
- rubber hammer;
- mounting crosses;
- glue for tiles and ceramics;
- fugue for filling seams.
High-quality materials and tools will significantly simplify the work process, and will more than justify their own cost.
Removing old tiles
When re-repairing, it is necessary to remove the old coating. The easiest way to remove tiles from the wall is to use a hammer drill. Protect your eyes and hands - glasses and gloves will protect you from sharp fragments. Pieces of tile may fall on your feet, so wear stiff shoes.
Break off the first tile using a hammer or chisel. Then switch the drill to hammer drill mode and place the drill under the bottom edge of one of the fragments. The coating may fly off along with the old mortar and plaster, but in any case you will have to get rid of them.
Preliminary leveling of walls and floors
After completely cleaning the wall, you need to take measurements and find out whether leveling of the surfaces is required. We measure the angles using a square - they should be 90 degrees. Using a plumb line, we identify the unevenness of the walls and their deviations from the vertical. It is recommended to prime a wall that is not strong enough. Next, we attach the beacons using adhesive and level them. We fill the gaps between the beacons and the wall with the solution. Avoid the formation of sagging.
Preparing the solution - you can use a regular cement mixture, adding one part of tile adhesive to it for strength and spreadability. We throw the solution with a trowel and distribute it using the rule with short zigzag movements. We send the excess solution into a container.
After drying, we remove the resulting irregularities using a trowel and wait for the material to completely set.
Gender may also need adjustment. Do it using beacons or using a self-leveling mixture.
Determine if there are any uneven floors. The best assistant in this matter is a laser level. If there is a deviation of up to 5 mm, alignment can be dispensed with. If the indicators exceed this number, get ready to work. We install the beacons in accordance with the line on the wall and check their level using the rule. Pour in the solution and leave to dry.
Waterproofing – moisture-resistant surface treatment
The bathroom is a room where there is always a risk of leaks. Therefore, reliable waterproofing should be ensured. Multi-layer protection will best cope with this task.
Coating waterproofing is the most reliable. This technology avoids the formation of joints. For this purpose, bitumen mastics are used. Special mixtures for waterproofing swimming pools are suitable. The composition is applied in several layers using a brush. It is necessary to distribute it not only over the floor surface, but also to cover at least 30 cm of the wall area. After the coating material dries, a waterproof, durable film is formed, fixed on the walls and floor. It is recommended to reinforce the corners with strips of rolled waterproofing. This must be done after the first layer of coating. If such a measure does not seem reliable enough to you, make an additional layer before laying the screed. Take a roll of waterproofing and glue it onto the mastic. Overlap the sheets by 15 cm with an exit to the wall at a height of 30 cm. Coat all joints with liquid waterproofing.
Primer
Before you begin laying tiles, prime the base. This procedure will improve the quality of adhesion of the glue to the surface of the walls and floor. The choice of primer solution depends on the surface material. The compositions differ in the depth of penetration and the presence of additional qualities - fire protection, antibacterial. Antiseptic properties are very important for the bathroom, as they protect against the formation of mold and mildew, which most often appear in damp rooms.
Treat the walls and floor with the composition using a brush 2-3 times. Before applying the next layer, you need to wait until the previous one has completely dried.
Marking rows
Marking is the final stage of surface preparation. It is done as follows:
- A tile laying scheme is being developed. Particular attention is paid to the corners from which work begins. With a diagonal layout, this is the most important point. The diagram will allow you to evaluate different options and calculate the amount of material needed;
- select the angle from which the process will begin. It doesn’t matter left or right - the main thing is that it is farthest from the door. If the door is centrally located, you can start from any corner;
- measure the height of the first row and install a rail to hold the second;
- Possible differences on the floor are determined, plumb lines are installed, a rough layout is performed taking into account the seams, and the position of the tiles is outlined.
Preparation of the solution
Proper preparation of the adhesive composition is the key to reliable fastening of the tiles and the durability of the ceramic coating.
Pour the required amount of water into a suitable container. To determine the dosage, read the instructions with a detailed description of the preparation of the solution on the package. Add the dry mixture into the liquid in small portions and mix using a construction mixer or a special attachment on a drill. Adding the powder gradually will prevent the formation of lumps. Add the mixture until the solution begins to resemble thick sour cream in consistency. This glue will be well distributed over the surface of the tile, and at the same time will not drain from it. Prepare the mixture in small portions, as it hardens quickly.
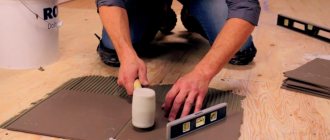
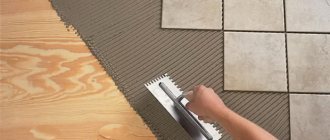
Laying tiles and grouting
We arm ourselves with a notched trowel and apply glue to the tile. We start laying from the second row, which is “supported” by the rail. Carefully press the cladding fragment against the wall so that the composition is distributed evenly. Check the side edge using a level. We perform the same manipulations with the next tile. We insert mounting crosses into the gaps, which will prevent the elements from moving and help make the seams even and uniform. Gaps are necessary to prevent cracking of the tiles due to thermal expansion.
We install vertical slats on both sides of the bottom row. We stretch the thread between them at the height of the tile. It will act as a guide for the next row. If you need to cut tiles, use a tile cutter. To cut a hole for the pipe, take a grinder. We place the cut parts in the corners - there they are less noticeable.
It is better to lay the floor before facing the walls. The wall tiles will rest on the floor tiles and will create a neat and even joint line. In this case, there is no need for a rail to support the second row. The gap between floor and wall tiles should be 2-3 mm. A sealant or fugue is placed into the seam. Laying the floor starts from the far wall from the door. The height of the tiles is adjusted using a rubber hammer. If the fragment lies too deep, you need to remove it and add glue.
The final stage of cladding is jointing of the seams. This is done after the solution has completely dried, which takes several days. Pre-clean the tiles from residues and drops of glue. Apply the grout using a small rubber spatula and immediately wipe off all excess.
Base leveling technology
If the walls are quite crooked, covered with mold or have many defects, the question of where to start laying tiles in the bathroom has one correct answer: with leveling.
The technology for carrying out this work consists of the following sequential actions:
- Old plaster and all loose elements are removed from the surface.
- The walls are covered with primer.
- Using a wide spatula, the plaster composition is applied to the surface and distributed over the entire wall using a wide rule. The work is done from bottom to top.
- If the walls have differences of more than 5 mm, the plaster is applied along the beacons. They are installed using a plumb line every 0.6 meters. After the solution has dried, the beacons are removed from the walls, the remaining grooves are filled with the same plaster composition.
When the plaster dries, the walls are coated with a primer. After this, you can begin installing the tiles.
Note! If the surface is fairly flat, but too smooth (monolithic, block), be sure to cover it with putty or concrete contact. Otherwise, the tile with the adhesive solution will simply slide down from the base.
Additional tips and advice from professionals
If you do not have the knowledge and skills to lay tiles, use the advice of experienced craftsmen.
Where is the best place to start laying tiles?
Bathroom tiling can start from:
- visible corner farthest from the door;
- from the threshold - if the far corner is closed by a bathtub or shower, this method is more suitable;
- from the center - this method is suitable for large bathrooms. If a shower drain is installed in the middle of the bathroom, you need to lay the tiles from this element. The trimmed fragments will be located along the walls, where they will be successfully hidden by furniture and plumbing.
How to cut tiles correctly
The quality of the cladding itself depends on the quality of the cut of the ceramic tile. For cutting tiles use:
- glass cutters;
- manual or electric tile cutters;
- Bulgarian
The choice of tool depends on the scope of work and the required functionality. When using a glass cutter, mark the line with a pencil or non-waterproof marker. Attach a metal ruler to the strip and run the glass cutter once in the direction from the farthest point towards you. After this, place the tile on the table so that the cut line and the edge of the tabletop coincide, and gently press on the tile. The tile will split to form a smooth edge that can be sanded down with sandpaper.
For this work, use a roller tile cutter - it is more convenient to use.
A manual tile cutter is a special device for working with tiles. Markings are applied to the tile, after which it is placed on a base with tubular runners. A carriage equipped with a cutting roller made of durable alloy runs along them. The roller is aimed at the tile and the handle is used to make a cut. To break we use a T-shaped heel.
An electric tile cutter is professional equipment that can handle even thick tiles. The design is reminiscent of a modern circular saw. The devices are distinguished by cutting discs and the presence of baths for collecting water. These machines can be used to perform decorative cuts with an angle, which allows the tiles to be joined at an angle of 45 degrees without the use of mounting angles.
Grinder – you can cut not only in a straight line, but also make wavy and round cuts. A damaged cutting blade can leave many sloppy chips in the gloss. For the same reason, it is recommended to cut from the back side.
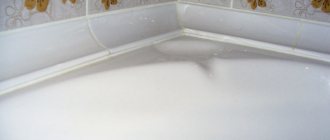
How to join corners
There are different ways to join tiles in corners.
- Perpendicular - when the edge of one of the tiles is hidden behind the adjacent element. It will not be difficult to hide the cut edge. This option is suitable for external corners.
- Connecting tiles at an angle of 45 degrees. A special device is required - an electric tile cutter. Carrying out this work requires special skills - the cuts must be flawless. Small irregularities can be hidden using tile adhesive and grout.
Using Tile Corners
There are special corners - profiles made of plastic, aluminum or brass for laying tiles in the corners - trims. They can be U-shaped, L-shaped, or a concave arc. The outer corners are decorated first, the inner corners second. They allow you to connect fragments of the coating as neatly and aesthetically as possible, and easily lay tiles on uneven corners, completely hiding visible defects. Trims are fixed with tile adhesive, which does not contain cement, sealant, or liquid nails. If the edge of the corner is hidden under the tiles, laying on a cement-containing composition is allowed. Trims guarantee neat transitions from one wall to another, do not allow moisture to pass into the seam and prevent the formation of fungus and mold in them.
Common Mistakes
In conclusion, let's look at some common mistakes that are made when laying floor tiles:
- The most serious mistake is failure to ensure that the tiles are laid out evenly on the sides of the room. It is generally better not to make narrow cuts, especially on a visible area of the floor that is not hidden by plumbing, as it does not look very attractive.
Examples of unsuccessful tile layouts.
- The joints between the tiles are too wide (more than 3 mm). Even if the tiles are large, a joint of 2–2.5 mm is more than enough.
A seam that is too wide looks awkward in any bathroom.
- Another serious mistake is trying to lay tiles without dismantling plumbing fixtures, such as a toilet. Attempts to cut tiles in a semicircle will lead to chips and scratches; as a result, such a finish looks ugly and even poor. The correct technology is to lay the floor covering and install the toilet on top of it. If the toilet is embedded in an old concrete screed, it will have to be broken and a new one purchased.
Before installing the tiles, the toilet is dismantled, and after installation is completed, it is installed on top of the new floor covering.
- Improper preparation of the base and the choice of inappropriate or low-quality adhesive leads to the fact that over time the tiles lag behind the base or adhesive solution. If there is a lot of air space under the tile, this coating is susceptible to cracking. Therefore, it is important to follow installation technology and purchase quality materials.
If you lay the tiles according to all the rules and avoid serious mistakes, then such a floor covering is considered the most reliable and durable, because high-quality tiles practically do not wear out and do not change their appearance throughout their entire service life.
Advice! If you need bathroom renovation specialists, there is a very convenient service for selecting specialists from PROFI.RU. Just fill out the order details, the experts will respond and you can choose who to collaborate with. Each specialist in the system has a rating, reviews and examples of work, which will help with the choice. Looks like a mini tender. Placing an application is FREE and does not oblige you to anything. Works in almost all cities of Russia.
If you are a master, follow this link, register in the system and be able to accept orders.