The bathroom is usually supplied complete with legs or a frame on which this sanitary product is mounted. When making hot tubs, manufacturers are guided by the fact that the distance from the floor to its side should be about 60-65 cm.
However, sometimes situations arise when the standard height of the bathtub is inconvenient for use or water does not drain well from it. In this case, there is only one way out - to lift it. In this article we will tell you how to raise a bathtub above the floor using the 3 most popular methods, as well as the advantages of each of them.
What is the difficulty in solving the problem of raising a bathtub?
The weight of any bath consists of various components:
- The bath itself.
- Water poured into it.
- Weight of a bathing person.
With even the most conservative estimates, the total weight of a full bathtub with 1-2 people in it can exceed 300-400 kg. In this case, the entire load is distributed over only 4 legs, and their total area of contact with the floor is unlikely to exceed 10 square meters. cm, which is 30 -40 kg per 1 sq. see. This circumstance is perhaps the most important when choosing the option of raising the bathtub. The material from which the bathtub is made also plays an important role.
How to raise a bathtub by lengthening its legs
Most often, standard bathtubs come with legs provided for them, which are attached directly to the plumbing structure itself. At the same time, their length does not always suit users. What can be done if the standard legs for the font are very short? Everything is quite simple: you should purchase new screws that are longer. To do this, you need to assemble one leg at home and go with it to a retail outlet where you can pick up longer screws. After this, instead of the factory studs, screw in the newly purchased ones and install the bathtub in place.
Raising a cast iron bathtub by lengthening the studs on the legs
When purchasing studs, it is necessary to pay attention to their quality, because they are destined to withstand half a ton of weight. This is the simplest method that does not require virtually any knowledge or skills. It allows you to elevate even designer bathtubs without compromising their appearance.
Scheme for attaching legs to an acrylic bathtub
What can interfere
Before starting work, you need to take into account some difficulties that may arise during the work. Installation is complicated by the following factors:
- Large weight of the structure. Here everything depends on the material of construction. Cast iron products are the heaviest. Therefore, during the installation process a person will encounter some difficulties. This factor must be taken into account when choosing a method for raising plumbing fixtures.
- Small area of supporting elements. The bathtub is installed on legs that can withstand minor loads. If installed incorrectly, they may become deformed.
- Strength and rigidity of the structure. First of all, this applies to acrylic bathtubs. Since the material has low strength and rigidity, the weight of the structure must be evenly distributed between all points of support.
Installing the bathtub on a solid and reliable support
Lengthening the legs of the bathtub, of course, is the easiest way, but it is much safer to build a reliable support under it from some solid materials. For this purpose, the following can be used: wood, brick, paving slabs. It should be remembered that none of these materials can withstand the loads from the legs due to their small area. Therefore, to increase it, it is necessary to place metal plates made of steel under the legs with a thickness of at least 3 mm and an area of 100 cm2.
Bathtub mounted on a solid support
In addition, it should be remembered that the bathroom has a special waterlogged “climate”. Therefore, when choosing wooden stands, they must be properly treated with antiseptic substances and waterproofed. For these purposes, the bars can be painted and coated with water-repellent varnish. These measures will protect the wood from rotting, delamination and the appearance of unwanted “life” on it in the form of mold and mildew. The only advantage of wood in this case is the ease of processing and, as a consequence, the speed of completing the task.
Scheme for installing a bathtub on bricks
When choosing a brick or tile, you need to be guided by the fact that the products must be intact without cracks, chips or other flaws. In general, these materials are much stronger than wood, but only if they are bonded together with mortar. It is also possible to use tile adhesive, but its reliability leaves much to be desired. When installing such a structure, it is necessary to raise the back of the bath approximately 1 cm higher than the front, if the configuration of its bottom does not provide for a slope.
Using hard material stands
As we have already figured out, lengthening the legs to increase the height of the bathtub is not the best way. Its main drawback is the small area of the supports, which leads to increased load on the legs, as well as deformation of the walls and chips on the enamel of the bowl.
To increase the area on which a fairly massive plumbing fixture rests, you can use stands made of brick, foam blocks or paving slabs instead of legs. The advantages of this method are considered:
Important! With heavy bathtubs made from easily deformable acrylic bathtubs and heavy cast iron models, you need to do exactly this - install them on posts. This is one of the best ways to install hot tubs at non-standard heights. When the bowl is raised on bricks, it stands stable, does not wobble, and does not deform under load.
Installing a bathtub on a homemade metal frame
If you have already learned how to use welding equipment well, then you can make a frame from a steel angle and pipes. For this you will need: a welding machine, an angle grinder, angles and pipes. The cross-section of the corners and pipes must be large enough to support the weight of the bath. The design of the bathtub frame itself should ensure maximum stability and strength. The frame is made of such a size that the bathtub rests against it with all its edges, but cannot fall inside. To keep the bathtub more stable on the frame, and to keep the water in it from cooling longer, you can use polyurethane foam to fill the gap between the frame and the bathtub.
Metal frame for a bathtub made of profiled pipe 40x25 mm
How to change the height of the intake hole in the riser
If you move the intake hole lower, keep in mind that the riser is a common house communication. If you do something wrong and deprive your upstairs neighbors of the opportunity to use the toilet normally, it will not turn out well for you.
If you cut a sewer into a riser lower than it is connected, consider the following. Without damaging the floor slab, the minimum height of the intake hole from the floor is 2.5 cm. To connect the sun lounger to the riser, you must use a clamp that blocks the drain hole by at least a quarter of the diameter in each direction.
The diameter of the lounger is 90-110 mm, therefore, to lower it lower than 2.5 cm, it is necessary to damage the floor slab.
The process of connecting to the riser is described in detail in the article.
Unless you are a professional builder, do not damage the floor slab. This is life-threatening. According to Russian law, making changes to the design of a building without approval from the city department of architecture is illegal and is punishable by a large fine.
If the minimum distance from the floor to the riser inlet does not allow you to create the correct slope, raise the inlet of the sun lounger. To do this, raise the floor level or the installation level of plumbing fixtures.
Placing the bathtub on a pedestal
Sometimes a bathtub not only has hygienic functions, but is also an object of design and decoration. Typically, such products have original beautiful shapes, curly curves, and, often, very short legs. What needs to be done in this case? It is clear that any of the above methods will simply ruin all the beauty. There is only one way out - if you cannot raise the bathtub, then you should raise the entire floor under it. Of course, raising part of the floor is undoubtedly a more difficult task, but after all the renovation work is completed, the bathroom will acquire a royal appearance. The podium you build can extend from under the bathtub as a straight or shaped step. You can even make several of them in the form of a staircase. This option will allow you to add special sophistication and incredible originality to an ordinary bathroom.
The main thing is that if you live in a multi-story building, then do not forget about the weight of this podium. To this should be added the weight of a bathtub with water and people. The load on the floors should not be too large, especially for old houses with wooden floors. To lighten the weight of the podium, it is worth making it not monolithic, but using frame structures that are finished with the material you like. Note that if the frame is made of wood, it will not support the weight of a full bathtub. Therefore, additional racks must be made inside it, which evenly distribute the weight of the bath over the entire area of the podium.
Installation of the structure in the floor
A properly equipped pit will help to properly install the bathtub into the floor. To do this, it is enough to dig a hole, line the walls and floor with concrete, thereby providing the necessary space for using the bathtub.
The receiver device has several nuances:
- Its contours should follow the shape of the bathtub, and its top should be completely covered by the sides of the bathtub structure. When lowering the bathtub into the pit, it can rest on its sides. In this case, the supporting area should be as large as possible.
- The depth of the pit is calculated based on the conditions that the legs of the bathtub will be unscrewed to the maximum, about 5 cm, and after installation they will return to their normal position. Thus, the structure should lie on the finished floor, but at the same time not completely rest on it.
- It is necessary to provide access to the sink in order to connect and install the bath.
- Water pipes are connected to the pit and sewerage is removed.
Now you can proceed to the actual assembly of the bath:
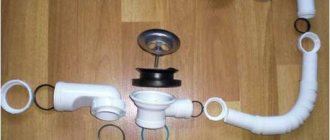
- The first step is to install the drain siphon and attach the legs.
- Next, the bath is placed in a basin, having previously unscrewed the legs to the maximum.
- Afterwards the sewerage pipe is connected and only then the water supply. In this case, it is better to use not flexible hoses, but a metal corrugated stainless steel hose.
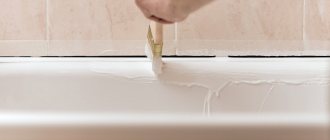
- Upon completion of installation, the capacity must be tested. To do this, pour as much water as possible, check the serviceability of the sewer system and the sealing of the connections.
- You can lower the legs of the bathtub only after tiling the floor.
The best material for a built-in bathtub is acrylic. The structure will be light and reliable. When installing a floor-to-ceiling bathtub, the sides should be high. This will prevent water from overflowing when immersed or moving. The ideal solution would be to install a heated floor.
This will not only make it comfortable to step on the floor when leaving, but will also solve the problem of puddles. Additional functions are selected based on individual needs.
A built-in bathtub is the center of attention in itself, so it’s best to choose discreet surrounding details so as not to distract from the main structure. The floor can be tiled with any classic option, or you can resort to modern 3D technology and turn the room into something unique. It all depends on your imagination and financial capabilities.
An overflow tray will also be an important element here, which will collect excess water and drain it into the sewer. Cover it with a grill. You can also arrange horizontal sliding doors.
So, we figured out how to integrate a bathtub into a podium, and more.
Installing a bathtub is a rather responsible undertaking that requires a clear understanding of the installation process and possible nuances. The installation height of the bathtub from the floor is determined by technical templates and requirements. The point is not some ossified and irrelevant stereotypes, but a real determination of the optimal height for comfortable operation of a plumbing fixture.
The main criterion that you should pay close attention to when installing any type of appliance is the standard installation height of the bathtub. This indicator is very important, because it is related not only to the functionality of the product, but also to your immediate safety.
The process of constructing a podium for a bathtub made of plywood and blocks
In order to build a frame podium you will need the following:
- Saw or jigsaw.
- Hand screwdriver or drill.
- Hammer.
- Plywood and bars.
- Self-tapping screws, corners and other fasteners.
- Building level.
- Polyethylene film.
Work on the construction of the podium will be carried out as follows. If your pedestal is adjacent to the wall and will not be in the middle of the bathroom, you need to use a building level and a regular pencil to mark the top edge for the future pedestal. The main floor under the bathroom is carefully waterproofed with polyethylene or a more suitable insulating material for these purposes. You can additionally use a cork backing.
Then you need to lay plywood on the floor in the place where you want to build the podium, and nail it to the floor with nails or dowels. After this, you need to assemble a strong frame from timber that matches the size and configuration of the future pedestal. The parts are fastened with screws and corners for greater rigidity. For a bathtub equipped with legs, special metal supports are made that increase the area of influence on the podium. The frame is covered with plywood and decorated with any material suitable for the overall style of the bathroom.
Podium made of bars and plywood for a bath
Features of pouring the mixture
In order for the mixture, regardless of whether it is cement mortar or self-leveling floors, to fully retain its functionality and properties, a number of conditions must be met:
- It is recommended to fill the solution at a temperature of 5-25 degrees;
- recommended air humidity – no more than 90%;
- there should be no drafts for at least 24 hours after pouring. To do this, it is recommended to close all windows;
- During the finishing process, it is recommended to make a slight slope of the floor.
By following all these recommendations, you can make a strong and durable bathroom floor with your own hands. The answer to the remaining questions will be provided by the corresponding video.
Raising an acrylic bathtub using bricks or lightweight concrete blocks
In private homes, it is possible to construct a podium not only from wooden parts, but also from brick, which is bound with cement mortar. Such a pedestal is very easy to decorate using tiled or mosaic tiles. It is done quite simply. The outline of the future podium is drawn on the floor and bricks or foam blocks are laid on it. Then the entire internal area is filled with the same material. The entire structure is poured with concrete and leveled. After the screed has completely dried, you can cover the podium with tiles. It makes sense to create such a structure during a comprehensive bathroom renovation or during the initial construction.
Beautiful multi-stage podium for a bathtub
Why is a threshold necessary?
Based on the documents, this is required by the joint venture “Floors. Updated version of SNiP 2.03.13-88.”
Part 4.8 states that the floor level in these rooms should be 15-20 mm lower than in the rooms, or separated by a threshold.
Subject to its availability and waterproofing
with a plant on the walls of 15-20 cm, a sufficient amount of time may pass to detect a leak and eliminate it.
There are four possible types of sill installation or compliance with the rules of this joint venture:
The bathroom floor is on the same level as the apartment floor:
The most common option: in this case, everything is simple - the floor of the bathroom and the corridor are on the same level, but they are separated by a threshold 15-20 mm high. During repair work, waterproofing must be installed on it.
Bathroom floor below apartment floor level:
A somewhat less common option, since not many owners want to create a step, even a small one, into the bathroom. This type of bathroom is called a trough bath or bucket bath.
The bathroom floor is higher than the apartment floor:
A fairly common option, especially when remodeling panel houses of the II-49, II-57, P3, P44, P44T series
etc. The peculiarity of these houses is that the walls of the plumbing cabins are demolished quite easily, but the pallet is very hard and difficult to dismantle.
Therefore, many owners dismantle the walls and leave the pallet. The disadvantage of this option is that the level of the bathroom itself is higher than the floor level, and it is also necessary to create a threshold. And the result is an almost full-fledged step.
Violation - missing thresholds in bathrooms and toilets:
It should be noted that the concept of “threshold” means a real threshold. Below are photos of “decorative” thresholds that do not replace
real.
"Decorative" thresholds:
Additional information on the topic
Often, owners do not want to put a threshold in the bathroom and install quite useful systems against water leaks, which, when leaking, block the entire flow of water to the apartment. With this system they seem to want to “counter” the lack of thresholds. Like, why is it needed if the leakage system will work anyway, and there will be no flood.
But objectively, the situation looks like all the approving bodies are working according to documents from those years, in which not only there is no mention of the installation of leakage protection systems, but the person who invented this system has not yet been born.
But everything about the thresholds is written there in detail, so even when installing this system, thresholds will be required.
And in every redevelopment project there is a section where this threshold is clearly reflected:
Different opinions often arose about the height of the thresholds, and in order to exclude them, we wrote a request to the housing inspection, and our request received a comprehensive and unambiguous answer, which you can see below:
Ceramic tiles are the optimal flooring solution for bathrooms. It has many undoubted advantages and advantages, which allows you to install plumbing equipment of various types and sizes on it. Bathtubs are considered one of the most complex and demanding accessories. The technology for mounting a bathtub on legs depends on the characteristics of the floor in the room.
Before you begin the actual work, you should briefly familiarize yourself with the differences between floor coverings.
| Type of tiled floor | Description of technical characteristics |
| The most durable coatings that can withstand significant forces. Only on such floors is it recommended to install heavy cast iron or stone bathtubs. The tiles are laid on a leveling cement-sand screed on concrete; there is no insulating layer. If various insulation materials were used to reduce thermal conductivity, then installing heavy containers is not recommended. | |
| Ceramic tiles are installed on sheets of plywood or OSB. Wooden beams are used as load-bearing elements. Such a base does not have high levels of physical strength; it is not recommended to install heavy bathtubs on them. The fact is that wooden structures change linear dimensions due to fluctuations in relative humidity. As a result of such movements, the degree of adhesion of tiles and adhesive significantly decreases. Loads from the legs of the bathtub speed up this process and increase the risk of tiles peeling off. | |
| In terms of strength they occupy an average position. The thickness and strength of the screed above the heating system cannot guarantee the integrity of the coating; sharp loads from the legs of the bathtub can cause critical damage to the coating. |
Be sure to consider the features and technical specifications of the floors before purchasing a bathtub.
Some nuances when lifting the bathtub
As mentioned above, bathtubs are different, therefore, depending on the material from which they are made, a slightly different approach is required in implementing the idea of raising them to a higher level.
Cast iron bathtubs are, for obvious reasons, one of the heaviest products. Probably only stone baths made from natural rock can compete with them. It is precisely because of their very high weight that cast iron bathtubs need to be treated with special care.
As for bathtubs made of acrylic components, they can be raised above the floor only with the help of some corners, which are simply mounted into the wall. You can raise a steel bath above the standard level using a cement screed. Moreover, such a screed is made only where the bath itself will be located. In this case, it is necessary to make the correct slope for water drainage. To do this, you can place any square pipe or an ordinary channel under the rear supports of the plumbing product. In addition, you can use wide round washers and threaded studs a meter long. In this case, it will be enough to drill holes in the brick support all the way to the floor. The hairpin is cut into four equal parts. They are inserted into the prepared holes and filled with mortar. After it dries, the bathtub is placed with its legs on these studs. This design ensures high reliability and immobility of the plumbing fixture.
When installing a bathtub on brickwork, it is important to know that when raising the bathtub higher above the floor level, it is very important to ensure that it is unshakably stable. Under no circumstances should it wobble or wobble. The leg mounts themselves must be very reliable. When raising the bathtub to a very high height (more than 10 cm), you should take several steps, and in no case just one. A podium that is covered with tiles when wet can be very slippery, which can lead to injury if it falls. To prevent such troubles, it is enough to come up with and install some reliable handrail near the bathtub, which you can grab onto in a critical situation. You can also use porcelain tiles instead of tiles, which are safer because they are not so slippery.
We really believe that this article has helped you gain the necessary knowledge on how to raise a bathtub higher above the floor. It doesn’t matter at all which option you choose, the main thing is to remember that you need to strictly follow the instructions and use only high-quality and convenient materials in your work. This will allow you to avoid various “unforeseen events”, and lifts, frames or fastenings made by yourself can be used without fear for many years.
Video instruction
Are you renovating your bathroom and want to connect the shower stall yourself? Agree, the comfort of taking water procedures and protection from accidental flooding of the bathroom largely depend on the quality of the installation and the serviceability of the drainage equipment.
Let's figure out how to choose the right drain for a shower stall, what parameters to focus on when purchasing a device. We will also provide a step-by-step technology for arranging a shower drain system.
The instructions for assembling and installing the equipment are accompanied by visual photographs for a better understanding of the process. The article is supplemented with videos about the nuances of installing shower drains.
In plumbing stores they are presented mainly with the classic scheme of drainage through a hole in the pan. This drainage device is easy to install, reliable and does not require preliminary floor preparation.
In shower rooms of saunas and public baths, more convenient drainage options are used. The water there goes into special holes (ladders) or channels, recessed into the floor at the stage of laying the tiles.
Image gallery
The corrugated siphon requires good fixation, and after the first release of a large amount of water it is necessary to make sure that the corrugation has not deviated
The water seal in corrugated siphons is formed manually in a place remote from the drain. To do this, the hose is bent in the shape of a U and fixed in this position below the level of the pan opening.
There are also exclusive versions of siphons that combine the features of several design options.