You are finishing the construction of your own country house or summer home in a garden community. Finishing work is already underway. Holes for communications were punched in the walls or left during laying, or sawed through in Finnish walls. They also require accurate calculations of the location of the future installation of water supply and drainage from the kitchen and bathroom.
Prerequisites for the construction of the frame
Steel frame for bathtub
A bathtub frame is especially necessary when choosing a bowl with an unusual configuration. Multi-sided, round, oval models are difficult to secure. The wide sides of the product are fixed to a special frame, this ensures a stable position.
The frame is mounted to the walls or made in the form of a separate platform. Use a ready-made design or make it yourself. To install a heavy cast iron model, the support is made of bricks.
The frame for a steel bathtub makes it stronger and more reliable. Such products are thin-walled, the thickness of the sides is half that of cast iron models. The base is made of wooden beams, plywood or metal profiles. This robust structure consists of vertical and horizontal supports.
Installation of the frame provides:
- even distribution of bowl weight;
- preventing deformation of the walls of the font;
- preservation of enamel on the surface.
Acrylic products are more elegant and require reliable support that will protect them from load and deformation. The material is much inferior in strength to metal and cast iron. The bottom of the structure bends easily.
A frame for an acrylic bathtub is simply necessary, especially for thin products. The more elegant the model, the stronger the support should be. If the bathtub has an unusual configuration, a special platform is required for support.
Materials for homemade frames
Wood frame
The stable frame for the bathtub is made by hand. This will save money and create a more reliable design. The material chosen is durable and affordable.
The most common types:
- Wooden beams are low cost, durable, and easy to process. Disadvantage: rotting due to moisture. To protect the surface, it is treated with a special moisture-resistant compound. Oak, cedar, alder, and larch are used.
- Galvanized profile, used for plasterboard construction. Does not withstand heavy loads, plays the role of decoration. The weight of the product falls on the legs and wooden beams.
- Iron profile pipe holds a font made of any material. Even a non-standard cast iron product. To make such a frame you will need special equipment and welding skills.
- The brick reliably strengthens the product and is used as a stand for cast iron bathtubs. To carry out masonry, you must have certain skills in construction.
The appropriate material is chosen depending on the type of product, wall thickness, and personal preferences.
Frame made of wooden blocks
Lumber is less suitable for use in conditions of high humidity than metal profiles, so it is recommended to pre-treat them with an antiseptic or oil-based impregnation. A wooden frame for a bathtub is assembled with your own hands from bars with a cross-section of 50×50 mm. Arrangement of a wooden frame and installation of a bathtub is carried out using a similar technology, let’s consider the main points:
- The frame is mounted on leveled, pre-primed walls.
- For additional rigidity and strength of the structure, horizontal slats are supported by vertical posts.
Wooden frame. - After constructing the frame, the timber is covered with a liquid waterproofing compound. If the walls behind the bathroom are not tiled, it is also recommended that they be treated with waterproofing.
Frame waterproofing.
After the waterproofing has dried, the bathtub is installed and connected. Under it, for greater stability, a support is built from brick or other piece of building material, while the junction with the bottom of the equipment is foamed. Then the frame under the screen is assembled and it is sewn up.
Construction methods
There are different frames for installing a bathtub:
- In the form of a stand on legs made of metal profile. Rectangular pipes are used. The structure consists of several elements that support the bowl. The set includes legs that can be used to adjust the height. Only the bottom of the bathtub is installed on the support.
- Flat frame with legs - this option is more complex and durable. The bottom rests on a profile stand, the base corresponds to the bottom of the bowl. Transverse ribs add stability. Vertical elements support the sides. Used for bathtubs of complex shapes and corner models.
- A fully welded frame is the most durable. It is a three-dimensional design that holds the bowl securely. It has several support points, distributes the load from the bottom and sides of the product. The stiffening ribs are located in the areas of the main load.
When choosing the type of support, consider:
- bath dimensions;
- configuration;
- wall thickness.
The thinner the structure, the stronger the support should be.
For a standard rectangular model, a regular frame will do. The supports differ in the thickness of the metal and the manufacturer. If the bathtub has a complex shape with hydromassage, a reinforced frame will be required. High-quality supports are made of thick, durable metal with an anti-corrosion coating.
How to assemble and install correctly - step-by-step instructions
The process of installing an acrylic bathtub is not complicated, and you can easily do it yourself in a few hours, without the involvement of plumbers.
What is included:
- Metal profile with ready-made holes, cut to the required sizes;
- adjustable legs;
- thrust bearings;
- self-tapping screws;
- racks;
- nuts;
- locknuts;
- washers;
- wall stops;
- assembly instructions.
Before installation, you need to check the package contents, and if you find out that something is missing, contact the seller.
Assembling the finished support
All-welded construction
Plumbing stores sell factory frames designed for each model.
Ready-made supports are distinguished:
- prefabricated;
- whole-welded.
How to assemble a finished frame for an acrylic bathtub is described in detail in the instructions. The kit includes the necessary fasteners.
To assemble a standard design:
- They disassemble all the elements and check their presence.
- Prepare tools: drill, screwdriver, screwdriver.
- The bathtub is turned upside down and the frame is put on top.
- Before screwing in the fasteners, mark and make holes to prevent the material from cracking.
- The bowl is inserted into the base and leveled using a building level.
- The bathtub is fixed in the frame.
After this, a siphon and mixer are installed, and the product is connected to the sewer.
If the design is not satisfactory, it is made with your own hands from wood, galvanized profile, or iron pipe.
Methods for exterior finishing of an acrylic bathtub
Finishing an acrylic bathtub with plastic panels.
If the decorative screen is not sold complete with the bowl, you can resort to the following methods:
- finishing with plasterboard (the screen is mounted on a metal base, pre-treated with an anti-corrosion compound, or a wooden frame painted with a moisture-resistant primer);
- forming a brick wall of ½ brick (the upper edge of the wall is 2-3 cm below the side, the gap is filled with construction foam);
- finishing with plastic panels;
- creating a decorative slate plate.
Tile or mosaic is laid on a base of plasterboard, brick or slate. You can also attach several mirror panels to the screen. A technological hole should be left in the area where the siphon is located. It is closed with a door made of plastic or other material.
Preparatory stage
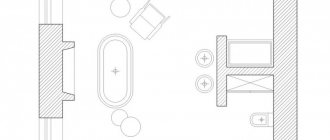
The frame for an oval bathtub is made by attaching it to the wall on both sides. First, calculate the height of the platform. To do this, measure the distance from the lower edges of the side to the floor.
It is necessary to calculate the load on the structure. The weight of the product filled with water and the weight of the person are taken into account. The choice of material, the number of stiffeners, and wall thickness depend on this. Next, you need to do the following:
- Boards for the base are laid around the perimeter and screwed to the floor.
- Install the racks, attach them to the base and to the wall.
- Another board is placed on top of the racks.
- Lay a sheet of chipboard or plywood and screw it around the perimeter to the frame.
- A hole is cut in it for the bathtub.
- A template is used to mark the hole.
- Cut it out using an electric jigsaw or a hand saw.
Plywood is used with increased water resistance, 15 mm thick.
The racks are nailed to the bars, and not to the base, this will simplify installation. For convenience, metal corners are used.
Sealing joints between the wall and the side of the bathtub
The silicone sealant you used to seal the joints between the wall and the acrylic bathtub is good, but not sufficient. No matter how tightly the structure fits against the wall, gaps still remain. You can buy special tape in construction stores.
It is mounted on silicone and attached to the wall and sides of the bathtub. In addition to complete tightness, it gives the structure an aesthetic and complete look.
You can also seal the joints using plastic corners. Their edges are equipped with rubber inserts that prevent water from entering. There are many skirting boards of various shapes, colors and designs, which allows you to choose a product to suit any bathroom interior.
The plastic corner ensures complete tightness of the joints and allows you to hide minor defects and irregularities. To make an even angle, you need to cut the lower parts of the baseboard at an angle of 45 degrees.
The corners are attached to the bathtub and walls using silicone, which is applied to surfaces previously degreased with alcohol. It is recommended to fill the bath with water before applying it and leave it filled until the sealant has completely dried. If this is not done, microcracks may appear on it in the future.
Profile construction device
Profile frame
A profile frame for a bathtub is the most popular option.
For production use:
- square pipes;
- U-shaped section;
- corner.
Algorithm of actions:
- Measurements are taken.
- The design is designed to ensure proper weight distribution over the entire frame area.
- Cut the profiles to the required length and fasten them together.
- The pipes are laid on the floor and welded or bolted.
- The frame frame is welded to the corners of the floor base.
- A platform made of bricks, boards, and sand is installed under the bathtub.
- Rubber is used for shock absorption so that the product does not wobble.
- The gaps between the bathtub and the floor are filled with polyurethane foam.
The edges of the metal parts are sharp and can damage the bowl. The profiles are in contact with the bathtub with the back side. Drywall and tiles are laid in the same plane.
Assembling a timber base with your own hands
Ready-made frames are not always suitable for installation. A DIY wooden bathtub stand is more durable. This is the simplest and cheapest option. You will need a beam with a cross section of 40 x 40 mm and a sheet of plasterboard.
Prepare a set of tools:
- drill;
- hammer;
- wood drill;
- hacksaw;
- screwdriver
The wood is treated with a special impregnation that protects it from moisture.
Procedure:
- They take measurements and cut parts. The upper and lower parts follow the shape of the bathtub.
- To begin with, lay out the support perimeter. This is a flat frame with stiffening ribs.
- The prepared parts are screwed to the floor with dowels.
- The corner posts are secured carefully; the main load falls on them.
- The stand is nailed to the wall along the entire perimeter.
- The upper support panel completely repeats the assembly of the lower one.
- The profiles are secured using self-tapping screws.
- Additional load-bearing walls strengthen the structure. They are installed every 0.5 m, along the longest side.
- One stand is placed on each side in the center.
After this, communications are connected, the frame is covered with plasterboard or a plastic screen. Decorate with ceramic tiles or panels.
Siphon assembly and connection to the sewer system
We have moved this point to the end of the article to describe in detail the process and nuances of connecting siphon equipment to an acrylic bathtub. However, this work must be done immediately after installing the legs or frame, before installing the screen, and before finally attaching the bath to the wall and brickwork.
As a rule, the siphon is supplied disassembled. A large number of chaotically located parts can, at first glance, even frighten a person who is faced with connecting a bathtub for the first time. However, the attached instructions describe everything in detail and show how the siphon is assembled, so assembly does not cause any particular difficulties.
When disassembled, the siphon is a collection of various parts. The figure shows the general assembly diagram and the sequence of fastening the siphon elements (+)
Installation of the siphon begins with connecting the receiving pipe (4) and the protective grille (2) to the lower outlet of the bathtub. Before this, the joints must be treated with sealant and a rubber gasket (3) must be placed inside, on top of which a layer of sealant is also applied.
Then, without waiting for it to dry, the outlet pipe is inserted into the lower part of the bath.
Next, an already assembled flexible hose (16) is inserted into the overflow outlet (13), and its other end with a pre-installed gasket (18) is connected to the upper hole of the bath and secured with a protective overflow grill (19).
This is what a fully assembled siphon looks like. To avoid its leakage during operation, it is very important to correctly install the gaskets, which, even with a slight misalignment, can move out of place and become deformed.
Then the part of the siphon that is connected to the sewer pipe is assembled. All joints are treated with sealant. When assembling the siphon, try not to overtighten the threaded connections, as this can lead to deformation and breakage of the plastic parts.
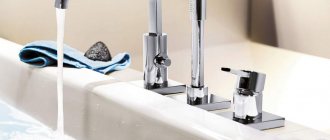
At this stage of work, it is worth taking care of installing the mixer.
Installation on bricks
Bath on bricks
This is a reliable way to install a bathtub. The brick base does not deform or deteriorate from moisture. This stand differs from a wooden and metal frame. Installation features:
- Two brick supports are placed at a distance of 50–60 cm from each other.
- The width of the structure should not be larger than the bathtub.
- The stand follows the shape of the bowl.
- The part on the drain side is 1.5–2 cm lower to ensure water drainage.
The bowl is placed on the finished supports and firmly fixed to the wall. The gap between the brickwork and the bottom is filled with tile adhesive or polyurethane foam.
Bath installation
When the frame is completely ready, install the bowl on it:
- A cement pad is poured onto which the bottom rests.
- Carefully lower the bathtub into the hole on the frame.
- Then connect the water supply and sewerage.
The sides of the frame are covered with panels made of thick plywood, chipboard or flat slate. The shields are secured using screws with anti-corrosion coating. Tiles are glued onto the resulting walls. The gaps between the tiles, floor and frame are sealed with sealant.
For convenience, doors are made to provide access to the pipes in case of leaks and blockages. Detergents are stored under the bathroom.
The service life of the product depends entirely on the reliability of the installation. The frame for the bathtub must be solid and very durable. It is up to the buyer to choose a ready-made design or make it yourself. You can call a specialist and entrust the installation to an experienced specialist.
How to secure and adjust the legs?
So, all the tools have been collected, the equipment has been checked, you can begin installation:
STEP 1. Unpack the bathtub and place all the components in one place for easy assembly.
STEP 2. Cover the floor with a soft rag or cardboard from the packaging to avoid chips and scratches , and carefully turn the bathtub upside down. We put it in the middle of the room so that it can be walked around from any side.
STEP 3. We assemble the bathtub frame according to the instructions supplied by the manufacturer: we observe all the indentations and fastening points specified by the manufacturer. You need to put the two longest profile slats on the bottom and screw the horizontal strips for the legs to them with bolts.
Be sure to check with a square that all planks are perpendicular to each other and the angles between them are 90 degrees. Only then can the bolts be finally tightened.
STEP 4. Assembling the legs. You need to screw plastic stops and washers with nuts onto the studs in the order shown in the picture.
STEP 5. We thread the pins with the free end up into the holes of the short profile.
Use your fingers to tighten the nut so that the distance between the stop and the bathtub body is 1-2 mm .
STEP 6. We screw onto the protruding end of the stud: a washer, 2 nuts, a washer and a leg - in exactly that order. Steps 5 and 6 must be repeated for all other supports.
STEP 7. Using a screwdriver and self-tapping screws, screw the longitudinal profiles to the bottom of the acrylic bowl, checking that all the indentations specified in the instructions are observed.
Be sure to use the screws included in the kit, otherwise you can easily damage the bottom of the bathtub if the fasteners are longer.
STEP 8. Adjust the length of all legs and carefully tighten all nuts on the studs using a wrench.
STEP 9. Turn the bathtub over and place it on legs. By twisting, we adjust the height from the floor; it should not be more than 65 cm - the most optimal and safest. You can check the horizon using a building level, and if there is a distortion, it should be eliminated.
If you want the water in the bowl not to stagnate, then you can make a small technological slope towards the drain, just half a centimeter is enough. To do this, after installing the structure in its permanent place, slightly raise the edge opposite to the drain by unscrewing the support leg.
Features of mounting a support for a corner and asymmetrical font
The process of installing a frame on a corner bathtub is practically no different from installing it on a rectangular one, the only difference is that the number of profiles and fasteners varies slightly, it all depends on the specific manufacturer, so it is worth studying the instructions in detail.
It is worth noting that corner and asymmetrical fonts have a fairly large volume, and the frame for them must be reliable and durable. It is highly undesirable to install such a font only on the legs, even if they are included with the product. Spare no expense and buy a bathtub frame made of profiled pipe.