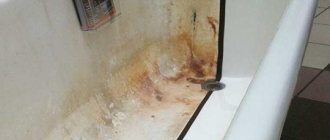
As we already wrote in the article about cast iron bathtubs, they are afraid of one thing - damage to the enamel. How to paint a cast-iron bathtub and what is the best way to do it if you have damaged its internal coating? In this article you will find 3 possible options with step-by-step instructions and all their pros and cons, as well as a description of the “bath in bath” method.
Pros and cons of painting
For painting, you need to choose only a dye for metal structures.
This method has a number of advantages:
- Large selection of paint and varnish tones;
- The price of the dye saves a lot of money;
- Possibility to paint a cast iron bathtub without calling specialists;
- Saving time and effort, fast execution;
- No unpleasant odor after the dye dries;
- Beautiful glossy finish.
However, this method of surface renewal has disadvantages:
- Before applying the composition, the outer coating must be treated with a grinding machine, and then with a primer mixture;
- It is necessary to apply dye to an old cast iron product only after treating the coating with an antifungal compound;
- There are acrylic solutions that take a long time to dry - three days.
How can you paint a cast iron bathtub? First you need to find the appropriate paint, only then begin work on treating the surface of the cast iron.
Bathtub renovation with acrylic paint
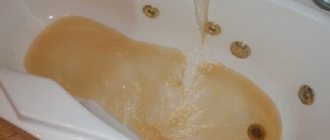
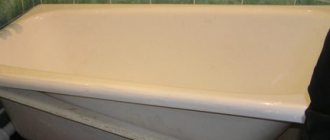
The most unusual and at the same time the most useful way of using the paints described in the article. If the surface of the old bathtub is cracked and yellowed, then it is not at all necessary to buy a new one, because restoration work can be carried out using acrylic. As a result, the bathtub will look no worse than if it had been replaced with a new one.
There are 3 main recovery methods:
- put an acrylic liner;
- apply new enamel;
- apply acrylic paint.
Acrylic liners
Bathtub restoration with liquid acrylic
The latter restoration method has recently become increasingly popular mainly due to its undeniable advantages. Let's get to know them.
- The method is suitable for any bath. There are, for example, thin-walled bathtubs in which a liner cannot be installed, as this may cause the structure to become deformed.
- When the paint dries, the surface becomes even and smooth.
- There is no need to disconnect the overflow or drain when applying paint.
- The work does not require special skills or special equipment.
- There is no need to look for a model that fits geometrically, as is the case with the same acrylic liner.
- Acrylic hardens completely in a maximum of 3 days, while enamel takes about a week.
Acrylic restored bathtub
There are essentially no disadvantages as such, if you do not take into account the relatively high cost of the material. In addition, when using the bath after restoration, certain restrictions must be observed.
- Do not use cleaning products that contain abrasives.
- The painted surface must be protected from sharp objects, otherwise scratches may appear on it.
Now, having familiarized yourself with all the nuances of using acrylic, you can start working directly. The restoration procedure consists of several main stages, let’s get acquainted with them.
Stage one. We prepare everything you need
After purchasing suitable acrylic paint (the exact amount of material depends solely on the consumption of a particular brand, and there should always be a small supply left), proceed to a very important and responsible stage - preparation.
To begin, prepare:
- the paint you mix before applying;
- gloves, overalls, safety glasses, respirator;
- electric drill, a special attachment for it (grinding wheel) for removing the old coating;
- hardener specified by the manufacturer;
- soda (for degreasing);
- syringe or measuring cup;
- mixing spatula;
- watering can;
- containers for diluting paint;
- flexible spatula.
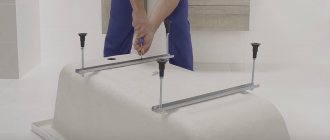
You also have to complete a number of preparatory activities. First, remove all auxiliary elements, i.e. drain and overflow of water. The installation/disassembly method depends on the type of bathtub, but often the work can be done with pliers and a screwdriver.
Prepare a set of screwdrivers for dismantling and installing drain grates
Place wide containers on the floor, directly below the holes in the tub, into which the paint will drain.
Prepare a container where the paint will drain
If the auxiliary elements cannot be dismantled, then simply insulate them with mounting tape, and then think about how to decorate them so as not to spoil the look of the entire bath.
Masking tape
Stage two. Preparing the surfaces
When everything is ready to go, start processing the work surfaces.
Step 1: Sand the previous layer first. Try to do everything as carefully as possible, because the reliability of the adhesion of acrylic paint to metal and the remnants of the previous enamel depends on this. For sanding, use an electric sander or electric drill with a grinding wheel.
Don't forget to remove the drain grate and trim
Surface preparation
On a note! During the work, the room will become very dusty, so do not forget about personal protective equipment.
Cleaned bath
If you don’t have the necessary tool at hand, you can resort to a more labor-intensive method of sanding - using sandpaper (the grit of the latter should not exceed 40).
Advice: if the bathtub has rust, use a converter after cleaning
Step 2. If local damage is found on the old enamel (deep chips and cracks down to the metal base), then it is unlikely that it will be possible to clean them by grinding. In this case, repair all these defects with quick-hardening automotive putty, and after hardening, thoroughly clean the treated areas with sandpaper.
Step 3. Next, carefully clean all surfaces from dust and dirt that remain after sanding. To do this, simply wash off all the dirt with water.
Step 4. Treat the bathtub with solvent to clean it of grease stains. As a rule, acetone is used for this, but if you wish, you can replace it with a solution of baking soda, diluted to a mushy consistency.
We also note that remnants of old enamel and insoluble dirt often accumulate in hard-to-reach places in the bathtub. You can clean such areas with acid. Upon completion of treatment, rinse everything off with hot water.
Stage three. Preparing acrylic
To obtain liquid acrylic, it is necessary to mix the hardener with the polymer base.
Liquid acrylic and hardener
For this purpose, pour the white mixture from the factory container into a mixing bucket. Make sure that no dirt gets into the mixture. Next, for a short time - no more than a few minutes - and slowly mix the mixture by hand, using a spatula or a small wooden block. Do this until you get a homogeneous mass. You can also use an electric tool, but this is not advisable at this stage, as air bubbles may appear when mixing quickly.
Mixing hardener and acrylic
Then, while continuing to stir the mixture, gradually add the hardener from the can into it. It is advisable to add in several portions, and after each of them mix thoroughly for about 2 or 3 minutes.
On a note! It is very important that the proportions specified in the manufacturer's instructions are strictly observed. In most cases, the hardener should be 9.5% of the volume of the acrylic paint itself.
After pouring all the hardener, mix the resulting mixture for at least another 10 minutes. Leave the finished acrylic for 15-20 minutes, after which you can proceed directly to painting.
It is also worth noting that the color of liquid acrylic paint can be changed at will. So, to obtain the desired shade, you can add color paste to the mixture, followed by thorough mixing. It is important that the color is no more than 3% of the total mass.
The procedure for mixing liquid acrylic for a bath
Stage four. Apply coating
The acrylic coating should be formed by pouring. Below is an algorithm of the required actions.
Step 1. The mixture will be distributed more evenly over a warm surface, so first fill the bathtub with hot water for about 15 minutes.
Step 2. Drain the water and quickly dry the surfaces with a hairdryer. Alternatively, you can use a dry, lint-free cloth.
Step 3. Pour the acrylic into a large container from which it can be easily poured in a thin stream. It is most convenient to make a special channel at the edge of the container, although you can use a watering can instead.
Step 4. Pour the mixture in a thin stream onto the edges of the edge that is adjacent to the wall. Push the acrylic under the cut of the tile using a rubber putty knife.
Acrylic pouring process
Do not skimp on acrylic, the layer should be of high quality, without drips or voids
Step 5. The technology for forming an acrylic coating is based on paint flowing under its own weight. Pour the prepared mixture onto the inner edge of the side, and it, in turn, will gradually flow down the walls.
Acrylic is poured onto the side and flows down the walls
Pouring acrylic and distributing it over the surface of the walls
The volume of material used is determined based on the fact that the thickness of the layer should be 5-6 mm, and it (the material) itself will reach approximately the middle of the bottom. While pouring the acrylic in a thin stream, slowly move around the perimeter of the bath until the circle is closed.
Pour acrylic evenly onto the walls
The photo shows the process of distributing black liquid acrylic
Step 6: Next, apply acrylic to the bottom. Make spiral movements with the paint container so that the entire surface is covered as evenly as possible. Typically, drips and sagging do not need to be removed, since they will disappear after the end of the process and during the curing period.
Step 7. If there are any uncovered areas, seal them with a flexible spatula (but in no case with a paint brush!). The excess mixture will flow through the drain hole into the container that you placed at the preparatory stage.
Restoring bathtubs with liquid acrylic involves applying acrylic to the surface and then polishing it. Layer thickness reaches 6 mm
Correct pouring of liquid acrylic
The coating will harden in approximately 8-24 hours, the specific timing depends on the brand of paint. This indicator must be indicated in the manufacturer's instructions. You can put the grate on the overflow before the material dries, while on the drain - only after the paint has hardened. 48 hours after pouring, you can begin to fully use the bathtub.
Bathtub restoration before and after
Video - Filling a bathtub with liquid acrylic
How to restore a bathtub with liquid acrylic is described in detail below.
Types of paints
The dye is divided into four types:
- Epoxy resin (two-component);
- Acrylic (liquid base);
- Epoxy;
- Aerosol – good for long products.
Resin
For painting cast iron bathtubs with severe surface corrosion (chips, deep cracks). Epoxy enamel is applied in a thick layer, even without preliminary primer treatment of the surface.
The resin is diluted with solvents to a thick consistency, applied to chips, and then to the entire surface.
Acrylic dye (enamel)
How to paint or treat the inside of a cast iron bathtub at home? Acrylic. Resurfacing cast iron yourself is a simple, easy method of resurfacing.
Acrylic has a liquid consistency, which simplifies the work with its distribution over the coating. After drying, the acrylic composition becomes glossy, which is why this paint coating is popular today. The service life of acrylic film is from 7 to 20 years with proper care, so painting the product with this composition will be beneficial.
Epoxy dye
Epoxy paint is resistant to mechanical influences. It is a synthetic oligomer produced from a resin. Long-lasting, durable coating for metal and industrial equipment. Paint with a glossy effect, hydrophobic in property. You can paint with any convenient tool: roller, brush, spray gun.
Spray
Cast iron bath paint is an aerosol, namely a dye for cast iron products.
It is applied after treating the surface with grinding equipment and a primer. This is a finishing coating with a large assortment - from a bright, varied palette to the manufacturer. The paint dries quickly and can be used in hard-to-reach areas.
We restore the bathtub with our own hands using enamel
If you decide to choose this method, first you need to objectively assess the condition of the bathtub. If there are significant chips or cracks on it, you may need to discard all ideas about restoration and fork out for the purchase of new plumbing fixtures. But if the surface is almost flat with invisible defects, it is quite possible to carry out restoration with enamel.
Restoring a bathtub using enamel
- First you need to prepare the coating. To do this, you need to get rid of the old enamel. This must be done carefully enough so as not to damage the bath itself with deep grooves and scratches. Apply Pemolux or a similar product to the old enamel (note that it should not contain chlorine), clean it directly with this product using an abrasive stone. At the final stage of preparation, the surface is washed well with water.
- Irregularities and signs of corrosion must be thoroughly cleaned and degreased. Now you can fill the bath to the top with hot water, let it sit for a while and drain. After this, you need to wipe the surface with a cloth or lint-free wipes.
- The working composition is prepared from enamel and hardener. They need to be mixed with each other.
- The first layer of coating is the primer. After it has dried, you can begin enameling with a second layer.
The whole process takes no more than three to four hours. And if you are doing it for the first time, pay special attention to the following nuances:
- The surface must be as degreased as possible, otherwise all the work will be in vain.
- You will also have to very carefully remove the old enamel, without missing a single centimeter of area.
- Follow the instructions for use and dilution of the enamel, which are indicated on the packaging. You should not do this by eye, because in the future such enamel can chip off and very quickly become unusable.
- A minimum of fifteen minutes should pass between applying the first and second coats.
- The first layer should be quite thin.
- You can also use enamel from a balloon for restoration. But in this case, it is necessary to avoid its dripping, and it is best to apply the composition at a distance of at least 25 cm from the surface of the cast iron.
Manufacturers
How to paint a cast iron bathtub at home without knowing what paint to choose? Among dyes and enamels, we can highlight compositions that are in great demand for painting a cast-iron bathtub:
- "Epoksin 51". Enamel.
According to the manufacturer (Russia), products with enamel will last about 9-10 years;
- Liquid acrylic Luxury "Ekovanna". (Manufacturer – Russia).
This is a kit that includes the hardener and the enamel itself. The service life of a product treated with acrylic is 15 years with proper care;
- Lako Colorful Materials Finnish. Price 1000 -1300 Russian rubles;
- Rust Oleum paint (USA). "Specialty Tub & Tile Refinishing Kit." Price 1700-2000 Russian rubles per liter. Painting a cast iron bathtub with this composition will not be difficult;
- Dulux (country – UK). Dulux Realife Kitchen & Bathroom. Dye. Its price is from 1000 to 2,500 Russian rubles per 1.20 l;
- “Svetlana” (produced in Russia). The set includes clearing pastes (white and other colors). The price of such a kit is about 800 rubles;
- "Renaissance" (manufacturer - Russia). Paint for cast iron. The kit includes all the products needed to paint the surface. Price up to 900 rubles per jar, volume 0.8 liters;
- "Kudo" (domestic manufacturer). Spray (enamel). The price of one can differs (from 200 rubles to 500 rubles) depending on the composition and color. This paint can be used to paint the outside of a cast iron bathtub.
You can look at all the variety of things you can use to paint or update a cast-iron bathtub at home or in the country on the Internet or in a hardware store.
What to look for when choosing bath paint? It is better to restore the surface of the bathtub using high-quality materials and paint coatings.
When choosing a paint coating (this is what can be painted), the characteristics of each product are taken into account. How to choose paint:
- The purpose of the composition is indicated on the paint can - for metal work;
- Bath paint has a shelf life of one year. The paint kit includes tinting pastes and special hardeners.
Painting a cast iron bathtub with an aerosol spray (with your own hands) will not work, since the coating will not form a dense layer.
Preparatory work
Practice has shown that restoration of enamel on a cast-iron bathtub occurs according to the same scheme: preparing the bathroom - cleaning the plumbing - washing the bathtub - dismantling the siphon - degreasing the surface - protecting the floor and walls from paint, acrylic, glue - restoring the enamel.
All points, except the last one, relate to preparatory work. Therefore, we will put this type of work into a separate section and consider it in detail.
Materials and tools
To carry out preparatory work you will need:
- old newspapers or packaging cardboard;
- polyethylene film;
- acetone or white spirit - degreaser;
- "Tsinkar" - rust converter;
- approximately 5 rolls of P60 sandpaper;
- 1-2 rolls of P600 sandpaper (people call it “zero”);
- scotch;
- masking tape.
Will help you with your work:
- electric drill or screwdriver with an attachment for grinding enamel;
Electric drill with grinding attachment.
- knife or scissors;
- slotted screwdriver;
- soft, lint-free rags - needed for work with grease solvent and rust converter;
- respirator.
Preparing the bathroom for work
In the room where the enamel of the cast-iron bathtub will be restored, there should be no unnecessary objects that could fall on the newly applied layer of paint, as well as household appliances - dust from the grinding wheel can get even into places protected by film. Therefore, personal hygiene products are taken out. The curtain and holder are removed. The washing machine is moved into the corridor or wrapped in film.
The ventilation hole is covered with paper - this prevents drafts that can carry dust from the apartment onto the undried paint. In a combined bathroom, metering devices are protected from dust with plastic film and tape.
Cleaning the bathtub surface. The liquid consistency of the paint does not allow you to hide the slightest flaws in the surface being painted. Therefore, it must be perfectly smooth, while still clean and dry. It is difficult to achieve this condition of the enamel coating of an old bathtub. It takes significant effort and time.
First, the peeled parts of the coating, rust and dirt accumulated in microcracks are removed. Work is carried out either manually, using P60 sandpaper, or using a power tool with a grinding attachment.
Rusted areas are treated with a rust converter and then sanded. Chips and cracks are filled with car repair compounds. Cleaning should be carried out over the entire surface of the bowl, paying special attention to the curves of the bath.
Attention: when working manually, it may be difficult to hold the sandpaper in your hands. A simple small block of sandpaper around which you can wrap will help.
The process is completed by passing fine-grained sandpaper over the entire surface of the bath. The initial movements are rectilinear, the final ones are circular. After the operation is completed, the sides and bottom of the font are rubbed with the palm of your hand to reveal the smallest irregularities. If problem areas are found, work with sandpaper is resumed.
Washing sanitary equipment. Any grinding work is accompanied by the formation of a dust cloud, which settles on the ceiling, walls, and surface of the bathtub. It is imperative to remove dust - it may end up on fresh paint. Therefore, the ceiling, walls and plumbing (taps, mixer, sink) are washed with hot water from a shower hose. The bowl itself is thoroughly washed with liquid detergents.
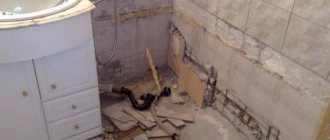
Disassembling the siphon. It is unlikely that it will be possible to protect a drain with overflow from paint. It's easier to remove them. For this:
- All water supply taps to the bathroom are closed. If this is not possible, you need to make sure there are no leaks at the taps. If they exist, repair work is carried out;
- remove the drain with overflow using a screwdriver: unscrew the mounting screws. If they are rusty, you will have to use brute force and buy a new drain pipe. It is not necessary to remove the corrugated pipe from the sewer pipe. If an unpleasant odor appears, plug the drain and overflow holes with a rag.
Degreasing the bath. Paint does not adhere to a greasy surface - work is required to degrease the enamel. To do this, wipe the bottom, walls and sides of the bathtub with a rag soaked in acetone or white spirit.
In this way, it is possible not only to remove fatty deposits, but also to remove remaining dust and dirt. After wiping, wipe the surface with a well-washed but dry palm. Hand pass along the sides and walls from top to bottom, driving the remaining fibers to the bottom. The dust particles are removed from the bottom into the drain hole.
Protecting the room from paint drops. You can paint the bathtub with a brush or using a spray can. In both cases, there will be tiny droplets of paint on the wall and floor that are difficult to remove. You can protect them using old newspapers and plastic film. The paper is laid overlapping on the floor and secured with masking tape (adhesive tape), the walls are covered with film. The sink and faucet with taps are also closed.
The walls are covered with polyethylene.
Coverage Requirements
There are many types of paint and varnish coatings on the market and there is something you can use to paint your bathtub. There are restrictions that prohibit painting the bathtub:
- The paintwork materials should not contain toxic substances that can interact with water, detergents and oxygen;
- The texture of the paint should be dense and hard, with a glossy effect. This paint fits perfectly on the surface of old cast iron.
A paint coating is what you can use to paint a bathtub. But you need to test it in advance for color. To do this, you should apply one coat of paint, before painting the cast iron bowl, onto the clear glass and let it dry. You can evaluate the tone quality like this: look at the back of the glass.
Strengths and weaknesses of acrylic paints
There are quite a lot of advantages, so we will consider only the most significant ones.
- The paint perfectly withstands sudden temperature changes, as we noted earlier, as well as exposure to various chemicals.
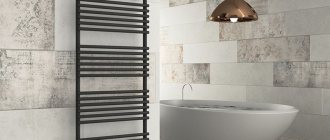
- It is sold in a white version, but if desired, the color can be easily changed to transform the bathroom to a particular design.
Blue bathtub
- Another advantage is versatility. The paint is easily applied to almost all existing building materials.
- The original appearance of the coating remains for quite a long time, and it is very easy to care for.
- The modern market offers a huge range of acrylic paints with a wide price range, which is also important.
- These paints are also very economical, due to the application technology: just a few strokes and the job is finished.
- Acrylic dries within 16-17 hours after application. After this time, you can safely use the bathroom.
The painted bathtub can be used just a short time after restoration.
Important advantages of acrylic compositions for bathtub coating
As for the disadvantages, the main enemy of any acrylic paint is abrasive materials, therefore, cleaning the bathtub with powder products is strictly prohibited. Instead, it is better to use delicate cleaning products in the form of gels that cannot damage the acrylic surface. This is, in principle, the only drawback of the material.
It is prohibited to use abrasives for cleaning.
Bath liner
How can you paint a bathtub? This question need not be asked, because this restoration method is called “bath in bath.” In an old cast-iron bathtub, a liner is placed on glue, which completely follows the shape of the bathtub.
This method has advantages:
- The new coating consists of acrylic, which is able to withstand impacts and is resistant to chemical influences from detergents;
- The surface does not change color over time;
- The bathtub is like new – smooth and shiny.
However, there are a couple of nuances when installing the liner in the bathroom. If the bathtub is made of thin cast iron, then in the future it is impossible to avoid deflection of the structure, as a result of which the liner is deformed. Also, before laying the acrylic surface, the siphon is dismantled. From the above, we can conclude what and how to properly paint a cast-iron bathtub inside and out.
Restoration of an acrylic bathtub
Filling the entire surface of the bathtub
It is necessary to distinguish between the need to change the shade of the bathtub or to repair it. In the first case, we recommend using glass acrylic of the desired tone. It is enough just to fill the entire surface, and then the composition will work itself without your participation. If repairs are required, then there is no need to fill the entire bathtub with acrylic. Simply clean the damaged area and then apply liquid acrylic to it. You can find all the necessary equipment for such a procedure in a special kit for repairing acrylic bathtubs. They are sold in almost all large hardware stores.
Tell us about your experience renovating bathtubs. What difficulties may newbies encounter? Leave your message in the comments below the article!
- Author: Julia
Rate this article:
- 5
- 4
- 3
- 2
- 1
(0 votes, average: 0 out of 5)
Share with your friends!
Required Tools
Painting an old cast-iron bathtub in an apartment by a specialist or with your own hands will not be effective without the following tools:
- Sandpaper with various grits;
- Paint thinner (No. 646) or alcohol (White);
- The putty is waterproof;
- A rubber spatula to carefully distribute the composition over the surface with your own hands;
- Roller for applying emulsion;
- Painting a cast iron bathtub with a spray gun;
- Grinding machine for processing the outside of the bathtub;
- A paint brush to paint the bath yourself;
- Drill;
- DIY nozzle for stirring enamel;
- Separate container for cast iron paint (bucket or basin);
- Container for diluting the primer;
- Bathroom paint.
Popular manufacturers and brands of acrylic paint
People are also often interested in which acrylic paint manufacturer is best to choose. There are a lot of options, but it is better to choose those manufacturers who guarantee quality and have been on the market for several years. Let's look at the best companies, as well as their most popular brands of acrylic paints.
Tikkurila
A popular Finnish construction brand that has been providing many countries with high-quality paints for many years. Let’s immediately say that Tikkurila’s assortment is large, it contains not only acrylic, but also other paints, but the most popular brand is Reaflex 50 (“Reaflex 50”) - a two-component epoxy material that is used for processing enamel baths and swimming pools. Available in traditional white and blue versions.
Reflex 50 – bath paint
Table No. 1. Main characteristics of Reaflex 50 paint
| Characteristic | Meaning |
| Container volume | 1 liter jars (1/3 liter hardener) |
| Gloss index | High gloss finish |
| Consumption | From 8 to 10 m²/l (painting) and from 5 to 8 m²/l (primer) |
| Density | 1.2 kg/l solution, ready to use |
| Viability | Approximately 4 hours after mixing |
| How to mix | Paint and hardener in a ratio of 4:1 |
| approximate cost | From 980 rubles |
Technical characteristics of Tikkurilla Reaflex 50 paint
Prices for paints in the TIKKURILA Reaflex 50 line
TIKKURILA Reaflex 50
Jobi
This German company occupies a leading position in the building materials market, offering high-quality products at affordable prices. Paints (including acrylics) of this brand are available in every specialized store, so there will be no difficulties with the purchase.
Jobi WaschFest
Jobi WaschFest, back of paint packaging
Table No. 2. Main characteristics of Jobi WaschFest paint
| Characteristic | Meaning |
| Container volume | 0.9 l, 2.5 l, 5 l and 10 l |
| Gloss index | Matt paint |
| Consumption | Approx. 6 m²/l |
| Colors | 2 years |
| approximate cost | From 280 rubles for a 0.9-liter jar |
Feidal
Another German manufacturer whose products are in considerable demand. Let's look at the characteristics of his acrylic paint Feidal Innenlatex Matt - a latex acrylic material that is resistant to humidity, cleaning agents and abrasion.
Table No. 3. Main characteristics of Feidal Innenlatex Matt paint
| Characteristic | Meaning |
| Container volume | 1 l, 2.5 l, 5 l and 10 l |
| Consumption | About 10-12 m²/l (the specific figure depends on the type of base) |
| Density | 1.48 kg/l |
| Viability | From 2 to 4 hours |
| How to mix | Paint (70%) and drinking water (30%) |
| approximate cost | From 575 rubles for 2.5 liters |
There are other popular manufacturers of acrylic bath paints - for example, Dulux, VDAK, Plaid or Worked. They all produce high-quality products, so you must decide for yourself which one to give preference to.
Stacril ECOLOR
FiberGlass, acrylic for bathtub
Preparing the bathtub for painting
After the question of what paint to paint the bathtub has been sorted out and the final conclusion has been made, it is necessary to begin work on preparing the surface of the cast iron for applying the painting composition:
- First of all, the drain and pipes are removed from the cast iron bathtub;
- All grease and limescale deposits are removed from the inner surface using special detergents that contain alkali (oxalic acid or baking soda). The cast iron bathtub is polished from the outside;
- Peeling paint and enamel are removed with a grinding wheel or electric drill with abrasive attachments to smooth the surface;
- Cracks and log frames are sanded separately with sandpaper;
- The primer is distributed throughout the bathtub, a thick layer is applied to chips and to the edges of the sides of the bathtub;
- We prepare the mixture and dilute it. You need to know that the diluted composition should not sit for more than half an hour - this is the time to paint the bathtub, as it begins to harden.
- Next, a coloring composition is applied to the dried surface and evenly distributed over the surface of the cast-iron bath by hand;
- The second layer of paint for a cast iron or metal bathroom (quick-drying option) is applied only after the first layer has dried;
- After application, allow to dry for at least a day with doors and windows closed.
The grinding attachment is selected in accordance with the material being processed - metal; you can also use sandpaper or a steel brush.
Check the cleaned surface for paint and enamel residues, and check the quality of degreasing using a stream of water. If there are smudges and drops left, the surface has been poorly processed, but if it is smooth, then the work has been done properly.
What is an unusual way to paint a cast-iron bathtub on the outside? You can use bright paint, and after it dries, apply a design.
The pattern can be found on the Internet and printed on a printer. Typically, the outside of the bathtub is covered with plastic frames or ceramic tiles. You can use a cast iron bath after painting no earlier than seven days after applying the pigment.
Tips and tricks
- To clean the bathtub during the preparation stage, do not use chlorine compounds.
- It is better to paint and enamel the bathtub in the warm season, so that the apartment or house can be ventilated.
- Before applying paint, primer, enamel or acrylic, you must remove the cuffs and seal the hole with masking tape.
- During the painting process, do not touch the bristles of the brush with your hands. The paint will come off faster from any fat in the future. Better stock up on several brushes for work.
- Never touch the bathtub with your hands while applying paint, enamel or acrylic!
- After restoring a bathtub using enamel or acrylic, it is necessary to replace the cuffs and gaskets, as the drain holes will become narrower and the walls of the bathtub will become thicker.
- To make your bathtub with acrylic coating last longer, apply 2 layers of the material. Then it will be more difficult to scratch it through.
- The acrylic liner can only be installed in high-quality cast iron bathtubs. It is not suitable for bathtubs made of “light cast iron” with thin walls.
Whether it is worth restoring the bathtub and how exactly to do it is decided by the owner of the bathroom and the plumbing item. Of course, no restoration lasts forever, but if you don’t have the money to buy a new one, but you want to take hygiene procedures in comfort, then you should definitely do it!
How to paint a bathtub. What paint and what to paint the bathtub with
How to paint a bathtub yourself
Sometimes, in order to update your bathtub, it is not necessary to replace it with a new product. You can safely paint an old cast-iron bathtub and give it a “second life.” How to paint a bathtub with your own hands, how to paint a bathtub and the choice of paint for this will be discussed in the article.
Painting a bathtub at home is a simple procedure. Nevertheless, a good result can only be obtained with certain knowledge of how to paint a bathtub correctly, as well as what paint and tool are best used for this.
What paint should I paint the bathtub with?
It all starts, of course, with the choice of paint. First of all, it must be moisture resistant, and secondly, it must adhere perfectly to any surface, otherwise it will begin to peel off over time. Professionals recommend compositions consisting of three components, which are mixed immediately before painting.
Before starting work, the container must be prepared. To do this, it needs to be cleaned and degreased. It is not recommended to use products containing chlorine. A well-cleaned and degreased bathtub is completely free of drops and streams of water when wetting the surface, and the glossy layer of enamel is also removed.
Next, the bath dries well. For this you can use, for example, a hair dryer. And then pour hot water into the container, which must be drained after about 15 minutes, then wipe the reservoir dry and apply a primer.
How to paint a bathtub with your own hands?
Then the process of painting the bathtub at home begins. In order to protect the bathtub from dust, it is necessary to tightly close all windows and doors and not open them for some time after the bathtub has been painted. It depends on how long the paint takes to dry.
For painting itself, it is advisable to use a flat-shaped brush with natural bristles. It is better to dilute the paint in such a way that approximately half of the prepared volume of dye is used for the first layer.
You need to start painting the bathtub from the edges, gradually descending to its bottom. After the first layer has dried, you need to apply the second. During painting, bath paint must be diluted in several parts, and not all at once, otherwise it may dry out before it is used.
You can use the bathroom no earlier than a week or a week and a half after painting it.
Arguments in favor of liquid acrylic
The positive qualities of self-leveling acrylic coatings are the following:
- Low cost. You don't need to buy a new bathtub right away. If the enamel has yellowed or chipped, you can apply an acrylic paint. The material allows you to extend the service life of the plumbing fixture.
- Easy to use. Applying a layer of enamel, taking into account surface preparation, takes no more than 3 hours. No special skills or expensive equipment are required.
- No need to remove the bathtub. When using acrylic liners, you have to dismantle the cladding and move the plumbing fixture. When applying liquid products, these steps are skipped .
- Wear resistance. The coating is not damaged by mechanical stress and does not corrode.
Which is better, acrylic or enamel
Acrylic and enamel are the main compositions for bathtub restoration. Therefore, many are lost and do not know what is best to choose. It is difficult to clearly understand which composition is preferable. You need to rely on your own painting skills, the condition of the product, etc. The advantages and disadvantages of each type of paint should be noted to make it clearer when and what is best to use.
The cost of liquid epoxy enamels, compared to the same acrylic paints, is low.
Pros of enamel:
- Reliability;
- Long service life;
- Economical consumption of funds;
- Fast application method;
- Resistant to chemical detergents.
Cons of enamel:
- Acrid odor;
- Long drying process. Takes on average a week;
- Poor thermal conductivity. The collected water will cool quickly.
Enamels for household use are thicker and are applied in two layers; they are suitable for self-application at home.
The advantages of acrylic include:
- Easy to apply. No roller required;
- Retains heat well. Therefore, the water remains hot for a long time;
- Long service life;
- a perfectly smooth surface is created;
- Wide selection of shades;
- Less subject to delamination.
Among the disadvantages of the composition:
- High cost of the product;
- The surface absorbs hair dye;
- Over time, the color may fade.
You can update your bathtub yourself with a relatively small financial investment.
It’s worth choosing one of the compositions based on personal preferences and the characteristics of the bath, as well as the effect you want to get. There are options that dry quickly, and there are products that create a unique bathtub design.
It is recommended that beginners who decide to paint a bathtub for the first time choose acrylic. Painting with enamel will require experience.