A modern bathroom is no longer an ascetic room with the minimum necessary. Old Soviet minimalism is a thing of the past. Today, in any bathroom, even a small one, there is a set of furniture, among which there is a cabinet under the sink. The choice of models is very wide and raises a logical question: “How to choose and install correctly?” Let's try to figure this out.
Bracket installation technology
- Determine the density of the load-bearing wall using a small-diameter drill. If the wall is not dense, then powerful and long dowels will be needed for fastening.
- Drill through the plaster to the base (brick, concrete, other material), going 3-4 cm deep into it.
- Choose special anchors with a length of 8 to 12 cm.
- Be sure to insert a plastic or nylon dowel.
- Secure the bracket.
- Check the installed (attached) bracket for reliability: pull it with your hand - it should not move.
- Proceed to install the bowl onto the attached brackets.
Attaching the sink will not be a big problem if you do not disturb the order of work
It is important to choose high-quality brackets that match the type of bowl
Now you know how to secure a sink. Mounting on brackets is the most difficult installation option. They need to be matched to the interior of the bathroom and securely fixed, because there will be no other support for the sink.
Installing an overhead sink on a cabinet
The only reasonable installation method is using plastic mounting brackets.
Plastic fasteners for overhead sinks.
The work order looks like this:
- In the side walls of the bathroom sink cabinet, holes 10-12 mm deep are drilled from the inside. Their location from the edge is marked so that the hole falls approximately in the middle of the groove of the corner placed on the edge. The diameter of the holes is 3 mm.
- The corners are placed on the edge of the cabinet, after which 4x16 mm self-tapping screws are screwed into the wall through them. Of course, not all the way. Then the corners are shifted so that there is a small gap between them and the upper edge of the walls.
- The sink is inserted from the front under the corners, after which they move, pressing it against the cabinet. To prevent future displacement, you can first apply a few drops of sealant to the ends of the walls.
Marking holes for fastening.
Installation of a sink without brackets
A mounting kit must be included with the sink upon purchase; if for some reason it is not available or the quality leaves much to be desired, purchase such a kit separately. Focus on products from well-known brands so as not to worry about the quality of installation later.
Decide on the location where the sink will be installed and take measurements. It is usually recommended to install the bowl at a height of 70 - 85 cm from the floor.
At the selected height according to the building level, draw a horizontal line. Now we place the upper edge of the bowl to the set aside line and mark the attachment points. We drill holes according to the marks and insert dowels. We screw the pins into the dowels. The screwed-in pin should be 2 cm longer than the width of the washbasin. After final installation, tighten the nuts until they stop.
Installation of a wall-mounted sink with a cabinet
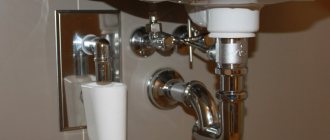
This option is good because you can hide all the plumbing connections in the cabinet.
At the required height, draw a horizontal line along the level. We try on the cabinet, see how it will fit with the siphon and mixer. If necessary, immediately measure and drill additional holes for plumbing in the back wall. Now we install the brackets and the cabinet on them. We described above how the brackets are attached.
We install a washbasin on top, connect a siphon and sewerage to it. If the bowl model provides for additional fastening to the wall, then drill holes in the right places and tighten the anchor bolts. Or glue the sink to the wall with silicone for greater reliability.
Installation
Installation of a cabinet with a built-in sink consists of several stages. To successfully complete all these stages, you need to follow some rules.
Choosing a location
Usually a new sink is installed in place of the old one. In this case, there is no need to rack your brains over how to install water supply and sewerage. If you want to install a cabinet in a new place, you will have to solve this problem. In addition, the furniture itself should fit there comfortably, and its cabinets should open and close freely. If you are going to buy a wall-mounted vanity unit, make sure the wall is strong.
Carrying out calculations and markings
Carrying out calculations and markings makes it possible to lay the pipes exactly, without damaging the cabinet itself. Fittings, that is, connecting parts of pipelines, must be located above the middle shelf. Incorrect measurements can cause them to rest against walls and furniture shelves. This also applies to the sewerage system. For the drain pipe that comes out of the floor, you will have to drill a hole in the bottom and shelves of the cabinet. Then the corrugated hose will stretch from the bottom to the top. Therefore, it is better to measure everything accurately in advance and run all the pipes through the wall.
Purchasing materials and preparing the necessary tools
During the installation process you will definitely need:
- adjustable wrench;
- FUM tape;
- screwdrivers of different sizes;
- screwdriver;
- mixer;
- siphon;
- plastic corrugated hoses.
If you purchased the furniture unassembled, you will have to first assemble it using a screwdriver. The attached furniture assembly instructions will help you with this. During this procedure, make sure that each part is firmly connected to the other. Because after you install the sink on it, it will no longer be possible to tighten the screws any more.
Installing a vanity unit with a sink
Having gone through the previous stages and successfully prepared all the necessary items and tools, you can begin the process of installing furniture with a sink:
- Turn off the water supply. Connect the faucet with hoses and secure the faucet to the sink. The best type of mixer for a cabinet is a modern single-lever model.
- Use FUM tape (fluoroplastic sealing material) to seal the connecting parts.
- Install a siphon on the drain hole.
- Attach the sink to the surface of the cabinet.
- Move the assembled furniture to the installation site. Do not install the sink cabinet close to the wall, as lack of ventilation may cause mold growth. If you need to attach it to the wall, do so using special bolts. But before that, do the calculations and make notes.
- Move the cabinet away from the installation site and drill at the marked points on the wall. Insert the dowels there, return the cabinet back and secure it with bolts.
- Connect the sewer pipe and the water supply system. This completes the installation process.
In the process of installing furniture with a washbasin, difficulties sometimes arise. For example, if the sewer hose prevents the furniture from fitting tightly to the wall, then it will be necessary to saw off part of the shelf, bottom or wall of the cabinet. To do this, use a hacksaw or jigsaw. Or, for example, there are no holes in the sink for bolts to install it on the wall. In this case, you can glue it with silicone glue.
Sink testing
After completing the assembly and installation of the cabinet with washbasin, check the functionality of the entire structure. First, check the reliability and stability of the cabinet, then turn on the water and check that there are no leaks anywhere. If everything works properly, then you can safely hand over the work or enjoy the new furniture.
Secrets of the master
In order to efficiently install a sink on a wall, it is worth learning some of the nuances of this process, without which the installed structure will not be as reliable and stable. These are tips from the best installation specialists:
- The wall structure has a significant disadvantage - it is visually open pipelines and fittings. The excellent aesthetics of the bowl is achieved thanks to a cabinet that matches the design, which will cover all these connections and the siphon. An additional advantage of this installation is a good place to store various necessary accessories.
- In practice, the entire set of fastening equipment should be included with the product. Check this issue yourself, because often: either the manufacturer forgets to complete the sink with fasteners, or their quality itself is not particularly high.
- To avoid moisture vapors from entering the space between the bowl and the wall, it is necessary to use a high-quality sealant, for example, silicone.
Upon completion of installation work, check the system drainage for leaks by filling the siphon with water. If you find a leak, make a tighter twist and an additional sealing layer.
- Install the bowl only after completing all finishing work. Be very careful when installing fasteners.
- The surface of the wall on which you mount the bowl must be strong and stable, otherwise use a supporting frame.
- If after installation the sink does not “move”, this is a clear indicator that the bowl installation procedure was successful.
A well-executed installation procedure is synonymous with excellent functionality and durability of the product. In view of this, before installation work, seek the support of an experienced specialist.
Frame structure for installing a washbasin
If the walls in your bathroom are not strong enough to install a sink, and you really want just such a model, then you can solve this issue by installing a frame structure. It is attached to the floor and walls and consists of profiles. The height is adjustable with legs, so that the sink can be installed at the desired height from the floor. All communications are hidden inside the structure.
The procedure is as follows:
- the frame is leveled and secured to the floor and wall;
- At the required height, screws are screwed in to secure the sink;
- cover the frame with moisture-resistant plasterboard and line it with tiles or any other finishing material;
- between the wall and the sink, a rubber washer is placed on the stud to reduce noise during operation;
- attach the wall-mounted sink to studs on top of the cladding.
A properly assembled installation can withstand a load of up to 400 kg, and this is not only a sink, but also other plumbing fixtures. In addition, you can make a niche in the design and use it as a shelf.
Design
When choosing furniture for any room, you need to pay attention to the appearance of the furniture. It must match the design of the room
This is not difficult to do; it is enough to know some of the features of various styles in the interior. For example, for a room designed in a classic style, the following are perfect: a marble countertop, a porcelain sink, a natural wood cabinet with elegant legs. A gold-plated faucet will complement this luxurious interior.
For those who want to create a more modern, airy style, we recommend turning your attention to glass models of cabinets. It is better to choose fittings for furniture with a sink in a different color that does not match, but is in harmony with the color of the furniture
For example, if the cabinet is light, then it is better to choose handles for it in dark shades, but if the cabinet is dark, then select elements in light shades. Thus, if you decide to buy a cabinet with a sink, then you need to do it carefully and with love, so that the bathroom becomes not only comfortable, but also cozy. Allow yourself to safely experiment with different styles, having first familiarized yourself with their features.
Specifics and models of wall-mounted sinks
The latest modern trend in sink installation is to mount the unit to the wall surface. This type of arrangement is one of the most familiar and favorite among Russians, since this type of installation has worthy and significant advantages. By installing the sink on the wall, you will save the desired meters of space, and the space under the sink is very convenient to use and keep clean.
Before you begin installation work, choose the model of wall-mounted sink that has the most ergonomic design. A separate model has specific design aspects, which, of course, affects the method of its installation. Therefore, it is so necessary to have at least some knowledge about the installation and specifics of connecting the device to the general water supply system.
An interesting solution is to install a sink above the washing machine; this saves precious space in the bathroom.
System health check
Before you start using the washbasin, you need to check the quality of the connections and how firmly the bowl is installed. To do this, check the quality of all fasteners again. After this, open the hot and cold water tap and check the tightness of the water hoses. If there are water leaks, then the connections must be tightened, and when this does not help, unscrew the hose and rewind the FUM tape.
To check the tightness of the siphon, it is recommended to fill the sink with water by closing the drain hole . Then drain all the water - if there are no leaks in the siphon or hoses, then you can start using the sink.
When draining the water, check the tightness of the connections.
Do not over-tighten the connections, as you may damage the gaskets or strip the threads.
Step-by-step installation instructions
https://youtube.com/watch?v=8d-LyqQfngQ
Mark the central horizontal line using a ruler, marker and spirit level. Installation will be carried out along its line
This will be, sort of, the upper limit of the bowl. It is important to consider the thickness of the side walls of the sink. They must be strong enough to withstand the pressure of the brackets
Measure the thickness and record the remaining parameters of the future installation on both sides of the bowl. Connect horizontally all the existing marks indicating the mounting height of the brackets. Finally, work begins on the sink itself. Turn the bowl over and fix the brackets on its outer walls.
- Move the sink closely to the horizontal and mark with a marker the places for mounting fasteners. This is done through recesses on the outside. Constantly check the alignment of all brackets and lines.
- Using a drill, make holes that are slightly smaller in diameter compared to the size of the fastening devices and dowel screws.
- Drive plugs or bushings made of durable plastic or nylon into the prepared drilled places, and screw the screws into them.
Support brackets are installed on this mount, on which the sink bowl is mounted. Mark the places where the device will be attached to the wall, drill and install the sink. Connect the outlet end of the siphon pipe into the socket of the sewerage system, install the mixer, and connect the water supply. Having made a light fastening “bait”, finish aligning the bowl horizontally. Then go through all the fasteners again and secure them.
Dismantling of old equipment
To remove an old sink, follow these steps:
- The water supply to the apartment is stopped. Unscrew the fastening elements of the mixer. The device is disconnected from the water supply. Make sure that the shut-off valve is not leaking.
- They are dismantling the drain. The lower part of the siphon is removed from the fixing nuts. Disconnect the flask from the outlet, pour out the water, and remove contaminants. Unscrew the fastening nut by turning it to the left.
- If the drainage device needs to be replaced, it is disconnected from the sewer pipe. At the junction of the flexible tube and the common line, unscrew the nut, lift and move the siphon. Before removing the device, you need to move the spacer washer and remove the outlet with the water seal from the sewer pipe. During work, a basin is placed under the sink, which prevents flooding of the room.
- The sewer socket is closed with a plug or rag.
To remove a sink attached to the wall, you need to loosen the fastenings located on the sides. If the washbasin does not have a pedestal, one hand of the master should hold the device so that it does not fall.
Removing an old sink.
Features of operation depending on the model
The types of fastening for a sink to the wall differ greatly depending on the modifications of the device:
For suspended installations, installation is carried out directly to the wall, so gravity is directed not only to the mount itself, but also to the wall
Therefore, it is very important that the base is strong and thick. Usually there are no problems with this if the installation is carried out in the place designated by the builders.
The “Tulip” model will look good in a spacious bathroom. When installing between the planes of the sink, floor and wall, polymer gaskets are installed, gluing them to silicone sealant
This technique prevents the appearance of squeaks and ringing of ceramics in the event of a careless impact. Another important point is that fastening and pulling the bowl to the wall should in no case cause it to be lifted on its “leg” in order to avoid splitting
Possible errors and methods for eliminating them
Although installing a sink is not a difficult task, doing it yourself can make certain mistakes. Improper installation not only leads to leaks, but a poorly secured sink can fall and cause injury to household members.
Main errors and ways to eliminate them:
- installing a new sink on the mounts from the old one. Often people don't want to make new holes and install a new bowl in the old holes. In this case, the sink is not fixed very securely and may fall;
- strong tightening of fasteners. If you do not calculate the force when tightening the sink fasteners, you can split the bowl . Over-tightening the nuts of the water hoses and siphon will damage the rubber gaskets, which will lead to leaks;
- thread failure. By applying a lot of force, you can break the threads on the fasteners and they will have to be replaced;
- selection errors. You need to choose the right size of the sink, otherwise it will interfere with free movement around the room;
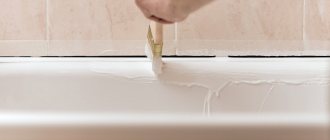
- the gap between the bowl and the wall. Its presence leads to the appearance of smudges on the wall, so it is necessary to lubricate the joint with sealant;
To seal the joint between the wall and the sink, sealant is used
- uneven installation. During installation, you do not need to focus on the tile joints . The horizontal installation should be checked using a building level. To install the pedestal, the floor must be level, otherwise you will have to use plastic spacers.
Types of sink brackets
The fasteners for mounting a washbasin on the wall must be able to withstand the weight of the plumbing fixtures with a margin. They are made from various metals.
special mounts designed for mounting a specific model. Often these are exclusive designer washbasins with an unusual shape. Brackets for such plumbing fixtures are included and can be made in the form of specially shaped pins, pipes that go around the sink, or unusual welded structures. Such fastenings are treated with special decorative compounds (ceramic or metal).
Brackets for standard wall-mounted sinks are made of cast iron or steel and coated with anti-corrosion paint. They are produced in the form of T-shaped or L-shaped racks, and can also be made in the form of frames with a sliding unit to adjust the size of the fastening. Brackets in the form of a metal frame into which the washbasin is placed are particularly reliable.
Where to put the faucet?
Before you figure out how to install a faucet on a sink, you should choose the right model, paying attention not only to its aesthetic appeal. Important parameters of shut-off valves are:
- installation location - on the washbasin, on the wall or in the wall;
- locking mechanism design.
1.Where and how to install the tap?
The most common are faucets that are mounted on a sanitary bowl in the corresponding hole. This arrangement is currently the most optimal in terms of design, ease of installation and maintenance.
Shut-off valves can be attached to the washbasin both before and after its fixation. However, it is often more convenient to install the faucet before the washstand is in its permanent place. The water supply in such models is carried out with flexible steel-braided hoses, metal-plastic, copper or corrugated bellows connections.
Wall-mounted faucets are often used when they are designed to distribute water alternately to the washbasin and bathtub, or when space under the bowl is limited, for example, due to the washing machine located there.
In the recent past, wall-mounted basin faucets were used alternately for the sink and bathtub to save space and money. Now this is an expensive accessory.
Faucet sets installed in the wall are considered luxury, expensive shut-off valves and require an extensive amount of preparatory work. Their connection to the water supply is carried out using specially installed rigid sections of pipelines.
2.Lock mechanism
Regardless of the sink model, the installation of the mixer is selected with a swinging lever (“joystick”) or with axle boxes (“twisters”) of valve or plate type. In the vast majority of cases, controlling the water supply using joysticks turns out to be more convenient than by rotating the axle boxes.
Attention! A ball valve with a swinging lever can cause certain inconveniences of use in systems in which hot water is supplied from double-circuit autonomous heating boilers without the use of intermediate storage tanks.
Tools and materials
For installation you will need: a sink, a set of auxiliary materials and various tools. Make sure everything is at hand. Tools you will need:
- Gas key.
- Electric drill + drill with pobedit tip.
- Screwdriver.
- Building level.
- Hammer.
- Marker.
- Special tape for threaded connections or tow.
The choice of fasteners is important if you have to deal with installing a sink in the bathroom for the first time. Most models are mounted on metal brackets, which come in different shapes (including openwork forged ones) and sizes. Installation is carried out using powerful bolts and studs. It is not always necessary to mount the sink to the wall. Depending on the model, it can only be placed on mounting brackets.
There are several types of shells:
Depending on the variety, the methods of attaching the bowl to the wall also differ. Most often, in about 50% of cases, conventional suspended structures are installed, this also includes “water lilies”. The installation of “tulip” type models is somewhat different: the bowl rests on the “leg”, and the sink needs to be attached to the wall only for additional fixation.
Siphon installation features
The siphon, like the mixer, can be attached before fixing the bowl or after. The ease of performing this operation determines the type of plumbing product. For example, a tulip sink, at the stage of screwing it to the wall, should already be equipped with a water seal, which will only need to be connected to the sewer. Otherwise, the decorative leg will create significant difficulties during the assembly of the drain fittings.
You can also use the option when only part of the drain (its upper part) is mounted on the washbasin, before it is secured. This is done if pipe or bottle type siphons are installed. If you have a corrugated water seal, then, in case of limited access under the washbasin, you will have to screw it in whole at once.
Preparatory work
The sink for the bathroom has been purchased, the necessary tools are ready, all that remains is to install the structure correctly. To do this, you need to prepare the wall on which the washbasin mounts will be mounted, and make markings so that the bowl is located at a height convenient for all household members.
The fastening for the sink to the wall must be installed after careful preparation of the surface. It is best if it has been finished (textured plaster, tiles or any other finishing material for the bathroom). If the wall is simply plastered, it must be treated with an antiseptic. There are many varieties of them in different price categories.
It is more convenient and easier to use liquid glass. It will perfectly protect the surface from exposure to water and at the same time destroy possible bacteria and fungi. After treatment, you need to wait a while until the surface is completely dry, then paint and begin installing the sink.
- Turn off cold and hot water.
- Stand at your full height in front of the installation site for the future sink.
- Select the upper limit for installing the bowl so that all household members can comfortably reach the sink.
- At the marked place, using a long ruler, pencil and level, draw a horizontal line along which the main work will be carried out.
- Check the dimensions of the sides of the bowl (measure it).
- Record the size with marks on both sides.
- Connect the marks with a horizontal line, thus obtaining the installation height of the sink brackets.
- Turn the bowl over and place it against the wall. Mark where the grooves for the brackets are.
Wall-hung or console sinks
Wall-mounted sinks are attached to the wall using a special installation system designed for each type. Console washbasins are distinguished by a variety of designs:
- Compact wall-hung bowls are great for small baths.
A compact wall-hung sink will fit perfectly into the interior of a small bathroom.
- Wall-mounted sinks with a cabinet or cabinet in which it is convenient to store detergents and other items. This option is suitable for large and medium-sized bathrooms.
Console sink with storage drawer.
- A hanging water lily sink designed for installation above a washing machine. It differs in the organization of drainage through the rear wall. Installing such a plumbing fixture allows you to ergonomically use the space in a bathroom of any size.
A water lily sink will significantly save space in the bathroom.
The advantages of wall-hung sinks include their versatility: they suit any interior, from retro to ultra-modern minimalism. The disadvantages include the complexity of installation and the need to attach only to solid walls.
Installation nuances
Installing a wall-mounted washbasin is similar to installing a sink with a semi-pedestal: first, the supplied brackets or a frame structure that encircles the bowl on all sides are attached to the wall. Installing the bowl in a frame is preferable in the sense that the sink is securely fixed and does not move in any direction.
The main difference in installation is the use of a special bottle siphon for wall-hung sinks. It is made of stainless steel (since it remains visible and must have a presentable appearance) and has a direct outlet to the sewer.
The assembly of the siphon for a wall-mounted sink must be carried out strictly according to the manufacturer's instructions.
Note! The assembly and installation of the siphon for a console sink must be carried out in the strict order specified in the manufacturer's instructions.