The choice of the type of foundation for a fence depends on its purpose and the materials that are decided to be used in the construction. The main criterion is the weight of structures installed above ground level. A massive fence will require the use of a strong foundation. A lightweight fence will make the underground part of the structure lighter by choosing more compact solutions; it is easier to do it yourself.
Ready-made strip foundation for a corrugated fence
When constructing with brick or small-sized wall blocks, the developer has practically no other choice but a strip foundation. However, strip foundations can be used in other cases. When there is a need to completely separate the territory, without leaving any gap between the soil and the fence, then it will also be the most reasonable solution.
An example of such a choice would be a strip foundation for a fence made of mesh or corrugated board. Compared to pillars on separate foundations, a strip foundation is a more expensive and labor-intensive option. But it guarantees reliability and the maximum level of isolation.
Return to contents
Options for a strip foundation for a fence
Although the installation of such a foundation will not be cheap, in any case, there are options to reduce costs.
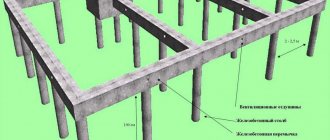
Diagram of a strip foundation for a fence
The foundation can be made in the form of a solid monolithic wall, the base of which is located at the level of soil freezing depth, and the upper cut extends to the design level above the relief level. A somewhat more economical method is to construct monolithic columnar foundations connected to each other by monolithic crossbars. The cost of such a foundation is lower.
The resistance of the structure to frost heaving is ensured by the depth of the columnar foundations.
Crossbars perform the function of foundation beams or grillage, distributing the weight of intermediate sections of the fence onto columnar foundations. They protect from frost heaving with a sand cushion and side sprinkling. In some cases, it is possible to use crossbars made of precast reinforced concrete, but this is rather an exotic option, used when there is an excess of suitable materials from the dismantling of other buildings.
Installation of a sand cushion under the foundation
The construction of almost any foundation for a fence can be done with your own hands.
Return to contents
Materials for strip foundation
The choice of options is small. You can confidently use only monolithic concrete and rubble concrete. The same materials are used in the construction of any monolithic foundation for other purposes. Monolithic concrete will be more expensive, although more technologically advanced. Rubble concrete will allow you to use available resources in the form of local stone or large pebbles, the cost of which will be significantly lower, and also do some of the work yourself.
You can use brick debris from dismantling the walls. It should be taken into account that not all mineral resources should be used for backfilling. Recommended materials include granite and basalt. Softer types of stone, such as limestone or other chalk deposits, should not be used below ground level.
An example of a foundation for a natural stone fence
It is necessary to take into account that the rubble concrete base cannot be reinforced in a suitable manner. Therefore, if there are significant loads from the fence wall or weak soils with a high groundwater level, it is better to refrain from such a decision.
Return to contents
How to make a foundation for a fence
A fence made of natural wood is a traditional structure on the territory of private households and serves as their protective element. Every owner, taking care of the safety of his home and site, tries to build a strong, high-quality fence that will last for many years with proper care.
As you know, any fence that is not reinforced, but is in direct contact with the ground, is susceptible to atmospheric phenomena (precipitation, large gusts of wind). Sooner or later, an unsecured fence will begin to deform, tilt, and then completely fall. This is especially true for a wooden fence, since wood is a thin material and is most not protected from moisture.
In order for your fence to stand strong and last for more than one season, you need to take full responsibility for strengthening it - installing the foundation.
Width and depth of strip foundation
In general, a strip foundation for a fence should be slightly wider than the wall resting on it. For example, if a fence is built from bricks 25 centimeters long, then you need to settle on a foundation width of 0.3 meters. Using piece blocks 20 centimeters wide, the foundation should be made 0.25 meters wide.
When the fence has different thicknesses of elements, for example, pillars and adjacent fencing elements, then the width of the foundation will be determined in the same way, taking into account the different geometry. The marking of the load-bearing supports of the foundation or the entire strip at one laying depth cannot be less than the freezing level of the soil in your region.
Design diagram and dimensions of a monolithic strip foundation
You can find out the standard freezing depth in the regulatory documentation, for example, in SNiP 2.02.01-83*.
Return to contents
Application of monolithic concrete
The most expensive and technologically advanced way to build a strip foundation is to use monolithic concrete. At the same time, all technological methods and the sequence of work do not differ from those used in most other cases, creating the same structures. The grade of concrete is selected depending on the loads. The load on the base is determined by the choice of material for the fence wall and its height.
A massive fence with brick walls made of ceramic or silicate material will require the use of B25 concrete. If you decide to use a lighter material or limit yourself to a small height, then you can use concrete grade B20, which costs less. In this case, it is necessary to comply with all requirements for laying concrete. Work must be carried out in the warm season, avoiding freezing of the base and concrete mixture.
An example of a massive concrete foundation for a brick fence
The use of frost-resistant additives for concrete is possible, but they pose certain risks. Additives will allow the mixture to be laid, but positive temperatures are still needed to gain strength.
Concrete should be compacted thoroughly. This is done either by the bayonet method or using a vibrating mace. When bayoneting, use a piece of reinforcement with a diameter of 12 millimeters. When laying concrete mixture in hot weather, it is necessary to protect it from drying out. To do this, a section of the monolithic structure is covered with plastic film and periodically irrigated with water for several days.
Return to contents
Fence support: how to properly make a strip foundation
Structure and features of strip foundation
The strip type is used more often than others in new fences. This is a reinforced concrete curb surrounding the perimeter of the site. It is shallow, but strong enough to support even massive fence structures. For example, it is poured when installing a fence made of corrugated sheets. The sheets fastened together have a high mass and give a strong sailing effect. It will be difficult for foundations of another type to support this structure.
Attention! For the strip base, concrete grade M200 of class B15 is used. Or higher, but definitely not lower, otherwise the strength of the structure will suffer.
Schematically, creating a foundation for a fence can be divided into the following stages:
- Calculation of the depth and width of the tape.
- Site marking.
- Laying of reinforcement.
- Installation of formwork.
- Filling the trench with concrete.
- Solidification of the foundation. Fence installation.
Calculation of the dimensions of a strip foundation for a fence
Correctly pouring a strip base under a fence begins with correctly calculating the load on it. The standard foundation depth is about 60-80 cm. The depth and width of the tape are determined by the material and design of the fence. The greater the mass, the wider the strip under the fence should be. The width of the foundation (and the trench dug for it) should not be less than the thickness of the fence.
For heavy fences made of brick or welded metal, use the widest possible tape. However, it is not necessary to lay it deep; the width will give the necessary stability. For light fences it’s the other way around: you can make a narrow strip, but the depth of the foundation should be large. Remember the supports. For them, the level of the base strip under the entire fence may be insufficient. To give the supports stability, you will need to drill deeper holes.
Strip foundation: getting started
Prepare pegs to mark the area. Fix one of them in the corner, pull the string to install the second, etc. Experts advise using professional tools - a level or theodolite. They will significantly simplify the entire process and increase the accuracy of measurements and the evenness of the structure.
If you already have data on the depth of the foundation, you can start digging a trench:
- On uneven areas, start working from the lowest point. This makes it easier to control the overall depth.
- It is advisable to make the walls at right angles. However, in conditions of loose soil, they can be made at an angle.
- Pour sand and crushed stone into the bottom of the trench, add water and tamp down thoroughly.
The foundation should be reinforced with corrugated reinforcement or metal scraps of suitable thickness and length. In the case of reinforcement, it is best to use a standard with a cross section of 10 mm. The optimal location in the trench is at a distance of 10 cm (minimum 7 cm) from the walls and 5 cm from the bottom. To fulfill this condition, the metal needs support. In addition, the racks should be 5-7 cm below the upper level of the foundation.
Secure two vertical rows of rods. Then connect them with cross rods. The horizontal elements should be spaced at a distance of approximately 40 cm from each other. You can fasten them like this:
Advice. To give the structure greater strength, make the axis of the column. To do this, concrete the metal pipe while pouring the base.
Formwork installation and pouring
For formwork, prepare a 25 mm thick edged board. Knock down the shields to the size of the ditch. They make up a box. Fasten it from the outside to create a flat and smooth surface inside. The bottom and walls can be covered with film, then the formwork will be easier to dismantle. The structure must be at least 30 cm above ground level. Install spacer boards that will prevent the box from deforming. Firmly fix the formwork in the trench.
Now you can start filling the trench:
- add sand and filler (crushed stone, screenings, small pebbles or expanded clay) to the prepared cement solution in a ratio of 1:4:4,
- mix the components in a concrete mixer to a thick consistency,
- Once again, generously water the bottom of the ditch, which is covered with a layer of crushed stone or screenings with sand.
Attention! Humidification will protect the cement mortar from losing its moisture into the soil.
Pour the prepared concrete into the formwork and level it. Remove air voids using one of the following methods:
- Place a construction deep vibrator into the poured solution. In a few minutes on a specific area of the foundation, it will bring bubbles to the surface. The device must not touch the formwork or reinforcement.
- Using a metal rod, carefully go over each section of the filled trench. In this case, concrete will have to be poured in layers of 20-30 cm and walked around the perimeter of the tape several times. At greater depths, bayoneting is ineffective. You can also hit the formwork from the outside with a sledgehammer.
To strengthen concrete, sift dry cement onto it with a sieve. The foundation will harden in about 7-14 days. Covering with film or other waterproofing material will help prevent sediment from getting into the immature solution. After hardening, remove the formwork and begin installing the fence. The foundation will reach its greatest strength in a month.
Installing a strip foundation is a simple process for a person who has minimal construction skills and is diligent. During the process, it is better to have professional tools at hand.
Application of rubble concrete
Rubble concrete has practically no technological differences when constructing structures from traditional monolithic concrete. The only difference is the larger aggregate, which is placed separately from the concrete mixture. Therefore, this type of foundation is preferred by those who like to build with their own hands.
The process of pouring a rubble foundation
The stone filling is laid out in rows up to 30 centimeters high and across the entire width of the foundation. After which the concrete mixture or sand-cement mortar is poured just above the backfill level.
It is very important to carefully fill all the voids between the stones with concrete. Sometimes the sequence of work is different. Backfill elements are embedded in a small layer of concrete or mortar, up to 15 centimeters high. The choice of techniques depends on the specific circumstances and size of the material. To settle the mixture and distribute it over the voids, you will only have to use bayoneting, since large rubble elements will interfere with the work of the vibrating mace. This reduces manufacturability and increases labor costs, but allows you to do the work yourself.
Care for freshly laid concrete is carried out in the same way as with a regular monolith. Either protection from freezing or irrigation with water during the setting period is required.
Diagram of a rubble foundation for a fence
Return to contents
Construction of a trench and soil foundation
The trench, or foundation pit, is made to a depth slightly greater than the bottom of the concrete. This requirement is due to the fact that the concrete structure must rest not on natural soil, but on a sand bedding 150 millimeters thick, which can be easily done with your own hands. It is made with medium-sized sand and compacted thoroughly.
It should be noted that the foundation soil should not lose its initial properties. That is, freezing, soaking and loosening of it is unacceptable. If such transformations occur, the disturbed soil layer is replaced with sand backfill of the required thickness with mandatory compaction. The width of the trench in the upper part is determined by the type of soil and the angle of its natural repose. At the base it will be 20–30 centimeters wider than the thickness of the foundation for the installation of a sand cushion and installation of formwork.
construction of a trench for pouring the foundation
In some cases, formwork for a rubble concrete foundation is optional. Construction is carried out by filling the trench with backfill and pouring the foundation with concrete mixture.
This option is possible in dense, hard and dry clay soils. But in general, formwork is necessary. After laying the foundation, the trench is filled with medium-sized sand with layer-by-layer compaction. The use of clay soils for this is highly undesirable. When wet and subsequent freezing, they can cause significant deforming and pushing forces that negatively affect the structure.
Return to contents
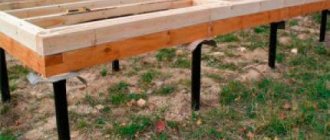
Features of the grillage device
The foundation for relatively lightweight structures can be made in the form of a grillage. In this case, the main supports on which the columns or fence posts are installed are poured to the freezing depth.
Drawing for installation of foundation grillage
Depending on the type of concreting used, they are made as a concrete or rubble concrete strip foundation. The section, made in the form of a crossbar or foundation beam, is laid to a depth of 0.5–0.75 meters.
Its sole is cast on a sand cushion 25–30 centimeters thick of compacted medium-sized sand. The element is filled with sand on the sides to a width of 15–20 centimeters; this work can be done with your own hands.
This solution allows you to distribute the weight over the main foundation supports, while protecting the grillage elements from frost heaving of the soil. The height of all foundation elements is set to the design elevation determined for this section of the fence. The grillage should not be made of rubble concrete, since it cannot be reinforced. Concreting of foundation elements of the same height should be carried out simultaneously for both the supporting part and the grillage.
An example of installing a foundation grillage for a fence
Return to contents
Reinforcement
The strip foundation for the fence works in quite difficult conditions. First of all, due to its length and due to the lack of transverse elements. Therefore, there is a high probability of cracks and deformations in the foundation, which can lead to destruction of the building envelope. Although this requirement cannot be considered mandatory, if there is an opportunity and desire, it is better to implement it.
The best option for reinforcement would be to install two belts of reinforcement with a diameter of 12 millimeters, with a step in the transverse direction of 100–150 millimeters. Longitudinal reinforcement should be tied every 30–40 centimeters with transverse rods. Reinforcement of the grillage is necessary both in the middle part, to absorb bending loads, and in places adjacent to columnar foundations.
Reinforcement should be calculated taking into account the load on the grillage. But the minimum requirement can be considered the use of three reinforcing bars with a diameter of 12 millimeters in the middle and lower sections and three rods of the same diameter about a meter long in the upper section, in the places where the grillage adjoins the buried part of the foundation.
When performing reinforcement with your own hands, do not forget the requirements for providing a protective layer of concrete. Its thickness from the outer edge of any concrete element to the outer surface of the reinforcement should not be less than five centimeters. The formwork of the element determines its outer edge; gaps are checked before concreting begins. During the process of pouring the foundation, if necessary, the installation of embedded elements is carried out.
Return to contents
Waterproofing
The foundation for a fence with brick pillars does not require coating waterproofing, unlike the foundations of buildings. Although if it is done, it will not be worse; the concrete will be less exposed to groundwater. But vertical waterproofing between the concrete base and brick or block wall elements must be done.
For it, you can use one or two layers of waterproofing, roofing felt or similar material. The choice is determined by the difference in their prices. Installation of waterproofing is carried out over a layer of bitumen mastic.
Return to contents
Making a foundation for a fence with your own hands
Builder 4th category
So, the decision was made to put up a fence. The basis of this structure will be the foundation, and the quality of the entire structure will depend on its strength.
The base is necessary so that the fence is not subject to deformation on the ground.
If you have the necessary skills, you can make a foundation for a fence with your own hands.
Types of fencing
Before you start installing the base, you need to decide on the type of fence:
After determining the type of foundation, you can begin work.
For light type fences
For a light type of fencing - corrugated board, picket fence, chain-link mesh - on solid ground, the less expensive method of post-casting is quite suitable.
Along the perimeter of the future fence, holes are dug with a depth of 80 to 120 cm at a distance of 1 to 5 meters, pillars are installed in them, bursting with stones and filled with concrete. When using corrugated sheeting, the distance between the posts is recommended to be no more than 2 meters , taking into account the windage properties of the material under wind loads.
If the soil is loose, sandy or muddy, a do-it-yourself strip-and-pillar type of foundation for a fence is suitable. This type of base is ideal for DIY construction.
Pouring order
We will divide all the work into five stages in order to make the foundation for the fence without errors:
- It is necessary to make markings along the perimeter of the foundation: to do this, drive in pegs and pull the rope, be sure to fix it at the corners. At the turning points it is necessary to hammer in a peg, and also mark the place for the gate and gate.
- They dig a trench 35-40 cm wide and up to 50 cm deep, in places where the pillars will be installed, make recesses up to 90 cm. The recommended distance between the pillars is 2 meters, and the height of the pillar, taking into account the underground part, is at least 2.5 meters. We install the pillars, fix them strictly vertically with stones, broken bricks and gravel, check them with a level - this is important. Cover the bottom of the trench with a 5 cm cushion of gravel.
Follow the rules for pouring a foundation for a fence in order to ultimately get a solid structure
- They begin to install a reinforcing belt made of corrugated reinforcement 10-15 mm, it is not recommended to use welding at the joints, it is better to use wire, the longitudinal reinforcement must be corrugated, with a diameter of at least 12 mm, and the transverse and vertical reinforcement can be smooth and of smaller diameter. The reinforcing belt is first made and then lowered into the trench; be sure to tie the pillars - this will strengthen the structure.
- They are putting up formwork. To assemble it, you can use available materials - old boards, plywood, slate, and so on. This will reduce the cost of the structure; the main task of the formwork is to provide the foundation with a flat surface. The formwork is positioned and wedged 25-30 cm above the surface, and the possibility of leakage of the filler mixture is checked. A thorough check of the formwork is carried out before concrete work begins. The formwork is a temporary element and should be easily disassembled upon completion of work.
- Concrete is poured. They are concreted in stages using horizontal layers and different types of mortar. Coarser sand with gravel or crushed stone is poured into the ground, and soft sand and cement are poured above the ground. With gradual pouring, voids in the concrete will be avoided. The formwork is removed after 5 days. In dry weather, the foundation must be watered to prevent cracks. Subsequent work can begin after complete drying, when the base has gained strength.
Foundation for medium type
The average type of fencing involves a mixed structure: powerful pillars made of brick, cinder block, stone or bentonite and between them a lightweight material - such as a wooden picket fence, corrugated sheeting or a grid of reinforcement.
Such a fence requires a more reliable base . For these types of fences, as well as for light ones, a strip foundation for a fence is suitable.
A feature of medium-sized structures is the installation of additional supports in the places where the pillars are installed.
To do this, where the pillars will be, they dig holes, taking into account that the depth of the foundation for the fence should be greater than the freezing layer, and 50x50 cm wide, we knit a frame from reinforcement, insert it into the hole and concrete it.
For heavy structures
Heavy fences are structures made of brick, stone or concrete and have a large mass, so they are often subject to deformation if the foundation is not installed correctly; these fences require a more powerful monolithic strip plinth.
When constructing this foundation, it is necessary to dig the entire trench with a depth of 30-40 cm greater than the freezing depth; to achieve maximum reliability, it is necessary to make a more powerful reinforced belt of reinforcement of at least 12 mm, it is thanks to the reinforcement that the load will be distributed evenly throughout the entire structure.
It must be remembered that the width of the fill should be 15-20 cm greater than that of the wall of the structure. This way you will get a monolithic strip foundation of special strength.
An important step is pouring the concrete, so before moving on to this process, you should make sure that everything is ready and check that you have the necessary tools. The foundation is poured with ordinary concrete. To make the solution yourself, the required proportions are 2:2:1 (crushed stone:sand:cement).
This concrete base for a fence will last for many years without defects or damage.
Fence formwork
When building a fence around a site with your own hands or with the help of hired specialists, you need to understand how the necessary work is performed correctly. Let's consider the question of how to make formwork for a fence.
Ready formwork for pouring the foundation
Return to contents
Why is it needed?
Even a relatively light fence made of profile pipes and sheet materials needs a foundation. The appearance of the fence, its verticality and correct geometry depend on how securely it is fixed in the ground. A rickety fence costing several tens of thousands of rubles will daily spoil the mood of the owner who has decided to save a couple of thousand on the foundation.
The fence is affected by wind loads, which are transmitted to the foundations through the pillars. But soil movements as a result of precipitation and frost heaving have a greater influence. Even slight tilts cause visible displacement of the pillars and can lead to cracks in the brick elements of the fence. Therefore, the fence is placed on a reliable foundation.
It is usually made from monolithic concrete. This is not a very difficult, although labor-intensive job, which many people try to do with their own hands to save money.
This is what concrete poured into formwork looks like
A concrete monolith requires formwork, which shapes its future geometry.
Return to contents
Formwork materials
The choice of materials from which formwork can be made is almost unlimited. The list can begin with special waterproof plywood and end with a mention of construction waste in the form of pieces of boards and tin, which all those who like to build with their own hands know about. The choice is influenced only by the preferences of the developer. However, free things are not always rational.
For formworks, an important economic criterion is the number of turnover cycles. Therefore, if a rotten slab can be used for some one-time work, then for repeated reproduction of a standard element it is more profitable to use even imported waterproof plywood. The typical choice of professionals are three materials:
- Edged board about thirty millimeters thick;
- Waterproof plywood with a thickness of one centimeter;
- OSB wood board with a thickness of one centimeter.
In addition to the materials that will form the outer surface of the monolithic product, a certain amount of timber will be required to strengthen the vertical walls and make supports. For this, material with a cross-section of three to five centimeters is sufficient.
Return to contents
How and where is it installed?
The formwork will determine the geometry of your foundation. Therefore, it is installed strictly where this foundation should be located not only in plan, but also in height. It is necessary to take into account the property of concrete to shrink during setting and the need to settle the concrete mixture by vibrating or bayoneting at the time of laying. Accordingly, the height of the formwork should be three to five centimeters higher than the design level of the concrete.
The formwork is mounted on a prepared base for the fence, that is, in a prepared trench or pit. The bottom of the trench is made fifteen centimeters below the design mark of the foundation base. This gap should be filled with carefully compacted medium-sized sand to the design level.
The width of the bottom of the trench or foundation pit for the pillars should be 15–20 centimeters wider than the formwork. This is necessary in order to be able to securely fasten the formwork from the outside.
Return to contents
Fastening the formwork
When pouring concrete and vibrating, significant displacement and deforming forces occur. They are especially large when using mechanisms for supplying large volumes of concrete mixture. Therefore, if mechanical rather than manual laying of concrete is intended for pouring the foundation, securing the formwork in the design position should be done with the utmost care.
Scheme of fastening the foundation formwork
The height of the formwork will be equal to the freezing depth, plus the base protruding above the relief. For most regions of Russia this will be one and a half meters and above. Displacement of the lower edges of the formwork is prevented by anchoring with wooden pegs driven to a sufficient depth.
If the formwork is installed to pour a strip foundation, then it is necessary to strengthen the entire length of the section prepared for pouring with the help of spacers. It is recommended to fix spacers not only on top of the formwork, but also in the middle section. They are usually installed at an angle of 45 degrees and supported in driven pegs or directly into the wall of a pit or trench.
When securing the formwork of individual foundations for fence posts, follow the same rules. But fastenings are placed along the entire perimeter of the formwork. This stage of work is not difficult, although it is responsible, so even a novice builder can do it with his own hands.
Return to contents
Fixation of formwork geometry
The concrete mixture weighs over two tons per cubic meter. This is a very heavy material that has the properties of a liquid before setting. Therefore, the pressure in the lower plane of the cross-section of the volume being filled will be very high. It tends to squeeze the formwork walls outward, which leads to deformation of not only the strip foundation, but also the bases for the pillars. In addition to geometry violations, this also causes excessive consumption of concrete. When constructing formwork, one should strive to reduce such deformations.
Although it will not be possible to completely avoid them when building with your own hands, since this requires special inventory formwork.
Fixing the geometry is required not only to prevent the formwork from expanding outward, but also to control the internal dimensions. The simplest way to prevent the formwork from bursting is to install twisted wires at some distance.
It depends on the rigidity of the formwork material and the height of the concrete layer being poured. It is recommended to place twists every one and a half, two meters in length and about half a meter in height. The number of tiers of twists depends on the height of the formwork. To ensure the required internal dimensions, bars with a length equal to the width of the foundation are installed.
Thus, the formwork for the foundation under the fence is rigidly fixed from compression by twists or spacers using bars, and from bursting with concrete when pouring - by means of twists. In addition to twists and spacers, which you can easily make with your own hands, there are professional sets of fixing elements for formwork, available for purchase in the retail chain.
Return to contents
Reinforcement
The formwork of a strip or columnar foundation for a fence allows you to install and secure the lower reinforced belt.
Option for reinforcing the corner part of the foundation in formwork
When reinforcing, the dimensions of the protective layer of concrete should be observed. It should not be less than five centimeters in any direction. The reinforcement is laid on pads resting on the ground.
The height of the spacers must provide the required clearance. The distance from the inner edge of the formwork to the outer surface of the reinforcement should also not be less than the thickness of the protective layer of concrete. When reinforcing pillar foundations, it is necessary to control gaps in both longitudinal and transverse directions. When installing reinforcing bars, mesh or frames, you can also use plastic elements specially made for this purpose, which can be purchased at building materials stores.
Return to contents
Concrete pouring and turnover
Before concreting, it is advisable to treat the inside of the formwork with a composition that reduces the adhesion of concrete to the material from which it is made. To do this, you can use special impregnations or used machine oil.
The main task when feeding concrete into the formwork is to maintain its design position. There is no need to rush to get the job done faster. Concrete must be supplied in layers up to half a meter high. After pouring the concrete, it should be compacted using a vibrating mace or using the bayonet method, making sure that the material completely fills the entire area of the formwork.
The process of pouring a foundation for a concrete fence
After some time, sufficient for the concrete monolith to set and gain initial strength, the formwork is carefully dismantled. It can now be used to fill the next section of the strip or column foundation. Fence formwork can be wrapped multiple times, depending on the quality of the materials and the care taken in assembly and disassembly.
DIY fence foundation
Foundation for a fence with your own hands
Creating a foundation for building a fence is a necessary condition. The design of the fence, regardless of what material it is made of, has a relatively low weight and a large windage. And, as a result, it is extremely sensitive to the effects of gusts of wind. A good, fresh wind can easily knock down a fence without a foundation.
There are several options for forming a foundation for a fence.
Shallow strip foundation for a fence
This option is the most common way to create a foundation for a fence. It is quite simple to construct and can be easily reproduced at home.
The necessary materials and tools when creating such a foundation are an entrenching tool (simply a shovel), wooden boards and carpentry tools for creating wooden formwork and metal rods for creating a metal reinforcing frame.
The first step in the construction of a shallow strip base for a fence is the development of its design. You must understand for yourself how deep you are going to dig the foundation and how wide it should be. An approximate design of such a foundation is shown in the figure.
Scheme of a strip foundation for a fence
After drawing up the project, it is necessary to transfer it to the area. Two parallel cords are stretched along the entire length of the future foundation. In our project, a deep foundation is formed under the supporting pillars of the fence foundation. Thus, we need to mark the holes to form the foundation of the load-bearing pillars. The pitch between such pillars is calculated based on the size of the fence structures. In this case, you can use ready-made elements.
After marking, a construction trench is dug.
Trench for the foundation for the fence
In the places where the support pillars will be placed, holes are dug or drilled for the supporting pillars.
In our project, the depth of the foundation is forty centimeters and the width is twenty centimeters. We plan to deepen the pillars into the ground by another forty centimeters.
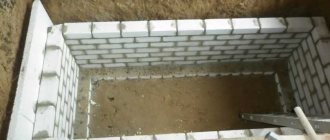
Along the walls of the hole dug in the ground, we place a sleeve made from a sheet of roofing material. It will simultaneously serve as a waterproofing agent for the concrete support and form the walls of the future formwork.
Installing load-bearing pillars
A metal reinforcing structure is placed in a glass made of roofing felt. It consists of 4-5 vertical reinforcing rods connected to each other by horizontal rings. At intersections, vertical rods and horizontal rods can be secured to each other by welding. But reinforcing rods can only be welded if they are marked with the letter “C”. In all other cases, fixation is used using plastic construction clamps or ordinary knitting wire twisted using a knitting hook.
Installing support pillars in the trench
We hammer a metal support post inside the reinforcing structure. Its bottom must be treated with waterproofing material. When installing poles, make sure that they are positioned strictly horizontally. We pour a sand cushion at the bottom of the trenches under the strip foundation. We compact the sand cushion tightly.
Please note that some gap must be provided between the outer surface of the pillars and the reinforcing mesh. The concrete solution will penetrate into it and fix the structure more firmly. We check the strict vertical position of the pillars using a building level.
We concrete the support posts for the fence
The holes around the support pillars are filled with cement-sand mortar. Without waiting for the solution to dry and mature, you can proceed to the next stage of work.
Installing a reinforcement cage for the fence foundation
On the surface of the earth and partially in the trench we form a metal power belt for the future strip foundation of your fence. Such a frame is a spatial structure in which there are at least two horizontal load-bearing layers. Inside such layers there are horizontal connecting jumpers, and the horizontal layers are connected to each other by vertical connecting jumpers. The metal rods are fixed together with plastic construction clamps, knitting construction wire or electric spot welding.
The pitch between the vertical and horizontal connecting jumpers is from twenty centimeters. The reinforcing structure turns the concrete cast into a new material - reinforced concrete, which has good resistance not only to compressive loads but also to bending or tearing.
The upper and lower horizontal reinforcing belts should be 5-7 centimeters from the surface of the future concrete casting. The ends of the reinforcing bars should not extend beyond the surface of the future structure.
Installation of formwork around the reinforcement cage
A wooden formwork structure is located around a metal reinforcing belt. You can use special collapsible structures, or you can simply use wooden edged boards. Please note that the mass of the concrete solution being poured is very heavy and therefore the wooden formwork structure must be made as strong as possible. To do this, the vertical load-bearing formwork pillars on opposite sides can be fastened together with steel wire. You can also install diagonal stops under the sides of the wooden formwork.
Foundation for a fence - photo
Concrete solution is poured into the resulting structure. In this case, you can carry out the entire pouring at once by ordering a mixer machine, or you can pour the concrete solution mixed in a household concrete mixer gradually, layer by layer. In this case, it is recommended to lay the mortar in layers, and not in separate sections.
During pouring, the concrete solution can be compacted with wooden tampers, or its thickness can be processed with vibration devices. This will expel the air bubbles that have formed there from the concrete mass, and will also fill the entire space of the formwork with concrete solution, preventing the formation of air cavities.
After pouring, the concrete base matures within several weeks. During ripening, especially in hot weather, it must be protected from excessive evaporation of moisture. To do this, the surface of the concrete casting is sprayed with water from a hose, and also covered with insulating materials or simple wood shavings.
DIY fence foundation
After the concrete has matured, other elements of the fence structure are attached to the supporting metal posts.
Foundation for a fence on screw piles
In addition to a concrete base and shallow foundation, the fence can also be formed on screw piles.
Foundation fence on screw piles
A screw pile is a thick-walled pipe, the end of which is pointed and has blades on it that allow the pile to be screwed into the ground when turning. Previously, such piles were mainly used for the construction of coastal infrastructure in soils with high levels of humidity, but now such structures are used almost everywhere.
Driving screw piles does not require any mechanical equipment, with the exception of a turning gate. These piles are screwed in very quickly, in almost minutes, after which horizontal structures can be immediately welded or screwed onto them. Thus, installing a fence using screw piles as a foundation base can take only one day.