Bath drainage device
In different rooms of the bathhouse, it is customary to make drainage devices that differ in design and operating principle. There are three options for constructing a drain in a bathhouse:
- Raised floors with sheer floorboards. Often used in a steam room, where there must be a warm wooden floor to ensure a comfortable stay in high temperature conditions. Whereas the wash compartment traditionally uses tiles with a slope and a shower drain;
- Leak-proof floors. All liquid and dirty water remains on the floor and is washed off from the surface through a standard drain with a bellows into a septic tank or collection container;
- A combined version, used only in small baths or in full-fledged washing departments of baths. In modern projects, baths are used to a limited extent, as they do not comply with sanitary standards.
The choice of a specific scheme depends on the structure of the foundation, the method of insulation and the arrangement of the water seal. For small steam rooms and washing sections of the bathhouse, a double floor system is used, this is convenient, especially when the building is installed on a pile foundation. If you plan to build a bathhouse box as an extension to the house, then the most suitable option would be a non-leakage floor with a drain through a drain. This will simplify the connection of the bathhouse sewerage system to the general wastewater disposal system of the building.
Leaking floors
Similar options for draining a bathhouse with a wooden floor were also called pour-over drains. The essence of the design was that the upper part of the floor consisted of boards laid with a gap of up to 10 mm, so most of the water simply flows through the cracks and collects on the lower tier or is absorbed into the ground. At the same time, the floorboards themselves, as a rule, were made with a slight rounding of the surface, which ensured normal water drainage and its discharge to the lower level in the subfloor. One of the options for draining water in a bathhouse with wooden floors is shown in the diagram below.
The gap between the floorboards helps to dry the floor
The advantages of such a device for collecting and draining water include:
- Simple room cleaning;
- No puddles or residual water on the surface of wooden floorboards;
- Durability of joists, insulation and wooden parts of the floor and drainage system.
Important! Despite the fact that the lower tier, on which moisture and dirt accumulated, actually remains closed with finished wooden floors, the entire water drainage system from the bathhouse is well suited for ventilation and drying of the subfloor.
As a rule, ventilation ducts from the stove, located either in the steam room or in the dressing room, go to the lower tier. Upon completion of the bathing procedures, the channels were opened, the ventilation windows in the steam room itself or in the washing compartment were uncorked, and the warm air from the stove quickly dried and removed traces of water, if it was not removed through the drain system.
Non-leakage floor
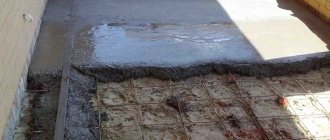
It is clear that the manufacture of pouring or deck floors requires quite significant costs associated with the manufacture of two levels of water collection, installation of a drainage system and connection of a sewer pipe leading to a pit or septic tank.
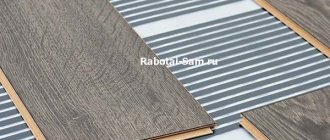
It is much easier during the construction process to make classic concrete floors in the bathhouse with a slight slope towards the drain. The concrete screed must be insulated with foam plastic or extruded polystyrene foam. To ensure water flow through the system, a classic version with an elbow and a corrugated pipe is used, or a more modern shower drain can be installed.
Scheme for a drain with a heated floor for a bathhouse - extensions to a house
At the same time, the floor of the bathhouse does not have to be covered with tiles; the surface can quite realistically be covered with wooden floorboards. This solution is most often used for steam rooms. The amount of water discharged through the drain system is relatively small, so you can get by with a small drain pipe installed in the corner of the room.
Combined water drainage scheme for a bath
This option for organizing water drainage is traditionally used for large bathhouses with an insulated base and a concrete strip foundation.
The essence of the drainage system is that water is collected in the center of the room in a special gutter or pit. The channel is covered with a protective grating, and the drain surfaces are usually covered with gratings.
A drainage channel or gutter usually has an additional slope along which water flows directly into the ground or into a septic tank located in the underground bathhouse. The design is quite simple, so it is often used for summer cottages of steam rooms and bathhouses built with one’s own hands.
Choosing reliability and durability: how to fill the floors in a bathhouse under the drain
Photo from the site: tutknow.ru
If you are thinking about how to make a floor in a bathhouse with a drain, then you have a permanent building that is supposed to be used not only in summer, but also in the cold winter, even if the thermometers outside the windows confidently drop below twenty degrees Celsius. However, you should understand from the outset that you will have to take into account many nuances and subtleties that professional builders can easily cope with, but a beginner will have to learn. True, there is nothing overly complicated, and everyone who has a head and hands is able to do everything exactly as needed.
A well-thought-out drainage system is the first step towards durability of the structure
In the old days, people did not think at all about how to properly make a floor in a bathhouse; they were also of little interest in draining water. The floor was often simply adobe, from where the liquid itself flowed and was absorbed into the ground, spreading evenly over the surface. Nowadays there is a slightly different approach to the design, since it is assumed that the bathhouse will stand for decades, allowing not just one, but even several generations to steam and get their share. If we talk about the concrete version of the floor, then it is necessary to take into account the slope, otherwise dirty water will simply stagnate. This will lead not only to the formation of, to put it mildly, an unpleasant odor in the room, but also to rapid deterioration and breakdown of the entire structure.
Photo from the site: banyarukami.ru
The simplest option for draining liquid from the floor would be a simple absorption hole dug directly under the bathhouse building. This is where, in theory, the water should flow. However, this is not always possible, since the soil must be sandy to ensure sufficient drainage. Moreover, the hole should be at least half a meter and no more than a meter deep. Such a pit is filled fifteen centimeters with large crushed stone, waste bricks, coarse sand and similar materials so that water can flow down completely unhindered. To prevent unpleasant odors from getting inside the room, you need to make ventilation holes below the level of the base, on opposite sides.
True, a more acceptable option, naturally, would be to move the cesspool outside the bathhouse itself, this will make it much easier to clean it, and it will be more useful. In this case, just a pit is made under the steam room and washing room, into which a water pipe leading into the pit is inserted. If you have a drainage system from your home, for example, then you can take the drainage from the bathhouse there. But there are also nuances, since you will still need to do high-quality ventilation, you cannot do without it.
Photo from the site: septikland.ru
You need to know that all the drainage systems described above are only suitable when the floor of your bathhouse is raised above the surface and the screed is poured onto pre-installed joists. If it is poured directly onto a bed of sand, expanded clay or crushed stone, then all drainage pipes must be laid immediately. The difficulty here lies in subsequent repairs, which will be quite difficult to carry out, because you will have to gouge the concrete, and this is not easy.
How to make a floor in a bathhouse with a drain: choose the appropriate level
When it comes to practical work, you already need to know exactly what and how you are going to do. Therefore, you first need to decide how exactly the screed will be performed. Concrete floors can be laid using two methods:
Photo from the site: tolkobeton.ru
- The easiest way is to pour the floor in the bathhouse directly onto the ground. That is, first you need to make a sand cushion, cover it with crushed stone, and then lay concrete. It is clear that such a floor will be extremely cold, and it will also be very difficult to warm up, especially in winter. Such a floor should be level with the base or below it, but the level of such a floor cannot be raised higher.
- The second option will cause much greater costs, both temporary and financial. To fill here, you will need to pre-install a wooden structure of joists, under which special ventilation will take place. This design is much higher quality and durable.
Stage three. Finishing the concrete floor
As we already mentioned, the drain should be located at the lowest point of the floor. It can be installed not only in the center of the room, but also against one of the walls. The decision should be made taking into account the placement of shelves for the steam room or shower, structural features, etc.
Floor drain layout diagram
There are recommendations from some builders to make the floor in the bathhouse heated. Of course, you can listen to them, but we do not recommend doing so. Why? Firstly, the floor in the bathhouse is already warm; in principle, it cannot be cold. Secondly, electrically heated floors require special wiring; the total installation power exceeds 5–7 kW. For rooms with high humidity, there are very strict safety requirements of the PUE; it is difficult and expensive to comply with them in full. Thirdly, if you are afraid that your feet will freeze, then it is much easier to make wooden grates. Place them not only in the bathhouse, but also in the dressing room and other rooms. It will be very cheap and will make washing comfortable.
Wooden grate on the floor
Drawing of a wooden grate for a bath
Keep in mind that the larger the tiles, the more difficult it is to lay them on a slope. All corners are located in different planes; it will not be possible to make the joints smooth. The best option is to use mosaic tiles. This material makes it possible to make any turns and tilts; a large number of small plates correct minor errors.
How to lay ceramic tiles with a uniform slope?
Step 1. Take four tiles, place them with corners on the drain and mark the diameter of the hole on them. Using a grinder with a diamond blade, carefully cut out the holes.
Step 2. All tiles near the drain should have a slope in two directions. We have already mentioned that there is no need to make a large angle, a few millimeters are enough. Small slopes can be made with glue; for larger ones, you will first have to screed or use cement-sand mortar for gluing.
Step 3. Throw the material under the surface of the first tile, put it in place and gradually push it in with your hands so that the drainage point is the lowest. Immediately control the amount of tilt. Place the remaining tiles near the drain in the same way, making sure that they all slope towards the hole.
Checking the levelness of the floor
Application of the solution
Leveling the solution
Step 4. Finish the first row, while controlling only one plane between adjacent tiles. This is much easier than setting two planes at the same time.
Applying mortar to tiles
Tile laying process
Step 5. The position of the tiles of the second row must be controlled according to two parameters. The edges must be located in the same plane as the first row and be parallel to each other.
First, it is recommended to lay four tiles around the perimeter of the drain and allow time for the glue to harden. The fact is that these tiles will be used as a template in the future; any displacements are strictly not allowed. The position of the others is constantly monitored using the first tiles; the load on them during the work is the greatest.
Trimming tiles
Slope check
Step 6. It is recommended to continue further work in parallel rows. If you have concerns about your qualifications, you can increase the area of the square plot by alternately laying tiles on each side of the square. This algorithm requires much more time, but allows you to correct mistakes in a timely manner. For beginners, it is advisable to first lay out the tiles dry and use supports of varying thicknesses instead of glue.
Tile marking
The process of laying tiles near the ladder
Tiles laid near the ladder
Laying is controlled by level
Drain in the corner, tiling completed
The larger the floor area, the longer the level should be. The tool must simultaneously control the position of at least three tiles; this is the only way to avoid kinks. The seams are sealed after the glue has completely hardened; with their help, you can slightly smooth out the sharp joints of the tiles.
Tile grout
At this point, the work on pouring the concrete floor in the bathhouse is completed, and you can begin finishing the interior surfaces of the room.
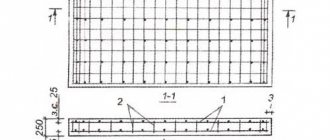
Pipeline slope calculation
Scheme for calculating the slope of the pipeline depending on the diameter of the pipe
To achieve normal drainage of water from the room, it is not enough to lay the tiles at an angle to the drain hole. Designing floors with a ramp also involves calculating the optimal slope of the water supply system. This parameter determines whether the water will flow into the sewer by gravity or not.
During the construction of a bathhouse, the degree of inclination of the sewer pipe is often determined by the values recommended in SNiP. However, in some cases, the standard proposed by SNiP is not suitable for arranging floors. In such situations, additional calculation and design of the pipeline slope is required.
The required parameter is determined using the following formula:
D*√L/H ≥ M, where:
- M – slope coefficient;
- D – speed of water movement through the pipe;
- L – liquid filling level of the pipeline;
- H is the diameter of the sewer pipe.
What to do with the finished floor
The resulting coating is quite smooth. The final stage may be processing with a grinding machine. After this, it will be pleasant to walk on such a floor, but it is better to make a beautiful finish.
Hand grinder
Today, ceramic tiles are often installed in bathhouses. You can use special types - for example, glass. It has the highest strength and abrasion resistance. In addition, the tiles are not afraid of strong temperature changes.
There are entire collections on sale, created specifically for bath conditions. There are mosaic coverings in the form of sea pebbles on the bottom or entire ceramic paintings. In short, you can find a finishing option to suit every taste.
Glass mosaic tiles for floor
Stage one. Organization of water drainage
These works can be considered preparatory work, but without them you cannot start pouring the floor. We chose the most difficult option - the bathhouse was placed on a strip foundation.
Step 1. Draw up a sewer plan taking into account the placement of the steam room, locker room and other premises. At the same time, carefully consider the installation location of the water receiver, if one is planned to be installed. The receiver can be made from an ordinary metal or plastic barrel with a volume of approximately 100–200 liters; holes should be cut on the sides and bottom of the container using a grinder.
DIY septic tank from barrels
Step 2. Dig trenches according to the diagram. Observe the slope; the difference in height per linear meter should be approximately 1–2 cm. There is no need to use special instruments; the slope can be checked by eye or using an ordinary level.
Trench
Step 3. Level the bottom and lay plastic pipes. There is no need to add sand, the depth of the trenches is insignificant, and the sewerage system will not experience much pressure. If we take the drainage level in the steam room as zero, then the maximum depth of the trench at the exit from a 6 m wide bathhouse will be approximately 25–30 cm. There is no need to be afraid that the water will freeze in the winter. First of all, it's warm. Secondly, the slope ensures complete drainage, the pipes are always empty, and there is nothing to freeze.
Pipe slope control by level
How to use a bubble level to control the slope of pipes?
- Place the device on a flat surface, take a ruler and place it on a level at a distance of 50 cm from the beginning.
- Raise the device until the clearance between it and the plane is equal to a centimeter.
- Visually remember the position of the bubble on the scale or make a mark with a marker. In the future, when checking the slope of the pipes, use the mark you made.
Step 4: Assemble the drain inlet and attach it to the pipe. To facilitate the assembly process, you can use soap, soapy water or sunflower oil. Wet rubber seals with these liquids. It is strictly forbidden to use automobile oil for these purposes - the rubber in the seals is ordinary, automobile oil will ruin it and will have to be completely changed.
Assembled elements of internal sewerage
Seals should be moistened with oil or soapy water.
If necessary, make holes in the foundation strip
Sewage installation
The pipe is laid on a bed of crushed stone to create a slope
Step 5. Check the functionality and serviceability of the drain. To do this, fill a liter jar with water and place an empty container of the same volume at the outlet of the sewer pipe. Pour water into the receiver and see how much comes out of the sewer. If the volume is much less than the filled volume, this means that the pipe is laid with differences in height, water is retained in uneven areas.
Everything is normal - fill the trench, carefully compact it every 10 cm of soil height. For compaction, you can use any convenient means at hand.
Manual tamping
It is advisable to slightly moisten the soil before compacting. Keep in mind that subsidence under a layer of concrete can cause major problems. After installing the drain, further construction work can continue.
Basic drainage scheme
A fairly complex floor arrangement allows you to avoid the destructive influence of water on the floor base.
How to make a floor slope to drain water from a bathhouse with your own hands? Before you begin the process of pouring floors with a drain system, it is worth familiarizing yourself with some technical nuances. According to many experts, installing a floor base with a hydraulic apparatus is advisable exclusively in the washing department. There are several reasons for this:
- Pouring concrete floors in a steam room leads to strong dust formation at a time of increased dryness of the atmosphere;
- Concrete surfaces tend to get very hot, unlike wood. Therefore, the presence of concrete in the steam room cannot be called appropriate;
- Cement screed has low ductility, so during thermal expansion or compression it will crack very quickly.
What should the base structure be like for the water drainage system to work like a clock? In order to evaluate the advantages of one or another method of laying a hydraulic apparatus, we will consider the process of assembling and draining water from the bathhouse. Sloped floors in most cases “work” using the following technology:
- The slope at the base allows you to collect all the liquid at one point in the room;
- A ladder is installed in the corner of the water assembly, through which “waste” water is removed from the room;
- From the drain, the liquid through the background pipe enters the sewer system or a crushed stone filter, which is installed under the bathhouse.
To make a really high-quality system for draining water from a bathhouse with your own hands, you need to take into account many points:
- foundation type;
- type of ladder;
- “seasonality” of the bath;
- floor type (concrete, wood).
Drain and its principle of operation
The main characteristic of a bath room is high humidity. This is what you should use as a starting point when installing the floor yourself. A proven drainage technology is to arrange the surface at an angle, so that water easily collects at one point in the room. Waste water is removed through a special drain. You lay a background pipe from it, connect it to the sewer, or you can use a crushed stone filter placed under the bathhouse.
The quality of the drainage system also depends on:
type of foundation;
- type of ladder;
- seasonality of the bath.
Important! The main advantage of a self-leveling floor with a slope is the ability to avoid damage to the concrete screed due to the rapid evacuation of waste water.
Concrete floor with joists
In addition to the described option, a concrete floor can be laid along the joists, in which case an underground ventilated space is obtained.
Wooden beams with a cross-section of 10x20 cm are used as logs, the laying step should be about 50 cm, wooden beams with a cross-section of 5x15 cm are attached to the bottom of the logs and boards 20-30 mm thick are mounted on them, which serve as a subfloor.
If the bathhouse is large, then it is better to install supports under the logs so that they do not sag over time.
Waterproofing material is laid on the finished subfloor with an overlap of at least 10 cm, and all seams must be sealed.
Experts prefer to use polyethylene film as waterproofing, since it is more plastic compared to roofing felt, so it is more convenient and easier to work with.
The next step is laying the thermal insulation; after its installation, it is again covered with a layer of waterproofing material, on which a reinforcing mesh is installed.
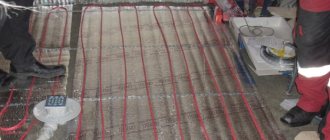
If you are planning to make a warm floor, now you can start installing pipes or laying cables. After installing the system, check its functionality.
pour a layer of screed,
To ventilate the underground space, vents must be left in the above-ground part of the foundation through which air will penetrate, so the subfloor and joists will not rot.
Before installing all wooden elements: logs, boards, they must be treated with antiseptics in order to prevent the development of the rotting process.
At the last stage of arranging such a floor, the finishing floor covering is installed; porcelain stoneware or tiles are usually laid on the heated floor; they must have an anti-slip coating.
If you do not install a heated floor, then walking on the tiles will be uncomfortable, in which case you need to make a flooring from wooden blocks or lay down polymer mats. If there is a wooden flooring, it is recommended to periodically remove it from the bathhouse for ventilation.
To prevent the walls from getting damp in the bathhouse, when installing the floor, you need to calculate its height, taking into account all the layers, so that it is higher than the top edge of the base and then there will be no problems.
How to fill the floors in a bathhouse under the drain along the joists
The second option for a concrete floor in a bathhouse is to pour it onto the subfloor, which is formed from wood. With such a design, you need to remember about ventilation, and for this you will need to make ventilation holes along the entire perimeter of the base of the building.
Photo from the site: russkaya-banja.ru
- In order for the design to be of high quality, you need to take logs with a cross section of 10x20 centimeters. They are laid in increments of half a meter.
- A special beam with a cross-section of 15x5 centimeters must be nailed to the bottom of the joists to secure the structure.
- Next, you will need to lay the subfloor, which will be hidden under the screed. It is best to take pine boards 2-3 centimeters thick for these purposes.
- A waterproofing layer needs to be laid over the surface of the wooden flooring, but it would be better to replace roofing felt with some more elastic material. For example, there is now a vapor barrier film on the market that is perfect for our purposes.
Photo from the site: hodremonta.ru
Next, you need to proceed in exactly the same way as when laying the screed on the ground. It is also worth remembering about drainage, since the pipe must be installed before the concrete is poured. It is also very important to pre-treat all wooden parts of the structure with antiseptic compounds. You will be given the necessary advice on choosing such a solution in any store, or you can read the information online.
Photo from the site: kaksdelatbanyu.ru
It is imperative to take into account that concrete can only dry properly in at least a week. That is why each new stage of work can be carried out only after the previous layer has completely dried. Otherwise, the screed may burst and you will have to start all over again. Moreover, the concrete surface must be kept well moistened. In the first days, you can simply cover it with plastic wrap, or even simple sawdust. After the screed has completely dried, it will be possible to lay clinker or simple tiles on its surface, and perhaps even finish it with other modern materials of your choice.
How to make a wooden floor in a bathhouse with drainage
Do-it-yourself bathhouse floors are most often made of concrete or planks. Wooden floors in the bathhouse are laid out from boards with a cross-section of 15x5 cm, attached to logs (logs with a cross-section of 14-18 cm or timber 15x15 cm).
Before making a floor in a bathhouse, keep in mind that they can be leaky or non-leaky. For leaking wood floors, slots are provided to allow water to drain, which will subsequently be absorbed into the ground under the bathhouse. The floor is removable because after visiting the bathhouse it is lifted and dried. It cannot be insulated, so it is suitable for areas with warm climates.
Non-leakage wood floors have a structural slope: along it, water flows into a drain, from where it enters a drainage basin and then drains into a settling tank through a special outlet. This design is possible with insulation, but is quite expensive.
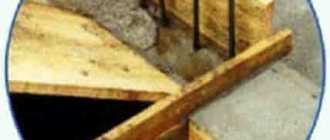
Before making a wooden floor in a bathhouse, a frame is created from logs (type of wood - pine or larch). Be sure to provide for a slope of the floor to drain the water in the bathhouse, and to avoid sagging of the logs under load, columns of brick or concrete are placed under them. If the supports are brick, you need to make reinforced concrete platforms more than 20 cm thick and 5-7 cm larger than the perimeter of the column itself on each side.
For concrete supports, prepare holes about 40 cm deep, carefully compact their bottom, pour a 10 cm layer of sand, then compact it, after moistening it with water. Then crushed stone is poured in a layer of 15 cm. A formwork is constructed that protrudes 5 cm above the ground.
Before making a floor in a bathhouse with a drain, be sure to provide a slope towards the drain hole. If the floor is leak-proof, the slope is not necessary. The edges are insulated with roofing felt. Pour a thick concrete solution in the following proportion: 1 part cement, 5 parts crushed stone and 3 parts sand.
To waterproof the site, after the concrete solution has completely dried, it is treated with molten bitumen and roofing felt is glued onto it.
In the process of laying the floor in a bathhouse, remember that the top cut of the support column must be at the same level as the top cut of the foundation if it is strip. With a columnar type of foundation, the logs are supported on the beam of the embedded crown, therefore, the upper cut of the supporting columns is flush with the beam.
Making a wooden floor in a bathhouse with your own hands
To make wooden flooring in a bathhouse, special floorboards are used, which are placed on logs, which are special transverse beams.
The process of constructing a wooden floor can be more clearly described using the following sequential steps:
At the initial stage, it is necessary to make a pit around the entire perimeter of the steam room, which should have a depth of 40–60 cm. Next, a concrete solution is taken, which is used to fill the edges of the pit and the base. This usually takes about 10 liters of concrete mixture. After waiting for the concrete to completely harden, which usually takes 3-4 days, you can proceed to laying a 5 cm thick layer of crushed stone and sand on the base of the floor. It must be thoroughly compacted.
Having completed the construction of the sand and crushed stone cushion, special brick columns with a cross section of 25 x 25 cm are installed on it, which will serve as support for wooden logs
When constructing these posts, special attention should be paid to ensuring that they protrude approximately 2–3 cm above ground level. Unedged wooden boards with a smooth outer surface can also be used as a material for constructing a wooden leaky floor
First, they must be adjusted to size in accordance with the dimensions of the main structure
Unedged wooden boards with a smooth outer surface can also be used as a material for constructing a wooden leaky floor. First, they must be adjusted to size in accordance with the dimensions of the main structure
After this, they can be laid on the joists. In the process of laying the first board, it is necessary to take into account that there must be a gap of approximately 3 cm from the wall for ventilation. Therefore, the fastening of the first unedged board is carried out taking into account this requirement. All other boards are attached with a gap of 5 mm. To increase the service life of lumber, it is treated with a double layer of drying oil or other protective material.
When installing a non-leaking floor, special wooden beams with a cross section of 50 x 50 cm are laid on the joists. Subsequently, a subfloor with waterproofing will be mounted on them. This design will include several layers to ensure leveling and insulation of the floor before the final installation of the finished floor boards. During the installation of the subfloor, it is allowed to take edged non-standard boards, pre-treated with an antiseptic and drying oil. After laying the rough boards, insulation is placed on them, which can be used as roofing felt and foam plastic 10 cm thick. An additional layer of roofing felt is laid directly on them.
Having completed the work on arranging the rough covering, you can proceed to laying tongue-and-groove boards 15–20 cm thick. All boards are attached to the joists using several nails or they can be screwed with self-tapping screws. Typically, 3–5 screws or nails are enough to install one board. But when calculating their quantity, it is necessary to take into account the thickness of the boards.
How to make a concrete floor in a bathhouse on the ground?
The installation of a concrete floor in a bathhouse on the ground involves the use of a strip foundation. The work itself is carried out in several stages and is quite doable with your own hands. The sequence of steps is as follows:
- first, the turf is cut from the area to a depth of 40-50 cm;
- gravel is poured into the resulting pit, in a layer of no more than 15 cm. After which it is also carefully compacted. At this stage, it is already recommended to begin to gradually slope the surface;
- a layer of sand 30-50 cm thick is poured onto the gravel layer and also compacted thoroughly;
- At this stage, it is necessary to take care of waterproofing the future floor. To do this, sheets of roofing felt or other material with similar properties are laid on the previous layers. Rolls of material must be rolled overlapping so that the sheets overlap each other by 10-15 cm. Joints and edges on the walls must be additionally lubricated with bitumen mastic. Waterproofing material can be laid in one or two layers, it all depends on its characteristics.
Polyethylene film for waterproofing
- then reinforcement is carried out. Here, a mesh with a rod diameter of 5 mm can be used as the main material;
- the installation of beacons and guides is carried out taking into account the inclination of the surface to the drain point. As a rule, it is installed in one of the corners of the room;
- Next comes the direct pouring of the concrete solution. The base material is a standard cement-sand mixture in proportions of one to three. However, today the construction market offers the buyer simply a huge assortment of different mixtures, which may include different fillers. They promote rapid hardening of the floor and also improve its technical characteristics;
- this floor is a rough basis for the future floor covering in the bathhouse, which may well be ceramic tiles. However, in most cases, a wooden flooring is simply placed on a concrete floor, water passes through it freely, and walking on it is comfortable. In addition, it also dries without problems.
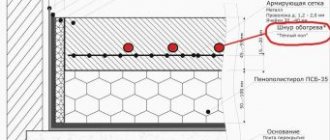
Diagram of an insulated heated floor
The above method concerns pouring concrete in one layer. Next we will talk about how to make a floor with two layers. The scheme of work is as follows:
- A concrete solution is poured directly onto the layer of sand, and its composition must necessarily include gravel with a fraction of 30 mm. The rough screed is leveled along the beacons and hardens;
- further spread waterproofing. The installation technology is the same as in the previous version;
- Let’s not forget about the insulation layer. The material may be the same as described above, but experts recommend adding another element to the composition of the cake - perlite sand. It has simply excellent characteristics; its small layer, 3-4 cm thick, will protect the room from the cold. However, perlite sand also has several disadvantages - it is very dusty, and also due to the fact that this material is very light, it is impossible to work with it even in light winds;
- then pour the second layer of solution, be sure to level it and leave it for weeks to harden;
- then, as in the previous case, reinforcement is carried out with a metal mesh, which is filled with concrete mortar at least 3 cm thick. This is already the finish, but the floor must harden before active use. If desired, the top layer of concrete can be painted using paints that contain epoxy, acrylic or polyurethane.
Video of a concrete floor on the ground:
Warm concrete floors in the bathhouse
Many people do not like tiles in the bathhouse because they feel “cold” to their feet. The solution is to warm it up. And this can be done by placing heating elements in the screed. This will be a well-known heated floor. There are a lot of them today, but there are two main types: water and electric. There are also water-electric and capillary ones - these are new products on the market. Whatever type of heated floor you choose, the structure of the cake will change slightly - for greater efficiency, you will need more insulation: so that the heating goes towards the room, and not into the ground.
Warm floors in the bathhouse are not such a rarity today
When installing a warm concrete floor, the order of layers can be as follows (layers down/up):
- All fertile soil is removed (if not removed, then it will begin to “smell” even through the screeds), the remaining soil is leveled and compacted.
- Backfill and drainage layer. Crushed stone 5-10 cm thick is poured onto the ground and compacted as thoroughly as in the previous version. The next layer is sand. It is spilled with water and also compacted thoroughly.
- Rough screed 1-2 cm thick. This is a regular cement-sand mortar, possibly with the addition of expanded clay or crushed stone.
- After the concrete has set, waterproofing is laid. The choice here is wide - from film to membranes and roofing felt with roofing felt. Who likes what more, or what the wallet will “pull”. The main thing is that the waterproofing is complete.
- Insulation layer. Its thickness depends on the type of material and region. Recommended - high-density polystyrene foam (at least 35 kg/m3). It can be from 25 mm thick for southern regions to 100 mm for northern regions. The slabs can be placed in two layers. Then the joints of the lower one are taped, and the upper one is laid with the seams offset. The joints of the top layer are also sealed.
- Film or membrane. This is hydro and vapor barrier. It is laid with an overlap: the edges overlap one another by 15-20 cm and are glued with double-sided tape. Along the perimeter, the edges are wrapped on the wall and secured there. They will then be covered with a strip of galvanized iron, on which the tile plinth will rest.
- For greater efficiency, it is desirable to lay a heat-reflecting layer. This can be a thin rolled heat insulator with a lavsan coating (not foil - the foil in the screed quickly collapses).
- Reinforced screed with a slope towards the drain. In its thickness there is a heating element - water floor pipes or a heating cable. They are tied to a reinforcing metal mesh, and then filled with concrete mortar with plasticizers.
- After the screed has dried, porcelain stoneware or tiles are laid.
Please note that before laying the entire cake, a damper tape is rolled out and attached around the perimeter of the walls. It will compensate for the thermal expansion of the screed and protect the walls of the bathhouse from pressure
Installation of floor skirting boards
Moldings for finishing a bath
The profile of the skirting boards does not matter, choose which one you like best. Skirting boards are nailed with nails 30÷40 millimeters long, the specific values depend on its thickness and width.
The shape of the plinth and the cutter for its manufacture
Prices for different types of skirting boards
plinth
Step 1. Take measurements of the steam room around the perimeter. Skirting boards have a standard length of two meters, and most paired ones are wider and longer. This means that the moldings will have to be joined. If in ordinary rooms uneven joints can be sealed with wood putty or colored sealant, then in a bathhouse this method of eliminating errors cannot be used; the putty will quickly fall off. Try to make the joints of the skirting boards in inconspicuous places: behind the stove, near containers with water, under a shelf, etc. Of course, be very careful when cutting the skirting boards; the tool must be sharp and in good working order.
Wooden plinth and heat-treated abasha strip
Step 2. Check the corners of the bath, they should all be exactly 90°. File the end of the baseboard at a 45° angle. For even cutting, use a factory-made miter box or make the device yourself.
How to cut a floor plinth
We recommend cutting with a hacksaw - the cut area is much smoother. Always apply the left plinth to the miter box on the left, and the right one on the right, to the side away from you. Otherwise, instead of an external corner, you will get an internal one and vice versa. If you rarely work with a chair, we advise you to write on its sides where to install the left and right ceiling and floor plinths on the outer and inner corners.
The photo shows the joining of skirting boards in the inner corner of the room
Video - How to join skirting boards
It is somewhat more difficult to cut the baseboard if the angle of the steam room is different from straight. If you do not have enough experience, we advise you to try cutting any slats for the first time. Install them in the right place so that they rest against the walls. Use a pencil to mark where the slats intersect.
Example of plinth markings
From these marks, draw straight lines to the corners, make a cut along the lines. Check what you got. Everything is correct - excellent, repeat the same operations with the baseboard. A large gap has appeared in the gley - think about where you made the mistake, repeat all the operations again, taking into account the error. This does not take much time and will save expensive material.
Accurate joining of skirting boards is very important
Step 3. Start nailing the baseboard from the corner of the bathhouse, step back 2-3 centimeters from the cut point, nail the nails at an angle at a distance of 30-40 centimeters.
Step 4. Using the same method, nail the baseboard on all sides of the steam room. Check their position and, if necessary, remove burrs or lint with sandpaper. If there is a noticeable difference in height at the joints, then first remove them with a sharp chisel, and then correct them with sandpaper.
Installation of wooden plinth in a bathhouse
That's all. In Russian baths, as a rule, the floors are not varnished or painted, but if you really want to, apply a topcoat. Just keep in mind that no matter how durable coatings you use, they will still peel off - the operating conditions are too harsh.
Now let's look at how to make pouring floors in bathhouses on a strip foundation.
Selection of materials
For the drain line, as a rule, a PVC sewer pipe with a standard diameter of 100 mm is used. The mainline is assembled from two-meter or meter sections, which are joined together using the existing sockets at the ends.
To connect a simple drain that does not have a side outlet, you will need to use a standard elbow to the drain pipe.
There should be an O-ring inside the elbow
At the same time, the sewer drain itself has a standard design in various variations. For a bath, you can choose either the simplest or the most complicated, since such products come with various additional functions.
The tightness of the device is of great importance for the operation of the drain system, so before purchasing a drain it is recommended to assemble the device and evaluate the tightness of the parts
Also, to construct a drainage line, you may need a sewer tee with a branch at forty-five or thirty degrees.
You will need a tee if you want to make additional drainage from the sink
In addition to PVC parts, we will need “cold” mastic to seal cracks if the sewer pit is equipped with an iron barrel. This material is sold in metal cans in construction hypermarkets. Before purchasing all the parts and consumables, it is better to make a list.
Mastic can be purchased at any hardware store
Selection of sewer pipes
Choosing the diameter of the pipe depending on the level of the slope
A correctly made slope at the base of the drain does not yet guarantee the rapid evacuation of water masses from the room. In this matter, the choice of sewer pipes is not the least important. Since the bathhouse uses a non-pressure liquid discharge system, it is advisable to use the following pipes to install the hydraulic apparatus:
- The minimum diameter of the pipe should be 50-60 mm, and the thickness of its walls should be at least 3-4 mm;
- It is advisable to assemble the external pipeline from PVC materials, since they are more frost-resistant;
- During the installation process, pipes are laid in the soil at a level that is below the freezing point.
Laying level of concrete floor in the bathhouse
The level of a clean concrete floor in a bathhouse depends on the method of laying it: on the ground or on wooden joists. The level also depends on the subfloor, insulation layer, waterproofing, and reinforcement.
The level of laying a concrete floor on the ground starts from the mark of the top of the cushion, the thickness of the insulating layer and the thickness of the poured concrete, taking into account the floor covering. The floor laid on the ground should not exceed the base.
The level of laying a concrete floor on wooden joists takes into account the height of the air holes, underground space, subfloor and thermal insulation, cement layer, reinforcement and waterproofing.
How to fill the floor in a bathhouse with a drain on the ground
Photo from the site: baniaisauna.ru
The first option for pouring the floor in a bathhouse is to place it on the ground. Moreover, there is also a technology that needs to be adhered to so that you don’t have to redo it later. The floor of a bathhouse can be poured onto the ground under the drain only if the foundation protrudes above the surface of the earth at a sufficient distance.
- First, you need to prepare the surface, and for this, the entire fertile layer of soil must be completely removed. You need to pour a layer of crushed stone underneath, and you will have to compact it quite well and firmly. Also, you should never forget about installing a drainage system, since the pipe must pass straight through the thickness of the screed. In addition, you need to make a sand cushion, from thirty centimeters to half a meter thick. The sand also needs to be very carefully compacted and leveled.
Photo from the site: russkaya-banja.ru
- The next stage will be the organization of high-quality waterproofing. Today the market offers a huge number of rolled materials with similar properties. The most affordable material can be called ordinary roofing felt, the qualities of which are quite suitable, because for an innovative membrane you will have to pay a fairly large sum, but if there are no problems with funds, then it’s worth thinking about it. Moreover, roofing material or membrane is laid on the surface, adjoining it by at least ten centimeters. All joints of the material must be properly soldered or coated with bitumen mastic.
- Some kind of insulation is laid on top of the waterproofing layer; fortunately, the choice on the market is rich and varied. It would be best to take mineral wool or polystyrene foam, but this is your choice. Do not forget that, just like the insulating material, the insulation will have to be tucked so that it fits onto the wall.
- Next, you will need to lay any reinforcing material that will give rigidity to the entire structure. You can purchase a special metal mesh, or you can get by with regular chain-link.
Website photo: baniaisauna.ru
The preparatory work ends here, and then the pouring itself will follow. It is worth understanding that for the screed you need to make a special solution of sand and cement, in a ratio of three to one.
Performing hydro- and thermal insulation
When studying the issue and trying to understand how to properly pour a concrete floor in a bathhouse, you cannot ignore the laying of layers of insulation. Without proper protection, the floor will not last long and will not provide comfort. Protection is needed both inside the room itself from moisture and from the ground.
Laying roofing felt
Waterproofing is usually made of roofing felt, which is laid in two layers. The roofing material is rolled out over the entire area of the room, overlapping with a bend on the walls of 3-5 centimeters. Where the sheets adjoin the walls and overlap, they are coated with bitumen mastic.
The second layer of waterproofing is laid in the same way, slightly moving it tangent to the first. The bottom and walls of the pit must also be covered with two layers of waterproofing.
Installation of EPS
Before pouring a concrete floor in a bathhouse, you also need to take care of thermal insulation. It is best to choose extruded polystyrene foam, which comes in slabs 5 centimeters thick. The material is not afraid of moisture and demonstrates good mechanical strength and density. Along the perimeter, the slabs have tongue-and-groove projections, thanks to which you can easily and quickly create a continuous thermal insulation layer.
Work begins from the pit, then the walls are lined flush with the floor, then the slabs are mounted on the floor itself. Any gaps between the material are carefully filled with polyurethane foam to create a monolithic layer of thermal insulation.
Preparatory activities
First of all, prepare all the necessary equipment for arranging a concrete floor. You will need:
Floor screed tools.
- concrete or ingredients for its preparation;
- a concrete mixer or container for preparing the solution manually (if the solution will be made independently);
- buckets;
- construction mixer or drill with an appropriate attachment;
- wooden beams (slats);
- tape measure;
- level;
- rule.
The installation of a concrete floor in a bathhouse on the ground begins with the removal of the entire fertile layer of soil.
After removing the fertile ball of soil, the base must be covered with gravel or crushed stone. The backfill is thoroughly compacted.
Provide in advance for the installation of a sewer pipe to drain water from the bathhouse. In the future, a siphon will be connected to this pipe. The siphon itself is installed in the washing room.
Place a layer of sand on top of the compacted gravel. A 300-500mm layer of backfill will be sufficient. Thoroughly compact the sand and level it over the surface.
What is a bathhouse, what floors can be used in it and why?
A bathhouse is a kind of object in which high humidity constantly accumulates and the temperature thermometer goes off scale, cold or hot water flows, creating an additional load on the materials with which the room is decorated, so their choice should be approached especially carefully.
Within the framework of the topic of this article, we will pay special attention to gender, which can be represented by the following materials
Concrete (most often it is used as a base for boards, tiles, etc.).
The service life of such a floor is very long (at least 50 years), but it is very cold, and in order to make it suitable for the bath room, you will need a lot of money and expenses.
Brick.
Due to the fact that fairly high temperatures prevail in the bathhouse, so as not to create conditions for discomfort (due to high heat capacity and low heat transfer, brick can even lead to burns), this material is used only as a base for a wooden or concrete floor.
Tree.
An ideal option for a room equipped for a bathhouse, it is environmentally friendly, warm, and the smell after heating the bathhouse is natural and very pleasant. It is believed that aspen is the best option. In addition to its good woody qualities, it also drives away all evil spirits and evil, restoring health and strength. At least, this is what our ancestors believed, which means that the judgment has a legitimate place to be taken into account.
Now let's get down to business. Due to the greatest popularity of wooden floors on a concrete base, we will focus on them and give a detailed description of their installation.
Primary screed
In order to provide additional thermal insulation, it is advisable to make the solution for the first layer of screed based on perlite. This material shown in the photo is an excellent insulator and therefore the floor covering will be warm and pleasant to the touch.
Since perlite is light and consists of small fractions, work with it should be carried out in a place well protected from drafts.
The solution is made with it in several stages:
- Pour 2 buckets of perlite into a concrete mixer and add 1 bucket of water.
- The mixture is thoroughly mixed, and its volume is significantly reduced.
- After the mass is made homogeneous, cement is added to it, which is poured gradually. The mixture continues to be stirred.
- When the mass becomes uniform in color and consistency, pour 1 bucket of perlite into it and pour in several liters of water.
- The mixture should ultimately be free-flowing.
- For perlite to react with cement and water, you need to wait some time - about 10-15 minutes with the concrete mixer turned off.
- Then they continue to knead until the mass is plastic.
If you don’t want to use a bathhouse during the cold season, you can do it simpler and use a mixture of 3 parts sand, 1 part M400 cement and 0.1 parts lime. These components are mixed by adding water until the color is uniform and the solution has the consistency of thick sour cream.
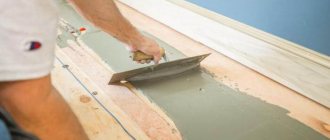
The finished mass is laid out on the subfloor and leveled. You don't have to use guide beacons at this stage. But at the same time, it is imperative to ensure that the floor in the bathhouse is poured correctly with a slope in the direction of the location of the drainage hole.
Option for installing a concrete floor using joists
The concrete floor in the bathhouse can be arranged with joists. In this case, the underground space will be ventilated, which is an additional advantage.
Scheme of cement-sand screed on wooden logs.
- Before starting work, saturate all wooden structural elements with an antiseptic. Thanks to this impregnation, the material will be protected from rotting and other damage.
- Get to work.
- Lay the joists. To do this, use a 10x20 cm beam. The optimal pitch for laying the logs is 500-600 mm.
- Nail 15x5 cm bars to the joists from below.
- Attach the subfloor boards to the bars. The recommended thickness of the boards is 2-3 cm.
- Place waterproofing material on the subfloor. Ruberoid works well. If you wish, you can use more modern materials. Ensure high-quality sealing of the joints of waterproofing elements.
- Lay insulation on top of the waterproofing layer. Typically, mineral wool slabs or foam sheets are used.
- Cover the thermal insulation with another layer of waterproofing material.
- Lay reinforcing mesh over the waterproofing.
- Fill the prepared base with concrete mortar. In most cases, a fill of 3-5 cm thick is sufficient.
In this method, as in the previous one, before starting the installation of the structure, you need to make an outlet with a connection to a pipe to drain water into a ditch or sewer system equipped for this purpose.
In addition, vents must be created in the above-ground part of the bathhouse foundation for the unhindered penetration of air into the underground space. This will prevent rotting of the wooden structural elements.