How to connect an induction hob: algorithm of actions
Connecting an induction hob resembles a similar process involving an electrical panel.
However, there are some nuances that require consideration. First of all, you need to prepare the tools and materials necessary to install the device. Connecting an induction device begins with wiring an independent power line from the junction box. Next, you should install the socket box. Correct selection of height is very important here.
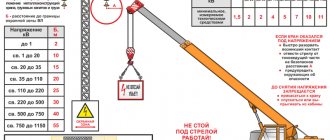
The next step in connecting an induction hob is connecting the cable from the device to the panel. The connection is made to a separate circuit breaker. Do not also forget about the grounding loop, which is very important in this case.
To seal, you need to glue the seal supplied by the manufacturer
After the socket box is installed, it is necessary to strip the ends of the cables. Next, they need to be inserted into the socket terminals and secured in this position using special clamps. Then you need to install the power socket for the hob in the socket box. The plug of the integrated brewing unit is connected using a similar method.
For a single-phase network, the voltage of which is only 220 V, copper jumpers are used. As an alternative, parts made of brass are suitable. Before connecting the device, it is recommended to draw your own diagram that meets specific conditions. Maintaining paired cables is a mandatory rule when connecting an induction hob. How is the connection process completed?
The three phase lines are connected to each other. The same must be done with the two wires corresponding to zero. Once all cables are connected, you can close the terminal box
It is very important to check the device after finishing work
Connection instructions
Connection via socket
Such an installation will require a special power outlet with grounding, designed for a power of 30 W or more. By connecting the wires to the socket and pins, the connection of the wires that are connected on the machine and electric stove to phase, neutral and ground is checked to the correct terminals.
Completion of all work - securing the rear protective panel of the stove and connecting it to the electrical network.
Detailed instructions for connecting a stove that operates from a single-phase 220 V network with a separate power line for it:
- The beginning of the work process is the mandatory de-energization of the switchboard.
- Initially, the wire cable is connected to the circuit breaker on the distribution board.
- The phase and neutral wires are connected to it, the ground is connected to the grounding of the housing.
- Next comes the serial connection of the RCD immediately behind the automatic fuse and its securing.
- Afterwards, the cable is laid to the location and the socket is installed. For this, an open installation method using a corrugated tube or PVC box is possible.
- A three-pin power socket and pins for a single-phase network are selected.
- Confusion of electrical contacts when connecting them to an outlet is unacceptable. Grounding must be connected to the grounding contact, 0 to zero, and phase to phase. The correct connection of the cable from the electric stove to the plug is also carefully checked.
- The socket is mounted on a wall plane, the location of which should be away from internal metal structures (water and gas pipelines or radiators of the heating system), so that it is not exposed to heat sources and water.
- Next, you turn on the power cable with the plug already connected to the electric stove.
- After carefully checking all connections for their thorough tightening and reliable fastening of the circuit elements, a test switch on of the kitchen equipment is carried out. The machine is turned on after the protective device, and accordingly the electric stove.
- First, the electric stove is turned on at full power, after which everything is turned off and all elements are checked for their heating capacity.
By connecting the wires to the socket and pins, the connection of the wires that are connected on the machine and electric stove to phase, neutral and ground is checked to the correct terminals
Connection to terminals
The terminal strip is attached to the wall surface. After this, the power line wire of the network is connected to this strip on one side, and the power cable of the electric stove on the other. When connecting everything to the terminal strip, you should make sure that wires of a certain color are connected to the corresponding terminals on the electric stove itself.
Connecting to terminals is similar to the operation using a socket:
- The electrical wire is connected to the machine, after which a protective device is installed, and the electrical wire is pulled to the future location of the electric stove.
- A recess is made in the wall surface to install a protective box to accommodate the terminal block.
- The terminal strip is connected to the electrical wire from the distribution panel and the electrical cable from the connected electric stove.
- They must be secured to the terminal strip without tangling electrical wires.
- Upon completion of this work, the protective box must be closed with a lid. The last stage is checking the functionality of the kitchen equipment.
The terminal block to which the electrical cord must be connected
Connecting a stove without an outlet
To connect a 32A electric stove without an outlet using 3 contacts with a 220V phase, no additional sophistication is required, just:
- connect the cable with plug from the electric stove to the machine;
- crash into an RCD;
- pull the wire to the installation site of the stove;
- install a box in a special recess in the wall and insert the terminal block into it;
- a wire is drawn to it from the electrical panel and from the stove and connected;
- In the terminal block it is important not to confuse which is which.
After this, everything is closed with a protective cover and tested in practice, with all the plates connected according to the standard scheme.
Interesting: according to experts, a direct connection saves the voltage loss that occurs when using a socket for an electric stove, and there is no additional heating.
Installation of the socket is possible for any user who has carefully studied the instructions and complies with all safety requirements. The main thing is to choose the right equipment, taking into account the technical characteristics of the electric stove.
Connection diagrams
Usually all electric stoves are delivered to stores with an outlet already connected, but it happens that you need to connect it yourself. This won't be a problem if you have the information.
First you need to understand how the electric stove will be powered, because the single-phase and three-phase connection diagrams will be different
It is important to understand here that electric furnaces can operate both from a 220-volt outlet and from a 380-volt outlet
The most common will be a 1-phase connection diagram, so we will consider it first. The plugs will then have 3 outputs, where the contact is a phase cable, another is a neutral cable, and the remaining one is a protective cable.
If the socket has already been installed, then you should find each of the indicated cables and connect the cables located on the plug to the necessary contacts.
The next step is to connect the equipment in question. A person who has little experience may find as many as 6 contacts puzzling, but there is nothing complicated about it. Contacts marked 1–3 and L1–L3 are needed to connect the phase wire. If it is single-phase, then a jumper should be mounted between the indicated terminals and a phase cable should be installed. A number of manufacturers supply devices with a mounted jumper.
Let's see how to make a three-phase connection correctly. The installation of the socket for the purpose in question will be slightly different. There will be 5 contacts on the plug and socket. And in this case, 1 wire will be protective, 1 will be neutral and 3-phase. Then the latter will be connected to contacts located next to each other, the neutral wire contact will be located on top, and the protective wire will be located below.
Connection types
There are several ways to connect the stove to electricity: directly to the panel, through a terminal box, or using a socket and plug.
Connection via terminal box
Connecting the stove via a terminal box is a widespread option. The point at which the connection is made can be hidden in the wall or installed externally. The box is placed a couple of meters from the stove, and the distance from the floor should be more than sixty centimeters.
Connection via socket
The third type of connection to the network is the use of a grounded outlet. It is not recommended to install ordinary sockets, because they are not designed for such powerful electrical appliances, which means they will constantly fail.
There are three types of power outlets:
domestic ones, the grounding of which is located at the top at an angle of 90° relative to zero and phase;
Belarusian, in which the contacts are at an angle of 120° relative to each other;
European, the grounding contact of which is flat and placed at the bottom.
Installation and connection of socket and plug according to the diagram
When choosing a location for installing an outlet for an electric stove, the following factors should be taken into account:
- Length of hob cable with plug.
- Move to a safe distance from the burners and the water tap.
- Availability for preventive inspection and, if necessary, repair/replacement.
- Inaccessible to small children.
Connection diagram of a plug to a 380V stove
Connection diagram of a plug to a 220V stove
We install the socket in the selected location. If a hidden modification is installed, you will need to use a hammer drill to make a recess under it in the wall. To do this, purchase a socket box that matches the size of the socket being installed. Next, the step-by-step installation of the socket looks like this:
- We apply the socket box to the installation site and trace its outline with a pencil.
- Using a hammer drill, we make a recess in the wall along the mark. As we work, we periodically measure the dimensions of the hole so that the socket box fits into it perfectly.
- When the recess of the required size is ready, a socket box is installed in it and secured with dowel nails.
- Next, we disassemble the socket, removing the cover from it, and secure it in the socket box. The methods of fastening are different, depending on the design and socket, socket box - either these are metal spacer legs, or just screws.
- After the socket for the electric stove is securely fixed in the recess, the power cable is connected to it. If you are using existing wiring in the kitchen, you should make sure that it is de-energized. The new cable should be connected to the network only after all installation work has been completed.
- Wiring for built-in sockets is also laid in a hidden way - in grooves. After installation, these recesses are sealed with plaster or putty.
- The power cable is connected to the outlet in accordance with the instructions supplied with the device. For ease of operation, the internal conductors of the cable have different colors: the phase is usually indicated in blue or red, the neutral is black, and the braid of the grounding conductor is painted in yellow-black stripes.
- After connecting all the wires, you need to double-check that they are connected correctly. If no defects are found, the protective cover of the power outlet is installed in place.
- Then the power cable is connected to the network in the switchboard.
- The last step is to test the correct operation of the device. To do this, you can use an indicator screwdriver to make sure that the phase and neutral of the cable exactly correspond to the desired terminals of the socket. After this, you can plug the electric oven into the installed outlet and start cooking.
A method of connecting an electric stove through a block without a socket and plug.
The installation of surface-mounted sockets differs from built-in models only in the installation method. For them, you do not need to hollow out recesses in the wall - they are attached directly to its surface using dowel nails. Wiring to overhead devices is also supplied externally, in special cable channels. A three-phase socket differs from a single-phase socket only in the larger number of terminals. When connecting wiring to them, you should be guided by digital symbols or connection diagrams. They are given in the attached instructions, or are indicated directly on the lid of the device.
Socket for oven and hob
Electric hobs and ovens consume a lot of power (from 2.5 to 10 kW). Therefore, according to modern electrical safety rules, an oven socket requires a separate dedicated power line from the panel.
Moreover, if the hob and oven provide for independent installation, then they will require two sockets, with separate connection points on the distribution panel.
Many people have a question: is it possible to connect an electric oven from an existing regular outlet that was previously installed in the kitchen for a kettle, microwave, etc.?
- It is possible, the main thing is that 3 conditions are met:
- the oven must have a power of no more than 3.5 kW;
- the socket is connected with a three-core copper cable from the panel with a cross-section of at least 2.5 mm2;
- in the electrical panel, replace a conventional circuit breaker with a thermal release with a differential circuit breaker with a rated current of no more than 16 A.
According to the third condition, some may experience inconvenience and minor problems. As a rule, many people still have one 16 A - 25 A circuit breaker for the entire socket group, plus one more for lighting.
If you replace the only circuit breaker for sockets with a differential 16 A and connect the oven through it, it will be practically impossible to use other electrical appliances while the oven is working and food is being prepared.
Here you will have to make your own choice, either in favor of saving (not installing new wiring, a separate outlet, etc.), or in favor of comfort and convenience. It is not recommended to leave a regular modular machine in the panel without protection against leakage currents when connecting the oven to an old outlet.
The installation height of the new socket under the oven should be no more than 90 cm from the floor. Although it is also often placed at the level of the kitchen legs.
The most important thing here is ease of use. For safety reasons, when wet cleaning and wiping the oven with a wet cloth, it must be disconnected from the power supply.
And crawling under the very bottom of the kitchen every time to pull out the plug is not always convenient. In addition, here you need to take into account possible situations such as water leaks and kitchen flooding. Therefore, the socket should still be raised 5-10 cm above the floor.
The main requirement for placing the outlet is not to place it directly behind the oven. You can install it on the left, on the right, or as mentioned above - under it, directly near the floor.
When you have decided on the location of the outlet, you need to connect it.
Connect the phase and neutral cores of the cable to the outermost contacts of the socket
In this case, it does not matter at all where the phase will be located, and where the zero is - on the right or on the left. Connect the grounding conductor (yellow-green) to the grounding terminal (usually the middle one)
Replace the frame or decorative cover.
Wiring Requirements
Particular attention should be paid to the quality of electrical wiring, on which the safety and correct functioning of the entire system depend.
The following factors are taken into account: The oven and hob are connected via grounding. The plug or socket for the oven must have 3 or 5 contacts (in the first case for a 220 Volt network, in the second - for 380 Volts)
In the tasks of the old building, this condition was not always adhered to. However, modern requirements are different, so a new cable will be required. Electrical wiring is connected to the distribution box only through an RCD (residual current device). Low-power equipment (up to 2.5 kilowatts) is connected to the existing electrical network (if it meets modern requirements). To connect powerful equipment you will need a dedicated line.
The optimal cable cross-section is 6 square millimeters. A wire with this cross-section will withstand a long-term load of 10 kilowatts. The recommended protection class for the machine is C32. If the panel power does not exceed 8 kilowatts, a cable with a cross-section of 4 millimeters and a circuit breaker with protection class C25 will be sufficient.
The correct choice of cable is VVGng or NYM. When purchasing a cable, take into account the diameter of the conductor. For a wire with a cross-section of 4 millimeters, the diameter will be 2.26 millimeters, and for a 6 mm conductor - 2.76 millimeters.
The data for the residual current device is one point higher than the rating of the circuit breaker. For a 32 Ampere device you will need a 40 Ampere RCD.
Connecting the socket
Connecting an outlet does not require any specific knowledge. You need to start installation by disconnecting the power supply. To do this, you need to turn off the circuit breaker of the group in which you want to install the outlet.
Installation of the internal socket is carried out as follows: first you need to unscrew the decorative cover, loosen the cable clamps on the product itself, and then connect the wires, holding them tightly with screws.
At this stage of installation, it is important to consider the polarity of the connection. It is important to remember that the ground wire (yellow or yellow-green) is clamped in the middle, and the connection of the phase wire (white or brown) and neutral (blue) is not standardized. They can be connected from any side, since “Schuko” type sockets and plugs are not phased and can change their position.
Important!
After connecting the wires to the socket, be sure to check the quality of the contacts by tugging them slightly. Poor contact under heavy loads can cause wires to heat up and materials to melt.
If everything is in order, then you can attach the decorative cover, turn on the power and test the operation. The plug of the electrical appliance must move freely into and out of the socket contacts.
Connecting multiple outlets
When installing multiple outlets in a group, only connect one outlet to the power cable.
The rest are connected by jumpers to each other along a chain. With this connection option, you can significantly save on cables and preparatory work; for example, you will not need to make additional grooves in the wall. Note!
According to the PUE, when connecting sockets in a daisy chain, it is prohibited to break the PE (grounding) contact. In the first socket box, the grounding wire from all sockets is connected using terminals, twisting and soldering (cold twisting is prohibited!), welding or crimping with sleeves.
Installing a power outlet
As a rule, installing a power outlet involves connecting more powerful consumers, for example, a hob, oven or dishwasher. The power outlet is connected directly from the electrical panel; it must withstand at least 25 Amps and be powered by a cable with a wire cross-section of 4x2.5 mm².
If the electrical network of your private house or apartment often experiences changes in mains voltage, then to protect critical household electrical appliances, it is advisable to use a voltage stabilizer, which can be connected immediately after the circuit breaker, thereby ensuring a continuous supply of high-quality mains voltage to the installed sockets.
CONNECTING THE ELECTRIC STOVE INTO THE OUTLET
Initially, most electric stoves have a power cord, at the end of which there is a 32A - 40A power plug, the type common in our country.
If you already have a corresponding socket installed on your kitchen wall (see image below), you just need to plug the plug into the socket and push the electric stove into place, and that’s where the whole connection will end.
But, unfortunately, things are rarely that simple. The fact is that in the kitchen, to connect an electric stove, there is often only a cable outlet, sometimes it is hidden in the junction box, but usually there are just wires sticking out of the wall. In addition, the outlet or socket for an electric stove is not always located where you need it; read about how you can easily move it yourself - read HERE.
In addition, the plug installed on the stove may not fit your outlet on the wall, because there is no single, unified standard for power connectors for kitchens. Often, even identical connectors from different manufacturers do not fit together. Let's figure out how best to perform installation in such conditions.
How to choose a socket and plug for an electric stove
An important point is the correct choice of power outlet for the electric stove. They are classified according to several criteria:
- Technical and operational characteristics.
- Installation method.
- Design and size.
In terms of technical characteristics, they differ from each other in terms of the maximum permissible power and the strength of the connected electric current. There are three options for installing the socket:
- Hidden, they are internal.
- External, or overhead.
- Combined.
Hidden modifications are installed inside the wall, in specially made recesses. When installing them, special fastening devices are used - socket boxes. Overlays are installed directly on the wall, without being buried into it. They are used, in particular, in wooden houses, where the installation of hidden sockets is prohibited for fire safety reasons. Combined options can be mounted both hidden and externally.
We recommend reading: “Connecting an induction hob according to the diagram.”
The design of the socket for connecting an electric stove differs from the usual ones used for other household appliances. This concerns the shape and number of holes for the plug. The power plug for an electric stove has special standards: three flat-shaped plugs for a single-phase network, and five round plugs for a three-phase network. When purchasing a device, you should pay attention to ensure that the socket and plug fit together perfectly.
As an additional option, sockets for hobs can be combined into one block with conventional sockets. This is convenient if, in addition to the electric oven, you need to simultaneously connect a hood, microwave, or other kitchen appliances. They can also be equipped with a hinged cover that protects live terminals from accidental ingress of moisture. There are also modifications equipped with an internal overload shutdown device. Here it acts as a backup element of the RCD installed in the electrical panel.
Wiring Requirements
According to the requirements of regulatory documents on electrical safety (PUZ - rules for electrical installations), bathrooms belong to the category of high-risk premises. It is generally prohibited to install sockets in them, but an exception is made for domestic premises if certain requirements are met. One of the requirements states that wiring in the bathroom must be done only in a hidden way to prevent direct water ingress.
Socket for washing machine in the bathroom
The cross-section of the wires must be designed for the current consumed by the washing machine with some margin.
Since the current value is usually not indicated in the passport data, you can calculate it yourself, knowing the power of the device using a simple formula:
I=P/U,
where P is the rated power of the washing machine,
U is the network supply voltage.
For example, if the power of the washing machine is 2.2 kW, then the current consumption will be 10 A.
This is quite significant. A wire that is too thin will overheat until the insulation melts and burns out.
Many sources provide voluminous tables to determine the permissible wire cross-section, but most of the information in them is unnecessary. With sufficient accuracy, you can calculate the wire cross-section at the rate of 2 kW of power per 1 mm2 of copper wire. Thus, to connect a washing machine with a power of up to 5 kW, it is enough to take a copper wire with a cross-section of 2.5 mm2 or an aluminum wire with a cross-section of 4 mm2. If an additional boiler or other powerful load is installed in the bathroom, then the cross-section must be taken larger, again, based on the total power consumption.
The best option is to lay a separate cable for the washing machine socket. If this option is chosen, then only copper wire should be used for work, since aluminum is needed with a larger cross-sectional area. This cable is quite rough, rigid, and difficult to work with. And most importantly, its strength is much less than copper, which, even being multi-core, is very difficult to damage, even without much experience in installation work.
Note! The examples and recommendations refer to the cross-section of the wire, not its diameter! You can determine the cross section, knowing the diameter, using the well-known school formula. For stranded wires, the total cross-section is the sum of the cross-sections of all elementary wires
To install the wiring, you need to use a three-core electrical cable. The colors of the veins may be different, but one of them will definitely be yellow with a green longitudinal stripe. This is the grounding conductor.
Choosing a power outlet for an electric stove
When choosing 220 V power sockets to connect an electric stove, you must be guided by two criteria. The first one is the power of your equipment:
- with a power consumption of up to 7 kW, it is advisable to use products with a rated current of 32A and a permissible short-term load of 63A;
- if the power of the electric stove is more than 7 kW, then it is better to choose a “plug-socket” kit designed for a current of 63A.
The second selection criterion is the type of power supply entering your home or business. The power line can be single- or three-phase. The most common type of connection is single-phase. Sockets designed for a single-phase power network have three connectors - two for the plug and one for grounding. If your home is connected to a three-phase network, then the power outlet for the electric stove should have five connectors.
Is it possible to connect two kitchen appliances to one power socket?
With proper electrical wiring, these devices are connected to the terminal for the electric stove. Often, craftsmen resort to cutting off the plug from the oven and connecting the device to the electrical network using terminals. The disadvantage of this method is that in this case the warranty on the oven is lost due to damage to the plug.
Another way to connect these two devices is to install an additional socket on the oven and on the hob separately. But this must be foreseen at the repair stage. Not all homeowners think through such things at the renovation stage, without planning the location of the furniture in the kitchen.
The third method can solve these inconveniences simply. In this case, there is no need for preliminary preparations, installing auxiliary sockets or damaging the plug feeder. In this case, there is no need to remove the power feeder. To connect the hob and oven, a compound socket is used, which combines a power connector for an electric stove and a classic European socket for an electric oven.
This socket model is superimposed on top of the standard one. A dilemma arises: what cable is needed to connect it? The answer is a regular electrical cable for a cooking device, where you can immediately connect a baking cabinet, but its power cannot exceed 3 kW. Simply put, they are connected to one cable.
The factory feeder is equipped with marked conductors: white, blue and yellow-green. To power the oven electrically you will also need:
- Socket box.
- Socket for electric oven.
- Plug (not included in the set).
To avoid the possibility of electric shock, control is entrusted to the circuit breaker and RCD. It is better to purchase it in advance for the shield. If it is necessary to connect the oven and hob, use a differential switch that can withstand the total load. The socket should be installed at an optimal and accessible height (one meter from the floor), but it should not be installed behind the oven. The best option is on both sides of the device.
Requirements for connecting an electric stove
Almost all electric stoves, regardless of the variety of models and brands, are connected in the same way. The difference is insignificant when turning on electric stoves for 220 and 380 V.
Primary requirements:
- The need to lay a separate electrical line using stranded copper wire with a cross-section of 6 mm or more to withstand significant loads;
- Supplying the line with an auxiliary automatic fuse in the panel with a power of 25 to 40 A. In this case, the automatic device must have a current parameter greater than the same parameter of the electric stove by 1 rating to prevent critical loads;
- Supplying the power connection line with a differential automatic device or emergency shutdown;
- Correct switching is carried out directly in the absence of a power cable - then the wiring is pulled from the automatic fuse to the electric stove without additional connections, reliably and safely through the terminals to withstand heavy loads - this connection is not detachable and the electric stove is de-energized when the machine is turned off, or through a specially designed power outlet - grounding is required;
- The parameters taken into account are phase, zero and grounding.
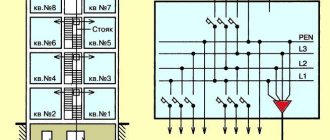
Connection diagrams for sockets in the switchboard
The first step in installing a power outlet is preparing the electrical panel for it. According to safety requirements, the kitchen stove must be grounded. This is necessary because it belongs to high-power household appliances, and is also operated in conditions of high humidity, and its contact with various liquids is always possible.
In modern residential buildings, according to SNiP rules, electrical wiring must be equipped with grounding. But in old buildings it may not be present, since until the 50s there was no such mandatory requirement in building regulations. In such a situation, you should invite a specialist for consultation and grounding installation.
Connection diagram for an electric stove in the switchboard
All three wires - zero, phase and ground - are led out to the electrical switchboard, which is located either directly in the apartment or on the landing. But before connecting the power cable to the socket for an electric stove, a safety circuit breaker is installed in the panel room - an RCD (residual power cut-off device).
Installing a socket directly, without an emergency circuit breaker, is prohibited due to the risk of a short circuit during peak load.
The basic requirements when preparing to install an outlet for a hob are as follows:
- The electric furnace must be powered by a separate wiring line, which is due to the high power of this household appliance. Otherwise, there may be an overload that can lead to heating of the cable and a short circuit.
- The wiring line leading to the stove outlet must be provided with a separate emergency shutdown device.
- The triggering threshold of the RCD is selected so that it is somewhat the maximum power of the electric furnace. Most often, emergency circuit breakers are used that are designed for a load of no more than 40 amperes. If the trigger threshold is too low, the RCD will turn off when all stove burners are turned on. A device designed for an excessively high load may not work if there is a short circuit, which can result in the stove failing and even causing a fire.
- The power cable running from the switchboard to the socket for the electric stove is taken with a minimum core cross-section of 6 mm2.
- According to the PUE rules governing the installation of electrical equipment, the cable for the power outlet must be copper. The use of aluminum wiring for such purposes is prohibited.
- The cable running from the panel board to the electric stove must have three cores for a single-phase 220V network (standard version), four for a single-phase 380V network, or five for a three-phase 380V network.
- Based on the power of the cooking stove, the design of its plug and the characteristics of the home electrical network, a specific type of outlet is selected.
Connection diagram for a 220 electric stove without a plug and socket. Modifications of cables used for an electric stove and the conditions for their use are given in the table.
| Cable marking | Number of phases | Mains voltage |
| PVS 3x4 | one | 220V |
| PVS 4x4 | one | 380V |
| PVS 5x4 | three | 380V |
Types of wires
In the case of the wire brand, the best solution would be the PVS or KG option. The first type stands for vinyl connecting wire. This product has copper conductors, each of which is protected by insulation and all of which are contained in a white sheath. Such a power wire can withstand voltages up to 450 V, and the insulating material does not burn, which allows the wire in question to be heat-resistant.
It is also characterized by high strength and excellent bending resistance. It can even be used in unheated and damp buildings, where it will last 6–10 years, depending on operating conditions. Excellent for connecting electric stoves.
If we talk about wire type KG, then its name stands for flexible cable. Its shell is made of a special type of rubber. In addition, the same sheath protects tinned copper conductors. Between the wires there is a special film that performs a protective function. It must prevent the wires from sticking together due to heat from use.
Typically, a KG wire contains from 1 to 5 cores. As you can understand, the core cross-section determines the power that the cable can withstand. This cable is operated in the temperature range from -40 to +50 degrees. The KG cable can withstand voltages up to 660 V. Typically, this wire has the following designation: KG 3x5+1x4. This means that there are 3-phase conductors with a cross-section of 5 square meters. mm, and one grounding conductor with a cross section of 4 sq. mm.
Regardless of which wire will be selected to connect the electric stove, it should be purchased with a reserve length so that the product can be moved. In addition, the wiring running inside the room and at the entrance to the apartment must be of high quality, which should also be checked before starting the connection.
Socket installation
After connecting the plug to the electric stove, you can begin the actual installation of the socket. For a device with one phase, the phase, neutral working and grounding wires are connected, the left terminal becomes phase, the right terminal becomes neutral, and the bottom one serves to connect the grounding cable.
Connecting a three-phase power outlet is more difficult, because, as we already know, it contains 5 contacts. We connect the phase terminals to the three contacts located in the same line, the neutral terminal to the terminal located at the top, and the protective ground wire at the bottom.
If you decide to independently install a power source for an electric stove, be sure to thoroughly study the main stages of this process, carefully understand the connection diagram, and strictly follow the safety requirements.
By taking the electrical installation process seriously, even a person who has no experience working with the electrical network can handle the job safely and correctly.
Installing a socket for an electric stove
Having decided to install the equipment yourself without calling a specialist, you need to study detailed recommendations on how to install an outlet on your own for an electric stove. After taking into account all the recommendations for choosing a socket set for connecting an electric stove, it is possible to begin independent installation. It is important to take into account that the schemes for connecting the set for electric stoves 32A and 40A to a 220V and 380V network have certain differences.
Removing an old socket for an electric stove
Having decided to install a socket for an electric stove with your own hands and having collected everything you need, you can begin to act. To do this, after turning off the power at home, you should dismantle the Soviet socket:
- unscrew the bolt in the center of the socket;
- remove the housing;
- engage the screws securing it to the panel;
- remove the screws that secure the wires to the terminal blocks;
- remove the fastening locks, removing the wires from the pipe;
- insulate the wires and remove the chipboard panel to which it was attached.
Preparing to install a new power outlet
In the process of preparing to connect a power outlet for an electric stove, the main thing is to take into account all safety standards, since its installation involves connecting to an electrical network, which means that any mistake can lead to irreparable consequences.
It is equally important to take control measures regarding power outages. For this, a voltage indicator is used - with this device it is important to check the absence of current in all wires.
Next, you should prepare the socket and plug of the electric stove - unscrew the terminal screws, prepare the wires of the required type and then strip them, select the type of cable.
Choosing a location for the power point
Once the cable has been selected, you need to decide on the installation location in the kitchen. If the kitchen is just at the stage of arrangement, then you should initially sketch out its sketch and determine where the equipment will be located in order to connect the power outlet for the stove in the right place.
In this case, you should plan a separate connection for each unit of kitchen appliances, plus two inputs on each side of the work surface.
It is also important to take into account the level of placement of the equipment - if the equipment is constantly turned on, then you can place the socket below the baseboard using a hidden option for installing the socket. But in case of constant disconnection, such placement will be inconvenient, then it is better to place it at the level of the lowered hand.
Interesting: it is very convenient to place a separate outlet for an electric stove, for example, the Legrand brand, in a cabinet with a hinged door, so it will be securely hidden both from view and from small children.
Power plug connection methods
Instructions on how to connect an electric stove step by step to a single-phase 220V and three-phase 380V outlet are contained in the following paragraphs:
- Initially, you should remove the cover from the back panel of the equipment and free access to the terminals.
- Connection occurs with single-color contacts if there is a color marking.
- Installation of jumpers in the space between the terminals, sometimes replaced with wire loops of the required diameter up to 6 mm, if a phase with a power of 220V is used in an electric stove and a plug equipped with three terminals.
- Installation of the ground wire on the top terminal of the adapter, if the plug is equipped with a corresponding contact.
- If you need to move the socket for an electric stove to a new location, you should take into account the wiring diagram. In this case, you may need to use an additional outlet with the installation of a socket box and the use of instructions on how to make a new socket for an electric stove.
If a three-phase power connection is used, then the connection diagram is slightly different, since both the plate and the plug have 5 pins:
- when using a voltage of 380V, it is necessary to connect the wires from the plug to the contacts on the rear wall of the oven L1, L2 and L3;
- In this case, jumpers are not needed; if present, they must be dismantled;
- the connection takes place according to the classic version.
Specifics and sequence of connection
After connecting the plug, you can install the socket for the kitchen electric stove:
- if there is only one phase, then the phase wire is the left wire, the neutral wire is the right wire, and the ground wire is the bottom wire;
- The three-phase connection is as follows: the phase terminals are connected to three contacts in one line, the neutral terminal is connected to the upper terminal, and the protective grounding terminal is connected to the lower terminal.
It is important to consider the following recommendations:
- It is better to use invoice equipment;
- It is better to use stranded copper cable;
- connection should be made according to the instructions in compliance with safety measures;
- The cable must be directed to the circuit breaker of the electrical panel 40A.
If the equipment is hidden, then the following standards should be observed:
- place it at a level of 10–12 cm from the floor;
- 60 cm from equipment;
- punch through the grooves and recess;
- fix the corrugation and install the socket box;
- finish the finishing work and install the device in the appropriate place.
Important: the horizontal position and general level of the wall must be observed.
Socket selection
According to technical standards, the electric stove must be plugged directly into an outlet. Connection via an extension cord is prohibited for electrical safety reasons. To connect an electric stove, you cannot use a regular outlet, since it is not able to withstand a high load. For high-power electrical household appliances, special sockets are required, designed for a power of 7 kW or more. When choosing such an outlet, you need to focus on the maximum rated current value.
Power sockets can be made of carbolite and high-quality plastic. Sockets of the first type are available only in black and have a lower cost. Plastic sockets are made mainly in white. They are of high quality and have a high level of wear resistance, which is why they are more expensive than carbolite ones.
Power sockets are available for open and hidden installation. If the socket is installed directly behind the stove, which is located near the wall itself, then it is better to use a model for hidden installation, in which the working mechanism is completely hidden in the wall.
It is also necessary to take into account the number of phases in the home network and the presence of a grounding contact in the outlet.
When starting to install an outlet, you must first turn off the power supply to the apartment. Then, using a puncher, a hole is made in the selected location for the socket glass. A power wire is threaded into the socket box, from which the protective braid is removed. The ends of the freed wires in multi-colored insulation are carefully stripped to a length of up to one centimeter. Then they are connected to the contacts of the socket.
It is very important to connect all wires correctly. The yellow-green wire must be connected to the grounding contact of the socket, which is located in the center, and the phase and neutral wires are connected to the outer contacts
It is very important that when connecting an outlet, the zero must be on zero and the phase on phase. Otherwise a short circuit will occur. Therefore, you need to very carefully check the correctness and quality of the wire connections. After checking, the socket box is tightly fixed in the wall using gypsum or alabaster mortar. Finally, you need to check the operation of the outlet and connect the stove itself.
Sometimes it is not possible to install a power outlet for an electric stove. In this case, the stove can be connected to the power cable directly. The cable is placed in a junction box and all its wires are connected to the corresponding terminals of the block. In some cases, the box is not used and the power cable simply comes out of the wall.
When connecting the stove to a cable without an electrical outlet, you must unscrew the plug on the stove's power cord. Then the cut end of the cable is inserted into the plug body and all its wires are connected to the wires of the cord. In this case, you must carefully ensure that the wires are the same color, that is, the blue wire of the stove's power cord is connected to the blue wire of the power cable, yellow-green to yellow-green, and red to red. Of course, all work related to connecting electrical equipment should be carried out when the home power supply is turned off.
Connecting the stove directly to the electrical cable is considered more reliable, since in this case there is a minimum number of contact points, which increases the reliability of the connection. But this method is not entirely convenient, since you can only turn off the power supply to the stove using a machine.
In the case when the apartment already has an outlet for an electric stove, it is necessary to check where the phase, neutral and ground are located and connect the wires in the plug accordingly. To determine the phase in the socket, you can use a voltage indicator in the form of a screwdriver. This is done quite simply: the indicator is installed in the place of the expected phase. If the LED on it lights up, it means there is voltage and this is a phase. If the LED does not light up, then there is no voltage and this is zero. Land is defined even more simply. This is usually the contact at the bottom or top of the socket.
Distinctive features
When choosing the right socket for your stove, you need to focus on the maximum rated current value.
Standard sockets for an electric stove are not suitable, as they are not designed for a large load. They must be connected taking into account the maximum power consumption, which can reach 8 kW. Conventional household points that are installed in an apartment are marked 16 A and can safely provide energy to consumers with a power of up to 3.5 kW.
The power socket for the stove has the following features:
- Large thickness of conductive contacts. May be 2-3 mm depending on the design load. The metal in power sockets and plugs for electric stoves has high strength, hardness and elasticity.
- Presence of a grounding contact. Necessary due to the fact that during operation there is a possibility of electricity leaking into the housing. Since conventional clamping antennae are not designed to handle high current, contact is made using a pin and a separate hole.
- More durable body. Sockets for the stove are made of fireproof polymer plastic, which does not lose strength when heated. The case is durable, shock and pressure resistant.
Depending on the voltage supplied through the cable, the socket may have 3 or 5 holes. The quantity is determined by the number of phases and the presence of grounding. A standard 380-volt outlet for a stove has 5 contacts, of which 3 are for connecting phases, and 2 are for neutral and ground. But this option is practically never found in apartments; similar decisions are made for arranging industrial premises.
Schemes and methods of connecting the stove
If the electric stove is not supplied with an electric power cable, you will need to supply it yourself, for which you remove the rear protective cover of the kitchen equipment, which is bolted.
In this case, single-phase (220 V), two-phase or three-phase (380 V) connection is possible. To find the wire connected to the phase, an electrical tester is used, which allows you to ring the network.
Marking of terminal clamps at the plate:
- L – phases;
- N – zero;
- And grounding, marked with a special sign PE.
If there are no jumpers between the terminals for single-phase and two-phase connections, they are made from small cable pieces.
Connection to a single-phase network:
The location of the contacts in the electric stove for turning on the wire is under the protective panel.
A three-core cable is selected: 1 core - coffee, gray or black phase wire, 2 - blue or cyan neutral, 3 - yellow-green ground.
The electric stove has more connecting contacts
Paying attention to the markings of the terminals, the cable is connected.
If there are several “L” and 1st phase terminals in a single-phase network, use jumpers supplied with the electric stove.
Initially, grounding is connected to the “PE” terminal, and after zero to “N”. If there are several terminals, use a jumper to connect the wires to each other and a blue wire is connected to one of the terminals.
The phase connection is carried out last - connecting all terminals marked “L” with a jumper and after connecting the phase wire.
Connection to a two-phase network:
- It is rare and desirable to use a four-core cable: 2 conductors for phases, the other 2 – neutral and ground.
- First, the ground connection is made.
- Then, using a jumper for the zero terminals, the zero is connected.
- If there are three phases in the electric stove, two of them are connected by a jumper and connected to one of the outputs of the first phase, and the remaining one will become the second phase wire.
Connection to a three-phase network:
- You will need a five-core cable: three wires for phases, the other two for grounding and neutral.
- Initially, grounding and zero are connected; if there are several neutral terminals, they are first closed with a jumper.
- Each phase is connected to the three phase terminals separately.
Connecting an electric stove
Previously, you already found out which single-phase or three-phase scheme is used to supply electricity to your home. In Soviet-built houses, a single-phase circuit is more often used, while in modern new buildings a three-phase circuit is used. Based on this information, you selected a cable to power the electric stove.
Many electric range manufacturers provide three main types of wiring diagrams on the back panel. Choose yours and get to work.
The most common type of connection for household electric stoves is from a single-phase 220 V network.
The plug used for this connection has three pins under:
- phase wire;
- neutral wire;
- ground wire.
It is important to maintain the alignment of the connection.
Connection diagram to a single-phase network
To connect to a three-phase 380 V network, the plug has 5 pins:
- phase - 3 outputs;
- zero;
- grounding.
Algorithm of your actions:
- Familiarization with the connection diagram.
- Connecting the plug to the plate.
- Remove the cover of the back wall of the device and remove the protection.
- In front of you is a row of terminals. Color and letter markings can be applied.
- We carefully monitor the compliance of markings.
- We combine only colors of the same name.
When installing a single-phase network:
- connect terminals L1, L2, L3 to each other (use a jumper) and connect the red phase wire to one of the terminals;
- We also connect terminals N1 and N2 with a jumper and connect the neutral wire to one of them;
- The ground wire is connected to the RE terminal.
When installing a three-phase network:
- dismantling factory jumpers;
- terminals L1, L2, L3 are directly connected to the phase wires;
- We connect the neutral and ground wires by analogy with single-phase wires.
Copper jumpers are usually supplied with the stove, but if they are not available, they can be successfully replaced with copper wire.
Attention! Please note that removal of jumpers installed by the manufacturer is MANDATORY. If this is not done, then there is a high probability of an installation error, and this is fraught with troubles in the form of a short circuit and fire.
The installation of four-pin sockets has a peculiarity - there is no PE wire. Grounding is mounted by combining the “zero” + “ground” wires.
The last step is testing:
- check if there is voltage in the outlet;
- plug the plug into the socket;
- We check the operation of the plate components.
It is quite possible to install a socket for an electric stove with your own hands in 1 hour. As you can see, this is not much more complicated than installing an ordinary socket, provided that you are familiar with the theory and have practical skills in carrying out electrical work. However, the quality of all stages of work and the compliance of all electrical installation equipment with PUE and GOST regulations is the key to your safety.