Dismantling an old chandelier: stages
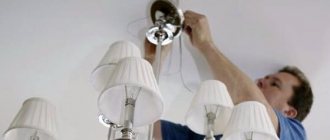
In most cases, apartment owners independently change such equipment suspended on a regular reinforced concrete ceiling. In this case, dismantling the chandelier will most likely include the following steps:
- blackout of the apartment;
- actual dismantling of lighting equipment;
- if necessary, remove the hook.
To de-energize the apartment, you need to turn off the corresponding machines in the panel located in the entrance or flip the toggle switches in the niche for the meter in the apartment. It is, of course, necessary to carry out such a procedure. Otherwise, you may receive an electric shock during the work process.
How to change a chandelier on the ceiling: dismantling technology
To remove old lighting equipment, you should:
- stand on a stepladder and lower the decorative cover, under which the twisted wires and hook are hidden;
- cut the wires and remove the old chandelier from the hook.
When replacing a chandelier, the mounting hook is most often left in place. Subsequently, new lighting equipment is attached to it. However, there are also lampshades on sale today, the installation of which must be done on a special strip. If you plan to install just such a chandelier in your house, the hook, of course, will also have to be dismantled. Otherwise, it will simply interfere with the installation of a new lighting fixture.
To remove the old mounting hook, you must first gouge out the plastic plug that it is attached to. Next, you should unscrew this element itself from the plate. If you decide to leave the hook, it should still be checked for strength. To do this, you just need to pull it harder. If the hook is loose or loose, it should also be removed. Next, you need to mount either a mounting plate on the ceiling with dowels or a new hook on a plug, depending on the type of chandelier purchased.
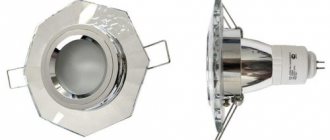
How to change a light bulb in a spotlight on a suspended ceiling
Depending on the type of socket, light bulbs are removed differently. Let us consider in detail the replacement process for each type of base. Before starting work, it is better to turn off the power supply at the panel, otherwise there may be an electric shock.
It is not very convenient to remove light bulbs of this type from spots, since the outer part is recessed into the lamp body and is located above the plane of the stretch ceiling. In the lampshades they are held in place using a special retaining ring or a wire clamp with antennae at the ends. Such lamps are compatible with LED and pin-type halogen elements.
To change a light bulb with a G5.3 socket, you need to squeeze the two antennae and pull out the fixing bracket. If a retaining ring is used as a retaining part, it is simply unscrewed. The lamp falls out. Then you need to disconnect it from the contacts by pulling it towards you. After this, a new lamp is connected, inserted into the lamp body and the fixing ring is installed in place.
Sometimes the retaining ring does not fit back in after replacing the light bulb. This happens for several reasons:
- the body is deformed - it will have to be replaced;
- the ceiling is fixed too high and the base rests on the concrete base - you need to purchase a lamp of exactly the same size, a difference of 1 mm can cause a problem;
- The fasteners are the wrong size - this happens if you had to unscrew several light bulbs and the rings were mixed up.
In luminaires with a GX53 base, the lamps protrude beyond the ceiling by 3-4 mm. On their back side there are two contact pins that are inserted into the corresponding grooves on the body of the lighting fixture. Dismantling is carried out by turning the lamp counterclockwise until it clicks, then it is simply pulled out.
Replacement is very easy; there is no need to install fixing parts or disconnect wires. Simply insert the new lamp and turn it clockwise.
G4, G9
The design feature of such lamps is that the body protrudes beyond the plane of the ceiling. LED and halogen pin-type models are available with G4 and G9 sockets. To dismantle the lamp, just pull it down. Then simply insert the new one into the groove. There is no need to rotate the lamp. In some models, you first need to disassemble the spotlight, namely, unscrew the decorative diffuser.
E14, E27
Such lamps are changed in the same way as in a regular chandelier or sconce.
Holding the flask, carefully unscrew it counterclockwise. Then screw the new one in until it stops, but without effort.
Sometimes the light bulb is difficult to grasp with your fingers, in this case you can use masking tape.
Installation of new equipment
The answer to the question of how to change a chandelier on the ceiling is actually a fairly simple technology. After the old lampshade is removed from the ceiling, you can begin hanging the newly purchased one. This operation is also performed in several stages. After installing the hook or strip:
- carefully clean the ends of the wires protruding from the ceiling;
- spread them apart;
- turn on the machine in the dashboard;
- check each wire using an indicator, thus determining the polarity;
- turn off the voltage again;
- Mark each wire with electrical tape of the appropriate color.
Next, the new chandelier itself is hung on a hook or bar using pins. At the final stage, guided by the diagram provided by the manufacturer, connect the corresponding wires of the lighting device to the cables marked in the previous stage. After this procedure is completed, the chandelier is checked for functionality. If the light turns on correctly, secure the decorative cover in place.
Types of chandeliers
Looking at any catalog of electrical appliances, you will find that chandeliers differ from each other not only in design. According to the method of fastening, they are divided into two types:
- ceiling;
- hanging.
With hanging ones, everything is more or less clear - the entire structure is hung on a hook or bar, sometimes you can reach the lampshades even from the floor, and it’s quite easy to figure out how to remove it.
Important! The main disadvantage of such lamps is that a tall tenant can easily knock down the lampshade with any careless movement. However, the length of the suspension in many models is adjustable, so you can always choose something suitable.
With ceiling models the situation is much more interesting. From below, sometimes you can’t see what is attached where and with what fasteners:
- on thread;
- on screws;
- on the latches;
- onto the spring plates.
In order to figure out how to remove the shade from a chandelier, you first need to understand what it is supported on. If for threads or latches, no additional tools are required. If the screws are visible, you will need a screwdriver, most often a Phillips head, but sometimes with a flat blade.
How to change a lamp
In ordinary chandeliers in apartments and houses, even today, in most cases, simple incandescent light bulbs are used. A feature of the latter is, among other things, a short service life. Accordingly, many owners of houses and apartments are also interested in how to change a lamp in a chandelier with their own hands.
Carrying out such a procedure, of course, will be extremely simple. To do this, turn off the power, and then unscrew the burnt out lamp from the chandelier and screw in a new one. This operation should be performed with thick gloves or using a napkin folded several times. A feature of incandescent light bulbs is, among other things, that during operation they can become very hot.
Hanging chandeliers
In order to remove the lampshade, such a chandelier does not need to be disassembled. A stepladder is also not necessary - if the lamp does not hang very high, you can reach the horns from the floor or from a strong chair.
Important! Since you are not going to bother with wires, there is no need to turn off the power in the entire apartment either - just turn off the lights in the room.
Open shade or horn
This is the simplest option. The light bulb can be unscrewed without difficulty, and you can clean such a lampshade without disconnecting anything. The main thing is to turn off the power supply, wipe the horn with a slightly damp sponge, wipe thoroughly and dry well. The need to disassemble the structure occurs relatively rarely.
Important! As a rule, the horns are screwed into the base without any screws. To remove the part, you need to turn it counterclockwise while pressing lightly. You should not use much force; a crystal or glass piece can be damaged if you do not handle it delicately enough.
If the lamp is closed
A pendant chandelier may also have closed arms, and they have to be removed if any trouble occurs with the light bulb. And such elements also need to be washed periodically, including the inside.
The algorithm of actions is almost the same as for a device with open horns:
LED lighting behind the baseboard
- Turn off the power.
- Turn the lamp counterclockwise.
- Take it off.
- Replace the lamp if necessary.
- Wash the lampshade with detergents intended for this material.
- Wipe thoroughly.
- Screw it in, carefully inserting it into the base and turning it clockwise.
Important! Do not screw the lamp too tightly, otherwise it will be difficult to unscrew it later without damage.
Chandelier on a suspended ceiling: rules for choosing
Sometimes apartment owners are also interested in whether it is possible to change the chandelier on a suspended ceiling themselves. This procedure will also be easy to perform with your own hands. But when replacing chandeliers on suspended ceilings, you still need to follow some rules.
Firstly, it is believed that only lighting fixtures without sharp edges are suitable for such a coating. Also:
- the base of the tension lamp should be made of plastic, not metal;
- the lamps of the chandelier should be directed in the direction opposite to the covering;
- The length of the suspension of a chandelier with an incandescent lamp should not be less than 15-25 cm.
Unfortunately, the last rule can be difficult to follow when choosing lighting equipment for suspended ceilings. In most cases, modern chandeliers are designed in such a way that after installation the lamps are practically pressed to the ceiling. Therefore, for such coverage, home owners usually choose lighting equipment with LED elements that do not heat up during operation.
Removing a chandelier from a suspended ceiling
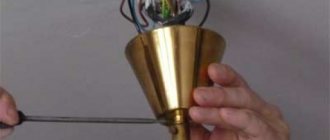
When removing an old lamp from the ceiling to replace it, you should pay attention to the way it is attached to the floor slabs and decide whether it is worth using the same fastening device. There can be two design options: a threaded hanging hook screwed into rough concrete or a strip with several pairs of screws. If the owners decide to hang a new chandelier in the same place, using the same fasteners, the replacement task is greatly simplified: they only need to switch the wires and hang the lamp.
To remove the lamp from the mounting hook and change it, you need to remove the decorative cap and carefully remove the product by inserting your hand into the hole. Having pulled out the device, you need to carefully disconnect the wires and insulate the exposed ends. You don’t even need a screwdriver to do this job: all actions can be easily performed without a special tool. Removing a chandelier from a cross-shaped strip will require more skill, because such a fastening system itself is much more complex.
Before replacing an old chandelier on a suspended ceiling, you will need to remove all fragile elements from it that could fall and break:
- lampshades;
- glass pendants;
- light bulbs, etc.
After this, you need to use a screwdriver to unscrew the nut or locking screw holding the protective cap. The fastener itself is hidden there. The pendants to which the lamp clings are screwed to the concrete base using screws. By unscrewing them, you can remove the entire structure, including the bar, and then disconnect the individual parts. After removing the lamp, as in the previous case, you need to sequentially disconnect all the wires and process their ends. Before this, you can make sure that there is no voltage in one of them by using a special indicator screwdriver.
Dismantling
How to change a chandelier on a suspended ceiling yourself? In this case, the operation of dismantling old equipment must be carried out, of course, as carefully as possible. They remove an LED chandelier using approximately the same technology as simply removing it from a concrete ceiling. The only thing is that in this case you will have to work through a hole in the PVC film. Remove the decorative cover from the old chandelier under the covering, cut the wires, strip their ends and move them apart. Of course, the home network is first de-energized. Then check the strength of the hook or the structure of the bar. If necessary, change these mounting elements. Next, a new chandelier is hung on the ceiling.
Repair of a table lamp socket
How to change a chandelier with your own hands: advice from an expert
During the repair process, I discovered that the Euro sockets, famous for their ease of installation, are not as reliable as they claim. In particular, in the socket that was previously in my table lamp, the “petals” for connecting the current-carrying wires have become almost completely unusable. For clarity, I suggest you look at the photo:
But I didn’t panic and immediately decided to borrow a socket from a foreign-made chandelier, which, like my table lamp, was in the closet. However, to my great surprise, the “petals” of this cartridge were in an equally deplorable state. There was only one way out - try to repair the Eurocartridge. After some time of thinking, my head generated a solution: remove the contact “petals”, secure the internal contacts of the cartridge with two M3 screws, and connect the wires to it using the same screws.
In principle, I think that there should not be any particular difficulties with this. However, for those who do not quite understand how to do this, I will explain in more detail. To remove the contact tabs, simply drill out the rivets that secure the tabs. This can be done with a drill with a 4 mm drill or even a simple knife (by picking out the rivet)
Please note: after removing the rivet, the central contact of the cartridge will not be secured and will simply fall out. Don’t lose it, it will be extremely difficult to find a similar contact
The next process for DIY table lamp repair is connecting the electrical wires.
Installation with transfer
How to change a chandelier on a suspended ceiling if a new installation location has been chosen for it? To perform this procedure, the old lampshade is also first dismantled. Next, the suspended ceiling itself is removed for a while. Of course, you should not carry out this procedure yourself. To do this you will need to hire professionals.
After the suspended ceiling is removed, wiring is pulled to the new installation location of the chandelier. Next, hang the PVC film in place. To install the chandelier in it, of course, you will need to make a hole and reinforce it with a plastic ring. After access to the reinforced concrete ceiling slab is opened, a hook is hung on it:
- drill a hole in the ceiling using a hammer drill;
- screw a hook into it (such elements are supplemented with threads);
- secure the hook with a spring latch.
Next, a new chandelier is hung on the ceiling using standard technology. Before performing this procedure, the film must, of course, be carefully leveled in height.
Tips on how to replace a halogen light bulb on a suspended ceiling
If your room has halogen lamps, replacing them will require a little more effort.
Halogen lamps have many advantages. The lamps do not blind a person’s eyes and provide a soft, pleasant light that we easily perceive. As a rule, halogen lamps last no more than 5 years, but this is much longer than that of a conventional lamp.
When replacing a halogen lamp:
- turn off the electricity;
- carefully remove the mount that holds the lamp itself;
- when you see the socket, unscrew the light bulb from it;
- replace with a new model;
- return the mount to its place and secure it firmly.
Thus, replacing any lamp, be it a halogen or LED model, is quite simple.
After all, on one ceiling, all lighting fixtures must be combined. Therefore, do not forget to buy a couple of extra lamps during the installation of the stretch ceiling, so that you can easily replace the burnt one.
If you found the article useful, don’t forget to share it on social networks with your friends.
If a lighting fixture in the suspended ceiling has burned out or started to glow dimly, it needs to be replaced. Some people don’t know how to remove a light bulb, so they resort to the help of a professional. You can do the work yourself. The process is simple, the main thing is to know some subtleties. This article describes in detail the types of light bulbs, as well as how to change a light bulb in a suspended ceiling.
Helpful information
Moving lighting equipment on a suspended ceiling with your own hands will, of course, be problematic. Usually, apartment owners still hire specialists for this purpose. At what price can craftsmen change the chandelier in this case? How much does such a procedure cost with transfer to today? If it is necessary to move the lighting equipment and dismantle the covering with subsequent installation in place, such an operation will most likely cost the apartment owner about 3-4 thousand rubles. If you just need to replace the old chandelier with a new one on a PVC ceiling, specialists will ask for about 800-1000 rubles.
Step-by-step instructions for dismantling the lampshade
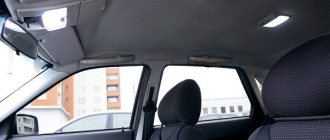
To do this, consider upgrading your interior lighting. The following example shows the replacement of a conventional incandescent light bulb in a lampshade with a more modern and efficient NIGHTON ML-6 LED board. This replacement will be relevant for the interior of Chevrolet Aveo, Daewoo Matiz, ZAZ VIDA with the same type of lampshades. This technology for dismantling the ceiling lamp will be relevant for other brands of cars. Carefully study the external design of the lamp.
Rice. 3. Lamp for dismantling
As you can see, near the switch there is a small groove, highlighted in the figure with a red circle. In order to remove the diffuser, it must be pryed off with any flat object. In this example, you pry up the lampshade with a knife and apply a little force towards the inside of the cabin.
Rice. 4. Pry off the glass with a knife
Please note that the knife should fit easily into the hole, but you will also need enough width. Since the thin fabric creates a large load at the pressure point. Also, you should not apply force only from the edge, since if it slides, the plastic may chip and you will damage the lampshade. Gently press down and remove the diffuser.
Rice. 5. Remove the glass
As you can see in the picture, you will see the lamp itself without glass. In this example, the housing is fastened with bolts on both sides of the ceiling lamp. To remove them, you will need a Phillips screwdriver of the appropriate size.
Rice. 6. Unscrew the mounting screws
To remove the fastening screws, jerking movements are not allowed, which could damage the bolt or cause the screwdriver to slip off. If excessive force occurs, you should first remove the lamp so as not to break it with a screwdriver or damage your hands or eyes from fragments.
Rice. 7. Unscrew the second screw
When unscrewing the second screw, it is better to hold the case with your fingers to prevent it from uncontrolled falling out. Since this can also break the light bulb or damage the housing.
Rice. 8. Take out the light
After unscrewing the bolt, carefully separate the lamp from the casing. At the same time, it should come off easily without any effort. If this does not happen, there may be an additional attachment point that you missed. Then inspect the surface again; you may need to pry it a little to determine the location of fixation.
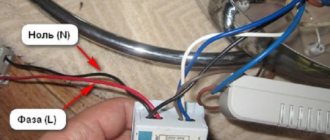
Rice. 9. Power cord
After the lamp is separated from the casing, it is necessary to disconnect the power cord. If they have a plug-in fixation, then it is enough to open them; if they have a bolted fixation, they need to be unscrewed.
Also make a note of which wire goes where, as you will need to reconnect them. In this situation, the power wires for the lampshade are multi-colored and easy to navigate. If they all have the same color, they can be marked with a marker or electrical tape, depending on what you have at hand. The main criterion for such spontaneous marking is that you can easily determine the original location of the wires in the lampshade.
Rice. 10. Removing the lamp from the lampshade
If everything went smoothly for you and you have not yet dismantled the lamp, remove it from its mounting location. In this case, you should not apply force to the glass bulb; if the lamp does not come out freely, pry it out from under the metal clamp near the end.
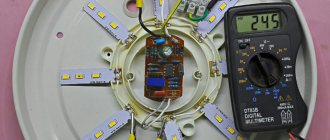
Rice. 11. Installation of LED board
The mounting of the NIGHTON ML-6 board clearly fits the holes on which the lighting lamp clamps were fixed. Screw it with the same bolts as shown in the figure.
Rice. 12. Connect the black wire
The black wire must be connected to the closest of the lamp mounting bolts. As indicated in the instructions for the lighting board.
Rice. 13. Connect the green wire
The green wire is connected to the outermost contact in the connector; it is considered unused. The remaining pins (red and white) are connected to the power connector.
Rice. 14. Connect the wires back
Consider the drawing, the red and white wires are connected to the corresponding terminal block terminals as shown on the left to match their color coding.
Rice. 15. Reinstall the lamp
The lamp is installed in the same slot in the ceiling trim. The fastening bolts are tightened one by one. Please note that a terminal with a terminal is already placed under one of the bolts, so the bolt should fit into its hole, and not past it.
Rice. 16. Reinstall the glass
First, match the protrusions on the diffuser and the holes in the lamp body, indicated by red arrows in the figure. Then place them inside each other and gently press down on the switch side. The diffuser must fit clearly flush with the body.
Rice. 17. Check functionality
After installation, reconnect the battery terminal and test the performance of the lampshade.
Replacing a spotlight
Such elements are often used in apartments when decorating the ceiling with PVC film. And, of course, spotlights on such coatings sometimes also have to be changed. The answer to the question of how to change an LED chandelier on a suspended ceiling is also a fairly simple technology. Do-it-yourself dismantling of old equipment of this type is usually done as follows:
- de-energize the lamp connection line;
- disassemble the junction box and disconnect the wires;
- carefully remove the old lamp.
Next, a new spotlight is assembled. The light bulbs are not screwed into it first. After the lamp is assembled, the actual installation begins. For this:
- open the junction box;
- connect the apartment wiring with the lamp wires according to the diagram provided by the manufacturer;
- crimp the wires and cover them with protective caps;
- Place the wires neatly in the box and cover it with a lid.
Do you always need to remove fasteners?
Recently, stretch and suspended ceilings have become extremely popular. Of course, lamps are also attached to them, and quite often with the help of disposable fasteners like “butterflies”. It is better not to remove such elements. They can last quite a long time even if you change the lamp. But, having disconnected such fasteners, you will not be able to use them a second time - you will have to buy a new one.
Everyone can assemble or disassemble lamps and chandeliers. The main thing is to adhere to the basic principles of working with electricity.
Before starting work on installing the chandelier, you need to make sure that the switch is turned off. To do this, you need an indicator screwdriver, which checks the absence of a phase on the terminal block or both contacts of the cartridge.
IMPORTANT! There are cases when, due to an incorrectly wired distribution box, the switch breaks the zero, and not the phase, touching which is very dangerous.
We invite you to read the instructions for connecting any chandelier with your own hands.