In this article we will give you step-by-step instructions for disassembling the socket. Remember that you shouldn't go into an outlet if you don't fully understand what to do with it. Read the instructions below. Good luck!
When your outlet fails, it becomes necessary to disassemble it. Instructions for disassembling sockets, as a rule, are a standard procedure where all steps are the same, regardless of the manufacturer. However, many modern manufacturers, releasing interesting designer sockets, go to various sophistications, which result in the fact that many elements of the socket are disassembled in a non-standard way. If you have designer sockets, then it is advisable if you use instructions for disassembling them, specifically from the manufacturer. We will tell you about the classic method of disassembling sockets.
Another small digression. If you decide to disassemble the outlet yourself, then first of all, turn off the electricity so that you do not get an electric shock. Never disassemble sockets or switches with the switch on.
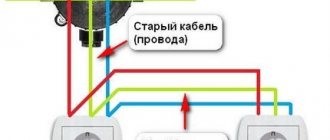
If the steps below to replace the socket did not give a positive result and the new socket also does not work, then you need to look for a broken cable, most likely this will be the problem.
How to change an outlet in an apartment
October 30, 2018
Most owners of not only city apartments, but also private houses have to regularly think about how to replace an electrical outlet. Sometimes this is due to the desire to install something more beautiful and modern, but most often the reason for replacement is the failure of the outlet or its failure to meet modern requirements.
It is not at all necessary that this work be carried out by a professional electrician. Anyone can cope with it if they work thoughtfully, slowly and follow basic safety precautions. And we will try to prove this to you with our story.
How to understand that the socket needs to be replaced
If everything is clear about the aesthetic considerations that prompt you to replace the outlet in the apartment with a new one, then the remaining motives require a little explanation.
As we have already noted, the socket needs to be replaced if it fails. This can be noticed by the following characteristic features:
- burning of holes intended for inserting a plug, or blackening of external elements caused by overheating and sparking;
- significant heating of the outlet when connecting electrical appliances to it;
- damage to the decorative panel or its cracking and melting due to overheating;
- socket falling out of the wall.
It is necessary to think about how to change the outlet in the apartment, whether it is worth inviting a specialist for this or doing it yourself by reading the necessary information or watching the corresponding video, even when you understand that it does not meet modern requirements.
A characteristic indicator of such a discrepancy is, for example, the insufficient size of the holes, which does not allow turning on some electrical appliances. Of course, an adapter-attachment to the fork can temporarily solve the problem.
However, only installing the “correct” outlet will be its final and completely logical solution.
What should you prepare to replace an outlet in an apartment?
Replacing a socket with your own hands cannot be done without tools. You should worry about their availability in advance so as not to be distracted while doing this work. These tools primarily include:
- indicator screwdriver. VIRA brand indicator screwdrivers are very convenient when replacing sockets;
- a regular screwdriver. It is advisable to stock up on both a flat and a cross-shaped model in advance;
- pliers necessary to hold individual elements;
- wire cutters;
- knife for removing insulation.
When thinking about how to change an outlet from an old one to a new one, you should take into account that this work will involve performing some additional operations, which will require:
- drill with a drill bit for concrete;
- chisel with hammer;
- a socket box of a size corresponding to the dimensions of the socket unit;
- gypsum or other similar composition.
How to change the socket in the apartment? Where to begin? How to change - we will talk about this below. You need to start by dismantling the one that needs to be replaced.
Power outage
An important operation preceding the planned work is turning off the electricity. It is quite clear that this must be done for security reasons. There are two ways to de-energize an apartment:
- turn the batch switch or turn off the machine that completely cuts off the power supply to the apartment;
- find a machine that serves a specific section of the electrical network and turn off only that one.
If you are not an electrician, then you should not expose yourself to unnecessary risks. It is best to de-energize the apartment as a whole. To have complete confidence in your safety, you should use the VIRA indicator screwdriver, which we wrote about a little higher, and use it to make sure that there is no voltage on the contacts of the socket being replaced.
Do you know how to use an indicator screwdriver to remove and replace an outlet at home? Like all VIRA tools, this screwdriver is reliable and easy to use. To make sure there is no voltage at the socket contacts, you should:
- Use the tip of a screwdriver to touch both contacts one by one;
- While touching, keep your finger on the round metal contact located on the handle of the screwdriver.
If the LED indicator located inside the tool handle does not light up, you can safely carry out the planned work. Otherwise, you cannot start work until you achieve a real power outage.
Dismantling the structural elements of the socket
The main structural elements of the socket are:
- decorative cover;
- internal mechanism.
In sockets of older models, the socket cover is monolithic. Modern products are additionally equipped with a decorative frame. In any case, the cover is held in place by screws that must be unscrewed. If there is a frame, it can be easily removed by only slightly prying it with the blade of a screwdriver.
As a rule, there are no difficulties with how to remove the cover to replace the old socket with a new one. The only tricky nuance is not to damage the wallpaper located near the device being replaced. At the slightest suspicion that they are sticking to the lid, the wallpaper should be trimmed and thus eliminate the possibility of tearing and damage.
The interior of the outlet can be attached to the wall structure in one of the following three ways:
- using spacer legs;
- screws to the socket box;
- a pair of screw-dowels to the wall itself.
The first two mounting options are most common. To dismantle the internal mechanism of the socket, you should find the fastening screws and loosen them (if we are talking about spacer tabs) or simply unscrew them.
If you watch a video of how to replace an outlet with your own hands, you will certainly notice that after unscrewing the mounting screws, the internal structure of the outlet will simply fall out of the wall, hanging on the wires that fed it. All that remains is to loosen the fastenings of these wires and remove them from the corresponding clamps.
A small but important nuance is that the socket can have not two, but three wires.
Moreover, the third wire, which represents the grounding, can be laid in a somewhat specific way: at the point of its connection with the socket there may be a loop, and both ends will be located somewhere deep in the wall.
Know that creating such a loop is one of the methods for ensuring reliable grounding, and its integrity must not be violated!
Removing the old socket box
This stage of work is optional. It only needs to be done if the old socket, due to its configuration or volume, is not capable of accepting the mechanism of the new socket.
Its removal and replacement must also be carried out when this element is made of metal, since metal socket boxes do not provide reliable adhesion to the rosette spacer legs and, therefore, do not guarantee reliable fastening of the entire mechanism in the thickness of the wall.
Removing the old socket box requires only physical strength and is done using pliers. Another method for removing it is to drill several holes around its circumference and then knock it out of the load-bearing wall structure.
To complete our consideration of the question of how to dismantle it in order to install the socket yourself, we will make a small but very significant remark. After the dismantling work is completed, bare wires will stick out from the wall.
To prevent them from becoming dusty and stained with plaster, they should be immediately covered with at least a thin layer of insulation. In the future, this will help you avoid problems that may arise due to lack of contact in new connections.
How to properly install a new outlet
The process of installing an outlet is in many ways similar to the work of dismantling it. However, all the previously described operations are performed in the reverse order and have the opposite direction. For example, the word “insert” will replace the word “remove”, the action “unscrew” will change to “tighten”, etc.
Installation of a socket box
Installation of a new socket box will have to be done only when it is necessary to remove the old one.
To do this, the hole in the wall must be widened so that it is slightly larger than the element of the rosette structure installed in it.
The expansion is carried out using a chisel and, of course, a hammer. If the depth is insufficient, then this problem is solved in one of the following two ways:
- it is additionally hollowed out and deepened;
- The socket box is trimmed according to its depth.
The purpose of these operations is to ensure that the edge of the installed plastic box is flush with the wall. Having achieved this, the wires protruding from the wall are inserted into the socket box, coated with plaster, pressed into the prepared hole and wait for the fixing composition to harden.
The just described method of attaching a socket box is hardly applicable if expensive, beautiful wallpaper is already hung on the wall: the probability of accidentally staining or damaging it is too high. In such a case, the socket box can be secured to dowels by drilling holes for them slightly obliquely. With this mounting arrangement, the reliability of fixation increases significantly.
Connecting the outlet
Before installing the socket structure, you should carefully examine the condition of the wires.
Since the old outlet could overheat due to poor contact in it, the insulation of the wires could burn, lose its ductility and its insulating properties.
If this is indeed the case and in order to avoid possible problems, the old insulation should be removed and the exposed conductors should be wrapped with electrical tape, covered with heat shrink or cambric.
If the electrical wiring in the house is made of aluminum wires, then overheating in the old outlet could cause their increased fragility.
It may well happen that during the manipulations the wires break. In this case, you will need to build them up. To do this, it is better to use soldering.
However, if space in the socket box allows, you can lengthen the wires protruding from the wall using:
- metal bushings;
- WAGO pads;
- classic connecting blocks.
Having prepared the wires, you can begin installing a new outlet.
Although this is not a written rule, it is customary for electricians to connect the phase to the right terminal and the zero to the left. Before connecting, the wires should be stripped, inserted into the terminals and the fastenings should be tightened. Stripping of the core is considered correct if its stripped end protrudes from the terminal by an amount not exceeding 3 mm.
Before you begin securing the wires, you must ensure that the terminal devices are dry and clean.
A very important point is that the contact between the core and the terminal is good enough. To do this, the fixing screw must be securely tightened.
If this is not done and if the contact is not strong enough, the connection point will overheat, which may cause the wire to burn out.
Fixing the socket in the socket box
Most often, the socket mechanism is fixed in the socket bowl using special spacer tabs. When inserting the device into the cavity of the bowl, the spacer legs should be held so that they do not cling to its walls and do not interfere with the correct installation of the device. This operation can be greatly facilitated by first tightening the legs using a regular rubber band.
Additional fixation of the mechanism can be achieved using mounting bolts, having previously aligned the corresponding holes of the socket itself and the socket box. If it becomes necessary to fasten the mechanism using dowels, then the holes for them should be drilled obliquely in different directions. This way they will better withstand pulling forces.
Completion of installation
Replacing sockets in an apartment with your own hands is completed by installing a decorative cover, turning on the power supply circuit breakers and checking the presence of voltage using an indicator screwdriver.
The work of this stage can be performed in a different order, starting with turning on the machines and checking the voltage and ending with installing the decorative cover.
This sequence may turn out to be more rational if, for some reason, the newly installed socket has to be removed from the socket box.
The very last step that should be performed is to check that the socket is securely fastened. To do this, you need to insert and then remove the plug of any electrical appliance, repeating this operation several times. If displacements are detected, measures should be taken to improve the quality of fixation of the socket mechanism.
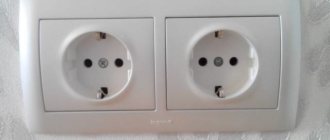
How to change a double socket
If an identical double new one is installed in place of the old double socket, then absolutely no problems will arise. All operations are performed in accordance with the previously described algorithm.
But how to change a single socket to a double one - this issue will be a little more difficult. Moreover, you will have to face difficulties that are completely unrelated to electrics, since the mechanism of single and double sockets is completely similar.
Additional, but completely solvable difficulties will consist only of widening the hole in the wall. It should be of such dimensions that a double socket socket can easily fit into it. Moreover, we must not forget that there must be a small gap between the walls of the hole and the socket box, which during installation will be filled with plaster or some kind of fixing solution.
To expand the hole, you will have to use, as described earlier, a chisel and a hammer. Electrician skills and any additional knowledge and skills are not required.
So, now you know how to change the outlet yourself at home. We are sure that after reading this material, you were able to understand that even a person who is not at all experienced in the intricacies of electrician craftsmanship can do this.
Preparation for dismantling work
Before installing a new outlet, you must decide on its type.
When buying sockets in specialized stores, pay attention to the presence of quality guarantees, certificates or evidence of their safety. The socket consists of several parts, and it is quite possible that you will not need to change all of them. It depends on what caused the outlet to be replaced
It depends on what caused the outlet to be replaced.
When choosing the appropriate option, focus on several important factors:
the location where you plan to install the outlet
Please note that there are a huge number of their varieties, so make your choice in accordance with the characteristics of the room. For example, the performance of outlets can be affected by the humidity or temperature in the room; . manufacturer's brand and reviews of such products
manufacturer's brand and reviews of such products
Analyze how popular the brand is and whether other consumers trust it. Choose sockets only from well-known manufacturers, otherwise you may stumble upon low-quality products;
purpose of the socket. Think in advance what electrical appliances and equipment you will connect to the selected outlet, and what power it should have;
appearance according to the interior of the room in which you plan to install it. Depending on the style of the room, select the required size, shape, texture and color of the outlet.
The choice of outlet also depends on how many electrical appliances you need to connect in this area of the room, how important it is to protect it, and whether there is a need to hide the wiring. Depending on these parameters, you can choose a socket for open or hidden wiring, single or double, with two or three phases, with grounding and many others. Advice: if you are going to change sockets in the children's room, choose options with curtains or other protective devices (plugs, covers, etc.)
This way you can protect children from unwanted contact with sources of electricity.
Advice: if you are going to change sockets in the children's room, choose options with curtains or other protective devices (plugs, covers, etc.). This way you can protect children from unwanted contact with sources of electricity.
Before you begin directly replacing the socket, you must prepare all the necessary tools. During the installation process, you will not be able to be distracted by searching for them, since at some stages of the work you need to hold the socket or ensure quick fastening of some parts.
To remove the old outlet and install a new one, you will need pliers, a screwdriver, a flashlight, electrical tape, a utility knife and a voltage gauge. Electrical tape may be needed for attaching some components or for working with wiring; a construction knife will be useful in the process of removing socket elements or, if necessary, cutting off some part of the wire (although you can use other tools for this). The flashlight will provide you with ease of operation.
Attention! Don't forget to turn off the electricity in your apartment before you start working on the outlets. If the switchboard is located on the landing, hang a note there asking not to turn on the electricity.
How to change an outlet in an apartment yourself
To learn how to change an outlet, you only need to do it once. There are nuances associated with installing grounding contacts or installing new devices instead of old Soviet ones, but there are no big difficulties in how to replace an outlet, the main thing is not to forget to turn off the electricity in the apartment or house.
Required tools and materials
To do all the work without being distracted by searching for the necessary tools, you should prepare everything in advance. To simply replace the socket with your own hands you will need:
If the question is how to replace an old-style outlet with a new one, then you will additionally have to prepare the following:
- A socket box suitable in size for the new device.
- Drill with a drill for the wall.
- Hammer and chisel.
- Plaster or other putty.
This is a necessary and sufficient set of tools to replace the socket yourself.
Removing the old socket
The most difficult case is the repair of an old-style socket, when it is replaced with a new one along with an old iron socket, instead of which a plastic one is installed. If you understand how to change such an outlet yourself, then in all other cases it will be much easier to act.
In general, the entire procedure comes down to a step-by-step execution of individual steps, before which you must first check the presence of voltage on the contacts (to make sure that only replacement and not repair is needed), then turn off the input circuit breaker and check the terminals again with a voltage indicator (to make sure that the circuit breaker worked).
Removing the cover
Depending on whether the socket is single, double or triple, the cover is held on by one, two or three bolts. If in old devices the cover design is monolithic, then in modern ones it consists of two parts - a decorative frame and the cover itself, which covers the current-carrying parts.
When removing the cover, the following nuances may occur:
- The bolts rotate, but do not come out due to broken threads. In this case, you need to help them by pulling the lid away from the wall. If there are two bolts, then you need to unscrew them a little, while alternately pulling on the top or bottom of the cover.
- A lid or decorative trim can “stick” to the wallpaper - this happens especially often in the kitchen due to high humidity. With a strong tug, such a cover can tear off a good piece of wallpaper or paint from the wall. How to properly tear it off the wall without consequences must be decided differently in each case. For example, you can carefully separate the lid from them with a knife.
Dismantling the interior
Depending on the model of the socket, its inner part can be supported on spacer legs, screwed to the socket box, or attached directly to the wall with dowels. The last option is rare: mostly the first and second ones come across - separately or together.
unscrew the screw holding the spacer legs
In any case, it is easy to find the fasteners - you either need to look for the bolts around the perimeter of the socket box or look at the spacer antennae with which the device touches the wall, trace which bolts they are tightened with and unscrew them. Usually two or three turns are enough for the fastenings to loosen and the inner part to fall out of the socket box, or rather, to hang on the wires, which also need to be unscrewed.
unscrew the screw holding the wire
The wires themselves can be two or three if there is grounding. To remove them, you need to unscrew the mounting screws. If there is a ground wire in the network, it may be laid differently than the rest of the wiring.
The PUE recommends using a solid wire for grounding, because a wire on which a loop is made can approach the socket and the same wire will go back to another point.
It is impossible to violate its integrity - this will affect the quality of grounding.
pull out the old socket
How to dismantle a socket and install a new one in an old socket box, see more details in this video:
Replacing the socket box
This is not a mandatory step - if the new socket fits the old socket, then it is not necessary to change it. Typically, replacement is needed if an iron socket box is installed in the wall, along which the spacer legs of the new sockets, made of soft metal, will slide.
You can remove the old socket box in two ways - deform (bend) it with pliers and pull it out, or drill holes around it with a drill and carefully knock it out of the wall.
Then the hole is cleaned so that it is slightly larger in diameter than the new socket. If it does not fit, then the hole is widened with a hammer and chisel. If the depth is insufficient, then you can deepen the hole itself or cut off a new socket box. It is necessary to ensure that it is installed flush to the surface of the wall.
To install it in a wall, the mounting hole and the outer part of the socket box are coated with putty and it is recessed into the wall (at the same time you need to thread the wires into it). When the putty has hardened, further installation is carried out.
installation of a new socket box
When you replace a socket with your own hands in a wall on which expensive wallpaper is already pasted or for some other reason there is a fear of damaging it, then the socket can be screwed in with dowels. In this case, you need to drill holes for them diagonally in different directions.
If the socket box is changed, even if you turn off the power to the input circuit breaker, it is advisable to wrap the exposed ends of the wires with electrical tape so that dust or putty does not settle on them.
For more details on replacing the socket and socket box, watch this video:
Installation of a new socket
All operations are performed in reverse order, but with a new socket. Before installation, you need to pay attention to the wire - if there was a poor contact in the old socket, then the core could heat up during operation - if the insulation has lost its plasticity, then at a minimum you need to remove it, and put a cambric, heat-shrinkable film or wrap it with electrical tape on top of the core.
If the wire is aluminum, then with frequent overheating it becomes brittle and the core itself may break - in this case it will have to be extended.
When the putty around the socket has hardened and everything is in order with the wire, you can proceed to further installation.
Securing the wires
It is considered good practice among electricians to “hang” the phase on the right and the zero on the left terminal of the socket, if you are facing it. If you screw the wires in reverse, nothing will happen. The cores are stripped, inserted into the terminals and tightened into the fasteners. It is considered correct to strip the core when its internal wire protrudes from the terminal no more than 2-3 mm.
Before fastening the wires, you must check that all terminals are dry and clean. Make sure that there is good contact between the exposed part of the wire and the socket, and that the bolt is tightly tightened. Otherwise, over time, the contact will begin to overheat and the wire may burn out.
Installing a socket in a socket box
Depending on the type of socket, it will be secured with spacer tabs, bolted connections or dowels. When it is inserted into the socket box, you need to hold the spacer legs, as they wobble freely when free and sometimes prevent the socket from completely moving into the mounting hole.
To prevent this from happening, they are fixed with a regular rubber band, which will hold them pressed against the socket, but will not interfere with its fastening in the socket.
Additionally, you can secure the socket with bolts, but you just need to make sure that the mounting holes coincide with those on the socket box.
Dowels are used only if, for some reason, fastening cannot be accomplished in any other way. Not all models have mounting holes for this, so there is a high probability that before replacing the socket you will have to look additionally for a suitable one. Holes for dowels are drilled in the wall diagonally in different directions.
Classification
The classification of overhead sockets is carried out depending on their purpose, namely:
- Regular network (power) electrical sockets;
Viko surface-mounted electrical socket with grounding
- telephone (RJ 11);
Single telephone socket ABB (RJ 11)
- socket for computer networks (RJ 45);
Computer surface-mounted RJ-45 Electric socket with casing removed
- TV sockets (television).
External TV socket Schneider (Schneider)
In addition, surface-mounted sockets are usually classified by protection class, in accordance with the IEC 60529 standard, for example, IP66 means that the device is completely protected from the penetration of dust and from the pressure of a powerful water jet. The protection class is usually indicated on the housing.
Electrical waterproof overhead socket Legrand (Legrand) protection class IP66
If in an ordinary room it is quite possible to install devices with a protection class of IP20 (that is, unprotected surface-mounted sockets), then in wet rooms, for example, in a bathroom or kitchen, this option will be unacceptable. External (street) sockets must be resistant to dust and moisture.
How to properly disassemble a socket
How the socket works, how and with what tools to replace it if it breaks. Safety rules, professional advice, about this and much more in the article below.
Procedure for dismantling and replacing electrical sockets of a household electrical network
Unqualified performance of work related to electrical power is fraught with the risk of electric shock and fire.
Some equipment is critical to power stability and reliability. Most electrical wiring repair and maintenance work can be done independently, provided that several requirements are met.
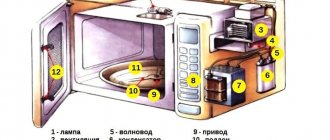
Socket arrangement
Most types of sockets have a similar design. The base is a plastic or ceramic base in which connection terminals and fasteners are located. A front panel is attached to the base of the device, which performs protective and decorative functions.
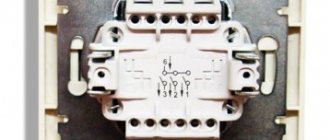
The electrical part of the sockets consists of metal terminals, which have a shaped spring part on one side for tight contact with the plug pin, and on the other a clamping element for connecting wires. A screw with a spring washer is most often used. There are three metal terminals. Two are located symmetrically for connecting the neutral and phase conductors, and the third is for connecting the grounding.
To secure the socket in the wall, curved legs are used, which move apart and rest against the walls of the socket when the fastening screws are tightened. For reliable fixation, the end of the legs is shaped like a dovetail. Modern sockets are also attached with self-tapping screws to the top of the socket box.
When is it necessary to dismantle an old outlet?
The need to replace the socket arises in several cases:
- malfunction of the old one;
- type mismatch;
- renovation of the premises;
- changing requirements for external design.
How to independently remove an old socket from the wall and install a new one
In order to replace the socket, you need to take some preliminary steps and prepare the necessary tools. The work consists of several stages:
- removing the decorative panel;
- loosening the screws securing the wire cores;
- removing fasteners and loosening the spreading legs;
- actually, dismantling.
Installing a new socket is done in the reverse order.
Tools
To dismantle and install the socket, you must have the following tools:
- screwdrivers with flat and Phillips blades;
- knife for stripping insulation;
- side cutters;
- pliers.
A discrepancy between the dimensions will lead to the spline breaking, which will complicate further work.
Dismantling process
First of all, remove the decorative cover. Different manufacturers have their own methods for attaching the cover to the base of the socket, but the most common method is one or two screws located between the holes for the plug pins. To prevent the screws from getting lost, they can be held on the reverse side with locking washers.
The lid is often secured using latches. Here you need to be careful not to damage the latches.
It is recommended to first release the base of the socket from the wall and then disconnect the wires. In old sockets, the screws stick strongly to the terminals and it is often impossible to unscrew them while holding the socket suspended. The screwdriver may break off and cause injury.
It's easier to loosen the screws while the case is still attached to the wall. Then remove the housing and finally disconnect the wires.
It is important not to apply bending forces to the wires, since the insulation of old wires is fragile and may crack or crumble. Aluminum conductors can break, and they cannot be extended inside the wall. You will have to change the section of wiring between the outlet and the junction box.
Stages of work with an external device
External sockets are distinguished by the fact that their base is not recessed, but is attached to the outer surface.
When installing a new socket, do not pull it too hard to the surface so as not to break the housing. If you place plastic washers under the screw heads, the risk of breakage can be reduced.
Attaching a new mechanism to the cores
Before installing a new socket, prepare the ends of the cable and the mounting location for the socket. The length of the conductors must be such that they can be easily connected to the terminals. It's not scary if there is some margin in length. The wires must be carefully moved in opposite directions from the base of the socket to the walls of the socket box.
Design varieties
The conditions in which sockets are used vary. For this reason, the design of external sockets is made most appropriate for specific conditions. Therefore, it is possible to systematize these electrical fittings products according to the following criteria:
- Main terminal material. Either ceramics or plastic are used. For connecting powerful electrical appliances, a ceramic base is preferable. It is generally not exposed to elevated temperatures. But its drawback is fragility. Therefore, when installing ceramic products, it is necessary to avoid efforts that could cause cracking of the ceramics.
- Number of pairs of terminals for connecting plugs. The minimum, as is obvious, is a single-plug socket. But blocks with more than four connections are rarely used; single, double and triple external sockets are more popular.
How to remove a socket with your own hands: device and step-by-step disassembly plan
Dismantling of the socket is carried out in case of wear, breakage, obsolescence and in the process of major repairs.
In theory, this event should be carried out by specialists who have education, experience and permission to carry out hazardous work.
But if you follow simple instructions and observe safety precautions, you can perform this procedure yourself, saving money and gaining much-needed skills in everyday life.
The principle of replacing sockets
All electrical work must be carried out in a de-energized room.
Regardless of the type and location, the design of all sockets is approximately the same.
Overhead products consist of a decorative cover and a contact block in which terminals and contacts are located. Fastening to the wall is done through holes in the block.
External structures are used when laying an electrical line under drywall or in wooden buildings where the wires are laid in an open manner. Removing a surface-type socket is not particularly difficult.
It is enough to remove the cover, loosen the contacts and pull the wire out of them. After this, you can remove the block and install a new device.
With internal sockets the situation is somewhat more complicated. Their pads are fixed in special sleeves, which are embedded in pre-prepared holes. The main difficulty is to correctly replace socket boxes and secure new products in them.
To remove the socket from the wall quickly and without unscheduled stops, you will need the following tools and materials:
- pliers;
- Screwdriver Set;
- hammer;
- chisel;
- indicator;
- Head Torch;
- stationery knife;
- insulating tape;
- dielectric mat;
- protective glasses.
The main condition of work is safety. Before starting dismantling, you need to turn off the power to the room where the work is being done. If this possibility is not technically provided, you need to turn off the general package switch or unscrew the plugs.
To avoid emergency situations, a sign “Do not turn on, people are working!” should be hung on the panel. If the panel door does not close, one of the neighbors or relatives must always be near it during the period of work.
After de-energizing the room, you need to once again make sure that no voltage is supplied to the terminals. To do this, use an indicator or any working household appliance - a table lamp, a razor, a fan.
Step-by-step dismantling instructions
Removing the socket step by step
After checking that there is no voltage in the network, you can begin dismantling.
To disassemble the socket, proceed in the following sequence:
- Remove the cover of the old outlet. To do this, unscrew the bolt or screw located in the middle. If the cover is stuck to the wall, you need to carefully pry it off with a flat-head screwdriver.
- Once again we check that there is no voltage on the line. We place a dielectric mat under our feet, arm ourselves with safety glasses and a headlamp.
- Unscrew the bolts that regulate the position of the legs. If they are stuck to the block, you need to lightly press them with a screwdriver, after trimming the wallpaper.
- We take the block out of the glass and unscrew the wires from the contacts. If the threads on the bolts are rusty and do not give way, you need to drop a little machine oil on it. If this does not help, the wire must be cut off if there is sufficient margin for this.
- Disconnect the ground wire. If it goes to another device, it cannot be cut, as this will negatively affect the grounding parameters.
- We remove the old socket box. The iron sleeve can be crushed with plumbing pliers, and the plastic sleeve can be pulled out by the edges with pliers. To avoid tearing out a piece of plaster, you need to make a groove around the sleeve with a knife or drill several holes.
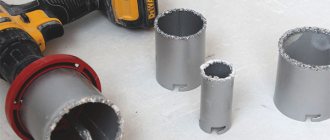
- Clean the hole from crumbs and debris. We check that the new glass matches the existing hole. If it is small, expand it with a hammer and chisel. You can use a diamond crown. The diameter and depth of the recess should be 4-8 mm larger than the size of the glass. Again, clean the hole from debris and dust. It is advisable to cover the bottom with felt to prevent the penetration of noise, bedbugs, fleas and cockroaches from neighboring apartments.
- We mix the starting putty, coat the socket box with it, thread the wires through the hole and insert it into the niche. The product must be aligned so that its edges are in the same plane with the wall.
Before continuing work, you need to wait 2 hours for the solution to set. After the putty has completely hardened, it is necessary to grout and polish the wall. Then you need to treat it with a deep penetration primer to strengthen the surface.
If you plan to replace the wiring, you should firmly fasten the old and new cables and pull the new wiring through the channels, using the old line as a pull cable.
Setting up a new connection point
Cables should not be bent when installing an electrical point.
After installing the new glass, you need to clean the ends of the wires from debris and dirt, and check the integrity of the insulation.
If there is damage, they are repaired using cambrics, insulating tape or heat shrink tubing. The veins must be cleaned of oxidation.
It is advisable to solder the copper wires, since over time they oxidize, the contact becomes worse and the socket begins to heat up, which is fraught with fire.
Installation is carried out in the following sequence.
- We check the new product for integrity and completeness.
- Let's see how tightly the plug fits into the terminals. If necessary, make adjustments.
- We loosen the expanding legs and fix them with a rubber band so that during installation they do not cling to the walls of the sleeve.
- We insert the cores into the contacts so that they protrude from the other end by 2-3 mm. You need to insert it on the left side of the bolt so that when it rotates, the wire does not push out of the socket.
- Tighten the bolt tightly. It is desirable that it be slightly flattened when twisted. The quality of tightening is checked manually by pulling the wire by hand.
- We fold the slack of the cable like an accordion, recess the socket into the hole, checking its correct horizontal position.
- When the bracket rests against the edges of the glass, we begin to twist the bolts of the legs. This must be done one by one, several turns at a time, so that the product does not warp.
- Install the cover. Some models have bolts, some are held on by latches.
- We check the functionality of the outlet using an indicator or any electrical appliance. The fastening strength is tested by inserting and removing the plug.
After this, you can turn on the package switches or screw in the plugs.
You may also like
Connection
Basic Rules:
- connecting electrical outlets of any type must be done when the power supply is turned off;
- open wiring electrical cable must be laid in a special box or protective corrugation.
Video: how to connect an outlet.
The algorithm of actions is as follows:
- de-energize the electrical wiring (by turning off the corresponding circuit breaker);
- disassemble the socket;
- place the base at the intended location and mark the holes for fasteners, usually there are two or four of them;
- in the case when the installation is made on a wall made of brick or concrete, the marked holes are drilled and a plastic dowel is inserted into them. The base of the socket can be screwed to a wooden surface with self-tapping screws. If the wall is made of plasterboard, then a special plastic fastener is used - “butterfly”;
Butterfly fasteners for drywall and PVC
when the base is screwed, electrical wiring wires are connected to it; to do this, you will need to carefully break out the corresponding hole on the desired side of the box
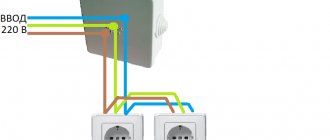
The plastic in the place where the wires are supplied is thinner, so there will be no problems with this; we connect the wires to the terminals, the photo shows how double surface-mounted sockets are connected (pay attention to the correct polarity, especially for the ground wire, if any); How to connect a 2-gang socket
How to connect a 2-gang socket
How triple surface-mounted sockets are connected is shown in the figure below
Please note that the ground wire is not connected from socket to socket, but to each separately. A 4-socket outlet is connected according to the same principle;
Connection diagram for 3-socket outlets
- after connecting the wires, the socket or group of sockets is assembled;
- The power supply is turned on and the operation of the devices is checked.
As you can see, if certain safety rules are observed, overhead sockets can be connected without problems. Their cost in various regions of Russia is almost the same as in Moscow, so there is no point in citing it.
What to look for when choosing
First of all, you need to select an outlet depending on its purpose, no matter how trivial it may sound. And if the device for connecting the antenna cable is difficult to confuse with an electrical outlet, then the RJ11 and RJ45 sockets are similar in appearance.
Next, you should pay attention to the body of the electrical outlet. The plastic base is not resistant to heat that can occur as a result of poor plug connections or when connecting powerful equipment.
Surface-mounted ceramic sockets are more resistant to temperature loads, but their price is slightly higher.
Protective shockproof plastic will provide high resistance to mechanical stress, which significantly increases service life.
When choosing a mechanism for fixing wires, you should take into account that key clamps, although they simplify the installation process, over time they can weaken, which will cause poor contact and lead to heating of the socket. From this point of view, screw clamps are more reliable.
Depending on the number and type of electrical appliances to be connected, you should decide whether to install a single, double, triple or combined socket, for example, electric and telephone.