How to crimp a telephone cable - 2 and 4 wires
Despite the fact that the world has almost completely switched to cellular communications, wired telephony still occupies a significant market share. Moreover, it is with its help that Internet access using ADSL and SHDSL technologies is organized in small towns and rural areas. And while the crisis is gaining momentum, there is no need to wait for the transition to fiber optics. At the same time, very often in residential buildings, as well as in various institutions, room wiring is in an unsatisfactory condition: the telephone cord is pinched by chairs, crushed by heels, cats, dogs and even drunk people chew it (this is not a joke, but a real case from practices). Therefore, sooner or later, the question arises of replacing the wire with a new one, for which they usually call an installer and pay money. You can do all this yourself, the main thing is to get the right tool and buy the wire of the required footage. But very often everything comes up at the moment when you need to crimp the telephone cable into the RJ-11 connector. We will talk about this procedure today.
What do we need?
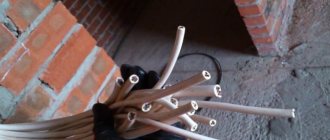
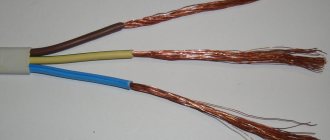
Firstly, the telephone cable itself is 2- or 4-wire. Personally, I don’t like the SHTLP telephone cable (aka CLT) because I didn’t live there alone and if you need to make a twist, sometimes you’ll have a hard time with it. Therefore, in my practice I try to use the cable for signaling KSPV-2 or KSPV-4. There are no problems with crimping it either. Secondly, we will need a stripping tool in the form of a stationery or construction knife. Thirdly - crimping tool. By the way, many of them, like mine for example, have a special knife for cutting cables. Well, RJ-11 connectors, of course, into which we will crimp the telephone cable for the Internet or wired telephone.
Sequencing:
We strip the end of the telephone wire from the outer braid, about half a centimeter:
There is no need to strip the cores themselves - they will be cut through by the connector blades. The cable layout is simple. In regular telephony, only 2 cores are used. The connector has two middle contacts:
With a four-wire wire the situation is a little more complicated. The point here is that abroad, due to the widespread use of mini-PBXs and faxes, a cross-over layout is often used - that is, the wires in pairs are swapped (see diagram on the right):
From the front side of the connector, make sure that the wires reach the end of the channels:
- Crimping twisted pair cables: step-by-step instructions and color schemes for 4 and 8 cores
Now carefully insert the connector into the crimping tool and clamp it:
Connector design for network cable
Most often, an Internet connector of the RJ 45 type is used to organize computer networks, although there are also many others - RJ 11 (for telephone lines), RJ 12 and so on, but the first type is the most common. The design of these cords, despite their different purposes, is similar.
The RJ 45 connector consists of a plastic housing in which special contact knives are built-in. The latter are distinguished by a golden coating on the metal, and their number directly depends on the type of cord and the standard of the connector with which it is used in pairs.
When assembling the plug, the contact knives are pressed inside the housing, since it is manufactured under pressure by casting. In addition, the connector has elements that securely fix the cord and prevent the contacts from breaking. The appearance resembles a rectangular cap with a latch so that the cable is securely fixed in the outlet or network card slot.
Important! For shielded cable, a different special connector is used. Its difference from the usual one is that it also has additional shielding protection
Crimping telephone cable "4 cores"
The quality of communication largely depends on how competently the telephone cable is crimped. To connect telephone cables to devices, mini-PBXs in offices, administrative buildings, apartments, etc., RJ-11 connectors are used, which are compatible with standard R-11/12 telephone sockets. In this article we will look at how to crimp a telephone cable using this connector.
What tools and materials are required for crimping?
Before crimping a telephone cable, you will need to purchase the following:
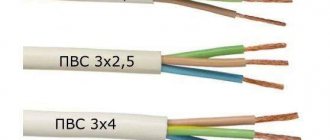
• Telephone cable (communications) - KSPV 2x0.4 (standard telephone sets) and KSPV 4x0.4 (digital programmable telephone sets). • Cleaning tool (construction or office knife). • RJ-11/12/25 connectors. • A special crimping tool - a crimper (some models already have a knife that allows you to cut the cable).
How to crimp using a crimper?
Crimping a telephone cable is most often done using a special tool - a crimper. Proceed in the following sequence:
• Remove the outer sheath from the end of the telephone wire (0.5–1 cm). The cores themselves do not require stripping, as the connector blades will cut through them. • There is nothing complicated in the layout (Fig. 2) of the KSPV 2x0.4 cable. Power and signal must be supplied to the two middle pins of the connector. In the case of KSPV 4x0.4, you can resort to direct layout (one core for each contact).
Rice. 2
- How to crimp an RJ-45 Internet cable with your own hands: methods + instructions for crimping an Internet connector
That's it - the telephone cable is crimped. All that remains is to remove the crimped cable from the crimp and carefully inspect the “knives” of the connector for good contact. If the connection is bad somewhere, you will need to cut the cable, use a new connector and crimp again.
If the crimping of the telephone cable “2 cores” or “4 cores” is done correctly, then you will hear the desired dial tone in the handset.
The nuances of performing crimping without a crimper
Crimping a telephone cable into 2 or 4 cores can be done without special tools. It won't be difficult to do this. So, let's look at how to crimp a telephone cable without a crimper.
When crimping a telephone cable in this way, be extremely careful and attentive. This method does not always provide high quality crimping. In addition, the risk of cable damage is quite high.
Knowing how to crimp a “4-core” telephone cable or how to crimp a “2-core” telephone cable, you can easily cope with this task. You can do this with or without a crimper. The whole process will take a couple of minutes. Always take into account everything written above. Only in this case will you be able to establish high-quality telephone communication.
is one of the leaders in the sale of cable products and has warehouses located in almost all regions of the Russian Federation. After consulting with the company’s specialists, you can purchase the brand of telephone cable you need at competitive prices.
How to lengthen a telephone wire
How to connect a telephone cable
The need to splice a telephone cable arises when it breaks (for example, during an apartment renovation), as well as if the telephone socket is moved to another location and the cable needs to be extended. Every home master should be able to perform this operation. Related articles:
- - wire cutters;
- - latex gloves;
- - electrical tape.
Instructions 1 Pick up the handset on the parallel telephone that, despite the cable break, remained connected to the network. This will prevent ringing voltage from shocking the line if there is an incoming call. If you have only one device, or the break happened in such a place that all the phones in the apartment turned off, you will have to work with rubber gloves. 2 Locate the cable damage. If it is impossible to find it visually, use a non-contact inductive fault finder. This device can be borrowed from the telephone operator for a while. In the absence of such a possibility, it is easier and faster to replace the entire cable section, the location of which is unknown. 3 To splice a two-wire flat cable of an older design, split the “noodles” lengthwise on each side with wire cutters so that the cut line is exactly in the middle. Carefully clean the ends. Remember that the insulation of the “noodles” is not made of PVC, but of polyethylene, so when stripping, carefully calculate the force to remove only the insulation without damaging the core. 4 Connect one of the wires of one end of the cable to any of the wires of the other end. Compliance with polarity is not necessary. Do the same with the remaining combination of wires. Carefully isolate the connections from each other. Then make sure that those telephones that stopped working after the break are working again. 5 Telephone cables of the new design have an outer sheath, inside which two or four stranded conductors are laid in one row, each of which has its own colored insulation. The outer sheath can be easily removed with almost no risk of damaging the conductor insulation. 6 If the cable is two-wire, the procedure for splicing it is the same as for the “noodles”. Repair a four-wire cable, which is much more common, as follows: do not connect the outer wires in the row anywhere or even strip them, since they are not used, and splice the wires in the middle in the manner described above. 7 If a special telephone set is connected to the line, designed to operate simultaneously with two lines (they are found, although rarely, in offices), the outer wires may also be involved. Splice such a line by simply connecting conductors of the same color. 8 Having finished work and making sure that all phones are connected to the line again, hang up on the device from which you picked it up before starting work. Related articles:
Instructions
Various wires are used for wiring telephone communications indoors. The most widespread, especially in old houses, is the telephone distribution wire (TDW), or “noodle”. The low reliability and noise immunity of this wire are compensated by its low price, which explains its widespread use. A more modern and convenient option is a flat line telephone cord (SHTL). Each of the four conductors is individually insulated with multi-colored plastic, which makes wiring easier. All the wires are sealed in a plastic sheath, which prevents mechanical damage. When purchasing a new wire, preference should be given to SHTPL or its analogues.
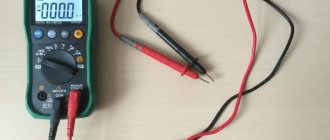
Regardless of the number of conductors in the cord, only two are used for regular telephony. The rest can be used to connect telephones according to the “director-secretary” scheme or in digital mini-PBXs. If there are more than two wires and you don't know which are connected to the PBX, use a multimeter. You can also use the traditional method of checking the signal “by tongue”, but this is unsafe. At the time of the call, the voltage on the telephone line can reach 150 volts, which is enough to cause serious injury. If connectors are on both ends of the wire, use color-coded conductors. All telephones, unless otherwise indicated in the operating instructions, use two central conductors as workers. The remaining contacts in the connector remain unused.
- Stretch the internet cable
In order to crimp a telephone wire, you must first cut it straight, and then remove the outer plastic insulation at a distance of one and a half centimeters from the edge. As a result, you should have in your hands the end of the wire with multi-colored conductors sticking out. Do not remove the plastic insulation from individual conductors. Identify the two wires that are connected to the telephone exchange. Arrange the conductors in one plane so that the connected wires are in the middle. Insert the wires into the connector without disturbing their location. Push the wire into the connector until it stops. Insert the connector into the crimping pliers. Be careful not to let the wires fall out of the connector. Squeeze the handles of the pliers tightly. Remove the crimped telephone wire and check its functionality.
If you need to establish a local connection between computers, use one of the most common communication cables - twisted pair. When you don’t have such a cable at hand, but the matter is urgent, and besides, buying it will take up a significant part of your time - try making such a cable at home. This procedure is technically simple. But it will require additional knowledge in this matter.
Crimping diagrams and twisted pair markings
When crimping a twisted pair of 8 cores, be sure to take into account the markings of the conductors. Each connection necessarily corresponds to a specific color scheme, which requires strict adherence. Otherwise, the signal will not pass through, and the network will not function.
Lazy crimp 2 pairs
In the considered option, direct crimping of the cord is used, where not 8, but only 4 cores are involved. Therefore, this method got its name for those who do not want to bother with all the veins. However, such a connection is only suitable for low-speed networks.
This type of crimping is not recommended for use at this time. The fact is that Internet speed is constantly growing, equipment is improving, and the 4-wire circuit stops working under new conditions. Therefore, sooner or later, you will have to switch to the standard scheme. If the network was initially laid with an 8-core cable, then all that remains is to crimp the RJ connectors in a new way, and everything will work. But, if the network is equipped with a four-core cord, then it will have to be completely changed and re-laid.
Pinout for a local network with more than 2 computers
When using RJ 45 connectors, pinout for connecting more than two computers to a network is carried out according to the standard scheme. All veins are untwisted and laid from top to bottom or from left to right as shown in the figure.
The conductors are aligned, cut, and then they can be crimped. After this, each twisted pair connector is connected to its own socket.
Direct pinout is marked as 568B
Direct connection is necessary in order to connect a HUB, router or switch to a computer. This method is most widespread in Russia. It is marked as 568V, and the wiring is carried out according to the usual scheme, starting with a white-orange conductor and ending with a brown one. There is a direct crimp here, since the wires are located the same on both connectors.
Crossover pinout is marked as 568A
Another way to crimp a twisted pair cable. To connect devices of the same type, for example, two computers, a crossover circuit or crossover labeled 568A is used. In this case, the first plug is connected in the usual way, and the second is connected by replacing the orange and white-orange wires with green and white-green wires. The conductors end up upside down, which is why the circuit got its name.
Direct crimp with 4 core twisted pair double pair wire
A cable with four cores is used when installing internal networks with low speeds. With large volumes, you can save significant money, since such a cable is much cheaper than a conventional twisted pair cable with 8 cores. Crimping is performed in the sequence shown in the figure.
However, the use of such networks has a number of limitations, primarily in terms of speed. In addition, it is not possible to supply power to the device when needed.
RJ 45 twisted pair compression circuit with POE standard IEEE 802 3AF
This circuit, made using PoE technology, allows not only to transmit information signals, but also to supply power to the router, switch, adapter and other devices. For example, when connecting video cameras, a separate power cable is not required. Thus, the connector combines two functions at once - data transmission and power supply to the device. The voltage in this pinout is supplied through blue and brown conductors.
It is strictly forbidden to use twisted pair to supply 220 volts, as this can lead to unpredictable consequences. The fact is that the cross-section of the cable in the network is only 0.51 mm2 and is designed for a current of up to 1.5 A. If the current needs to be increased, two conductors are connected in parallel and then the figure increases to 3A.
Cross-circuit for pumping speed of 1 Gbit/s
The connection scheme is used in high-speed networks, up to 1 Gbit/s. Eight wires are crimped in the sequence shown in the figure.
Rollover Cable console cable crimping diagram
Each end in such a connection is crimped mirrored in relation to each other. This scheme is used to configure a switch or router using a computer.
Standard telephone cables
Any telephone wire or communication cable is a special wire designed for laying fixed subscriber lines of open or closed type. They are based on conductive conductors made of, the cross-section of which is only a few fractions of a millimeter. These cores are enclosed in special individual insulation. For each isolated pair there is a specific color. Ultimately, all pairs are twisted into certain types of cables.
Each wire is a finished product that can be connected immediately. This procedure is very simple, provided that certain rules are followed and the sequence of all operations is performed.
How to extend the Internet cable (network cable)?
In this article we will look at several ways in which you can extend your Internet cable. Do it yourself (using twisting) and without additional devices, or at minimal cost (using an adapter). Using the instructions in this article, you can also extend the network cable that you use to connect your computer to the router, or for other tasks. Not just the cable that your Internet provider installed into your home.
Most often, there is a need to extend the Internet cable that comes into our house or apartment from the provider’s equipment. Please note that we are talking about twisted pair cable. If you have, for example, fiber optics, then the solutions in this article will not work.
During the repair process, when rearranging furniture, or moving devices, it turns out that the Internet cable is short and does not reach our computer or router.
In this case, there are not many options: adjust to the length of the cable, ask the provider to lay a new cable of the length you need (which they are unlikely to do), or simply sharpen the Internet cable. What are we going to do now? But first, some tips:
- If you want to connect a regular network cable that you use to connect two devices (for example, a PC to a router), then this may not make any sense. It is easier to make a new cable of the required length. This will make it easier and the cable will be more reliable. Since any connection and especially twisting is not very good. You can make such a cable yourself, or ask to crimp the cable to the required length at some digital equipment store.
- Perhaps in your case it makes sense to install a Wi-Fi router (if you don’t already have one), rather than extend the cable and lay it through the entire apartment. And if there are desktop computers, to which a network cable is most often laid, then they can also be connected via Wi-Fi. You only need a Wi-Fi adapter, which I wrote about here.
- If we are talking specifically about connecting an Internet cable, then you can call your Internet provider and explain the situation. That you do not have enough length of the network cable laid into your house. Perhaps the provider will offer you some reasonable solution. For example, they will send specialists who will replace the cable free of charge.
- Internet sockets. If they are installed in your house/apartment, then consider possible connection options using these outlets.
If you cannot do without connecting a network cable, then it is best to use special connectors (coupler, joyner). If everything is done correctly, the quality of the connection will not suffer. I do not recommend using twists. They create additional resistance and this can greatly affect the stability of the connection. And ultimately on speed and ping. A computer or router may simply not see such a cable.
Extending the network cable using an adapter (connector)?
This method is suitable in all cases. Both for connecting the network cable through which the Internet enters the house, and for extending the network cable for a computer, TV, router, modem, etc.
These connectors look something like this:
They call him a joyner. There is simply an input on both sides for the network cable (for the RJ-45 connector). The "mom-mom" type. To connect a cable using such a LAN connector, you need to crimp the cable on both sides into an RJ-45 connector. I wrote how to do this with your own hands without a special tool in the article on how to crimp a network cable without a tool. If you have a special tool (crimper), everything can be done according to these instructions: how to crimp a twisted pair cable into RJ-45.
If you use such a connector to extend the Internet cable, then you can buy a second piece of cable in the store. It will be ready (with connectors). If the cable of the required length is not available, then this cable can be made for you. Ask around in stores that sell computers and other computer equipment.
Simply connect two network cables to such an adapter and you're done.
Let's say on one side we have an Internet cable from the provider, and on the other side there is a second piece of cable that we made ourselves or bought in a store.
There are slightly different LAN cable connectors - couplers.
With their help, extending the LAN cable is even easier and more convenient. There is no need to crimp the cable into the connector and no special tools are needed. Only a screwdriver.
Do not confuse these connectors with splitters. They have one entrance and two exits. And they are intended for other tasks.
If you need to extend the network cable for a computer, TV, router
When the network cable is not long enough to connect a computer, TV, another router or some other device from a router or modem, you can also use connectors. But don’t forget that you can always buy or make a longer cable, or connect the device via Wi-Fi. Perhaps in your case this solution will be more correct and convenient.
Of course, you can take two pieces of twisted pair cable crimped on both sides into an RJ-45 connector and connect them through the connector.
Using such a cable, you can connect absolutely any device that has a LAN input to the Internet.
We connect the Internet cable using twisting
I already wrote above that this is not the best way to connect a network cable. The quality of the connection may suffer, or even not work at all. But if there are no other options, or you need to do everything urgently, then you can try.
Simply strip the cable at both ends and twist it color-matched. For insulation, use insulating tape or heat shrink tubing. Each cable must be securely twisted and insulated.
I did everything for the first time. The most difficult thing is to strip the veins and twist them. They sometimes break. First we remove the outer insulation, and then we strip each wire.
Next we twist all the wires according to color.
I think this can be done more accurately than I did. After the network cable is twisted, each wire must be insulated. I used heat shrink tubing. Duct tape will also work. Here's what I got:
Believe it or not, this cable even turned out to work
Source: https://help-wifi.com/poleznoe-i-interesnoe/kak-udlinit-internet-kabel-setevoj-kabel/
How to crimp and connect a telephone cable
For practical connection you need:
- telephone wire,
- Telephone jack
- Standard crimping device.
First of all, a piece of cable is cut, the length of which should not exceed five meters, otherwise a signal amplifier may be needed. Using knives located in the crimping tool, the top insulation of the cable is carefully removed at a distance of approximately 7-8 mm. If necessary, the conductors can be trimmed evenly.
The prepared conductors are placed in the connector to the very end. should be located in the connector housing at a depth of approximately five millimeters. The linear layout makes it very easy to position the conductors in the connector. Their alignment is also easy, thanks to the transparent plastic of the connector housing.
In order to directly crimp a telephone cable, a special tool is used that can work with different connectors.
During compression, the knives are pressed into the body. The conductor sheath is cut and contact is created. In the connector itself, the cable is securely fixed with a flat bar. The finished connector, together with the telephone wire, is inserted into the socket, after which a connection is established.
Thus, crimping and connecting the telephone cable is a simple operation. If you have certain skills and the necessary tools, the connection is made within a few minutes.
Design and types of telephone sockets
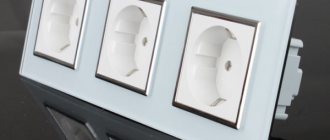
The market for sockets for connecting telephone communications is represented by two types of sockets. Single-connector models provide for connecting one device to the network. Multi-socket power points provide the ability to connect multiple devices.
- Frame. A box that protects the connection from external irritants. It must be made of dielectric material. Old devices are made of ceramics, modern ones are made of plastic;
- Contacts. Plates that are made of brass. Ensure uninterrupted flow of current;
- Terminals. Elements that are used as adapters. Thanks to them, the wires are connected to the contacts of the device.
If everything is simple with boxes, then there are many more connector standards. Connector types:
- RJ-9. Connecting the handset to the device.
- RJ-11 – two wires. Connecting the phone to linear networks;
- RJ-12 – four wires. Connecting 2 phones to the network;
- RJ-14 – four wires. Connecting a phone to several lines;
- RJ-25 – three pairs of contacts. Connecting phones to lines with additional capabilities. It is extremely difficult to connect on your own.
To connect yourself, you need to follow the diagram on how to connect a telephone socket to a telephone cable by color.
The process of connecting a telephone cable to a socket
The connection diagram is presented for an RJ-11 type communication box. The process consists of the following steps:
The telephone line voltage is only 60 V, while the signal passes through - 120 V
However, precautions are needed. It is advisable to use rubber gloves
If the bows are wet, you can get unpleasant electric shocks. It is necessary to remove the outer insulation of the cable. After this, you need to clean the edges of the veins from insulation. It is important not to damage the wires or leave any notches on them. This increases the chance of them breaking. It is not recommended to remove insulation with a lighter or matches. This can damage the veins. According to the diagram, you need to connect the wires to the contacts. To connect a regular landline telephone to a line, the circuit is quite simple. Two wires need to be connected to the contacts that are located in the middle of the outlet. If the box is standard, such as Vico or Legrand, then the veins should be green and red. Use a tester to check the polarity. In connected networks, the minus should be a red wire, and the plus should be green. Place the veins in the recesses in the bonded box. They must be hidden and not intertwined with bare contacts. The socket is attached to the wall or shelf. After attaching the box, you need to close it with a lid. Place the connector into the socket. After this you can check the connection.
The veins do not need to be secured too tightly so as not to pinch them. After connecting, it is advisable not to pull the main line cable. The veins are thin and break easily.
Installation and connection of a hidden socket
Before connecting a power point in a hidden way, you need to buy it. The hole in the wall is made to match the size of the outlet. Once the device has been purchased, you can begin the installation process:
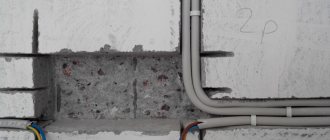
- A communication cable must be connected to the place that will be equipped with a telephone socket. It is best to run it along the baseboard, and at height you can hide it in a special plastic box.
- Drill a hole in the wall with a hole saw that has the same diameter as a telephone box. To ensure everything is smooth, before drilling you need to draw the outline of the socket with a pencil.
- The box must be placed in the hole and secured with fittings.
- Use a standard color scheme to connect the telephone cable to the contacts.
- The device body must be secured with spacers. Tighten the screws, but not too much.
- You can connect the telephone to a power outlet and check if it is working correctly.
- If the phone works, you can insert the outer frame.
Installation of information switching on one side may seem simpler than electrical lines. After all, they do not contain a life-threatening voltage of 220/50. But installing and connecting a telephone socket is not as simple as it seems at first glance. This is explained by the wide variety of stationary devices that are used in everyday life, as well as the connectors with which the connection is made. Next, we will tell you how to connect a phone socket with your own hands, providing all the necessary diagrams and photo examples.
Step-by-step instruction
Initially, we will consider a simple way to connect a universal telephone socket. Today, the most common devices are those that comply with European standards RJ-11 and RJ-12.
In order to connect them, you must adhere to the following algorithm of actions:
- Initially , you will need to turn off the power supply and put on protective gloves, since the voltage in the telephone network is 60V, and in working condition it can reach 110-120V.
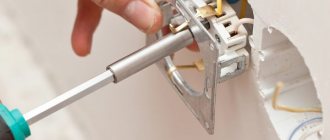
- Using side cutters to remove the insulating layer from the conductors, it is important not to touch the conductors themselves. The length of the stripped cable should be about 4 cm.
- Using a tester, determine the polarity of the contacts.
- Connect the conductors to the contacts. In a telephone jack, the red wire has negative polarity, and the green wire has positive polarity. It is not necessary to follow the connection rules taking into account polarity, but there is a certain risk that in the future the telephone set will from time to time make its own during operation.
- Connect the cable cores , then tighten and ensure reliable fixation using special screws for clamping.
- Some models have 2-4 contacts in their design, which have a fork shape; these elements are made of steel. In such a situation, 2 central contacts are used.
- Fix and fasten the telephone socket on the wall surface. This can be done using double-sided tape, but the most effective way is to use self-tapping screws.
- Snap the cover of this device.
How to extend the Internet cable
Twisted pair Internet cable has become a part of our daily lives. Like everyone else around us, the cable sometimes breaks down. A typical situation when working with a twisted pair network cable is when there are only a few meters left to the connection point, but the cable is literally a couple of meters short, either your pet happily enjoyed the cable from the provider, or the cable can easily be damaged during repairs or simply due to negligence. In such cases, it is necessary to extend or splice the twisted pair cable.
Many services and craftsmen will come to your aid. But it is quite possible to fix this problem yourself, saving time and money. Let's look at 4 ways to extend the Internet cable with your own hands.
Joyner and patch cord detachable connections
This option is simple, accessible to most audiences and does not require special knowledge. To extend the cable length, we simply purchase a patch cord and the necessary special RJ-45 sockets and plugs (joiner). Such computer connectors are sold for a low price in almost any office equipment store.
It is worth recalling that an ordinary telephone adapter and the RJ-45 twisted pair adapter itself are practically indistinguishable in appearance - so be careful not to confuse them. As a rule, a telephone has 7 contacts, but in our case, that is, a computer has 8 when purchasing.
Next, we plug the patch cord into the network card of the computer (laptop) and, accordingly, insert the other end into the joyner to which we connect our Internet cable - everything is ready.
The most significant drawback is special equipment (crimper) for crimping connectors, which is an additional cost. And the contact area is smaller compared to the following methods, and reliability, service life and tightness are not at the highest level.
Extending twisted pair cables
This technique is widely known in almost all areas where cable is used. The method is accessible to everyone who confidently holds a knife and electrical tape in their hands, and at the same time ensures good reliability. In terms of time, such a build-up may well last the entire service life of the cable itself. Speeds of up to 100 Mbit/s are maintained over sections of up to 100 meters, as well as over entire sections of cable.
Often the twists are made at the same level, and each wire is insulated separately. However, there is a more reliable technology for connecting wires. It is very common among telephone operators, system administrators, installers, etc., people who are often faced with the question of how to extend the Internet cable with their own hands. The basic idea is to connect the cable at different levels to eliminate the possibility of contact between stripped wires.
It is necessary to remove about 10 centimeters of the cable from the outer sheath. There is a split nylon thread inside the cable, so it is enough to make a small cut, find the thread and then use it to remove the sheath. The same procedure must be done with the second piece of cable. The sheath cut along the cable should not be completely cut off; we will use it again when the connection is ready.
We strip each twisted pair wire about one centimeter, not forgetting to make sure that the location of the twists cannot touch each other. Stripping the wires will require patience and accuracy, the main thing is not to trim the copper strands.
Also, you should not neglect the folk wisdom “Measure twice, cut once”; it is better to strip the wires gradually after you finish the next twist.
If you don’t yet have enough experience in stripping cores from insulation, it makes sense to practice on an unnecessary piece of cable.
Place the two stripped ends of the wire crosswise and twist them with your fingers. It turns out something like a “pigtail”. When connecting copper wires to each other, you must remember that both wires must be twisted together. And it is not permissible for one of the wires to remain straight and the other to be twisted around it. After we have made the twist, bend it in half and press it with pliers to ensure mechanical strength.
It is advisable to insulate each twist with insulating tape for greater reliability and tightness. Next, the wires are laid in the sheath of one of the cables and covered with the second. To give strength and a finished look, we tightly tighten the joint with insulating tape and the work is ready.
Extension and connections of twisted pair cables by soldering
This method is the most reliable, especially for radio mechanics, and is accessible to many. However, you must have experience in soldering. If the location of the planned connection is located far from the power source, for example, the attic of a house or an entrance, and it is not possible to use an extension cord, a mobile soldering iron will come to your aid.
Before splicing twisted pairs by soldering, we prepare the cable in the same way as when splicing twisted pairs by twisting (see above). The only difference is that the wires do not have to be twisted; it will be enough to hold them close to the cable overlap of 5-6 millimeters. Or you can make hooks at the ends of the wire and hook them together for further convenience when soldering.
The soldering process itself requires the performer to be careful, since a heated soldering iron can easily cause damage to adjacent wires.
After soldering, we insulate the wires for greater reliability. Then we place the wires in one of the outer shells, and cover the second one on top. We insulate the joint with insulating tape for greater tightness and a better aesthetic appearance.
The methods discussed can be applied not only to twisted pair Ethernet cables. The same principles of building and extending are suitable for a wide variety of cables, be it stranded or single-core wire with a wide variety of purposes.
Router for extending Internet cable
This method of extension is also quite convenient and practical. By connecting a router, you can connect an unlimited number of laptops, computers, etc. to the global network. (but still within reasonable limits).
To extend our Internet cable using this method, we will need to purchase the router itself and a crimped twisted pair cable (Internet cable) of the required length. If necessary, you can buy a ready-made crimped piece of such a cable; in some cases, the twisted pair is crimped in a specialized store. But even if not, then you can easily crimp the twisted pair with your own hands.
Now the Internet cable should be connected to the WAN port (Internet port) of the router, and the compressed twisted pair cable should be connected directly to a simple LAN port of the same router and then to your laptop or computer. All that remains is to carry out simple settings on the router, after which you will be able to use the network without any problems as before.
Source: https://vseprostroiku.ru/sovety/kak-udlinit-internet-kabel.html
How to connect your phone to a communication line. How to properly connect telephone sockets?
Modern means of communication are constantly being improved, new technologies and devices are being invented, but, despite the dynamic development of cellular devices, “home” phones are also popular. This article discusses the issues of what a 4-core telephone wire is, its application and installation methods, as well as the algorithm for crimping the ends and installing the connector.
MGTS is calling: replacing the telephone cable with fiber optics
The topic received wide resonance, so I decided to write an entire article. You get a call from MGTS and talk about a planned replacement of equipment and offer to coordinate a time for a technician to come. What does this mean and what should I do?
First about how it happens
Personally, for some reason they called me on my cell phone, they also called my friends at home.
The operator, introducing himself as a representative of MGTS, gets straight to the point, and, informing that MGTS is changing equipment, offers to choose a time for the technician to come, and assures that it is free.
The first slight attempts at objection are countered by the words that the planned replacement of MGTS equipment due to the replacement of the telephone cable with MGTS fiber optics is mandatory and is not a subject for discussion; it should be taken for granted (together with the master).
So where does it all come together?
You will need to find the other end of the selected cable. All my cables were clearly labeled and accompanied by explanatory documents and diagrams. If you are less fortunate, you may have to use a cable tester and, as they say, “ring” each cable. You can try borrowing it from a cable guy or network specialist you know.
My cables ended in RJ-45 plugs. If you use connectors or even loose wires, there will be less hassle. Once you locate the correct end of the cable, pull it out of the panel. If possible, place it on a flat surface for further work.
Again, we pull out a couple of wires and use a knife to cut off a small section of insulation as close to the RJ-45 plug as possible. Do not damage the wires, otherwise you will have to re-crimp a new RJ-45 plug, which means additional costs for plugs and a second trip to a specialist for a crimping tool. Although even if this happens, just do not crimp the brown pair of wires (you won’t have to remove it later). It is better to avoid such a situation.
Using side cutters, bite off the brown pair closer to the plug. Carefully cut out a small piece of cable insulation about 5 centimeters from the plug, as you did before. Again, use a small screwdriver, pliers (a knife if necessary), pull the brown pair out of the cable.
After this, we take a standard telephone cable and cut it approximately in half - you will only need half for each socket. Inside it there are two (or four) wires insulated like a twisted pair. Carefully cut and bend back the insulation, leaving 3-4 cm of wires, and cut it off.
Now you need to decide which of the wires in the telephone cable is “green” and which is “red”. In my case both were black. To determine this, you can find a telephone cable with multi-colored wires and use it as a basis (everything is clearly visible through the transparent plug). You can also look for labels online.
Rostelecom services: replacement of telephone and Internet cables
The occurrence of malfunctions in telephone communications from the Rostelecom company is often associated with damage to the cable, in order to debug the operation of which it will be necessary to completely replace it. The laying of a new wire should be entrusted to technical support specialists who have the appropriate qualifications, skills, experience, and most importantly, the tools for crimping and installing plugs.
Replacing a Rostelecom telephone cable
Despite the fact that mobile communications have become widespread among the population, many do not plan to give up landline devices due to habit and convenience. As with any problems, Rostelecom subscribers are caused a lot of inconvenience by the fact that the service cannot be fully received, and replacing a telephone cable can take a long time: from the moment the technician is called until the work is completed.
The reasons that subsequently lead to breakdowns are often:
- frayed cable fibers;
- the appearance of kinks;
- vein breaks;
- reflow.
Often, defects are noticeable upon visual inspection, but there are also microscopic, hidden damages that only a specialist can identify after diagnostics.
Find out how to set up a remote control from Rostelecom to simultaneously control the set-top box and TV?
You can view the tariffs for telecommunications provider services for legal entities here.
Extraneous sounds and noises during a telephone conversation, conversation breaks, lack of communication signal may be a consequence of wear or damage to the wire cores. To correct the situation, you should call a specialist.
You can submit a repair request through the feedback form on the operator’s website, in your personal account, or by calling the support and customer service line.
Attention! During the conversation with the manager of the Rostelecom company, we recommend that you immediately clarify all the information you are interested in about the service: time, timing of the work and how much it will cost to replace the cable.
Cable TV and Internet from Rostelecom
Currently, Rostelecom is carrying out large-scale work to replace and modernize outdated copper telephone cables with modern ones made from high-tech fiber optics. Many cities are already covered by this program, and hundreds of settlements are next in line to undergo network re-equipment.
Anyone can take the opportunity and apply to connect to GPON (data transmission over fiber optic cable) in order to receive such types of services from the operator as:
- IP telephony;
- Internet access;
- watching interactive TV.
Internet television is becoming increasingly popular among users, allowing them to become the owner of a home entertainment center. Viewing hundreds of channels, recording function, rental, karaoke and other options are included in the packages offered by the provider.
Interactive TV connection options
The operator Rostelecom offers residents of Tyumen an interactive television connection via cable or Wi-Fi. Accordingly, there are two access options. The first is interactive TV, the signal of which arrives via cable as a separate stream. The service has such features as:
- availability to all existing Rostelecom subscribers;
- wired connection;
- limited work area;
- payment through a joint account.
The second is a more modern option - Interactive TV 2.0. It is impossible to say unequivocally that such a package will be better. Unlike the previous option, the connection here is made via the same line as the Internet.
Features of this connection method:
- the subscriber is not tied to a specific provider;
- the connection can be established either via wire or Wi-Fi;
- Internet connection required;
- quality depends on the speed provided by the provider on your line;
- payment online, by card or by invoice.
Having chosen the appropriate option, all that remains is to submit an application and connect access to watch IPTV.
Find out how to troubleshoot a TV set-top box from Rostelecom.
You can read about online debt with the Promised payment service here.
Open ports on the router: //o-rostelecome.ru/oborudovanie/nastroyka-porti/.
You should check with the company’s specialists about how much it will cost to replace a cable for a Rostelecom subscriber. Typically, the amount depends on the amount of material used for replacement, as well as the complexity of the job. If you submit an application for connection to GPON, the company will lay new wires at its own expense.
Source: https://o-rostelecome.ru/uslugi/kabel/