LED ceiling lighting is being used more and more often in rooms, as it provides not only a decorative effect, but can also serve as main lighting. The main advantage is that anyone can install the tape if they follow the instructions and select high-quality elements for the system.
Installing the LED strip yourself is not difficult.
Pros and cons of the solution
First of all, you need to understand the advantages and disadvantages of this option to understand whether it is suitable. In most cases, there is simply no alternative, since LED strip is much cheaper than analogues with similar properties and can be bought in almost every electrical store. The main advantages are:
- System security. Most often, the operating voltage is 12 V, less often 24 V. Both options do not pose a danger to life and in case of electric shock, human health will not suffer.
- Versatility. You can install the tape both in residential premises and in bathrooms, toilets, kitchens and even outside. For places with high humidity, it is worth choosing waterproof products; they are much more expensive.
- Compactness. The tape takes up little space - a maximum of a couple of centimeters in width and literally 5-10 mm in height. This allows you to place it in any niches, cavities or on the ceiling.
- Flexibility. The base bends well, so no problems will arise when attaching it to corners, uneven or oval surfaces. You just need to remove the protective layer and glue the tape to the base.
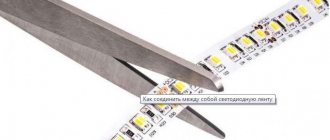
- Possibility of length adjustment. Places for cutting are usually located every 5 cm, but there are types that can be cut every 1-3 cm. It’s not difficult to choose the exact length; you can cut as much as you need. But options with a voltage of 24 V are cut after 5-10 cm, this is worth remembering.
- Easy installation. By following the instructions and having a simple set of tools on hand, you can install the tape yourself.
- Low energy consumption, this is one of the most economical options, so lighting costs will decrease.
- Long service life. An ordinary good quality tape lasts at least 10 years, which is much longer than any analogue.
- During operation, the LEDs heat up slightly; there is no need to create a system for heat removal.
- You can control both the switch and the remote control or an application from a smartphone.
- Large selection, there are both single-color and multi-color options.
The tape provides enough light for illumination.
For your information! When burning, no harmful substances are released. Even if you damage the tape, nothing bad will happen; there is no mercury vapor or glass elements in it.
The LED strip also has disadvantages, but they are much fewer than the advantages:
- For multi-color options, you need to use a controller, which costs a lot and breaks down faster than the tape itself.
- With a length of 3 meters or more, the end does not glow as brightly as the beginning due to loss of current. The problem can be solved by connecting the wire to both sides, but this complicates and increases the cost of the project.
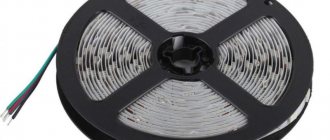
- The maximum length of one piece at a voltage of 12 V is 5 m, at 24 V – 10 m. But several sections can be connected in parallel.
Strip ceiling lighting is not difficult to make, but the room will be transformed. And thanks to the controller, you can change the brightness and shades.
Choosing LED strip for different rooms
When purchasing tape, you need to understand where it will be used and for what purposes. Only in this case can you choose a specific option. You should not use the same product everywhere; take into account the characteristics of the room and the nature of the lighting.
An option for spectacular lighting in the living room.
Before purchasing, you need to measure the approximate length of the tape to select a roll of the appropriate size. But first of all, it is worth considering the installation location. Use the recommendations in the next section.
What criteria should you pay attention to, which is better?
Taking into account the features for each room, you can decide which is best suited:
- Use only waterproof models in the bathroom. You can highlight niches, the place in front of the mirror or the perimeter, or you can make the strip the main lighting.
- In the bathroom, due to the small area, you can attach a monochrome option around the perimeter and provide good light.
- The scope of application in the kitchen is very wide. You can highlight the work area and shelves in cabinets. Often niches are made or lighting is laid around the perimeter.
General lighting in the kitchen. - In a nursery, LEDs can serve as a night light at minimum brightness. You can also illuminate the playing area.
- For corridors, it is better to choose monochromatic options, pay attention to brightness indicators so that the light is of high quality.
- In the bedroom you can make both decorative and main lighting. The choice of type and characteristics depends on this. The light should be dim.
- In the living room, it is better to use powerful monochromatic strips for general lighting or RGB options for decorative lighting. You can illuminate individual areas or niches.
Important! Use lighting standards when choosing LED strips for different rooms.
LED strip under a suspended ceiling - installation methods
Stretch ceilings are an elegant solution for uneven surfaces that are difficult to fix in other ways. And together with modern LED lighting, your perfectly smooth ceiling will look European. LED structures are used not only in apartments, but also in hotels, restaurants, shops and other premises. Read below about what types of LED strip installation exist and how to illuminate a stretch ceiling with LED strip.
- Pros and cons of using in rooms with suspended ceilings
- Mounting options
- LED lighting around the perimeter of the stretch ceiling
- Interior lighting
- Installation technology
- How to install tape under a suspended ceiling
- How to install tape around the perimeter of a stretch ceiling
- Video
- Conclusion
The best LED strips for ceiling lighting
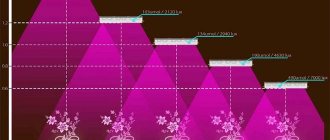
There are many options on sale, so choosing can be difficult. You first need to figure out the brightness in order to understand how much power is required. It depends on the number of LEDs per meter and their size. As for varieties, it is best to use the following options:
- Plain, best suited for general lighting or white illumination of niches and cornices. Burns brightly, light quality is good.
- RGB strip is a combination of three LED colors: red, green and blue. By changing their brightness and intensity, you can achieve different shades and even make white light. But the quality will be an order of magnitude worse than that of the plain version.
- RGBW consists not only of colored diodes, there is a white one, which burns with a bright, cold light (approximately 6000 K). Can be used for both backlighting and lighting, but due to its high brightness it is not suitable for everyone.
- RGBWW is a solution that adds another white LED with warm light (2400-2700 K). It can be used as a backlight or as a main light, because the brightness can be adjusted as desired.
RGBWW is the most advanced option for indoor lighting.
If you need to combine the main light and decorative lighting, you can lay two strips side by side. But this option will cost more than combined strips with high-quality white light.
Which installation option to choose, main varieties
LED strip on the ceiling can be attached in different ways. Therefore, you need to decide in advance how best to install it. It is necessary to prepare the base in advance, and sometimes make special structures at the stage of ceiling repair. There are several main ways:
- The location of the lighting in niches along the perimeter of the ceiling or along the cornice. In this case, when installing a plasterboard structure, a gap is left in which the LED strip is placed.
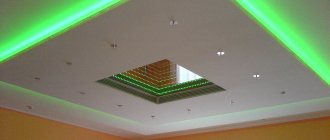
- Protrusions in multi-level ceiling structures. In this case, when constructing frames or tensioning the canvas, small shelves are left in which the strip is positioned with LEDs facing upward and illuminates the surface.
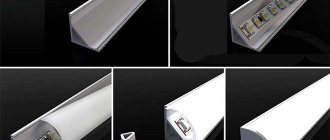
The option with a protrusion around the perimeter looks impressive. - Using an aluminum profile specially adapted for LED strip. The advantage of this option is that it is easy to mount, the appearance of the structure is neat, and the LEDs are covered with a diffuser, so the light is uniform.
- Pasting around the perimeter of the ceiling. The simplest way that also looks good.
After choosing a method, it will become clear what to buy and how to properly organize the work.
Connecting and installing LED strip
We connect the tape to the controller. The tape is usually sold with ready-made wires already available. If you need to connect LED strips to each other, you need to use special terminals (connectors). No additional tool is needed for this. The ends of the connected sections of tape are placed in the terminal and fixed. In this case, you need to make sure that the contact elements of the tape are in contact with the contacts of the connector. After this, the terminal latch is closed. The tape is securely fixed in it.
The tape is attached to a clean, grease-free surface. If it is treated with a primer or degreaser, the connection will be of better quality. After removing the protective film, the tape is attached to the desired location.
It is advisable to hide the controller so that it does not spoil the interior. For example, if you are installing an LED strip on the ceiling yourself, the controller can be hidden behind the ceiling plinth.
For proper installation, you need to follow the LED strip connection diagram. There are various connection schemes:
Therefore, it is very important to choose the right scheme correctly. Otherwise, an incorrect connection will significantly shorten the life of the tape; its parts may glow unevenly. You also need to pay attention to polarity when connecting the lighting to the transformer. If you get it wrong, the tape will fail. Therefore, if you are not confident in your abilities, it is better to turn to professionals.
| Examples of using LED strips | ||
Description of DIY LED lighting installation
To carry out the work correctly, you need to follow the step-by-step instructions. At the same time, it is not complicated, but it requires accuracy and precision. For all its advantages, the tape is easy to damage, especially if it is attached carelessly.
Preparation, necessary materials
First of all, you need to purchase an LED strip of the selected type. Always make a reserve of 10-15% so that you don’t end up with 5-10 cm missing. Also prepare everything you need:
- Controller for multi-color options. Select according to the total power of the LEDs and the type of strip. If the length is large, it is worth using several controllers to distribute the load.
- Dimmer for adjusting brightness and shades. Place as desired.
- Copper wires for connection. Heat shrink tubing for insulating connections.
- Aluminum profile, if it will be used for laying the backlight.
- Small soldering iron for connecting contacts. Sometimes you just need connectors.
- Construction knife, medium or large scissors.
The power supply is selected with a power reserve.
It is important to prepare the place for installation; it all depends on the installation features. If the tape sticks, the surfaces need to be leveled and cleaned of dust and dirt. You can degrease the base by wiping it with a cloth soaked in solvent. This will ensure good adhesion of the double-sided tape.
For your information! If the surface is porous, it is advisable to prime it to strengthen the structure.
Connection diagram
Before work, you need to draw at least the simplest diagram on which to indicate all the important points:
- The connection point for the cable supplying electricity.
- Location of the power supply unit or units and controllers. They should be easily accessible to check or replace if necessary.
- The length of the tapes depends on the power of the equipment and the number of controllers, as well as the method of connecting them.
- If you need to install two power supplies, connect them in parallel. When two tapes are placed on one block, connect them as shown in the diagram below.
The LED strip connection diagram is simple.
Installation and power connection
If the preparation is done correctly, then installing the LED strip is easy. The process consists of several stages:
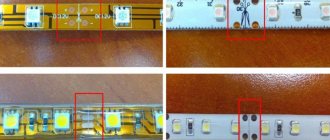
- Take measurements and cut a piece to the required length if required. Cut only along the dotted lines marked with contacts. Connect the wires using a connector or soldering them.
- If you need to connect two strips, you can solder them directly along the contacts; the thickness of the base allows you to do this. Or they use small pieces of wires.
- Connect the power supply and controller following the diagram. The main thing is not to confuse the terminals so as not to damage the equipment. Check your work first.
- Secure the tape; to do this, you need to carefully glue it along the line, gradually removing the protective layer from the back side. Place the power supply and controller in the cavities or glue them with double-sided tape.
Cutting can only be done in designated areas.
Important! The main thing is not to mix up the wires, as you will have to redo the work later. The tape will not burn out because of this.
Video on the topic:
Common installation mistakes
There are several mistakes that are often made during installation and because of which the LED strip lasts much less. Remember a few tips:
- Do not fix the backlight with plastic clamps. They pinch the base and it burns out in these places.
- Do not connect strips in series with a total length of more than 5 m.
- When using the silicone-coated version, it is better to glue it to an aluminum profile, which serves as a cooling radiator and prevents overheating.
- Choose a power supply with a power reserve of at least 30%. If it constantly works at the limit, it will not last long.
Options in a silicone shell are not afraid of water, but they heat up much more.
If you understand the topic, then choosing an LED strip and installing it on the ceiling is not difficult. The main thing is to choose a suitable power supply and controller, not to mix up the wires when connecting and securely fix the backlight to the surface.
Beautiful examples in the interior
To choose your own option for LED strip ceiling lighting, you can refer to examples of beautiful designs from the photo gallery.
- A classic example of emphasizing a ceiling ledge with strip lighting combined with spotlights.
- Flexible ribbons favorably emphasize the curly lines of the two-level ceiling, emphasizing the guest space of the living room.
- Highlighting the complex design of the dining area with a counter table looks unusual, but it is not devoid of harmony.
- The technique of combining LED lighting and spotlights using different shades allows you to create a fancy ceiling composition.
- An unusual version of the built-in strip lighting with a lightning effect on the ceiling looks impressive.
- Accentuating a multi-level ceiling space with lighting of different colors creates a unique effect.
- Highlighting a small fragment of a stretch ceiling with strip lighting creates the illusion of a realistic image.
In this video you will find a master class on installing an LED strip, and useful tips that will help you avoid common mistakes.