How to assemble and install a distribution box
Anyone, even the least experienced electrician, can tell you how important the distribution box is for the electrical power system. This seemingly not the most complex design provides:
- evenly distributed load from elements consuming energy;
- the ability to add a new electrical circuit branch to the general power system at any time without resorting to fundamental changes in the existing wiring;
- ease of use and repair of electrical communications.
In principle, electrical distribution boxes are housings made of plastic and metal, inside which a number of necessary parts of the electrical network can be joined together. Today we will talk about the switching version of the distribution box, which, in turn, can be overhead or built into the walls. Both types, as a rule, are supplied with the required number of special terminals, with the help of which the wires can be connected reliably and quickly.
The switching type of distribution boxes is the optimal solution if there is a need to connect wires with cores made of different materials. A typical example is copper and aluminum cables, which tend to oxidize when interacting with each other. As a result, after some time the contact disappears completely and some “consumers” simply stop working.
As for the shape of the current distribution boxes, there is no particular variety here, only square and round options with various dimensions.
Junction box installation technology
So, let's talk directly about the process of installing and connecting the distribution junction box. If we talk about installing the box itself, there is nothing complicated or problematic here. Built-in versions of boxes are built into the walls, and overhead boxes are attached to the walls with dowels or self-tapping screws. Installation of a built-in box is more complex and time-consuming; in this case, it involves the creation of a special landing niche. In one of the walls, closer to the ceiling, it is necessary to make a niche of the appropriate size, this is where the box will be installed and secured with alabaster or cement mortar.
However, these procedures refer to the final stage of work. First of all, you should create a “network” of grooves - channels through which cables will be connected to the distribution box. The required number of drops to switch boxes and sockets must be in a strictly vertical position. In order to lay cables horizontally, it is recommended to take advantage of the gaps between the floor slabs and the walls.
Connecting the branch box
The wiring diagram is determined by the installation diagram, which is developed before the start of work. A neutral, phase wire and grounding must be installed in each box. The devices are connected to wires that go to switches and sockets.
Since the box allows you to connect different groups of wires, keep in mind that they must belong to the same network, type of voltage and the same type of current. Radio, telephone and fiber optic lines cannot be connected together in one design.
When one of the lines in a mixed distribution box is disconnected, at least one active circuit will certainly remain under current voltage, which is very dangerous. Therefore, if you plan to install different lines, you must provide a separate distribution box for each of them.
When introducing cables into the box, their outer shell is cut so that at least a small part of it goes inside - 0.5-1 cm. To prevent the cable from slipping out, it is carefully secured at the input and output, as well as along the entire route every cm. The length of the gaps depends on its rigidity.
Distribution boxes for electrical wiring
The use of a distribution box when installing an in-house electrical network can significantly reduce the risk of fire. Connections of electrical wires are the most problematic from a fire safety point of view. The electrical wiring should be connected precisely in the junction box on the wall in order to create a non-flammable barrier between the point of potential fire and the interior finishing materials.
Why do you need a wiring diagram?
It turns out that installing modern electrical wiring in an apartment is a real art, which only a professional electrician can handle.
If you do not want to constantly change the decoration of the walls in order to mask cables that appear here and there, we recommend that before renovating an apartment or building a house, draw up a drawing indicating all significant objects related to electricity: sockets, switches, an electrical panel with an RCD, lighting fixtures.
Based on the requirements or wishes of the home owner, the electrician draws up a schematic diagram of the electrical wiring in the apartment. His task is to divide the cables into groups in order to properly distribute the load, think through the control and protection system, and ultimately do everything to guarantee safety and comfort.
Junction box for electrical wiring
According to the PUE standards, branching and connecting places for wires in the house should be located inside the housings of electrical appliances, in special niches in partitions and ceilings, or in junction boxes. That is, all such switching nodes must be additionally insulated in case of overheating and fire.
In principle, you can do without a box. But then you will have to connect each outlet to its own separate wire from the house electrical panel without twists or other connections along its entire length. As a result, the cost of such electrical wiring due to the large total footage of the lines will be considerable. Plus, the grooves and boxes will need to be larger in size, since in some places several electrical wires will be laid in a bundle.
Distribution boxes (also known as junction boxes, switch boxes and branch boxes) differ in design, appearance, material of manufacture and degree of protection, as well as the presence or absence of terminals inside. For each case, you should select your own option, otherwise this element of electrical wiring will be of little use.
Types of boxes and wiring options
By installation method
According to the installation method, the boxes differ in:
The former look more presentable and are used when laying electrical wires openly. The second ones are installed inside building structures and then covered with decor. For example, it is recommended to do electrical wiring in a wooden house with your own hands using open installation. But when laying cables in steel pipes under the finishing, hidden wiring is also possible using appropriate electrical installation products.
Step-by-step instructions for terminal wiring
By type of material
Boxes for arranging branching points for wires are made from non-flammable plastic or metal. They are usually selected in accordance with the braiding (insulation) material of the electrical wiring. If the cable is armored or laid in a metal pipe, then the junction box must also be made of metal. For other cases, it is better to choose a plastic analogue.
Other boxes
The degree of protection of junction boxes is IP from “20” to “68”. For dry, heated rooms, IP “20” or “30” is sufficient. But usually for domestic conditions, in a cottage or garage, they choose the option with IP “55”. But for bathrooms and outdoor installation, you should purchase an electrical installation product with IP from “65” to “67”. The number of inputs can be from two to sixteen.
If the degree of protection is increased, then the cable openings are equipped with glands. But usually they are simply made in width to match the thickness of the inserted wire. The inputs can be located both in the sides of the product and on its bottom (the inner side in contact with the wall).
Distribution of wires in the box
Installation
The junction box is installed on the wall with a lowering of 10–30 cm from the ceiling. Moreover, this is done in such a way that there is open access to its lid. Checking the condition of the wires should be carried out on a regular basis.
Step-by-step instruction
Installation of the junction box is carried out in four simple steps:
- Fastening the box to the wall according to the wiring diagram.
- Planting wires inside and then connecting them to each other.
- Checking the assembled electrical network.
- Closing the electrical installation product with a cover.
Conclusions and useful video on the topic
Visual instructions for installing a junction box:
It is not possible to cover all existing design variations of distribution boxes in one review. But the design principle and installation features for all existing products are almost the same.
Therefore, the instructions given can be considered universal for installing many models of junction boxes.
Those interested in the selection and installation of junction boxes are encouraged to leave comments, ask questions and participate in discussions. The feedback form is located in the lower block.
Security measures
The most important thing when installing a distribution box is compliance with basic safety measures. Wires of different metals should be connected only through adapters, and not directly. Plus, do not confuse phase with neutral and ground. And before closing the junction box with decor, if a hidden wiring option is chosen, you should check the entire system for functionality.
Standard color scheme for phase identification
Installation of distribution box
An important element of electrical wiring in a house or apartment is the installation of a junction box. Being a link in the entire electrical chain, it is responsible for the distribution of electricity among consumers. A box is installed in each room or room; it collects all the wires that come from sockets and lighting fixtures.
Electrical wiring diagram in the apartment: electrical wiring for different rooms
An obligatory part of renovation work in an apartment is the replacement or installation of electrical cables, junction boxes, and electrical panels.
A well-chosen electrical wiring diagram will protect your home from accidents and unforeseen situations. We will tell you what you need to consider when replacing or installing electrical wiring yourself. Here you will learn how to draw up a diagram and distribute electrical points in one-room, two- and three-room apartments. Taking into account our recommendations, you can provide yourself with a trouble-free energy network.
What is a junction box and what does it consist of?
It is perhaps difficult to overestimate the importance of the junction box. Thanks to the box, convenience is provided in the process of operation and in repairing electrical wiring. In addition, as already mentioned, it distributes the load from all consumers in the room. The electrical distribution box promotes order and makes it possible to add more and more branches of the electrical network, without radically interfering with the existing wiring.
In appearance, the electrical distribution box is a plastic or metal casing to which all electrical wires are connected without exception. It is divided into two types: overhead or built into the wall. Each of them is equipped with special terminals, with the help of which a reliable and quick connection of wires is made.
This version of the junction box allows you to connect wires made of different materials. The box allows you to connect even incompatible materials, such as aluminum and copper, which oxidize when in contact with each other. Over time, such contact disappears and any of the consumers stops working. The shape of the boxes is also divided into two types: square and round. They all have different sizes.
Methods for connecting wires in a junction box
There are several basic ways to connect the wiring in a junction box. In order to choose one of them, you need to consider the options in more detail.
Stranding and insulation
This is an old, but proven method of connecting wiring over the years. The bottom line is that the ends of the conductors are first stripped of the insulation layer and then twisted together with pliers. After which this place is wrapped with electrical tape.
This method has advantages:
- ease of installation;
- no need for additional expenses.
However, there are some disadvantages:
- poor-quality connection of cores;
- inability to connect copper and aluminum wires.
It is worth noting that conductors are often connected in this way during temporary installation of electrical wiring. According to safety regulations, the connection method is not suitable for rooms with high humidity levels.
Soldering or welding
It is in these ways that you can make a durable connection of wiring cores. First, their ends are carefully stripped of the insulating layer, then twisted, but without effort. Next, you will need to solder the wires using solder and a soldering iron so that they turn out monolithic. Then you need to wait until they cool naturally, and only then wrap them with electrical tape.
In cases of soldering thick wires, you will need to use a soldering iron with a dense copper tip.
The advantage of soldering is the reliability of the connections, but this method also has some disadvantages:
- the need to purchase a soldering iron;
- this is a labor-intensive process that not every beginner can handle;
- the connection is permanent;
- Over time, the level of resistance in the soldering increases, which leads to voltage leakage.
Often, instead of soldering, the cores are connected by welding. The process has a similar principle, only here a welding machine is already used, so the master must have the appropriate skills.
Crimping with sleeves
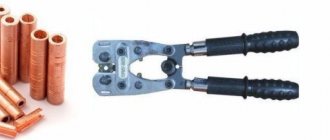
This is also one of the most reliable methods of fixing conductor cores. Here they are placed in a special sleeve and clamped with a crimping tool on both sides. After which this sleeve is wrapped with electrical tape or a cambric is attached to it.
It is worth noting that the cores are placed in the sleeve either from different sides or from one. In the case of the first option, they will be connected in the central part of the tube. When choosing the second option, it is necessary to take into account that the diameter of the cores should not exceed the volume of the sleeve.
The advantages of such a connection should be noted:
- reliability;
- affordable cost of sleeves.
Disadvantages of the method:
- The sleeve is used only once. This means that in case of repair, it is torn down and a new one is fixed.
- You will need to use a special tool for high-quality crimping on all sides.
- Wires made of aluminum and copper are crimped only with special tubes, which are difficult to find in stores.
- Electrical installation will take time.
Terminal connection
If the wiring is made of different materials, it is recommended to use special clamps with springs or screws. Connecting the conductors using this method is not difficult; all you need is a screwdriver. The main thing is not to overtighten the bolts.
DIY distribution box installation
The installation of the overhead box is quite simple; it is attached to the wall using dowels. But installing a built-in distribution box will require some effort and skill. You will need to create a special seat for it. As high as possible, preferably near the ceiling, a niche is selected in the wall into which the box is installed, using alabaster or cement.
However, this refers to the last stage of work; first, a network of grooves should be installed through which wires will be supplied to the box. Descents to electrical outlets and switches should be made strictly vertical; to install horizontal wiring, you can use the existing gap between the floor slabs and the wall.
After completing the installation of the grooves and installing the socket boxes, it is necessary to proceed directly to the installation of electrical wiring, while the installation of the distribution box is an integral part of the work being carried out.
One important detail should not be forgotten. To avoid difficulties when connecting wires in the box, the end of each wire coming out of it should be labeled. They just connected the wire feeding the electrical panel and immediately signed its “input”. They connected the wires from the sockets and signed again. In this case, each individual circuit that connects to the distribution box should be signed separately, in this case, you will definitely not get confused with the connection of the wires.
Putting aside for a moment the question of the design of the junction box, let's figure out what wire cross-sections are used when installing electrical wiring. From the panel located in the apartment, electrical voltage is supplied to each room via a two- or three-wire wire; its cross-section should not be less than 4 square meters. It is this cable that can withstand any sufficiently powerful consumer. In this case, the sockets are connected using a wire having a cross-section of 2.5 squares, and lighting devices - 1.5 squares.
Having selected the correct cross-section of the wire and assembled the electrical wiring, we proceed to complete the installation of the junction box and connect all the necessary wires in it.
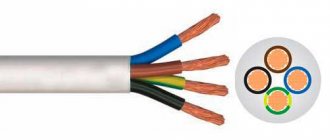
The work, which is quite complex at first glance, is done quite easily if you delve into the installation process and understand the very principle of how the wiring works. We have a variety of wires and inputs for connecting them. The input consists of two or three wires that differ in color. One of them supplies the phase, the other “zero”, the third is intended for grounding. Wires are connected to switches and sockets in exactly the same way.
In general, the mechanism for connecting wires is now clear: “zero” to “zero”, phase to phase, grounding to grounding. When connecting wires to sockets, there are no difficulties at all; you just need to connect the wires by color. The situation with connecting lighting is a little different. In this case, the outgoing phase going to the switch is connected to the phase of the lighting circuit, and the “zero” of the input is connected to the “zero” of the lighting.
One of the most important points when constructing an electrical distribution box is a reliable and high-quality connection between them. If during installation work a communication box equipped with terminals is used, the situation is simpler. You just have to insert the wires and tighten the screws harder. But in the case when the box design does not require the use of special terminals, the wires must be soldered. This is done in this way: first, the wires are twisted together with pliers, after which they are soldered using rosin or other special solder, as well as tin. If large-scale installation of electrical wiring is carried out, electric welding is often used to ensure high-quality connection of wires.
Connecting switches
The input wires are connected to the switches according to the principle of similarity. There are 2-3 wires from the power source. Each of them is responsible for phase supply, disconnection and grounding.
Accordingly, when connected, they will connect like this:
- shutdown to shutdown;
- ground to ground;
- summing up to summing up;
There is nothing complicated about connecting an outlet. The principle of color similarity, phase and working zero determination also works here. Each color corresponds to the color of the opposite contactor.
![Turboloan [CPS] RU March](https://dush-pol.ru/wp-content/uploads/turbozajm-cps-ru-mart-330x140.jpg)
