Tips on how to properly position the lighting near a mirror
- The color of the lamps should be close to the sun (neutral white).
- Use several types of lamps: above the mirror - neutral white, main lighting - a milky warm shade.
- Light sources should not be reflected in the mirror.
- It is better to use frosted bulbs on make-up mirrors to avoid shadows or glare.
- Use two types of light: diffused (a uniform flow of light from the main lighting, such as a chandelier) and directional (light with a direct flow of light from backlights, light spots, sconces, etc.
Large wardrobe mirror with lighting
How to install an illuminated mirror
Installing an illuminated mirror can be done by anyone with minimal skills in such work. Before you begin, you need to study the instructions to understand how best to attach the structure. After reading the documentation, follow the steps in the table.
| Step 1. The location of the mirror is determined, first of all, the height is important. Marks are made on the wall in the places where the fasteners will be located. Ideally, do them at the seams between the tiles. | Marking can be done using a laser level. |
| Step 2. It is best to drill first with a drill for ceramics, and then with a drill for concrete. Select the depth according to the size of the dowels used. If they are flimsy in the kit, you should buy reliable ones. | Bit for drilling ceramics. |
| Step 3. Attach the mirror to the surface; this part of the work is best done with an assistant so that he holds the product. If the wire needs to be connected directly to the power cable, then pull it through the hole in advance during installation, so as not to remove the structure later. | We fix the mirror. |
| Step 4. To connect the wires, you will need a connection diagram; the insulation markings are indicated there so as not to confuse anything. It is best to connect with special terminals, do not use electrical tape or twists. After finishing work, check the switch on and off to make sure everything is normal. | We connect the lighting cables. |
| Step 5. If the lamps are placed on the side, you may need to mount them to the wall; in this case, you often have to route the wires to the right places, which complicates the work. Sometimes the elements are attached to the sides of the mirror body, this is much simpler. The lamps must be mounted strictly according to the instructions; most often, points for installation are marked on the frame. | If the lamp is mounted separately, see the complete drawing. |
| Step 6. Connecting the socket options is much easier, since you just need to insert the plug. But in this case, you will have to first supply power to where the mirror will be located. The socket must have the highest class of moisture protection and a lockable housing. | You can use a plastic protective case. |
Important!
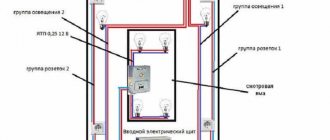
Before starting work, be sure to turn off the power supply to the instrument panel to eliminate any problems. Do not forget to connect the ground wire if available.
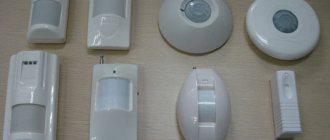
Types of lamps in backlights and their color temperature
All light sources are divided into two groups: cold and warm light, and have their own color temperature (see diagram below). For example, a warm white color (from 2800 to 3200 Kelvin) is suitable for a cozy atmosphere in a bedroom, and neutral white (from 3500 to 4000 Kelvin) is suitable for more practical lighting. However, color temperature cannot be used to judge the quality of color rendering, since this quality depends on from the design of lamps and lighting itself.
Color temperature warm daylight cool light scheme
ADVICE:
When lighting any room, it is better to use two types of light: natural functional lighting and warmer halogen lighting.
Halogen lamps - warm white
Full halogen lamps on mirrors give a yellow glow and emphasize the shadows in the reflection (this makes the face look tired), but at the same time they make the surrounding colors brighter. For example, halogen lamps enhance the shine of a metal mirror frame. An excellent option if you need to highlight the decor in the interior with lighting.
Wall lighting near the dressing table mirror
Color temperature chart by type of lamp in Kelvin
LED lamps - neutral white
Natural daylight is considered the standard of light, and LED lamps in a neutral white shade (4000-5000 Kelvin) are the closest to it, and therefore the most popular.
Round full-length mirror LED lighting neutral white
Neon lamps - bright colors for decoration
Neon lighting for mirrors is often used as decorative. It definitely won’t be suitable as the main light source, but it will transform the interior.
Blue neon lighting above the mirror and orange cabinet in the bathtub
How to make a mirror with LED lighting yourself
Make your own dressing room mirror with LED lighting
- The easiest way to make your own lighting in a mirror is with an LED strip. To do this, you need a power supply, the tape itself, connecting wires and silicone sealant.
- Cut the desired piece of tape, usually the places where you can cut the tape are marked with dotted lines.
- Attach the tape to the back of the mirror with double-sided tape
- Solder the wires taking into account the polarity. There is a way to connect the backlight without a soldering iron - use an LED connector. Insert the wires and close the lid. However, such a catheter costs the same as 5 meters of LED strip.
- Treat the joints (where the tape was cut) with sealant.
- Secure the power supply and connect it.
- And to attach the LED strip to the mirror frame, use a thin LED strip with an adhesive side.
IMPORTANT:
If the backlit mirror is in the bathroom, then the LED strip should be covered with a moisture-resistant coating.
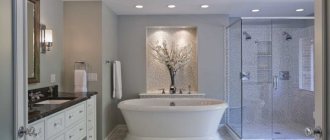
Hollywood mirror
You've probably seen these gorgeous illuminated mirrors in movies and in photos from celebrity dressing rooms. A mirror with lights creates a glamorous atmosphere and can decorate a dressing table in a bedroom or bathroom.
You can look for a Hollywood mirror in specialized stores or make a backlit bathroom mirror with your own hands. Now you will learn how to do this.
How to make a mirror frame yourself
The most popular material for the frame is the finishing materials left over after repairs: trim from doors, windows and trimming skirting boards, especially ceiling ones. The latter are great for DIY frames because they are easy to cut, glue, any paint can be applied to them well, and the material is durable.
Rococo style mirror frame
ADVICE:
If you want to repaint or age the baseboard (or any other material), do it in advance so as not to spoil the mirror later.
- Measure the mirror and use a construction saw to cut the required size plinths at an angle of 45°C or cut straight (depending on which joint you prefer: oblique or straight).
- First, using silicone sealant, glue the base - a sheet of plywood - to the mirror (determine the size based on the size of the mirror and the width of the frame). This is not necessary, but remember that it is easier to glue the frame to plywood or thick cardboard than to glass.
- Glue the plinth joint to joint and press down the entire structure with a weight (distribute it evenly over the entire mirror so that it does not crack) and leave for 24 hours for better gluing.
- If the mirror has a horizontal frame, hang it on the wall (choose a mounting method based on the weight of the mirror, for example, a small one will be held on with mounting tape, and a large one with “liquid nails”; if the mirror is vertical, it will look good on the floor near the wall.
Frame for mirror made of wood and ceiling plinth
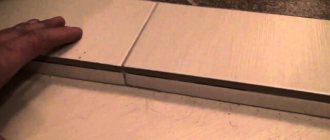
Instructions for installing the tape
You can easily illuminate the mirror with an LED strip yourself. The main thing here is accuracy and adherence to consistent actions:
- You should start with precise markings for placing the LED strip and metal profiles. Here you should consider how you would like the rays of light to shine from under the surface of the mirror.
- Glue the profiles with brackets, and before doing this, degrease the contact surfaces and parts.
- Place pre-soldered sections of LED strip onto the surface of the profiles. The tape has a sticky base for fixation, but still the surface underneath also needs to be degreased. It is not recommended to place the tape directly on the mirror amalgam, since in this case, as a result of regular thermal exposure from the operation of LEDs, the surface of the mirror will begin to deteriorate.
- To fix the power supply, you can use the same polymer glue that you use to attach profiles, or double-sided tape.
Many people insert a switch into the electrical circuit of the mirror illumination. This is not advisable. The fact is that it needs to be installed on the section of the circuit from the network to the power supply, where the voltage is 220 V. The switch is another element of the circuit where, one way or another, the tightness of the insulation will be broken. This will reduce the overall safety level of the entire electrical system. It is much easier to turn the backlight on and off by inserting and removing the plug from the socket.
What you need to know before attaching a mirror
- If the mirror is large and the frame is voluminous, then it is better to mount such a mirror on holders, on average each of which holds 20 kg.
- If the walls are uneven, then it is also better to choose holders for fastening.
- If the walls are smooth or the mirror needs to be installed on a cabinet door/niche, etc., you can use glue.
- To glue mirrors, it is better to use special glue for mirrors or silicone sealant.
- To attach a mirror in the bathroom, it is better to use glue with antifungal additives.
- Before gluing the mirror to a wall/cabinet/niche, etc., it is important to degrease this surface (wipe with alcohol, wash with soapy water and dry).
- If the mirror area is small (from 600 to 2000 cm2) and the thickness is no more than 5 mm, then double-sided mounting tape can be used to attach the mirror.
Round mirror dressing table
Lampshades of different shapes for the bathroom
The most familiar picture for us is sconces on both sides of the mirror. Similar light sources could be seen before in many apartments when illuminating mirrors in the hallway or bedroom. When the lamps are placed sideways, the face will be illuminated evenly from above and from the sides. This design is appropriate:
- for retro and country style (with shades made of frosted glass or plastic);
- for a nautical style (imitation of ship lanterns);
- for a classic or palace style (light sources - in the form of candelabra or models with pendants, where transparent cut glass or crystal is often used);
- in minimalism or for small bathrooms (as an option, white matte balls that provide soft light that does not hit the eyes);
- in Tiffany style (colored glass, forged elements);
- in high-tech style (if you use cold light in a cylindrical or curved model);
Lamp shades can be protruding or completely adjacent to the wall.
The direction of light from the lampshades near the mirror in the bathroom
schoerner
The direction of light affects both the proportions and dimensions of the room, as well as the perception of one’s own appearance.
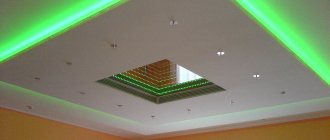
1. If the lampshades are directed upward, the ceiling reflects the light and distributes it evenly throughout the room, especially if the walls and ceiling are made of highly reflective materials. This light is saturated, but does not irritate the eyes.
2. Light sources can be placed not only on both sides of the mirror, but also above it. If the light flux is directed downwards (direct light), then a “subway effect” can be obtained, which helps to focus attention on skin imperfections.
3. Sometimes in cylindrical or tubular lamps the direct light has a double direction: up and down. This allows you to use the ceiling, walls and even the surface of the tabletop as reflectors, achieving brightness with small lamp sizes.
4. Scattered light sources distribute light evenly in different directions (for example, matte spheres).
Placing the lighting only at the bottom visually deforms the face.