Published: 11/23/2014 Category: Materials and technologies, Repair, Construction Views: 14886
Installation of electric infrared film heated floor
After a preliminary acquaintance with the variety of electric heated floors and their basic structure, described in the first part - “Electric heated floors: part 1. What are they?”, it’s time to move on to the features of selection, calculation and installation in particular cases of using electric heated floors. So, if you are ready to purchase an electric underfloor heating system, then first you should decide on its intended purpose - whether it will be additional or primary heating of the room.
Two options
To understand how to properly make a heated floor, and whether you can handle it yourself, you need to get acquainted with their structure. Let's consider two options for heated floors - water heated floors and electric heating systems. Each of their options has the right to life, the final choice is up to the consumer.
There are many subtleties and nuances that need to be taken into account when choosing which system is better:
- Electrical systems will be more expensive during operation, but their installation will not be difficult and the devices and devices themselves are much cheaper. Now you can choose electric floors of various modifications. Installing electronic thermostats will significantly reduce energy consumption, especially in cases where family members spend most of their time at work or traveling. A big plus of installing warm electric floors is that you can use temperature sensors to set different temperatures in individual rooms. For example, you can make the nursery warmer than the family room.
- Water floors are difficult to install, and even the simplest equipment for it will be more expensive than high-quality electric ones, but they will pay for themselves during operation. The difficulty of installation lies in the fact that you need to select suitable pipes, which are not as easy to install as it seems, since they must be a solid coil. Water floors made from high-quality pipes, in compliance with all conditions, are considered very durable and reliable. The savings are that water floors can be connected to an existing heating unit. As a rule, this is a gas boiler, and this fuel is considered the cheapest. On the other hand, to install a gas unit, considerable funds are needed. Therefore, with a small house area and warm winters, you can get by with electric heated floors.
To choose a convenient option, you need to know how to properly install an electric heated floor and how to install a water one.
Introduction to heated floors
Heated floors are characterized by certain nuances, without knowledge of which it is impossible to obtain a positive result. If the technology is broken, then during operation it will not be possible to achieve effective heating of the subfloor in the room. In addition, it is worth paying attention to the fact that such installation is feasible for private construction. In apartment buildings, it is unlikely that special permission for the device will be obtained. And the heating season will affect the degree of heating of the air in the room.
New buildings include water heated floor systems in the design. To avoid heating failures, an autonomous boiler operates instead of a central one. Due to this, you can heat the room at any time and at your own discretion, adjusting the temperature conditions.
The most popular type of screed is concrete screed, which has a sufficient number of positive qualities and is also easy to install. But if you pay attention to the other main options - laying or semi-dry, then all the work can also be done without much difficulty. In addition, sometimes the results are even better than when pouring concrete.
Temperature change in the water heated floor circuit
There are several main and very important stages in which the installation of a water-type heated floor is carried out; the step of laying the heated floor is selected. All of them should be adhered to without fail and all the necessary time should be spent to achieve results. This should include:
- Design and calculation of heated floors.
- Preparatory activities.
- Assembly of the collector group and pipeline.
- Heated floor screed.
- Floor covering.
What is a water system
Water floors require the presence of a heating unit to which a water circuit can be connected. Therefore, a water floor is most often installed where it is possible to install an autonomous heating system. In such cases there are no problems. Sometimes they are still connected to central heating systems, but in this case there are some nuances, which will be discussed later.
The main element of such a system are pipes. Therefore, when figuring out how to properly install a heated floor, you need to pay attention to the choice of material from which the pipes are made.
What kind of pipes can there be?
To choose the right pipes for a water floor system, you need to know what properties the materials from which they are made have, and what to especially pay attention to.
Important points when choosing pipes:
- Pipes must be solid along their entire length, without seams. And it doesn’t matter whether the seams are welded or soldered.
- Polypropylene or rigid steel pipes are not suitable, since they cannot be laid on the floor in a single contour. Adapters and fittings are not used for concrete screed; they are not designed for this due to their performance characteristics.
- Elastic pipes that are not subject to scale formation and do not react with oxygen are suitable for water heated floors. The technical characteristics of such pipes should indicate that they can be installed under a concrete screed in a heated floor system.
- The pipes must withstand a pressure of 8 to 10 bar. This is a very important condition when choosing them. Otherwise, there is a possibility that the heated floors will break through the system.
- The average cross-section of the pipes should be from 16 to 20 mm. A thinner diameter will reduce heat transfer, and for a thicker one you need to heat a very large volume of coolant. This will increase fuel consumption.
- Copper pipes are considered the best for water floors. They combine very high heat transfer and are durable. However, very expensive in price.
- For a long time, metal-plastic was the optimal choice. But good metal-plastic pipes are not cheap now. And it is highly undesirable to install poor quality pipes into heated floors, because remodeling the system will be very expensive. If you buy metal-plastic pipes, then you need to buy them from a well-known manufacturer that has proven itself in the market, at a retail outlet that you can trust.
Advice. When choosing metal-plastic, there is one trick: you need to look for pipes that have an oxygen barrier. The fact is that metal-plastic pipes are made of aluminum, which becomes brittle with constant contact with oxygen.
There are a lot of new products on the market made from cross-linked polyethylene, made using high technology. Pipes marked “PE-Ha” and having a protective layer “EVON” are ideal for heated floors. Consumers have already appreciated their quality.
Corrugated stainless steel pipe is another great new product. But quite expensive.
Important. When choosing pipes, you need to take into account that the contour is laid correctly only when it is solid. In this case, the length of one circuit should be no more than 80 meters. When this length is not enough, then you need to lay two contour lines.
Installation options and procedure
When the house already has water heating, the task is to integrate a heated floor into the existing system. If the system design starts from scratch, installation of a water heated floor heating unit is necessary.
The concept of “thermal unit” includes a heating boiler with a heat exchanger and the main elements of its piping:
- circulation pump. The installation of a heated floor requires the choice of forced circulation of coolant in the circuit;
- filter. Installed together with the pump, needed for cleaning the coolant;
- expansion tank - a device for relieving excess pressure;
- safety group: pressure gauge, automatic air vent, safety valve and other elements that control the operation of the system and prevent emergency situations.
When using a gas boiler, it is also necessary to provide a gas supply from the main line or cylinder and a chimney. When using an electric boiler, a power cable must be connected to the heating element.
The pump is most often installed on the return line (the pipe through which the cooled coolant returns to the boiler) directly in front of the boiler. The expansion tank is usually installed at the highest point of the system, but for closed systems with membrane-type tanks this is not a necessary condition.
Important! To connect the boiler to the gas mains, permission from the local administration is required. Insertion into the main line and connection may only be carried out by personnel who have the appropriate license.
Installation of the floor itself can be carried out in several ways - with or without a cement-sand screed, using special insulating mats, laying pipes between wooden joists or on top of the subfloor.
The choice of method depends on the type of foundation: if the house is wooden, do not use a screed, because load-bearing wooden structures will not withstand the load. And when laying on the ground, a screed is needed, because... without it, the thermal efficiency of the floor will be low.
The choice also partly depends on the floor covering: laying screed under laminate is undesirable, because too thick an intermediate layer between the pipes and the room will interfere with heating. And the technology for installing water-heated floors under tiles involves installing a screed.
Another selection criterion is the height of the ceilings. The screed inevitably takes up some of the usable space in the room.
Selection of waterproofing materials and heat insulator
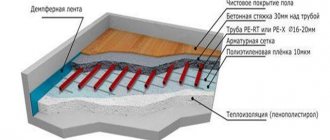
A water-heated floor requires the installation of a waterproofing layer. It can be ordinary polyethylene film of at least 150 microns. It is spread over the entire area under the entire contour.
There is a large selection of thermal insulators. The most effective is tile extruded polystyrene foam with bosses. It is not cheap, but it is incredibly reliable and very convenient to install.
Sometimes, in order to save money, foam boards with characteristics of at least 40 kg/m3 are used. But still, experts do not recommend doing this. It is believed that even such dense foam may not withstand. How do foam boards behave under heavy load? They “sit down,” and thus create a threat to the integrity of the installed underfloor heating system.
Regular tile extruded polystyrene foam without bosses, smooth, has a good margin of safety. It is affordable, and this is the golden mean among all heat insulators.
Choosing a method and scheme
To install a heated floor “pie,” two main methods can be chosen:
- Concrete. The simplest and most common option. The heated floor contour is laid under a concrete screed. Quite a lot of work will have to be done. Sometimes it will be problematic even to carry out installation on your own. Here you will need to choose the optimal layer thickness so that the quality of the heated floor is the best. Before laying the floor covering, you will also need to wait until the solution has completely dried.
- Grazing. Concrete work is not carried out here at all, and there is also no “wet” method. No water is used at all during the execution process. The main components are ready-made materials. This allows you to slightly reduce the costs of installing a heated floor, as well as the period of its implementation. But it is worth noting that the larger the “pie” layer, the more money will be spent. Depending on the chosen material, several varieties are distinguished: polystyrene system, as well as wooden (slat or modular).
In each case, you should know how to lay a heated floor. All the subtleties are contained in technology that must be observed.
The optimal distance when laying underfloor heating pipes is 150mm.
Particular attention should be paid to the choice of the layout of the underfloor heating pipeline. There may be several main options: snake or snail. The most effective method is the “snail” method, when the pipes are located throughout the entire area of the room in a circle, starting from the walls and heading towards the central part. After reaching the center, the pipeline is directed back. Efficiency lies in the fact that the hot coolant will be distributed over the entire plane in the room. It will be located alternating with the reverse flow, which will be cold. In this case, it is very important to choose a step for laying pipes that will allow heat to be transferred to the entire surface of the floor.
Design and calculation of heated floors
As for the “snake” scheme, less people use it as the main and only option. The fact is that the main heat will be concentrated in the area where the hot coolant exits. The second half, where the cold flow will be directed to the outlet, will warm up noticeably less. An alternative and more effective option is a double snake. But the installation process takes longer and requires attention. There are also features regarding the distance of correct installation of a heated floor, on which the degree of heat transfer will depend, as well as its uniform distribution.
There is also a combined scheme, when both of the above options are combined with each other. So, for example, you can arrange a “snake” pattern at the entrance to the room, and in the central part of it, where most of the time is spent, you can choose a “snail” pattern.
What else is needed for warm water floors?
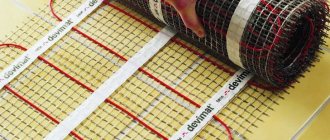
In addition to the materials listed, you will need to make a reinforcing mesh for the screed. You can, of course, do this yourself. But this work is justified only if there are suitable metal rods on the farm and there is nowhere else to use them. It is better to buy a ready-made mesh made of 3-4 mm wire, with cells of 10 cm.
The compensator for temperature changes in the concrete screed is a damper tape. Modern tape is foamed polyethylene 1 cm thick. Rolls come in different widths, you can easily choose the size.
Installation of water floors
If the materials are of high quality, then the question of how to properly make a water-heated floor can be solved much easier and faster. As a result, all work and actions will be more economical and there will be no need to redo the system several times.
There are many installation methods, the stages of the most economical are as follows:
- First you need to prepare the base. You should get an absolutely flat, clean surface. Small depressions can be filled with regular sand. When the unevenness is very large, you will need to make a concrete screed of such thickness that it completely levels the floor.
- Then waterproofing is applied. If the floor was leveled with a screed before, it should be dry by this time. The polyethylene roll is rolled out over the entire area with an overlap of 15-20 cm and even slightly overlapping the walls.
- A damper tape is attached around the entire perimeter of the room. This will protect the concrete screed from cracking when heated. If the area is very large, more than 50 sq. m., then the damper tape is also inserted between the water circuits. Soft plastic will be of great help in this case. These works are most often entrusted to professional builders.
- Heat insulation slabs are laid end to end. Usually 3 cm of smooth extruded polystyrene foam is sufficient. If we are talking about the first floor of a private house, where the surface is cold, the insulation can be thicker. However, there is no need to take more than 5 cm, unless this is the Northern region.
- Now it’s the turn of the reinforcing mesh. It is laid immediately on top of the insulation in even rows. The mesh link can be either 10 cm or 15 cm. Both options are suitable.
- The turn has come to the flexible pipe. It can be laid in the form of a snake or snail. This does not change the heat transfer. But it has been noticed that the “snail” behaves better in rooms of regular geometric shape - square or in the form of wide rectangles. It is better to lay the snake in long elongated corridors and loggias.
- The laid pipes must be secured.
This is done using plastic clips (into the insulation) or clamps (to the reinforcing mesh). At least three clips or clamps must be secured to one linear meter. Important. A gap of 10 cm is left between the supply and return. A closer distance is not recommended. If you make it wider, the temperature of the coolant will have to increase. The contour is laid approximately 15 cm from the wall. - All circuits are ultimately assembled into one unit, which is connected to the distribution manifold. The supply and return manifolds are located in a box that is mounted on the wall. Typically, the dimensions of such a cabinet are as follows: 60x40x12 cm. You can make them yourself or buy a ready-made one.
Important. How to make sure that the pipe does not break when leaving the concrete screed? At the transition point, a special metal corner is put on it. As an option - a corrugated plastic or metal sleeve.
The pipes are connected to the manifolds in the following sequence: nut, O-ring, connecting nipple. Then the nut is tightened.
Pipe laying options
The consumption of materials and the amount of heat in the room depend on the installation method. There are three main methods for placing pipes on the floor:
Pipe laying options
Snake laying is easy to design and install, which makes it widely used. The serpentine pipe arrangement is ideal for rooms with low heat loss and industrial facilities that require year-round heating.
Snake pipe laying
But such a scheme for placing heat sources can lead to temperature changes in different areas of the floor, which will affect the degree of comfort and the possibility of individual zones exceeding the permissible SNiP values, according to which the temperature maximum for heated floor coverings in places where people are constantly present is +25°C, periodically + 32°C. To reduce the effect of uneven heating during design, a number of restrictions are imposed on the inlets and outlets of heating fluid circuits:
- the maximum temperature difference is no more than 5 °C, the method cannot compensate for larger values;
- The maximum power of the heating system is 80 W/m².
Laying heated floor pipes in a “snail” pattern
A more complex arrangement of coolants is the “snail” method, sometimes called a spiral or “shell”. Despite the more labor-intensive execution and the required accuracy of design calculations, this method is characterized by a uniform distribution of the temperature field over the entire surface of the floor. This is achieved by alternately placing forward and return pipes. Temperature equalization is carried out using a surface concrete screed, the recommended thickness of which is 3-5 cm, or aluminum plates placed on top of the coolant. Installation with a “shell” helps to eliminate the temperature gap from 10 to 25°C and uniformly distribute the temperature over the entire area.
We recommend: Insulating a concrete floor with penoplex without screed
Pipe laying option
The combined method is a combination of different laying methods over large areas. Significant surfaces of the coating are divided into zones in which insulation materials are installed according to the location of the site - pipes are placed in a snake pattern near windows, entrance doors and external walls, and along.
Last stage: checking and screeding
The next very important stage is checking the functionality of the floor. It needs to be filled with water under pressure, which is one and a half to two times higher than the working one.
You can use not water, but air, which is pumped using a compressor. The main thing is to withstand the pressure and leave it like that for at least 2 days. Of course, in winter conditions you can only use an air compressor, as the water may freeze.
After everything has been checked and no leaks are found anywhere, you can make a concrete screed.
Stages of work:
- the pipes are covered with another layer of reinforcing mesh;
- install beacons;
- pour concrete in the proportions of cement and sand 1:3. For each bag of cement add a glass of PVA glue (200 grams). This is necessary for plasticity.
Important. During concrete work, the pipes must be under pressure. You should know that concrete must stand for about 26-28 days in order to gain the required level of strength. And only after that you can start the system.
The task of pouring a concrete screed will be greatly facilitated by a solution that does not require beacons. It has excellent quality, but the only drawback is that it is not cheap, because even a screed of half a centimeter will take a lot of it. Therefore, cement-sand mortar would be a good option.
Warm water floor in a wooden house
If warm water floors are installed in wooden houses, or the situation is such that a concrete screed is not suitable, then you can use a simplified technology.
For example, an option when the floors are already insulated and a heat insulator is not needed.
How to lay a heated floor in this case:
- edged boards 26x100 mm are stuffed onto the base at intervals to create flooring for heated floors;
- pipes are laid in the gaps between the boards; to do this, two boards are nailed end to end, then the gap, then the next two boards again;
- To increase heat transfer, metal plates with grooves for pipes are placed between the boards (preferably made of aluminum, they are easier to work with and easier to fix).
Advice. If, instead of wooden flooring, it is decided to use a heat insulator with bosses, then heat reflectors made of durable galvanized material are used for it.
Further, the technology of laying and connecting to the collectors does not differ from the classic version.
When you plan to lay laminate on top, you need to spread polyethylene, then penofol and only then the laminate. If linoleum is used as a finishing coating, then penofol is not needed. However, linoleum is not the best solution for heated floors. Not every linoleum can withstand the temperature of a heated floor and becomes deformed.
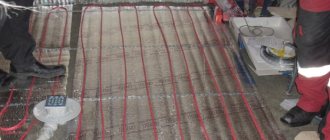
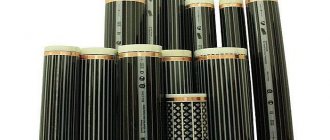
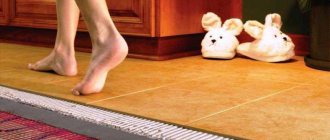
Installation of infrared film heated floor
Installation of infrared film occurs as follows:
1. First, standard surface cleaning and installation of thermal insulation is carried out. Do not use aluminum foil or any other material that contains aluminum for this purpose. In addition, it is prohibited to use metal mounting mesh when laying tiles.
2. After laying the insulation, the infrared film is cut strictly along the lines and laid on top.
3. The next step is to install the thermostat and temperature sensor.
4. Next, the IR film is connected to electricity. When laying the strips, it is best to secure them with masking tape so that they do not change their position when installing the coating.
5. The last step is installation of the floor covering.
The video instructions will help you learn more about the procedure for installing and connecting the Caleo film infrared heated floor.
Material prepared
These articles may also be of interest to you:
- Electric heated floors. What are they?
- Electric heated floors
- Installing a water heated floor
- Methods for protecting water pipes from freezing
Features of installing water floors in apartments
Making a warm water circuit under the floor in addition to wall radiators is the dream of many residents of high-rise apartments. However, it is not always possible to make a dream come true. And there are compelling objective reasons for this. According to the law, it is forbidden to connect any other system to the central heating. It is even prohibited to add additional radiator sections.
And this requirement is justified by the fact that the power of pumps and heating boilers is designed for a certain volume of coolant. And if it is exceeded, the equipment will not cope with its task.
Things are a little simpler with this in new buildings of the T-44 project, which means an open plan. In this case, the technical specifications regulate power and volume. They can be distributed onto radiators and underfloor heating circuits.
If residents commit a violation and increase the contours, then in the apartments that follow the “pirate” one, residents will immediately feel a decreased level of heating of the radiators.
When the culprit is found based on a complaint from residents, there will be a fine and a demand to return everything as it was. It’s better to find out how to properly make an electric heated floor - it will be cheaper.
But even if the neighbors turn out to be kind-hearted and do not care about the situation, it will not be possible to sell such an apartment without alterations. Otherwise, there will be a serious fine and dismantling again. And this is both time and money.
If it is possible to legislate the decision to install water-heated floors, then other difficulties will arise. Floors in apartments are difficult to install, since central heating radiators are supposed to keep the temperature at about 70 degrees. However, for the floor the upper temperature limit is 40 degrees.
To achieve this level, you will need to install a step-down capacitor - a very expensive and complex device.
The second reason that speaks against the installation of water floors is that there is already quite a lot of debris in the circuits, since most of the systems have been installed for a very long time. Old Soviet-era heating systems used different materials and equipment. For this reason, water floors connected to central heating will quickly fail.
Infrared heating
Heating systems are organized using carbon rods or thermal film, on which the carbon mixture is located in the form of strips. When heated, the mixture emits infrared waves, which heat the floor in the room. How to make a carbon electric heated floor?
- The heating elements are placed on a flat surface. Installation of infrared heated floors is carried out under the laminate. Carbon rods are used under tiles.
- The base is treated with liquid waterproofing material.
- Insulation and a reflective screen are laid on the surface.
- Install carbon mats or thermal film.
- It is necessary to connect the heated floor correctly. All elements are connected in parallel.
- A temperature sensor is placed on the mats or film.
- All conductors are protected with a corrugated tube and connected to the thermostat.
- Connect and test the system.
We recommend: What kind of warm floor should I lay under the parquet board?
Carbon mats are covered with tile adhesive or a thin concrete screed. It is recommended to use tiles as flooring. How to lay thermal film? The system does not require additional protection. The substrate and coating are immediately mounted on it.
Thermal film is an ideal warm floor for laminate or parquet. You can connect the heating immediately after completing the installation of the decorative covering.
Water heating can be installed under any floor covering. Cable sections and carbon mats are more often used for tile coverings. The film floor is suitable for laminate or linoleum. Carpeting will not add warmth to the room. It is not chosen as a topcoat.
YouTube responded with an error: The request cannot be completed because you have exceeded your quota.
- Related Posts
- How to install heated flooring under a shower stall?
- Features of Legrand heated floors
- How to connect a warm water floor in a house from a gas boiler?
- How to connect a mixing valve for a heated floor?
- How to assemble a Valtec manifold for underfloor heating?
- How much does underfloor heating cost?
Connection diagrams in apartments
What is the way out of the situation?
In city apartments, you can connect water heated floors according to several proposed schemes:
- Scheme A using a two-way valve connected to a thermostat. It regulates the flow of water. You can also install balancing valves. In this way, the temperature level will be regulated by just pressure. In this case, the pressure is controlled by the bypass valve.
- Scheme B involves the use of a bypass, which is a jumper between the combs. Here you can do without a bypass valve.
- Scheme B provides for the installation of a three-way valve on the return line. It will redirect the cooled water to the supply, leveling the desired temperature. The simplest but reliable scheme.
- Scheme D is the same as B, only a three-way valve is placed at the input. It dilutes the hot water with cooled water from the return before heading to the circulation pump.
- Scheme D. A four-way mixing valve is needed here. Can be installed with either manual or automated control.
- Scheme E. One of the most complex and expensive, since it is necessary to purchase a pressure gauge, an air vent and a valve that will regulate the pressure. But that's not all. A membrane expansion tank is needed to compensate for water hammer. In addition, the coolant is fed using a block equipped with a filter, check valve and valve.
How to install electric heated floors
Water floors are, after all, a rather complicated installation option. It is not always justified to focus on cheap installation and low operating costs. In addition, the water circuit is very difficult to connect in an apartment. An alternative in this case is electric floors. To know how to properly make an electric heated floor, you need to know what they are. They can be roughly divided into three categories:
- heating cables;
- heating mats;
- film heated floors.
If you delve deeper into the system, you need to clarify that heating mats are the same cables, only attached to a flexible mesh.
Types of electric heated floors
There are two types of electric underfloor heating - infrared and convection. They differ from each other in their operating principle.
Convection floors
Such heating systems heat the floor covering, which then releases heat to the air. Warmed air masses rise upward, resulting in an increase in room temperature.
Convection floors
Infrared systems
According to manufacturers, such heated floors are sources of infrared radiation, which heats objects in the room.
After this, they give off heat to the air, which increases the temperature in the room. Infrared systems provide rapid heating of the room, saturate it with ions and destroy microbes.
Warm floor under tiles
Reality shows that almost 100% of radiation is absorbed by the floor covering. Thus, infrared floors act like convection floors. They warm up the floor covering, after which the temperature in the room rises. Their main advantage is ease of installation.
To install an infrared heated floor, it is enough to remove the floor covering, lay down the heating elements and cover with the old finishing material.
Laying in concrete screed
How to properly install an electric heated floor so that it does not cause trouble during further operation? First of all, you need to determine where the thermostat will be located. It is placed at a height of about 30-35 cm from the floor; lower is not advisable.
So, the stages of installation of warm electric floors:
- Install a thermostat. Installing this device is almost the same as installing an outlet with closed wiring.
- Down from the thermostat a groove is made for the supply and control wires. This recess measures approximately 2x2 cm.
- Clear the base of debris and sharp objects.
- They make a thermal insulation layer. In apartments, it is best to take foamed polyethylene, covered with foil (isolon). It must be covered with a single layer, the joints must be glued with tape.
- Since we are talking about a concrete screed, a damper tape must be fixed around the perimeter. To install the heating cable, you will need mounting tape.
- The cable is attached to the mounting tape (plastic or metal) using special clips.
- If mats are chosen, they are simply nailed to the base.
Important. Electric floors should not be installed under heavy furniture. You should also step back from the walls by about 5 cm. If there are also heating elements in the room, then the heated floors should be located at least ten centimeters away from them. Between turns of the cable the distance is maintained at 8 cm. - The next step is to insert the cable into a corrugated soft sleeve so as not to damage it with a concrete screed. The bending radius is about 5 cm.
- After checking the system, a concrete screed is made.
For an electric heated floor, you don’t need to make a powerful concrete screed; a thickness of 3 cm is enough. You can also take a ready-made mortar or make a cement-sand mortar yourself.
Calculation of power and laying pitch
Of course, the heating temperature depends on the climate zone and the material from which your house is built. However, the calculation of an electric heated floor is made not by temperature, but by power consumption. For central Russia, the following parameters are accepted:
- Living room, kitchen, dining room, hallway, corridors: 150 W per m²;
- Bedroom, children's room, office (subject to lockable entrance doors): 120–150 W per m²;
- Glazed loggia: 200 W per m²;
- Bathroom: 180 W per m².
Having determined the energy costs for each room (according to the room design), we “cut out” from the area the area occupied by permanent furniture: cabinets, chests of drawers, sofas, beds. The technology for laying electric heated floors involves calculating only the area over which there are no objects.
In this case, there is no need to differentiate the power by the new area: you calculate the actual clean floor surface.
Important: The area of the room is taken to be the area of the heated surface (minus the furniture), and not the dimensions determined by the BTI.
The cable laying pitch is calculated as follows. Initial data:
- power per linear meter of heating wire;
- heated surface area;
- coefficient (W per m²) for a specific room.
For example, a living room is 25 m². There is a total of 5 m² under the furniture, so the heated area is 20 m². The power parameters for this type of room are 150 W per m², therefore the cable power will be 3 kW.
Information: connecting an electric heated floor as an additional measure does not require calculation of the total power. The resulting figure is reduced by 1/3.
Cables are regulated according to the so-called linear power. As a rule, this ranges from 12 to 24 W per linear meter. Based on this, you can buy either 125 or 250 m of cable for a power of 3 kW. The installation step depends on this. You simply determine the distance between the lines (more dense or less frequent) by choosing a more or less powerful cable. Of course, the price per linear meter will vary.
The illustration shows a typical table for calculating a cable of a certain brand. This is not absolute information for all options. You can just understand how you can vary the laying step with the same thermal parameters.
Many experts believe that a fine step provides more uniform heating: stripes with different degrees of intensity do not appear. The other side of the coin is that the longer the cable, the more difficult and time-consuming its installation.
A pitch of no closer than 70 mm is considered normal.
If you buy heating mats, the step has already been formed in production. The unit of account in this case is W per m². You have the opportunity to choose denser (or less frequent) cable laying for different rooms.
We have already considered the advantages and disadvantages of linear heating cables and thermal mats. However, if your premises have a complex configuration, stacking the rolls may be difficult. In this case, a linear cable will help. Although, with some ingenuity, you can beat the configuration using mats.
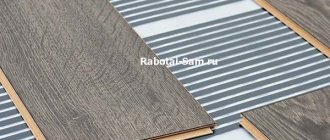
How to lay film floors under laminate
Most often, film floors are laid under laminate.
The algorithm of actions is similar to that which should be performed when laying cables:
- forgive isolon,
- the joints are taped;
- nail a damper tape around the perimeter;
- The underfloor heating strips are cut into the required lengths and placed on top of the insulation.
- a silver or copper bus runs along the edges of the film; at the cut site it must be insulated with a bitumen adhesive plate;
- The contacts of the supply metal wires are connected to the busbars and crimped with pliers.
All contacts must be covered with bitumen sticky insulator. All protruding parts of the contacts are hidden in cut-out recesses in the heat insulator.
A temperature sensor is installed and also hidden in a cut-out recess in the isolon. In order to cut recesses in the heat insulator, use a regular knife.
This entire procedure must be done carefully and diligently, without leaving exposed wires.
The heating film is covered with plastic film on top. You can lay laminate flooring.
Important. When laying laminate on a heating film, no foamed polyethylene layer is required. If, instead of laminate, you need to lay linoleum or carpet on top, then you need to lay 1 cm thick plywood on top of the film. It is not recommended to use thick plywood, so as not to waste extra energy on heating it.
Stages of laying heated floors
Types of electric heated floors:
- based on cable laying;
- rod with infrared radiation;
- matte type;
- infrared in film.
Matte
Film
Rod
Cable
An alternative type of heated floor is water, based on connecting the system to a hot water supply. Installing a heated floor under tiles, regardless of the type that is planned to be installed, involves following a mandatory algorithm of actions that requires strict adherence before laying decorative floor tiles.
Surface preparation
At this stage of repair work for heated floors, it is necessary that window and door packages be installed, the walls be completely plastered, and the height of the final decorative coating is marked. Sewage systems, water supply and electrical connection points must be installed before underfloor heating is installed.
You need to prepare the base for laying heated floors under the tiles with your own hands:
- carry out thorough cleaning of the surface;
- lay a layer of heat-insulating material and waterproofing.
Using a level, you can check how level the surface is for a heated floor; if there is a strong slope of several centimeters, the subfloor is leveled using a new screed. If this is not done, then the installed heating element will end up under a screed of different thicknesses, and the room will warm up unevenly. Completely get rid of the old floor covering, remove the old screed completely.
If necessary, a screed is made
Surface cleaning
The second step of the preparatory work will be to lay the waterproofing material. The film is laid directly on the subfloor, creating an overlap of 12-15 cm. The waterproofing is tucked under the wall, and the excess is carefully cut off after installation. The joints are carefully taped with construction tape. These manipulations are required to protect the heated electric floor from the penetration of moisture from the underlying building floors or rooms, from the basement if the house is located directly on the ground.
Laying insulating material
Tools and materials
Before laying the heated floor, the sub-base is leveled and waterproofed. To install a heated floor you will need:
- waterproofing film;
- thermal insulation material at your discretion;
- damper tape;
- material for concrete screed, if you need to level the surface.
Now let's move on to materials and tools, depending on the option chosen for the heated floor under the tiles.
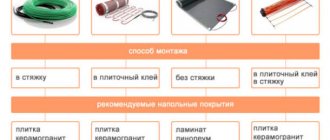
| Heated floor type | Necessary materials | Tools |
| Water heated floor | ||
| Water floor |
|
|
| Electric heated floor | ||
| Infrared in film |
|
|
| Matte |
| |
| Based on laid cable |
| |
| Rod with infrared radiation |
| |
With the exception of the tools used when working with pipes, the remaining items make up a universal set for those who plan to install heated floors. You also need to take care of the tools for laying the tile covering - spatulas.
Tools
Laying insulation
How to make a warm floor in the house, eliminating unnecessary consumption of the energy source? To do this, before installing the heating elements, a heat-insulating layer is laid on the prepared base.
Technology allows you to bypass this stage. By refusing insulation for a heated floor, you will reduce the number of operations, material and financial investments, and time resources. This approach is justified if the room is internal in a building with good thermal insulation, and heating through the floor is carried out exclusively periodically. The heat-insulating layer will create the effect of a thermos. The heat will remain within the boundaries of the heated room. Heat consumption due to heat transfer to building structures and ceilings is blocked by the screen.
To reduce energy costs, it is necessary to install insulation even in a house that has been occupied for a long time. If the building is just being built, find out about the heat saving methods used.
The thermal insulation coating is laid on a clean base. The insulation can combine reflective and insulating characteristics, or the layers can be produced separately by the manufacturer. Penofol is a fairly popular material on the market, which combines both functions that interest us. The material is sold in wide rolls and is easy to cut. The foil side is placed on top. The edges and base of the insulation are fastened with mounting tape - the fragments are qualitatively combined into a single layer.
Penofol
The material is laid with the foil side up
Mounting tape is used to fasten the sheets
Laying heating elements
In the absence of thermal insulation, when the base is only a concrete slab, its surface, after cleaning and screeding, is treated with a primer so that all working surfaces interact with the adhesive composition as efficiently as possible.
Next, a heating element - cable, mats, pipes - is laid out on the primed surface. Each option requires maintaining a certain distance between the heating elements. Remember not to lay the cable too close or to cross it - this can lead to overheating of the area or a short circuit. The layout is carried out evenly over the entire area of the room, with the exception of places occupied by bulky furniture or other heating equipment.
Electrofluidic modules or when installing a heated floor based on infrared film, use adhesive tape to fix the heat reflector screen to the coating. This is enough to ensure the static layout, and after the fixing screed has hardened, the building mixture becomes the fixative.
When laying the cable, it is important that it does not intersect
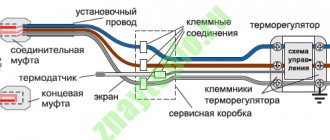
Installation of a thermostat
The temperature sensor is mounted between the temperature control device and the heating element. The sensor housing is retracted inside the corrugated pipe. The wire is laid from the sensor to the thermostat housing. When fixing the wires to the thermostat, carefully ensure that the connection is correct. Follow the connection diagram carefully.
How to install a heated floor under tiles without a thermostat? It's like turning on a tap and allowing water to flow uncontrollably. When choosing a regulator, read the specifics of the device in the model instructions. Learn how to remove the front control panel. If the procedure is carried out incorrectly, the device can be irreparably damaged.
The thermostat kit includes a temperature sensor, mounting box, terminals, installation and operating instructions
The mounting box can be attached directly to the wall or placed in a pre-prepared recess in the thickness of the wall. The optimal height from the floor ranges from 60-100 cm. The thermostat is located as close as possible to the location of the power outlet. To ensure that the thermostat is level, use a level.
Next, let's look at the power cables. Determine using the indicator:
- phase wire (dark brown);
- wire with working zero (blue color);
- ground wire.
Take a measurement between phase and zero using a tester - the voltage should be 220 V.
General thermostat connection diagram
At this stage, an interference situation may arise. No forced force, otherwise you risk damaging the fragile device. The device fits neatly inside the mounting box. The problem may be poor placement of the wires or excessive length of the corrugated pipe used. Eliminate the shortcomings and install the thermostat inside the mounting box. The “sensor” markings are terminals for attaching the wire from the temperature sensor. The contact of the phase wire is marked with the letter “L”, and for zero – “N”.
Install the front control panel and secure it with screws. After installing the thermostat, turn it on. Set the required temperature and check the floor in test mode. For programmable thermostats, check the quality of operation in daily mode.
Two light green wires are connected to the ground loop through the PE terminal
When connecting the thermostat, follow the connection diagram shown on the device body
Connection diagram of a two-core cable to a thermostat
Connection diagram of a single-core cable to a thermostat
System health check
Testing is carried out to verify the effectiveness of the system. Optimal conditions are created by adjusting automated resources, in parallel, consumption currents are measured with special devices, and electric meter readings are taken. All readings must comply with the technical standards stated by the manufacturer in the accompanying documentation.
The overall design of a heated floor is a multi-layer system, which includes laying tiles on the heated floor. The joint functioning of each layer ensures comfortable conditions inside the room and a long service life. If the installation is made with defects, the overall efficiency of the system will be seriously reduced.
Before applying electricity after the fixing screed has dried, check the operation of the protective devices - the residual current device (RCD) and the automated circuit breaker. If during the installation of floor tiles the electrical insulation was damaged or the installation was carried out incorrectly, these means will prevent the unpleasant consequences of leaks and short circuits.
Laying the covering
Laying tiles on a heated floor is carried out after applying a fixing screed. Experienced craftsmen can try to combine fixing and laying out the flooring. This solution may encounter an obstacle in terms of differences in screed thickness for different coolants:
- cables and electric heating modules with liquid media - requirements of 5 cm or more. This layer requires more time to warm up, but at the same time retains heat better and cools more slowly;
- thermomats with a cable are less demanding on the thickness of the screed. The level required can vary significantly. It all depends on the manufacturer;
- infrared (IR) film - the thinnest layer, starting from 2 cm. In the case of IR, they prefer to lay the tiles directly on a fresh screed in one go.
In the process, you need to use specialized compounds designed for laying tiles on heated floors. The solution is distributed directly over the gasket of the heating elements. For convenience, use a wide spatula with a wavy edge.
When laying out, use inlays with crosses for equal gaps, and control the level to ensure a horizontal surface. The laying is carried out in the direction from the far wall to the exit, so as not to disturb the already laid covering. We remind you: the screed finally hardens after 28 days. Until the process is completely completed, it is necessary to isolate the coating from mechanical loads, drafts and moisture.
Laying tiles on a heated floor
Results
It is possible to lay warm floors in any room yourself if you know all the subtleties and features of installation. To decide how to lay a heated floor yourself, it is important to choose the appropriate heated floor option for a specific room. Cheap installation does not always justify expensive operation. The same can be said about the difficulties of installing a water floor. The equipment is cheap, but installation is complex and time-consuming. Therefore, electric floors are increasingly becoming a priority. Their main advantage is mobility and the ability to easily adjust the temperature. There are many installation methods for both electric and heated floors. It depends on the house plan, financial capabilities, choice of material and equipment.