How to connect a chandelier with 3 lamps to a switch with 1 key
Connecting this lighting device to a single-key switch is carried out in several stages. First of all, you need to deal with the wires in the chandelier itself. Here, each cartridge is connected to two wires - phase and neutral, the insulation of which is painted in different colors. Most often, the blue conductor is considered zero, and the remaining colors indicate phase. In accordance with the rules, the phase is connected to the central contact of the cartridge, and the zero is connected to the side.
The chandelier arms are attached to the body, where all the wires are combined. Their distribution for a single-key switch is as follows: phase wires are combined into one group, and neutral wires into another. It should be remembered that zero is supplied to the chandelier directly, bypassing the switch. Subsequently, the nodes of the phase and neutral wires coming out of the chandelier are connected to the corresponding conductors of the electrical network.
The distribution box also has two wires - phase and neutral. It supplies a two-core cable separately to the chandelier and separately to the switch. The lamp is supplied with phase and zero, and the switch is supplied with only phase to both contacts. Closing and opening the contacts allows you to turn the light bulbs on and off.
Connection via one-key switch
This circuit is the simplest, since it is designed for one light bulb and one switch with one key. This type is considered the main one from which other, more complex schemes evolved.
The operating principle of this connection is very simple. Phase and neutral from the voltage source are supplied to the light bulb through the distribution box. Next, a switch is installed in the gap in the phase wire to interrupt or supply voltage. Each of them is equipped with two terminals - an input and an output, and in some designs there may be more than one output.
It is advisable to install the distribution box as close as possible to the switch and provide easy access to it. After this, the installation locations for switches and lighting devices are determined. The wiring coming from the distribution panel is inserted into the distribution box, from where it goes directly to the switch and lamp.
The wires can also come from the outlet. All connections are made with a two-core wire, the phase and neutral conductors are connected to each other according to the diagram in all places. Before connecting, they need to be checked with an indicator screwdriver so as not to be confused.
How to connect a chandelier with 3 lamps to a switch with 2 keys
Before installation begins, you need to decide which lamps will be turned on by each key. In this case there are very few options. As a rule, one key turns on one light bulb, and the other turns on two at once. You can also change the functions of the keys among themselves for ease of use.
Typically there are 3 conductors or a three-core cable coming out through the floor slab. In modern houses, 4 yellow ground wires with a green stripe are added to them. The remaining wires are determined using an indicator screwdriver with the switch in the on position. The wire on which there is no voltage will be zero, and all the rest will be phase.
In the chandelier itself, the phase wires can be combined in advance into groups. Of the three bulbs, two are connected to each other to turn on simultaneously. If this is not done, the wires must be distributed independently. Next, the neutral wires of the chandelier and the network are connected to each other. Then the phases of the chandelier and the switch are connected. After this, a functionality check is performed.
If you need to change the functions of the keys, just swap the wires. If both keys are turned on at the same time, all the lights will light up at once. All connections are made with the protective device disabled.
How to connect a chandelier with 3 lamps to a switch with 3 keys
This diagram is an expanded version of the previous connection, and all the main steps remain the same. In this case, four wires come from the ceiling, and there are three or more in the chandelier. The fourth yellow-green wires relate to grounding and are designated PE. They just need to be connected to each other. If there is no ground wire in the chandelier, then the same wire on the ceiling must be cut and carefully insulated. The remaining conductors are connected according to the same scheme described above.
In some cases, the fourth wire coming from the ceiling can act as another phase. This option is most suitable when using a three-key switch. It makes it possible to control all the light bulbs in the chandelier. A three-key switch makes it possible to turn on and off each independent group of lamps. To do this, you will need another free core in the ceiling wiring, which has already been mentioned. All actions will be the same as for the two-key design. The phase of the home network is connected to the input contact of the switch, and from the output the phase goes to each group of lamps.
When installing a switch, you must follow electrical safety rules to avoid electric shock. Therefore, before performing electrical installation work, you need to disconnect the entire electrical network. You can check the absence of electricity using an indicator screwdriver.
Thus, connecting a chandelier with three lamps is not particularly difficult. The most important thing is to carefully study the diagram and, if possible, use only solid cables, with a minimum number of extensions and twists. As a result, the operation of the chandelier will be long and safe.
From this article you will learn what cross-section of wires is needed to connect to a chandelier, how to ring and determine the phases on the ceiling: we are looking for a ground wire, we are looking for phases and zero, the designation of the chandelier wires.
How to connect a chandelier in a simple way, rules for connecting wires, connecting a 2,3,4,5, 6 chandelier to a single and double switch and many other questions.
DESIGN FEATURES OF THE CHANDELIER
Chandeliers are most often used as lighting devices in residential premises - multi-lamp lamps designed for installation on the ceiling.
A chandelier is a structure that connects several lighting elements - light bulbs - to provide good lighting in the room.
If you use a regular light bulb in a room, then to ensure proper lighting you will need to install a powerful lighting element, and even then, if the room is large, it will not be enough.
But such light is not always needed, so the best option is to use several lamps.
But in the case of using ordinary light bulbs, each of them will have to run its own wire or branch from the junction box.
But if you install a chandelier, the design of which involves installing several light bulbs, then the complexity of the connection will be the same as for one or more light bulbs.
But at the same time, all lighting elements included in the design will be powered, and from one wire.
And all because the wiring branching occurs at the entrance to the chandelier, and not in the junction box.
Well, don’t discount the aesthetic side of the issue. A lonely light bulb hanging on the ceiling looks dull, or maybe a beautiful chandelier.
Read also: Pen on tiles 6mm
To get good lighting in a room with a perfect combination of lighting fixtures with the interior, it is not enough just to purchase a suitable chandelier, you also need to hang it and connect it correctly.
Therefore, next we will consider how to properly connect the chandelier.
WHAT IS TO BE CONSIDERED BEFORE CARRYING OUT WORK?
Let’s immediately identify a few key points that should definitely be taken into account:
- Design of a chandelier (They are usually divided among themselves by horns - elements at the end of which sockets for light bulbs are installed. As mentioned above, the division into power branches for light bulbs is made at the entrance to the chandelier, and the horns can be considered these branches. By design, chandeliers are hornless, two-, three-, four- and five-horn);
The switch used (the method of connection depends on this. If, for example, the switch is a single-key switch and when the light is turned on, all the lamps of the chandelier will light up, then this is one connection diagram, but the use of two- or three-key switches, each key of which will be responsible for the operation of a specific group lamps require the use of a slightly different connection method);
- The presence of additional equipment in the design of the chandelier (a fan or a remote control unit makes certain adjustments to the connection diagram);
- Features of the electrical network of the house (in old buildings, two-wire wiring is usually used, and in new or restored buildings the number of wires is already three).
- Breaking the circuit with a switch is carried out only through the phase line, and the neutral conductor and grounding conductor (if any) go directly to the consumer;
- For each branch, a separate phase wire is laid at the output of their switch (It is separated in the switch itself. A single-key switch has one phase conductor at the output, a two-key switch has two, a three-key switch has three). This affects the wire used leading from the switch;
- On the terminal blocks of the chandeliers you can find the designation of the terminals, which makes the connection easier (the marking “L” indicates that the terminal is phase, “N” is neutral, “PE” is grounding).
And one more thing - it’s one thing to simply remove the old lighting fixture and connect a new one in its place, and quite another thing to completely create a lighting power line, including laying wiring from the distribution board, installing switches, junction boxes and lighting fixtures, and then connecting them into one network.
We will not delve into the specifics of independently installing the power supply branch of a chandelier, since we are more interested only in how to connect the lighting elements, although some points regarding wiring will be touched upon.
HELPFUL INFORMATION
Let us immediately point out some features that can help:
Now directly, how to connect the chandelier to the switch.
Let's assume that the line is made in advance, the switch is in place, and 2 or 3 wires stick out from the ceiling (with the third wire being “ground”).
In general, the connection diagram is the simplest - “one-key switch - 1 lighting fixture.”
If the chandelier is armless (with 1 lamp), then the connection method does not differ at all from powering a simple light bulb.
SINGLE KEY SWITCH – 1 CHANDELIER
Before starting work, you should determine which wire is which. It would be good if modern wiring with color differences between the cores was used. At the initial stage, only “land” is of interest.
If the electricians did not mess anything up, the ground wire will have a yellow-green braid.
But you will have to figure out the phase and zero yourself and for this you will only need an indicator screwdriver, but all precautions should be taken, since the test is done in live wiring.
Therefore, before applying voltage, you should make sure that the ends of the wires are separated in different directions and do not touch each other.
And only after this can voltage be applied (you also need to turn the switch to the “on” position).
After we touch the ends of the wiring with the tip of the indicator screwdriver, the indicator light that comes on when touched will indicate that the core is phase, which means the second one is zero.
If there are three wires at the output, and it is not clear which of them is zero and ground, you can use a test light to determine it (we connect a two-core wire to a regular 220 lamp through a socket). Then we identify the phase with an indicator screwdriver.
And then we connect the light bulb to the phase wire and one of the other two.
If the lamp lights up after applying voltage, then the second wire will be zero (if it doesn’t light up, the “ground” is connected to the control). For reliability, the wires should be swapped.
After determining where each wire is, all that remains is to connect them to the corresponding terminals of the chandelier terminal block, and then secure it to the ceiling hook. In general, everything is as simple as shelling pears.
The diagram for connecting the chandelier to two terminals is as follows:
If the circuit is three-wire, then the connection is made like this:
Now let’s assume that the chandelier is a two-arm chandelier and you need to connect it to a single-key switch.
Each horn is a branch and two wires must come from it (phase and zero), but the “ground” is connected to the body, so it does not go to the branches.
Let's assume that there are blue and brown wires coming from each horn.
To connect the chandelier, you need to separate the wires of the horns by color and twist them together (the blue ones are separate from the brown ones).
Then we connect them to the power line, and it does not matter what color the wires will be phase and neutral.
For example, we connect the brown wires through the block to the phase conductor, and the blue wire to the zero.
Then we isolate everything and check its functionality. Here we note that with such a connection, no matter how many bulbs there are in the chandelier, they will all light up when turned on.
It happens that the third wire in a chandelier or wiring is superfluous (ground is not provided in the lighting fixture or power line).
In the case of a chandelier, we simply ignore this output (this will not affect the performance in any way), but the grounding conductor of the wiring will need to be insulated.
In general, this is a general diagram for connecting a chandelier and it is identical for everyone, but there are some nuances that will be indicated below.
A little about wiring connections. To do this, you can use either terminal blocks or conventional twisting followed by insulation with protective caps.
Each connection method has its own advantages and disadvantages.
Terminals are more convenient for installation, but it is not always possible to install it.
The twist is more compact in size, but it is not always possible to twist the wires well.
TWO-KEY SWITCH – CHANDELIER
Now let's talk about how to connect a chandelier to a two-key switch.
Since the number of lamps and their division into groups can be very different, we will consider several options:
- “The switch is a chandelier with two lamps.” Since it was mentioned that in such a switch the phase is divided into two lines, for which a separate key is intended to open the circuit, then 3-4 wires should come out on the ceiling (two phases, zero and ground). It is assumed that each key will power its own lamp. To connect everything, you must first decide where the phase and neutral terminals are. We take the wires of each of the horns, separate two of the same color (for example, blue), twist them and connect them to the zero terminal of the power line. All that remains is to deal with the brown wires of the chandelier. Each of them must be individually connected to the phase terminals of the wiring. There should be three connections in total - two phase (with brown wires) and one neutral (with double blue wires);
Read also: The need to clean up defects in weld joints
“The switch is a three-arm chandelier.” The peculiarity of this scheme comes down only to the correct separation of the wires. Since there are three lamps, and only two keys (and therefore two phase wires), one of them will power two chandelier bulbs at the same time. As a result, we also get three connections. First we connect zero. To do this, we select one wire of the same color (blue) for each horn, twist them all together and connect them to the neutral wire. That leaves three brown wires. We twist two of them and connect them to one of the phase conductors, and the third to the second phase;
“Switch – 4-, 5-, 6-arm chandelier.” Here the connection diagram is the same as above, that is, the total number of connections will be three. As before, we twist all the wires of the same color (blue) into one twist and connect it to the neutral core (here a twist is more suitable, not a terminal block). We divide the remaining wires into two halves (for example, in a 4-arm chandelier, you can divide them so that when you turn on one key, two parallel light bulbs light up). We twist each half of the wires and connect them to one of the phase wires. We do the same with the other part of the wires.
ONE SWITCH – SEVERAL CHANDELIERS
Now let's look at how to connect several chandeliers to one switch. Here you will also have to consider the features of the power line.
For example, let’s take a single-key switch that will power three chandeliers at once.
The lighting line diagram with this switch is as follows: phase and zero go from the switchboard to the distribution box.
A wire goes into it from the phase conductor to the switch, and returns to it again.
As a result, in the box we have a zero and a phase (with a switch included in the circuit), to which we can connect the wiring leading to the consumer.
Therefore, in order to connect three chandeliers to this switch at once, it is enough to throw one common line and insert the phase and neutral wires of the lighting devices into it.
Moreover, it is better to connect each chandelier to a common line in distribution boxes (they additionally need to be installed). And then in the chandelier itself, divide it into horns (branches).
CONNECTING A CHANDELIER WITH ADDITIONAL EQUIPMENT
Now about connecting the chandelier in which the fan is mounted. This lighting device does not require anything special to connect, since the fan is the same consumer as a regular light bulb (that is, the circuit is the same as that of a two-arm chandelier).
It should be connected to a two-key switch so that you can turn off the light or fan if necessary.
Also, when connecting such a chandelier, you should read the instructions, which should indicate which of the wires going to power the fan is phase and which is neutral, and use this information when connecting.
The same applies to chandeliers that have remote control using a remote control.
Inside such a device there will be a special executive unit with a controller that receives signals from the remote control.
So, this unit requires power, and it works on the same principle as a light bulb.
But in chandeliers with LED lamps, the lighting elements operate from a 12V network with direct current. And for this purpose, the design of the lighting device contains a step-down transformer, which has phase and neutral terminals.
Connecting this chandelier is as easy as connecting a regular light bulb.
Sometimes there is a need to install a combination switch to power the chandelier, combined with an outlet.
And here the whole peculiarity lies precisely in connecting the switch itself, and not the lighting device.
Since there is an outlet, in order for it to function, both phase and zero must be supplied to it.
And if only a phase conductor was routed to a conventional switch, then a neutral conductor will also have to be routed to the combined switch. The connection diagram for such a switch is presented below.
There are times when the part of the supply wiring protruding from the ceiling is not enough to connect the chandelier. In this case, you can simply increase them.
To do this, you can take two pieces of copper wire with a cross-section of at least 1.5 mm. sq. and connect them to the line terminals using twisting. Then the connection points should be properly insulated.
SAFETY
When connecting a chandelier, do not forget about safety precautions. All work should be carried out only with de-energized wiring. Moreover, simply disconnecting the line at the switch is not enough; it must be de-energized at the distribution board.
You need to be very careful about the distribution of wiring before connecting.
If the instructions contain recommendations for connection, they must be followed.
All connections must be of high quality. If terminal blocks are used, then the clamps should be tightened well, and in the case of twists, the wires should be tightened with pliers. All exposed connections require high-quality insulation.
Functionality checks should only be carried out after all connections have been isolated.
Often a situation arises when it is necessary for the light bulbs in one of the rooms to be turned on from different places. For such cases, on flights of stairs there are pass-through switches, which are difficult to install, so it is usually impractical to install such switches in apartments.
It is much easier to turn on several light bulbs from one regular switch. How to connect two light bulbs to one switch will be discussed in this article.
Is it possible to connect a chandelier to a double switch yourself?
Yes. But, before you start working with electrical devices, you need to familiarize yourself with safety precautions, distinguish cables by color (PE, L, N), study the connection diagram of the lamp, have tools and insulation on hand.
In order for the chandelier to decorate the ceiling of the room and to work correctly, connect to the switch in strict sequence.
Before connecting, you should familiarize yourself with the safety precautions:
- The tools used must have insulated handles.
- Before work related to electricity, turn off the power to the panel. That is, this is a meter (private house), electrical panel of the apartment. Disconnect the plugs (if there are no buttons, they are unscrewed).
How to recognize wires
All cables of private houses and apartments have differences in color. This is a kind of hint for inexperienced people.
Yellow cable - grounding, PE designation. Designed to ensure that during operation of the electrical appliance there is no current “small trembling”.
Zero – blue or cyan color, symbol N.
Phase – all other colors indicate L.
In old houses and apartments, all electrical wiring is the same color. Grounding is extremely rare. Therefore, equipment and tools are used to determine the phase.
Wiring diagram for a chandelier with 2 lamps
There are 3 or 4 cables coming out of the ceiling. These are two phase cables from each key, one “zero” from the distribution box, grounding. Check with an indicator screwdriver. When checking, turn on the voltage, the keys are alternately in the “on” position. A wire without voltage is zero. It is designated. The remaining cables are phase cables.
In the lamp, all wiring is connected according to the accessory. That is, a modern lighting device contains phase leads for each horn, 1 zero, 1 ground.
In a lighting fixture with 2 arms, the phases are not connected. This means that you can make a connection so that either one light bulb or all of them will light up.
Grounding is connected immediately. After this you need to connect the zero. Chandelier-ceiling. The phases are removed from the device and connected to the corresponding keys.
Connections should be insulated. Only after this turn on the power supply from the panel or meter.
Connecting light to three lamps with three wires
The three-arm chandelier contains 3 lamp sockets. They have 2 contacts: N, L. The connection is carried out according to the same algorithm as a lamp with 2 horns, only one switch key will turn on 1 lamp, and the second - 2 light bulbs.
If you press both keys at the same time, all the horns will light up.
The neutral cables from each horn are combined, the grounding is connected immediately.
The phases are divided into 2 groups.
Connection diagram for 4 bulbs
There are 2 phases coming out of the 2-key model, and zero, grounding, and phase cables are visible from the ceiling.
The connection can be made in 2 ways:
- 1+3=alternately turning on 1 lamp - 1 key and 3 lamps - the second key.
- 2+2 = 2 light bulbs turn on alternately. Moreover, you can make it so that 2 lamps located next to each other or crosswise are lit.
If you turn on both keys at the same time, 4 horns will light up.
The connection principle is as follows:
- The cables coming out of the lighting fixture are different colors or all the same. Then they make a call and mark the value (N, L).
- Grounding - it can be immediately connected to the ceiling.
- The blue ones are connected with one terminal - 1 blue wire comes out of the ceiling.
- The phases are divided into groups: the first - 3 wires, one separately or 2 groups of 2 pieces.
- Next, use terminals to connect the twists on the light fixture and the ceiling.
The twists are insulated so that they do not come into contact with each other.
5-bar chandelier
A common “zero” comes out of the five-arm chandelier. It must be marked (maybe with electrical tape). Sometimes there are several blue wires, they are combined with one twist.
Attention. The distinction can be made using an indicator - whether there is voltage or not. If there is voltage - L, otherwise - N.
Phase wires are divided into 2 groups:
- The first twist will consist of 3 phases - one key will turn on 3 lamps.
- The second group - 2 phase twists - 2 horns, the other with a power key.
When the keys are turned on at once, 5 lamps light up.
After the groups have been created, the chandelier is connected to the wiring. After checking, if the wrong groups of lamps are lit (randomly), you can re-twist 2x3 (groups) by changing the phases.
Double connection diagram for 6 bulbs
Connecting a device with 6 lamps requires good wiring. Further, the two-key model for turning on the light provides operation in three modes: turning on the lamps in groups (2 modes) and turning on the lights in general. In this case, at least 3 wires should come out of the ceiling.
Let’s say group 1 – 2 lamps, 2nd – 4 lamps, third mode – all lamps are in working condition.
There are 12 wires coming out of the chandelier, 2 for each horn.
You need to select all the blue wires or those marked when ringing, connect them with one terminal (1 twist). The remaining cables are connected in groups (these are phase). 4 wires one terminal and 2 the other.
Before connecting the wires of the lamp to the ceiling, using an indicator screwdriver, determine the line L, zero N, as well as the assignment of L1, L2 to the keys. They do this with an indicator at constant current, with the keys turned on alternately. The found wires are marked with a marker or electrical tape. After this, you need to de-energize the network, connect the finished chandelier (connect zero to zero, and phase to phase). Grounding is connected immediately.
Scheme for double connection of a chandelier for 8 bulbs with 4 wires
4 wiring are visible from the ceiling: 2 phases (from the keys), 1 neutral, grounding.
Sometimes wires of the same color come out of the lamp. To determine phase and zero, it is necessary to ring with a multimeter and mark them in the same way as on the ceiling (so as not to confuse them).
“Zero” comes in one twist, because there is 1 neutral cable on the ceiling. Phase wiring is divided into 2 groups: 8 lamps are 3 lamps and 5 or 4x4, 2x7 and so on. Afterwards, the created groups of insulated wires or placed in terminals are connected accordingly to those marked on the ceiling.
Switch device
The main element of the switch is the working part, mounted in the socket box. It is a metal structure with an attached drive. The drive is used to turn the device on and off. The drive is a moving contact that closes and opens an electrical circuit between two static contacts.
The first contact is called incoming: it is connected to a phase from the mains. The second contact (outgoing) is connected to the phase conductor coming from the lighting device. When the switch is positioned correctly, both fixed contacts are initially in an open state. When you press the device button, the moving contact provokes the closure of both fixed contacts. As a result, current flows through the closed circuit of their electrical network to the light bulb, and it lights up.
Read also: Connecting a hammer drill button with reverse
To ensure safety, the working part of the switch is housed in a housing made of dielectric material. The cases are made of plastic or porcelain.
Other components of the switch are the frame and keys. These elements are usually made from plastic. The keys are fixed on the drive of the working part. Moving as a result of pressing, the key changes the position of the contact, which leads to turning the light on or off.
The frame is designed to prevent a person from accidentally touching the switch contacts. In other words, the frame acts as a barrier between the energized elements and the person. The frame is fixed with screws or latches made of plastic.
The only difference between a two-key device and a single-key device is the presence of a pair of output contacts. Each contact is connected to a phase conductor of one of the lamps.
Regular switch for one lamp
The figure below shows a diagram of connecting a light bulb to a regular light switch.
The switch is installed in a phase gap. Zero is directed to the lighting fixture. If you set the switch to zero, the contacts will soon burn out. The reason is the increased load when electricity passes through the zero contact.
Another reason for breaking a phase conductor is the need to quickly disconnect voltage from the consumer in the event of an emergency. Zero does not allow the system to be de-energized, but only opens the circuit.
Note! Electrical installation work should only be carried out in a de-energized electrical network. If it is not possible to determine the phase conductor by color scheme, it is allowed to supply current to carry out “ringing”. Before checking, you need to make sure that there are no short circuits in the exposed wiring.
Parallel connection
In most cases, a parallel circuit for connecting spotlights (lamps) is used. Even though a large number of wires are required. But the voltage is supplied to all lighting devices at the same level; if one burns out, one does not work, all the others work. Accordingly, no problems with finding the location of the breakdown.
Parallel connection diagram for spotlights
How to connect spotlights in parallel
There are two ways to connect in parallel:
Methods for implementing parallel connection
Radial
The beam connection scheme is more reliable - if problems occur, then only this light bulb does not light up. There are two disadvantages. The first is high cable consumption. You can put up with it, since the wiring is done once and for a long time, and the reliability of such an implementation is high. The second disadvantage is that a large number of wires converge at one point. High-quality connection of them is not an easy task, but it can be solved.
You can connect a large number of wires using a conventional terminal block. In this case, a phase is supplied from one side and, using jumpers, it is distributed to the required number of contacts. On the opposite side, the wires going to the light bulbs are connected.
Methods for connecting wires in radial design
In almost the same way, you can use Vago terminal blocks for the corresponding number of contacts. You need to select a model for parallel connection. It is better if they are filled with a paste that prevents oxidation. This method is good - it’s easy to implement (strip the wires, insert them into the sockets and that’s it), but there are a lot of low-quality fakes, and the originals are expensive (and it’s not a fact that they will sell you the original). That's why many people prefer to use a regular terminal block. By the way, there are several types, but carbolite ones with a protective screen are considered more reliable (they are black in the picture above).
Two lamps per switch
The diagram for connecting two lamps to one switch is similar to the rules for connecting one lamp. The neutral conductor is sequentially directed from the junction box through all lighting sources. The phase wire running through the switch is connected to the second contacts of the light bulbs.
The contacts must be connected as securely as possible. It is recommended to use terminal blocks. Connections are made with screws or Wago blocks (the conductor is pressed with a spring).
Note! It is unacceptable to twist wires of different metals (copper and aluminum). Otherwise, the result of such actions will be an oxidation process, which will lead to loosening of the contact and overheating.
The diagram below shows the connection of two light bulbs to a single-key switch.
Each light source has a marking indicating the load limit. This information must be kept in mind when calculating the total power of connected lighting fixtures.
Parallel connection
Parallel connection of light bulbs
The classic parallel connection of lamps differs from the serial method in that in this case the full mains voltage is applied to all illuminators.
When connecting light bulbs in parallel, each branch has its own current flowing through it, depending on the resistance of the given chain.
The conductors supplied to lamp bases and sockets are connected to one wire in the form of a parallel assembly. The indisputable advantages of this method include the following features:
- if one of the bulbs burns out, the others continue to work;
- in each of the branches they burn at full power, since full voltage is applied to all at the same time;
- It is allowed to use energy-saving light bulbs;
- To connect to the network, it is enough to remove the required number of phase conductors from the room chandelier and arrange them in the form of a switched group.
This method has practically no disadvantages, with the exception of the high consumption of conductors in highly branched circuits. You can easily connect several light bulbs to one wire using the wiring principle. A typical circuit for connecting light bulbs in parallel with a switch is no different from conventional switching. In this case, a key switch is additionally introduced into it.
Separate lighting
A similar scheme is often used in office buildings, where it is necessary to separately illuminate many local areas. The separate lighting scheme is not particularly complicated, although it requires special knowledge.
The switch is placed in a phase break. The devices are equipped with one input and two output voltage contacts. The phase wires after the switch go to the lighting fixtures. The neutral conductor will be common to all light sources in the room.
As a result, pressing one of the keys turns on only the devices connected to a specific phase. Other light sources do not turn on.
Chandelier with multiple arms
To connect a multi-lane lighting device using a two-key switch, you will need a three-wire conductor. One core is shortened so that it goes into the junction box, and a couple of other wires should reach the switch.
The phase wire is directed to the breaker. The outgoing conductors are fixed in the terminal blocks of the switch. The lighting device comes with an output of three wires: neutral and two phase. The zero from the distribution box is directed to the zero contact, and the outgoing wires from the switch are connected to the phases of a multi-arm chandelier.
The connection diagram for a chandelier with five arms is shown in the figure below.
The result is a connection where pressing one key only turns on a pair of lamps. Another key controls three lamps. If you want to turn on all the lights, you must press both keys. Ultimately, this design provides a choice of three light intensity options: with two, three or five bulbs.
In retail chains there are switches with three keys. Their connection diagram is a little more complicated, but generally similar to those given earlier.
Connection from an outlet
In some cases, you need to connect an additional lighting fixture with a dedicated switch. In this situation, connecting from an existing outlet will do.
When installing a single-key switch, you will need a two-wire wire and a switching device. For a voltage breaker installed above the socket, zero and phase are removed from it. The phase wire is interrupted inside the switch, and the neutral wire is left intact. Other lighting devices in the circuit are provided with power in a similar way to the above circuits.
For electrical installation work, you will need three wires (zero and two phases). For a three-key switch, one more phase core is required.
How to avoid mistakes
Electrical appliances must be connected to the network in compliance with electrical regulations. The connection features are not obvious and may be incomprehensible to people far from the topic.
It is important to consider:
- Each type of connection has features associated with Ohm's law. In a series connection, the current is equal in all parts of the circuit, while the voltage depends on the resistance. In a parallel connection, the voltage is the same, and the total current is the sum of the values of the individual sections.
- Any circuit should not be overloaded, as this can lead to unstable operation of the devices and damage to the conductors.
- In a parallel connection, the cross-section of the wires must correspond to the applied load, otherwise overheating of the conductors is inevitable, followed by melting of the winding and a short circuit.
- A phase is supplied to the switch, zero goes to the lighting fixture. Failure to comply with this rule may result in electric shock when replacing the lamp, since even when the device is turned off, the device is energized.
- The main wire from the lamp is connected to the common contact. If you connect it to a tap, only part of the circuit will work.
- Before installing the switch, it is better to mark the wires in advance. During installation, it will be easy to connect the same conductors together.
Failure to follow the recommendations may result in unstable operation of lighting equipment, rapid lamp burnout, and serious injury that could lead to life-threatening injuries.
Connecting lamps with converter
To organize lighting for point consumers, you can use 220-volt networks or 12-volt converters. The latter create a switch-on delay of several seconds, after which they smoothly transfer current to electrical appliances.
The circuit allows you to take care of incandescent lamps or halogen light sources, since it protects them from voltage surges.
The connection diagram is shown in the figure below.
If a converter is used, the switch is installed before it. There are two important technological reasons for this:
- Reduced voltage is associated with significant current. Breakers are not designed for this mode of operation, as a result of which the contacts may burn out.
- The converter allows you to turn on the lamp smoothly. If you place a breaker after the converter, it will not be possible to ensure a smooth start, and the electricity will flow intermittently after pressing a key.
If you are installing a switch with two keys, you will need a second converter. Its power supply will come from the second line. The neutral conductor will be common.
Electrical installation requires special attention to safety. You should start working only after the network has been de-energized. If you do not have confidence in your abilities and at least basic knowledge of electrical engineering, it is better to seek help from a qualified electrician.
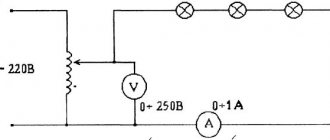
Serial connection of light bulbs: diagram, mixed connection, pros and cons
When placing network lighting devices (lamps or LED strips), as a rule, there is no doubt about how to connect them to each other. If they are designed for a voltage of 220 Volts, the traditionally used connection method is a parallel connection. Serial connection of light bulbs is used only in rare cases, when garlands are made based on them, for example. Another common reason for using this method is the desire to increase the life of lighting products by using them at partial operating power.
Serial connection
Serial connection diagram
A non-standard serial connection of light bulbs to a 220 Volt network has the following characteristics:
- the same current flows through all lighting elements included in the circuit;
- the distribution of voltage drops across them will be proportional to the internal resistance;
- Accordingly, the power consumed by each illuminator is distributed.
When connecting light bulbs in series in a circuit with a common switch, lights designed for 220 Volts will not burn at full power.
When two incandescent light bulbs with different power P are installed in a chain, the one with higher resistance, that is, less energy-intensive, burns brighter. This can be explained very simply: due to the greater internal resistance, the voltage across it will be more significant in magnitude. Since this parameter is included in the formula for P in the square P=U2/R, then with a fixed resistance, more power is dissipated on it (it burns brighter).
The advantage of sequential switching of lamps is a more gentle operating mode due to the lower power consumed by each of them. In all other respects, this method of connection is undesirable, since it has the following characteristic disadvantages:
- when one lamp fails, the entire circuit is de-energized, so that the lighting line stops working completely;
- when installing light bulbs of different power, they give a different glow;
- the impossibility of using a sequential circuit when connecting energy-saving lamps (they require a full voltage of 220 Volts).
The sequential option is optimal for creating “soft light” in sconce lamps or when making garlands from low-voltage LED elements.
Parallel connection
Parallel connection of light bulbs
The classic parallel connection of lamps differs from the serial method in that in this case the full mains voltage is applied to all illuminators.
When connecting light bulbs in parallel, each branch has its own current flowing through it, depending on the resistance of the given chain.
The conductors supplied to lamp bases and sockets are connected to one wire in the form of a parallel assembly. The indisputable advantages of this method include the following features:
- if one of the bulbs burns out, the others continue to work;
- in each of the branches they burn at full power, since full voltage is applied to all at the same time;
- It is allowed to use energy-saving light bulbs;
- To connect to the network, it is enough to remove the required number of phase conductors from the room chandelier and arrange them in the form of a switched group.