Feeling of weightlessness
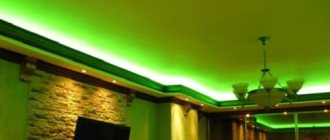
“Floating” ceilings are in great demand. In various types of designs and in combination with any type of canvas, they fit perfectly into the interior. LED strips framing geometric, abstract shapes attract the eye with their brightness and originality.
Even very small rooms miraculously expand and are filled with lightness.
At the peak of popularity is the mesmerizing starry sky overhead.
Let's meet the magician
Yes, this seemingly inconspicuous strip wound on a bobbin can work wonders! Widely used not only in interior decoration. It can even be found as a decoration on clothes.
Illuminating a stretch ceiling with LED strip is an expensive pleasure compared to other methods of decoration. But such an amazing effect has not yet been invented.
What is hidden in this skein?
A narrow flexible strip up to 5 m long, up to 2 cm wide. Consists of groups of interconnected segments. In each, several LEDs are connected in series and each segment is a complete circuit. This makes it possible to cut the tape into sections of the required length.
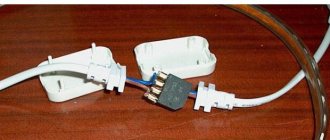
To connect to a 220V network, you need an adapter (power supply) and a controller to regulate the light intensity.
How to install the backlight correctly with your own hands
The instructions for carrying out the work depend on which option of LED lighting for the stretch ceiling is selected. You should determine in advance the appropriate method, prepare everything you need and follow the recommendations from the relevant section.
Features of installation in the ceiling plinth
Instead of a plinth, there may be a protrusion around the perimeter.
In this case, the lighting is located on the outside and is done after laying the canvas. This simplifies the work, you can take your time and think carefully about the location of all the elements. Follow these simple guidelines:
- Choose a plinth of medium or large width. Determine the position relative to the ceiling; usually leave a gap of 3 to 10 cm wide.
- Determine the position of the LED strip. It should be located so that it is not visible from human height.
- Attach the wires to the tape with a connector or solder. Consider the location of the power supply and controller. If the baseboard is wide, you can put it in a niche. When connecting, observe polarity and check the reliability of the connections.
- Apply tape around the perimeter of the room. There is an adhesive layer on the back side, but if it does not stick well, it is better to additionally use double-sided tape. The surface must first be cleaned of dust and primed if it is porous.
- The baseboard is glued last, this is the most convenient option. Nothing interferes with the work and you can set everything perfectly level.
If the room temperature is high, then it is better to glue an aluminum profile to the wall and attach a tape to it so that it cools better.
Hidden lighting around the perimeter
An effective solution that allows you to fill the room with soft light and gives the ceiling an unusual look.
The work should be carried out taking into account several recommendations:
- Order a ceiling made of translucent fabric that transmits light well. Companies have special options, you just need to determine the color.
- Determine the level at which the fabric will be stretched. Based on this, select an installation line and mark it along the walls; the marks will still be hidden later.
- Consider the location of power supplies and controllers. Since pieces of no more than 5 meters can be placed, 2 or more segments are usually needed. All control and energy supply elements must be placed outside the ceiling, since they last less than the tape and will have to be removed when replacing. For power supply, you can solder wires of a suitable length.
- Attach the tape with double-sided tape of increased strength, the kind sold in automotive stores. Check the functionality in advance so that no questions arise.
- After tensioning the canvas, turn on the backlight and adjust the brightness and mode, if possible.
In the same way, you can place an LED strip on the ceiling surface to create different effects. In this case, it is important to ensure reliable fastening, so you can use assembly adhesive.
Directed
You can highlight not only slopes, but also niches and structures in the room.
If you need to highlight window openings, you can use LED lighting. At the same time, you need to remember that temperature and humidity differences near the window can be greater than in the room, so you need to:
- Consider the installation location of the tape. It should be positioned in such a way as to highlight the opening, but at the same time not create discomfort to the eye and not give reflections into the room. Make marks on the slopes so as not to make mistakes during installation.
- Select an aluminum profile with a diffuser in which the backlight will be installed. It must be cut in advance at an angle of 45 degrees in order to fit perfectly evenly at the corners. The easiest way to do this is with a hacksaw.
- Secure the profile with liquid nails or dowels. In the second case, you need to drill holes for the screws and select countersunk ones so that their heads are flush with the surface.
- Select the location of the power supply and controller so that they are not visible. For example, you can glue them to double-sided tape on the underside of the window sill. Connect the tape to other elements using a connector or solder contacts.
- Carefully glue the tape inside the profile and cover it with a diffuser. Check the work.
Often they illuminate the niche under the curtains opposite the window. In this case, it is also advisable to use an aluminum profile that diffuses light.
Spot
Using special pins you can create the illusion of a starry sky.
Many people know this option under the name “starry sky” and it is much easier to make than it seems at first glance. You can assemble the system yourself if you follow simple instructions:
- Before installing the stretch ceiling, you must first install the LED strip. It can be placed around the perimeter using an aluminum corner or in several rows along the surface. It is better to use a profile with a diffuser to ensure uniform light.
- The elements must be secured securely; it is best to use dowel nails, since double-sided tape will lose its properties over many years. You can also use modern adhesives. When connecting, remember that the power supply and controller must be outside the ceiling.
- Order an opaque fabric so that the LED strip does not give off reflections, this is important to obtain the desired effect. You can choose options that slightly transmit light.
- After installing the ceiling you will need Starpins. These are special elements of small thickness with which you can achieve the effect of a starry sky. Use a needle to make holes in the fabric and insert pins into them. It is safe for the ceiling; it will last the same amount of time. Arrange pins in a chaotic order or create a map of a section of the starry sky with some constellations.
You can add pins later if the effect is not enough. They adhere well to the material without any fixation.
Placement methods
The design of a stretch ceiling creates free space between the load-bearing slab and the canvas. Therefore, most often electrical wiring and lamps are placed there.
LED strips are also installed in niches, cornices, on profiles of multi-level ceilings, above and behind baseboards. The light flux can be directed at any angle relative to the ceiling surface.
To obtain uniform lighting, LEDs need to be placed five centimeters from the ceiling.
Kinds
There are two types of tapes:
- single-color (SMD) - monochrome, producing one color: yellow, red, white, green, blue, as well as turquoise, raspberry, lilac, blue and other tones;
- multicolor (RGB). LEDs should be hidden from view to make the color change more effective. In addition, you will need a controller and remote control.
Single color gives three times more light than multi color with the same crystal size.
The variety doesn't end there. The material is divided according to technical characteristics.
The larger the LEDs and the higher the quality, the greater their concentration, the brighter the light.
The more LEDs, the more powerful the power supply will be required and the more expensive it will cost.
| Method of use | brightness |
| Contour lighting | low-power |
| Partial replacement of main lighting | average |
| Complete replacement of main lighting | powerful |
The more powerful it is, the hotter it gets. This means you will additionally need to install a cooler if an aluminum profile is not installed in advance.
The protection class indicates the degree of protection against dust and moisture. For the bathroom and damp places it is higher. At the same time, tightness prevents heat removal and reduces brightness.
Recently, Duralight LED strips have appeared, designed for direct connection to a 220 V power supply.
Preparing for installation
Let's start by choosing the installation location. If you are just planning a renovation, then you need to make a niche in the ceiling in the form of a shelf around the perimeter of the room. But let's look at the order of work.
Before installing the ceiling:
- Lead the power wire to the future niche through the switch;
- In the future ceiling it is necessary to provide space for a power supply unit, also known as a converter, i.e. the width of the shelf should be sufficient for its installation, and there should be enough space around for effective heat removal;
- Calculate the space for the controller and think about where its IR sensor will be connected to receive signals from the control panel.
Now you can make a ceiling with LED strip. In addition to such lighting, you can consider the option. All materials described below must be purchased in advance.
Selecting the backlight type
Choose LED backlight. There is a large selection in our market. You must decide for yourself what kind of backlight you want.
The most popular LED strips:
- With the lowest brightness. Number of LEDs – 60 pcs. linear meter;
- Bright. Number of LEDs – 120 pcs. linear meter;
- RGB – three-color. Number of LEDs – 30 pcs. linear meter;
Reference! All tapes have a standard length of 5 meters. They are sold in coils, but you can buy any length that suits you. We will consider an option with RGB backlighting. If you want a single color, then the installation method will be even simpler - at the end we will say a few words about this.
Calculation
Your ceiling is ready and you can begin installation work. The amount of tape should be enough to cover the entire planned perimeter. If you have more than five meters, you will have to power the tapes in parallel and not in series. For such an operation you will need a power supply with the appropriate power - you can install two.
For example, a room of 20 m2 is taken. Taking into account the false ceiling and niche shelves, its perimeter turned out to be 14 linear meters.
Necessary materials:
- 3 rolls of tape, 5 linear meters each;
- Transformer 220v/12v and power 150 watts;
- RGB controller, it is necessary if you decide to use three-color backlighting;
- Wiring for connection or connectors;
- Aluminum profile measuring 3 cm x 1 meter for the entire perimeter. It is necessary to secure the tape and serves as a radiator to remove generated heat;
Advice! If your cornice is made of plasterboard, then the profile of its frame can serve as a heat sink.
- Heat shrink tube (about 0.8 meters).
How to calculate this data yourself? You need to know the power of the LEDs per 1 meter, in our case it is 7 watts. We multiply by the total length of the tape that we will mount, i.e. 7 Watt x5 meters/linear x3 bays and you get 105 Watts.
Then we multiply by the power factor (it ensures uninterrupted operation of the circuit) 1.25, resulting in 131.25, rounded to 150 watts, i.e. with reserve. For our scheme, the conditions are met.
Well, let's get started?! Where does the installation of LED ceiling lighting begin?
Preparing the Tape
Cut the tape to the required length, in our case the length of the sides of the shelves is 3 m x 4 m, i.e. We connect 2 pieces of 4 meters each, 1 piece of 3 meters and the remaining ones with wires from the kit, by soldering followed by insulation with shrink tape. If you are planning a continuous chain, then we lay the tapes with a bend on the sides, cutting only the last piece to length.
The tape must be cut in specially marked places, otherwise it will not work.
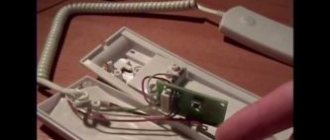
How to connect the wires? Prepare a 25 W soldering iron, 4 wires of different colors (red, green, blue and a fourth of any color), for each section with a cross section of 0.75 mm2. Actual length, depending on the connection diagram. Strip the ends on both sides, 1 cm each.
Tin with tin and rosin. Solder carefully to the board, observing the color. Then, put on the heat shrink tube and use a hair dryer or matches to heat it up. She'll tighten up.
Attention! Each five-meter piece of tape is connected to the controller with separate wires. You cannot connect sections into one strip longer than 5 meters, since the farthest LEDs will burn much dimmer, while the closest ones will begin to overheat due to increasing resistance, which will lead to their accelerated wear.
Installing a monochrome tape will take you even less time, since its circuit does not include a controller. The LED strip is connected by two wires (plus and minus) to the power supply, which is powered from a 220V electrical network.
If desired, you can add an LED dimmer to the circuit to be able to smoothly adjust the brightness of the lighting.
Installation
Lay the prepared pieces of tape around the perimeter of the ceiling, remove the protective layer of paper and glue it to the aluminum profile. If you want to glue it directly to the base of the shelf, it may come off over time, as the LED area heats up, so the inside of the cornices is not lined with plasterboard, but the tape is glued directly to the profiles.
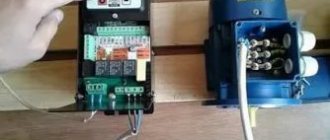
Install the transformer on the shelf niche and connect the leads from the controller to it - this will be only two wires. Before doing this, carefully look at the connection diagram.
How to make an LED ceiling, if you, for example,? LEDs can be hidden above it. To do this, you need to provide space for the transformer and controller.
They must be freely accessible. The installation method is identical. To create the effect as in the photo, first attach the profile to the ceiling, then glue the tape on it.
You can place the LED strip behind a light polystyrene or polyurethane foam cornice. This option is very helpful when the ceiling does not have built-in levels and cornices. In this case, it is also necessary to have space for a transformer and controller.
If space allows, they can be hidden in the cornice. The method of attaching the tape is the same as in the previous examples.
Signs of the original
It is very difficult to determine the quality of a material; even the price cannot be a guarantee of a good manufacturer. There are some tips from "experienced" people.
- Examine the tape. The location and quality of soldering of the elements must be smooth, the contact pads are not oxidized, without yellowish stains.
- Bend the strip and release. A high-quality one will retain its bend for some time.
- Looking through dark glasses can reveal counterfeit LEDs. The different glow temperatures will be immediately noticeable.
- Compare the glows at the ends - the brightness should be the same.
- A good manufacturer values its logo; this will be visible on the packaging at first glance.
LED strip for stretch ceiling - installation features
Stretch ceilings with LED strip are very attractive and desirable. But they are very demanding regarding operating conditions. And the installer must have golden hands - the slightest inaccuracy will very soon make itself felt. The matter is delicate and scrupulous.
It is necessary to collect more information, because literally every step is important - from purchase to connection. It is better to first become familiar with possible problems than to rack your brains later in search of solutions for dismantling. Here, for example.
The adhesive side weakens over time and may eventually fall off altogether. If it is initially weak, then it is better to immediately strengthen the fastening with double-sided tape.
And high-quality LEDs lose their quality, but after 5-10 years. But overheating can speed up this process. If the operating mode is not followed, the LEDs can heat up to 80 degrees or more. This may also be due to the lack of breathability when installed behind the canvas.
To prevent overheating, it is necessary to maintain 3 cm from the crystals to the canvas.
The delicate body can be bent only in specially designated places, so as not to disrupt the connection diagram. And moisture-proof materials require mandatory sealing when cutting.
Depending on the power consumption, there may be several power supplies. It is important that it is 25% greater than the power of all tapes connected to it.
It is necessary to determine the location of the devices. After all, powerful units are equipped with fans, the noise from which increases over time and negatively affects well-being.
To change the color you will need another controller. These units have a much shorter service life, so it would be prudent to place them in an easily accessible place.
Proper connection of the circuits is the key to uninterrupted operation of the backlight. After doing a little analysis, you can decide on how to install it.
Recommendations for installing LED strip
Since the ceiling is installed by attaching it to guides along the entire perimeter of the room, the space between them is the basis for the lighting device. Installing a stretch ceiling is quite complicated, but installing light patterns on it is accessible to many.
The placement of luminaires on the ceiling is designed based on an exclusive light pattern. They should be selected depending on the color of the ceiling material. These can be white or colored LEDs.
The meter of the tape is carried out according to the drawing. Material is taken with reserve. Its cutting is carried out only according to special marks. The individual parts of the tape are connected using connectors. A relay is used to change the light intensity.
The surface of the base for mounting the backlight must be well cleaned and degreased so that the light source can serve for a long time.
When creating a design, it is necessary to take into account the fact that the service life of lamps is reduced under the influence of strong kinks. There is no need to think that the lighting mounted on the ceiling is connected directly to the outlet. This should be done using a special power supply. After the final lighting installation and connection of the lighting to the network, it is necessary to check the operation of the entire system.
Implementation of the idea
There are many opinions about how to install tape on a suspended ceiling . Let's look at the main methods.
We will omit purely electronic matters because they require a separate description. There are many variations in the design of the schemes, as well as the characteristics of the material. Soldering and compliance with all related technologies will be required. The master must have skills and knowledge in this sensitive matter. Otherwise, breaking the electrical wiring contacts can lead to very unpleasant consequences.
When installed above the canvas:
- First, the membrane, a prototype of the main fabric, is stretched. In order to avoid contact with the inner surface of the main construction chips or insects.
- The mounting profile is attached along the perimeter with a solid line.
- An aluminum strip is also glued to the side surface of the profile along the perimeter with mounting adhesive (economical option). This ensures free heat transfer.
- The LED strip is pre-unwound, and all components are connected according to the required length and pattern. Blocks are fixed. Network operation is checked.
- After the glue has dried, the tape is attached to the aluminum strip.
- The main canvas is installed.
Installation of a stretch ceiling under the canvas is simpler and safer. Freely mounted, for example, above or behind a plinth, in a niche between the wall and the edge of the ceiling structure. In case of equipment repair, no effort or complete dismantling of the ceiling structure will be required.
Powerful power supplies often cost more than the rest of the material. In search of a cheaper replacement, you can opt for a working power supply from an outdated computer system unit.
Backlight options
If we take it globally, there are only two types of lighting: external lighting of a stretch ceiling and internal. There are mainly four main methods of ceiling lighting:
| Diffused light around the perimeter | The most preferred option. In this case, the tape is placed on a special stand under the suspended ceiling. The light is directed upward and diffuses softly. |
| Directional backlight | Separate lampshades are mounted on slopes and directed to the ceiling surface. Visually, the resulting rays are directed along the canvas. |
| Curly lighting | The lampshades are placed in such a way as to create the appearance of various configurations. Inside the suspended ceilings there is a diode strip, which is laid in intricate shapes. |
| Spot lighting | The LED is mounted in such a way as to create spot lighting. This creates a “starry sky”. In this case, the light is directed downwards. |