How to connect a 4-socket outlet: two ways to achieve the same goal
Household electrical appliances make life much easier, so a large number of them in the house is the rule, not the exception or a tribute to fashion. There are especially many devices in the kitchen and where the TV and computer “settle”: both types of smart technology often require a large army of “helpers” to provide comfort to the owners. Tees or extension cords are not the best solution to a pressing problem, so the best option is a block of sockets, which can have 2-4 electrical points. To avoid unpleasant situations in the future, you need to know about the nuances of their installation. For example, how to connect a 4-socket outlet.
Socket device
Before you start installing the outlet, you should have at least a general idea of its structure. In this section we will take a closer look at its design. As we get acquainted, we will conduct pre-installation preparations.
First of all, you need to remove the plastic protective frame, which during operation protects the live parts of the mechanism from people touching them. To do this, unscrew the cover fixing screw located in the center of the socket.
Before us is the socket mechanism.
It has contact and spacer screws. Contact ones are designed for fixing wire cores in terminal clamps, and spacer ones are for fastening the socket mechanism in the socket box.
There are two types of sockets, with and without a grounding contact. Our example shows a socket with a grounding contact. What grounding is and what it is intended for is described in detail in the following article, grounding in an apartment.
The socket has three contacts for connecting wire cores:
- phase;
- null;
- ground contact.
Let's look at the arrangement of contacts on the socket mechanism. On the left and right of the mechanism there are two identical screw contacts; they are intended for connecting the phase and neutral wires.
Which contact the phase will be connected to and which zero will be connected does not matter.
The middle contact is intended for connecting the grounding conductor. This contact has the form of a screw terminal connected to a metal strip, which passes through the entire body of the mechanism and has hook-shaped roundings at the ends.
Two side screws located on the left and right are spacers; they set metal tabs in motion, which, when the required position is reached, fix the mechanism in the socket box. Also, to fix the mechanism, special holes are provided along the perimeter of the metal frame.
We move on to the installation location of the socket, which must contain a socket box, two wires and an electric current.
Types of devices and their features
There are quite a lot of varieties of plug sockets and blocks. Each type has its own design features and purpose.
The devices differ in the method of clamping the contacts. It comes in screw and spring types. In the first case, the conductor is fixed with a screw, in the second - with a spring. The latter are more reliable, but they are not so easy to find on sale. The devices are fixed to the walls in three ways - claws with jagged edges, self-tapping screws or a special plate - a support that facilitates both installation and dismantling of the socket.
In addition to conventional, inexpensive devices, there are models equipped with grounding contacts. These petals are located in the upper and lower parts, and a grounding wire is attached to them. To ensure safety, sockets are equipped with curtains or protective covers.
Main popular types
The last type is less common than the others, since it is less convenient to use: turning the plug 180° with such a socket is impossible.
The security of the case is the next difference between the models. The degree of security is indicated by the IP index and a two-digit number following these letters. The first number indicates the class of protection against dust and solids, the second - against moisture.
Installing an outlet on an open balcony is a sufficient reason to purchase a product with a higher degree of protection, this is at least IP55.
Connection diagrams
Even a novice master will not face any special difficulties, everything is very clear, but it is better to consider the features of each option.
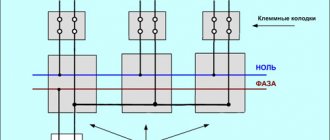
Single-phase network without grounding
The diagram is indicated by numbers:
2 - the one that turns off the phase on a specific line;
4 - distribution boxes, separate for each outlet;
Any electrical specialist knows that the phase should be located on the left, but owners often break this rule. If there are problems in the electrical network, they create additional difficulties for themselves when diagnosing, as well as in the case of self-repair.
Single-phase network, but with grounding
In this case, only one element is added, number 6, this is the main grounding bus for the protective conductor (PE). It is indicated in green.
There is another option, used for outbuildings if they have open wiring. In this case, the grounding runs along the floor - along the perimeter of the walls, and a separate wire leads to the sockets below. There are no other differences in the eyeliner.
Possible connection methods
There are several ways to achieve the result, but it all depends on the potential load on such outlets.
Loop - sequential method
If it is necessary to install blocks consisting of several sockets, all elements are connected using the daisy chain method. The phase is connected to the second device with jumpers, then the next device is switched in the same way. Do the same with zero contacts.
The method is quite simple, but not without its drawbacks. Thus, poor contact in one of the intermediate sockets automatically causes the following elements to fail. Checking and tightening the terminals will help you avoid trouble; the operation must be planned and carried out at least once a year.
If the terminals allow, then instead of separate jumpers it is better to use a solid wire. The insulation is removed from a small area, then it is bent into a loop, clamped into a terminal, then the next sockets are “straightened” using the same method. The reliability of all elements of such an electrical network is a big plus of this method. The disadvantages - the need to calculate the length of the wire, relatively long, more difficult work - are still insignificant.
A much bigger disadvantage is the impossibility of simultaneous operation of several powerful devices, since the maximum current value for one outlet is 16 A. If several “serious” pieces of equipment are involved in the work at once, then the power cable simply may not withstand the increased load.
Star - parallel connection
In this case, all sockets in the room are connected with a separate, “own” wire, suitable for the distribution box, where the main cable is connected from the panel. This method does not limit the operation of the sockets, since even if one of them fails, the rest will remain in working order.
Choosing the Right Method
The decision largely depends on the amount that the owners plan to spend. Other factors are the power of devices that will be connected periodically or work constantly, the presence of decoration on the walls and the degree of readiness to disturb it. The best way is a star connection: either to the main panel or to the distribution box.
For devices that are not very powerful, and which also will not operate hourly, a simple daisy chain connection is suitable. A major renovation or its immediate planning will provide an opportunity to modernize a house or apartment. In this case, they usually decide which devices are planned for purchase. It is this list of all future (and present) devices that will become an incentive for calculating the required cable cross-section, as well as choosing methods for connecting them.
Selecting cable cross-section for sockets
All rooms in the house must be provided with a separate electrical box and gas station. It is prohibited to combine several electrical outlets and electrical wires of lighting devices into one circuit.
Experience shows that for use in the kitchen, the wire for sockets must correspond to the cross-section:
- dishwasher and washing machine - 3x2.5;
- hob - at least 3x4;
- oven - 3x2.5.
For electrical wiring for other devices, 1 mm of electrical cable profile must withstand 8 amperes. That is, in general, for use in the kitchen, a wire with a cross-section of 4-6 mm² is optimal.
For all premises, electrical wires are calculated using the formula:
I= P/U nom, where: I – current strength; P is the power of the electrical equipment of the room and U is the voltage of the electrical circuit.
When installing electrical wiring, Ptotal is calculated. (total power) of consumers connected to the distribution box of each room. If the Psum of the devices does not exceed three kilowatts, then it is enough to use a wire with a profile of 2.5 mm².
In everyday life, as a rule, two- or three-core copper electrical wires with a profile of 2.5 to 6 mm² are used to connect electrical outlets.
Each device has its own power consumption. The main condition for the arrangement of any facility is the calculation of the consumer sum, which will help you choose the input electrical cable. It must be remembered that in addition to internal consumption, it is possible to connect power tools for various types of outdoor work, when there is a need to connect pumps, generators, welding units, etc.
To find out which conductor to use to supply electricity to the house, Psum of electrical appliances is multiplied by a factor equal to 0.75. In the same way, the capabilities of electrical circuits for each residential area are assessed.
The calculation of the required cable cross-section for sockets is determined based on the technical characteristics of the wire: diameter, voltage, current, and Pconsumption.
I = (P × Ki) / (U × cos(φ)) - calculation for a single-phase circuit; where, cos(φ) = 1; U – circuit voltage within 210 -240 volts; I - current strength; Psum - electrical power of all electrical appliances; Ki = 0.75.
I = P / (√3 × U × cos(φ)) calculation for a three-phase electrical network; where Cos φ is the angle between the phases; Psum. all electrical appliances; U = 220 volts.
Installation of sockets
Before looking for how to wire a 4-socket outlet, it is better to become familiar with the requirements and installation process of a simple single device. The fact is that there is no difference in installing double, triple sockets, or devices with a large number of sockets.
Complete blackout is the first condition for any electrical work. When installing, be sure to pay attention to the color coding of the wires. Phase wires (L) can be:
But still, 3 colors are more often used - white, black or brown. Neutral (N) - zero working contact - blue or blue. Grounding (PE), which is often called “zero protection,” has a shell of yellow and green stripes (longitudinal, transverse), sometimes a yellow-green tint, and can also be purely yellow or only green.
The process of installing sockets looks like this:
Installing a block of several sockets
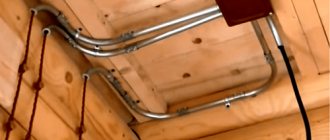
The most popular method of connecting single elements among home craftsmen is still the daisy chain method, even despite its shortcomings. In this case, next to the hole with the working cable, several more are drilled (1,2, 3 or 4), located at the same level, so before work it is necessary to apply the correct markings.
For the operation, use a ruler, level and marker (pencil). It is necessary to maintain the distance from the center of each element (72 mm), otherwise the decorative covers will not be able to be installed in place. When gating, the vertical (horizontal) lines are strictly observed and the same level is used for them.
If such “fuss” is not too impressive, then you can get by with a purchased model - double, triple or quadruple. However, many owners are against this decision. The reasons for the failure are possible savings, the massiveness of such sockets, both buses equipped with two terminals, which sometimes lead to mistakes by novice craftsmen during installation. The result may be a short circuit, and such an emergency will negate all efforts and also destroy the new product.
Since there are two ways to connect a 4-socket outlet, the decision is up to the owners of the house. To get acquainted with all the pitfalls of working with electricity, it is better to look at the exemplary work of other craftsmen. For example, the one shown in this video:
There are four wires coming out of the old outlet, how do I connect the new outlet?
Thank you. Best regards, Olga.
Just a few months ago I had a similar situation. It turned out that the wires go through one outlet to another.
Try disconnecting the wires from the top photo of the socket and check which other nearby socket the current disappears from. That socket is connected to this one.
How can I change it? Just connect exactly the same as in the photo, without changing anything.
Personally, I didn’t immediately understand this, since all the other outlets that I changed at home (and there were quite a few of them) were not connected in this way. I realized this when I disconnected some wires, considering them unnecessary (initially I thought that 2 wires were connected for reliability and to increase the cross-section, that is, to reduce resistance). And it began: either the outlet wasn’t working, or the next one. Then it dawned on me that the current in one socket was going through the terminal of the other.
You need to either connect in exactly the same way, or first find out which two wires carry electricity and which are empty, that is, leading to the adjacent outlet. Only if you want to disconnect, it is better to mark the wires with something, for example, with a felt-tip pen, which ones are connected to one terminal, and not to mark those that are connected to the other. Next, when you understand which wires are live and which lead to another outlet, you can also mark them somehow. Then you won't get confused when you connect.
Personally, the bigger problems I had when installing this outlet were not due to determining that it was connected that way, but because there was little space inside the outlet (in the wall recess) and the wires were thick aluminum. The new-style socket had such side horns that did not allow it to tightly and firmly secure the socket in this recess of the old model. As a result, a bunch of thick wires inside the socket pushed the socket itself out and it was slightly pressed against the wall (about a centimeter and a half), and this is bad, since dust can accumulate inside, which can lead to a fire due to a spark. Therefore, we had to press it deeper and twist the horns more tightly. But it still didn't do much good. Firstly, there was still a gap of half a centimeter, and secondly, if you put the plug of the device in there and then pulled it out, then the socket would also move out a little after the plug. And thirdly, due to the constant disassembly and reassembly and pressing of the wires, these aluminum wires began to break. They break inside the insulation. Where the breakdown can be felt by moving the wire. At the point of breakage, the wire bends easily without force. I built up one wire, then the second one broke off. In general, I had to increase 3 out of 4 wires.
As a result, I had to abandon the new type of socket and install an older one (that is, I replaced a very old one with a not very old one, but not with a new one either). But in fact, I don’t use it, since it has always been closed in the closet.
Source
Socket connection diagram: from a socket, with 3 or 4 wires
Connecting an outlet is a procedure that has to be performed during construction and major repairs of residential, administrative and commercial buildings. To carry out this activity, there is no need to call a professional electrician; everything can be done with your own hands. The main condition for carrying out work on the line is strict adherence to safety measures. Devices can only be connected after the apartment has been de-energized. You also need to familiarize yourself with the possible connection diagrams for sockets and the rules for their placement.
How to properly connect a socket from an outlet
General diagram of connecting a group of sockets with a cable
The most popular way to connect sockets is to install jumpers between their terminals.
The advantages of this solution are the following:
- ease of implementation;
- there is no need to groove walls for a new line;
- speed of implementation;
- minimum consumption of materials.
There are also disadvantages:
- a large number of connections contributes to heating the circuit;
- there is a risk of wires coming loose and short circuiting;
- You will still have to drill and cut - you need to make channels and a hole for the glass.
If you carefully perform each stage of the work, the structure will be strong and safe.
Common types
Manufacturers produce products that have a wide range of applications, designed for use in certain conditions.
Based on the number of consumers, products are divided into single and double. To create blocks of 3-5 points, sources are combined into one system.
Regarding the ability to withstand loads, the devices have the following power ratings:
The most popular products in everyday life are those designed for a voltage of 230 V and a current of 16 A.
How to connect an outlet: connection diagram. ⋆ Electrician's manual
It is simply impossible to imagine our life without electrical appliances. A large number of household appliances have confidently entered our apartments to make homework and information space easier. Therefore, it is increasingly necessary to install a new outlet to connect various electrical appliances.
What rules must be followed when installing an electrical outlet, how to properly connect single and double outlets, what tools will be needed and other nuances we will tell you in this article.
Fig. 1 - visual diagram of the socket connection
When performing work on connecting an outlet, you must: 1. Before electrical installation work, it is imperative to de-energize the wiring at the entrance to the house or apartment.2. Carefully read the instructions supplied with the product and follow its instructions.
Do not ignore these recommendations, because... it could save your life.
Preparing to connect the outlet
To connect the outlet to the electrical network yourself, you need to prepare the following:
- decide on the type of outlet and purchase it;
- lay a wire to the location of the future electrical connector;
- prepare the tools necessary for installation work;
- follow the step-by-step instructions described below.
Today, stores offer a wide selection of different sockets for any room, in various designs:
- external;
- internal;
- single, double, triple, etc.;
Wiring and socket installation method
Depending on the material from which the bearing surface is made, the choice of method for laying lines and installing devices is made.
In accordance with the requirements of SNiP, the following installation options are possible:
Each method has its pros and cons. The choice is made based on an analysis of all factors regarding the regulatory framework and ease of use.
Components
The general arrangement of the electrical circuit in a building is the same for indoor and outdoor structures.
They include the following elements:
The meter can be installed inside the apartment, in the entrance or in a special box on the street.
Connection type
The choice of outlets for your home is determined by the type of wiring that is installed in it. In buildings of various series, cables with 2, 3 and 4 cores are laid. Labeling will help you figure out what they are intended for.
The color of the insulation corresponds to the following characteristics:
If all the wires are colored the same, you need to use an indicator to determine their identity.
Before connecting the outlet, you need to determine the locations for placing household appliances.
Switching can be done in the following ways:
Disconnection of sockets is carried out in cases where it is necessary to replace the product or carry out its maintenance - clean the contacts, tighten the bolts, secure it more tightly in the box.
At what height should sockets be installed?
Electrical points cannot be installed wherever you want, based on the aesthetic or practical side of the issue.
The following standards exist for the placement of devices:
| An object | Distance (cm) |
| Floor | 20-120 |
| Doorways | 100 |
| Corners between walls | 80 |
| Gas pipes | 50 |
| Water and sewer pipes | 60 |
| Heating devices | 100 |
| Gas and electric stoves | 30 |
| Water taps | 40 |
Failure to comply with these parameters may result in a fine from the inspector or a complete disconnection of the home from the network.
Schemes for connecting sockets to the electrical network
When conducting electricity into the house, the following schemes are used:
Regardless of the choice of circuit, you need to use wires whose cross-section corresponds to peak loads.
Construction and components
To thoroughly understand how to properly install a new outlet at home, you need to study a little about its components. All sockets are sold already assembled. Therefore, when installing it, you will have to unscrew everything yourself.
We suggest you familiarize yourself with How to fix a wire on a wall without drilling
The main components of the socket are the base, the conductive part, and the decorative front panel. The base is made of ceramic or high-quality plastic. All elements are attached to it - conductive parts and the front cover.
Ceramic bases are considered more reliable, but they require particularly careful installation, because if damaged, you will have to buy a new socket.
The decorative overlay is designed to hide all working elements. It serves as a reliable insulator of the working part from external influences. Some models provide the ability to simply replace this part of the outlet.
Getting to know the internal structure of the outlet will help you better understand the process of connecting it correctly.
The working part of the socket consists of spring contacts and terminals to which electrical wires are connected. One of the important contacts is the grounding one.
The conductive elements are made of brass or bronze. The latter are better, but are extremely rare. Therefore, you should choose options made from tinned brass - they are more reliable than conventional brass, are better soldered and last longer.
Designer sockets allow you to make the interior of your home unforgettable. Their unusual performance adds its own flavor
Installation process
Installation of sockets is a procedure that is carried out in a certain sequence.
First you need to prepare the following tools and materials:
When installing the electrical system, you must wear safety glasses, gloves, and a respirator.
Preparatory work
The scope of this process depends on whether a new cable will be laid or everything will be limited to replacing the socket.
The sequence of actions when electrifying a building under construction or its major renovation is carried out:
When the solution has completely hardened, it is sanded flush with the wall surface.
Connecting wires to the outlet
To prevent damage to the cable when the building shrinks or comes into contact with moisture, it should be pulled through a corrugated plastic tube. After this, the channel is walled up in grooves. The ends of the cable are led out into mounting boxes so that there is enough material left to make the connection. Further actions are carried out after the solution has completely hardened.
Connecting the socket
Before connecting the wires to the outlet, you need to make sure that they are not live. To completely protect yourself, you should turn off the input switch.
After this you need to do the following:
After this, you can supply electricity and use the point.
Standard installation steps
In order for the outlet to work for a long time and not create any problems, you need to be careful about its installation. It is important to do everything correctly and consistently, without haste. Only in this case can a good result be guaranteed.
The preparatory stage of installation begins with the purchase of the desired model and the required number of sockets. Here it is important to consider where they will be installed and select the models that are most suitable in a particular room.
For the kitchen, it is important to select the required number of sockets, and the power cable must be designed for the total load of all devices that will be connected to them.
Then you need to take tools that may be useful during the installation process. This is a construction level, the socket itself, screwdrivers for tightening fasteners and screws, a construction knife or stripper for removing insulation, pliers, a special screwdriver for checking voltage, electrical tape.
It is better to prepare all the tools necessary for installation in advance so that nothing distracts you during the work process.
If you not only need to replace an old outlet with a new one, but also install additional space for connecting electrical appliances, then an extensive set of materials and tools may come in handy.
You will need a socket box (mounting box), a puncher for making recesses for the working mechanism, attachments for a puncher of the required diameter, a ruler/tape measure, a simple pencil, and a construction plaster mixture.
If you are going to install a socket in a concrete wall, you can use a hammer drill with a concrete bit to mark the required diameter of the future socket box. Then use a drill to punch holes and remove excess pieces of concrete
The most important thing in any electrical work is turning off the electricity! Without this, it is unacceptable to begin installation.
Depending on what is installed in a particular apartment or house, you need to unscrew the plugs if a meter with plugs is installed or set the levers to the “off” position if there is an electrical panel with automatic switches.
Then you need to additionally make sure that the working area is truly de-energized. To do this, you need to take a pre-prepared indicator screwdriver and check for the presence of voltage in the wiring to which the outlet is to be connected.
A screwdriver for determining voltage works like this: you need to touch its tip to the wire being tested, and with your finger, press the contact on the back of the screwdriver. If the indicator lamp built into the housing lights up, there is voltage
Having chosen the appropriate socket models and prepared the necessary tools, you have to decide how to properly connect the socket.
There are different schemes for connecting sockets to the electrical network:
- sequential, when the sockets are connected one after another;
- parallel, if each outlet has its own wire from the junction box;
- mixed, the option when some sockets are connected in one way, and the rest in a different way.
It’s easy to decide on the type of connection - if the additional connection point to the electrical network will be used to operate powerful devices, you should choose a parallel circuit. For low-power electrical mechanisms, it is convenient to give preference to a sequential circuit.
Parallel connection is more reliable and allows you to turn on powerful electrical appliances. The advantage of serial connection is saving wires and, as a result, money
After making sure once again that the workspace is de-energized, you can proceed to the next installation step. If this is not a replacement for an old outlet, then you will need to note where exactly one or more additional outlets will be located. For this you will need a ruler/tape measure and a pencil.
If you plan to replace a damaged socket or remake a device, then you need to act in a different sequence, described in detail in the article we propose.
We suggest you familiarize yourself with Installing a socket in a concrete wall
When choosing a location for the future location of sockets, you should focus on the convenience of their further use. For sockets, they try to maintain the following distances:
- from the floor - not less than 30 cm;
- from the ceiling - at least 20 cm;
- from the window - at least 10 cm;
- from the plinth under which the wire is hidden - 0 cm.
If the sockets are placed too high or low, it will be extremely impractical. The rules for the location of sockets and switches according to European standards are written in detail here.
There are no strict rules and regulations for placing sockets in a room. In this matter, you should adhere to the convenience for the residents of a particular house/apartment
Having marked the places where the sockets are to be installed, you should make holes for the mounting boxes. They, depending on the material of the walls, come in different diameters. Here you need to focus only on your own situation. The main rule is that the hole should not be smaller than the socket itself.
The mounting boxes themselves are made of plastic, very rarely metal. Good quality plastic, non-flammable. It provides reliable insulation of the wires that will be located in such a box. The shape of socket boxes can be round, oval and even square. Although it is most convenient to work with round plastic boxes.
Models for plasterboard walls are equipped with presser feet to make fastening easier. They are adjusted using special screws
The order of the installation stage of the socket box depends on the condition of the walls and the individual characteristics of the home.
The most common situations are:
- full-scale renovation of the premises. In this case, grooves are cut in the walls, a cable is laid in them that will power the sockets of the entire room, and holes are made for mounting boxes;
- the walls are already finished with a decorative coating, and the electrical cable is recessed into the wall. In such a situation, you will need to carefully use a knife to clear the already prepared holes for installing mounting boxes;
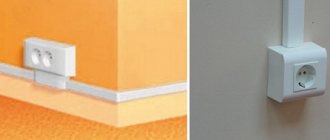
- the walls are finished, the cable is laid under the baseboard or hidden in an external insulating box. Then you need to install external sockets;
- The walls are finished, the cable is not laid. Here you have to choose the most optimal installation option.
Convenient if you only need to make a hole for an additional outlet. Decorative overlay - the front part will cover the consequences of the work.
Otherwise, if you want to avoid damaging the external finish of the walls, you will have to approach the installation process creatively. One of the options is to use an overhead installation method, when the wire is to be run over the wall, packing it, for safety reasons, in a protective and decorative channel.
If in the process of connecting an additional outlet it is necessary not to damage the walls, then you can use overhead sockets
Another convenient option is to install the socket immediately above the baseboard, hiding the electrical wire under the baseboard. In this case, you will also have to use an overhead model.
You need to install a mounting box into the prepared hole for the socket, threading the power cable into it. This hole must be thoroughly cleaned of dust and construction debris. You can use a vacuum cleaner or brushes. The socket box is securely fixed in the cleaned hole.
To do this, the prepared gypsum mixture is applied, and the installation box with the cable threaded is immersed in the hole with the mixture. All work continues after the solution has set - this will take no more than 10 minutes.
A wire is threaded into the socket box, which will have to be worked with in the near future.
In this way, one or more socket boxes are installed, as well as a mounting box for a double socket. If a whole row of sockets is to be installed, then the mounting boxes are installed in a row strictly horizontally or vertically - as planned by the owner of the room.
Most often this is a horizontal option. In this case, single socket boxes are placed close to each other. They are necessarily connected to each other, and their horizontalness is checked by the building level.
After securing the box, work begins with the power cable coming out of it. Firstly, you first need to cut off the excess piece, leaving about 7 cm from the edge of the socket box. Remove the braid from it - the top insulating layer that unites the internal wires.
Inside you will find 3 wires of different colors - blue, white and yellow-green. This is the most common color composition used for markings. Instead of white there can be brown, red, black and others.
Secondly, the wires need to be freed from the individual insulating layer by carefully removing it with a stripper or knife at a distance of about 1 cm. Now the work ahead is to connect them to the working mechanism of the grounded socket.
Yellow-green is the color of the grounding conductor. It must be connected to the central contact responsible for ground.
The wires must be securely fastened into the working mechanism of the socket. They should not dangle or be easily pulled out of their installed place.
Blue or blue-white is a working zero. This wire must be connected to the extreme terminal of the working mechanism of the socket. The remaining wire, most often it will be white or beige-brown, must be connected to the second outermost contact.
Depending on the type of socket, the connection is made by pressing a special key if the mechanism uses spring terminals, or is fixed between the plates using a screw clamp.
To fix it in a screw clamp, sections of wires cleared of insulation are first bent so that it looks like a small half ring. Thanks to such preparation, it is easier to work: the wire will not slip out from under the screw during fastening. You need to bend it clockwise.
When all the contacts are connected, you need to carefully bend the wires and carefully place them together with the working mechanism of the socket inside the mounting cup. Then carefully screw the mechanism to the socket box using the screws located on its edges.
These screws will allow you to tightly fix the working part of the socket. It is important not to overtighten the fasteners so that nothing breaks.
When the socket mechanism is installed in the mounting box, you need to take a building level and check the horizontalness of its installation
If everything is securely and horizontally fixed, you can proceed to the final stage of electrical installation - screwing on the decorative trim. To do this, you need to tighten the central screw without overtightening it.
After installing the frame and face of the socket, it is important to tighten the mounting screw tightly so that nothing dangles
Features of connection in three- and four-wire networks
The presence of a three-wire network in a house means that in addition to phase and neutral, there is a ground line. To connect to such wiring, you need to purchase sockets with three terminals. Phase and zero are attached to the extreme contacts, and ground is in the middle.
Four wires mean that two phases are supplied to the house. The second conductor can be used to directly connect double points. When connecting to a single socket, it is advisable to insulate and bend the second phase, since two wires will not fit into one hole.
Source
Grounding and grounding, or why does a socket need a third contact?
Recently, sockets and plugs with a third contact have become increasingly common. Few people know that any electrical appliance needs only two wires for power supply: phase and zero or plus and minus. So what is the third contact for?
The third contact was introduced for the protective wire, which can be either ground or neutral.
It is this wire that provides additional protection against the appearance of high electrical potential on the body of an electrical appliance - be it a refrigerator, washing machine or computer.
What is the difference between grounding and grounding? In a nutshell, grounding is a separate wire connecting an electrical appliance to the ground loop, and grounding is a wire connecting an electrical appliance to the neutral bus on the distribution panel.
In practice, grounding is most often used in residential premises. In order to carry it out according to all the rules, it is necessary to provide for its presence at the stage of planning the electrical wiring. Wiring when using grounding must be done with a three-wire wire. When installing wiring, it is very important to connect the wires in the distribution boxes by color, otherwise you can confuse the wires and connect a phase wire instead of the ground wire in the socket. It is better not to talk about the consequences of such an error. In the distribution panel, it is advisable to connect the neutral wire to the neutral bus using a separate terminal.
If, while living in an apartment building, you decide to connect the grounding contact of the outlet to the plumbing or heating system, throw this thought far away and for a long time. With such a connection, you will endanger not only the lives and safety of your neighbors, but also your privacy and freedom. In order to understand why such a connection can be dangerous, it is enough to remember the school physics course and estimate, for example, what voltage the nearest neighbor will have on the heating battery relative to the water supply if your faulty electrical appliance supplies a phase to the grounding contact. You can also imagine what will happen to your neighbor if he accidentally touches the heating pipes with one hand and the water pipes with the other.
If you live in a private house, then it is better to connect the third contact to the ground loop. To do the latter is quite simple - 3-4 steel reinforcement bars with a diameter of at least 10 mm or 3-4 corners with a cross section of at least 100 sq. mm and a length of 1 m or more are driven into the ground. Then these corners are welded together with a steel strip. It should be noted that it is safe to do this and preferably at a depth of more than 0.5 m, since in winter the top layer of the earth freezes and contact becomes worse. A copper wire is connected to the strip. Its cross-section depends on the expected total, maximum load in the house. The higher the indicator, the more reliably the distribution panel will be grounded.
As for the rest of the distribution of “ground” around the house, here, as they say, the master is the master. You can lay a separate wire from the ground loop to each socket, as recommended by the PUE (Electrical Installation Rules), or you can lay the “ground” through all sockets with one wire.