And the question of redoing any group of wiring in a room or the entire apartment as a whole will no longer arise even in the distant future. Let's look at the order of work in as much detail as possible, following which you will ultimately get a high-quality result.
Electrician before or after plastering
First of all, remember that all electrical installation is done properly after plastering. Therefore, the finishers work first, then the electricians come in.
In extreme situations, you have to do the opposite, but then you will encounter a lot of problems that could have been avoided in the first place.
Electrical markings
Any quality work begins with accurate markings. Most often, professionals use laser levels and axle builders for this.
With their help, you can quickly and accurately mark the centers for all the sockets in the room. It would seem that a couple of millimeters will not play a decisive role here. What's wrong with one block at the beginning of the room being slightly higher than the other at the end.
However, very often in apartments you come across wallpaper with horizontal or vertical stripes. And these stripes will clearly show when the socket box is not installed level.
The same can be said about the seams on the tiles.
Therefore, place all socket boxes in the room in the same plane. The recommended distances are as follows:
- for sockets – 30cm from the floor
- for light switches – 60-90cm
- everything above the countertop, in the bathroom or kitchen – 110cm
After all the centers of the socket boxes have been marked, then proceed to marking the mounting points for the lamps, both on the walls and on the ceiling.
At the same time, you can mark out places for hanging plasterboard structures. Since in the future, when all the cables and corrugations are on the ceiling, marking the fasteners for drywall will not be very convenient.
But it’s worth bothering with all this if you will also be installing the structures.
After all this, proceed to making marks for the corrugation fasteners. The most important thing is that they do not interfere with each other.
Usually, competent marking, even with the use of modern measuring instruments, takes a full day of work. Prepare yourself in advance for exactly this period. If you are in a hurry, it will definitely backfire on you during further installation.
Main stages of installation
There are two main steps in the process of conducting electricity. This:
- Preparatory work: drawing up a plan/diagram, preparing all consumables and instruments, gating walls for subsequent cable laying. Also, holes are created in the walls for mounting boxes. Their edges do not protrude beyond the walls, and they themselves are plastered around the base. All pipe connections must be checked for leaks and protected from moisture.
- Connecting all electrical devices to the system. Cables are routed into channels to switches and sockets. The cable, depending on its cross-section, is laid using an elastic plastic broach. After all the wires have been pulled and installed, you can begin making connections. This can be soldering, terminals or twisting, as well as other methods.
The last step is to check the entire electrical system. After connection, the serviceability of the energy supply to consumers is checked. If the line operates without interruption, then the boxes can be covered with plaster.
The main thing is to remember the precautions. To compare all upcoming expenses, you need to calculate the costs of all materials and equipment, as well as find out the cost of electrical equipment in a new building.
Drilling out socket boxes
Next begins the noisiest and dustiest part of electrical installation work - drilling and chipping.
In order to minimize the amount of dust, construction vacuum cleaners are used.
In addition, each tool in this case must have an outlet with a pipe or a dust removal device.
Small hammer drill, medium hammer, large hammer, wall chaser, all of these tools must have dust removal, otherwise your vacuum cleaner will be of no use.
There are also special attachments that fit on a regular grinder and all work is carried out with almost complete dust removal. You can purchase both expensive models from the famous companies Hilti or DeWalt, and absolutely affordable ones, for example Mechanic AirDuster.
First, the centers of the socket boxes are drilled out using a d-6mm drill. Then, based on the material of the walls, a tool is selected for arranging niches for socket boxes.
It could be:
- medium hammer drill with diamond bit
- large hammer drill with impact bit
- wall chaser with a cut 60mm deep
Basic recommendations
Firstly, you need to take into account the mandatory insulation of connections - they must be sealed. This is one of the most important nuances. But there are also basic, main steps during electrical installation that must be followed when working:
- When carrying out electrical work, a three-core cable is used for the lighting line, the minimum cross-section of which is 1.5 mm. For the power line - 2.5 mm. For household appliances (for example, stoves) - the cable cross-section should be 4 mm.
- Each room/room requires a separate distribution box. Connecting it using terminals is one of the most reliable options.
- Circuit breakers must be installed. To repair the wiring, you will need such a switch on the main cable.
- The safest wiring method in a new building is hidden. Bare walls are tapped and cables are laid.
- Before you begin electrical installation, draw up a diagram with all the devices and wires indicated on it.
Wall chipping
After making niches for sockets and switches, gating for cable lines begins. You need to do it in exactly this order.
Otherwise, if you first groove and then try to make niches, your center drill will lead into the groove.
The easiest way to cut grooves is with a laser level. Sometimes several lasers are used for this work simultaneously.
For example, if you have two grooves going down to the socket block - one power, the other low-current, then it will be faster to set up two laser levels and, without descending from the stepladder, cut both parallel straight lines from top to bottom at once.
When all the niches and grooves are ready, the premises are cleaned and all the socket boxes are installed.
Next comes the adjustment of the clips for the corrugations on the ceiling. The easiest and fastest way to do this is with a mounting gun.
If it is not there, then use a regular hammer drill to drill holes d-6mm and the clips are placed on the dowel and nails.
Is it possible to lay cable routes without corrugation and how this can all end, read in a separate article.
You only need to use gray PVC corrugation. Unlike other multi-colored species, it does not support combustion. Its flammability class is A1.
In addition to being non-flammable, the corrugation protects the cable from mechanical damage. You can step on it, hit it lightly with a hammer, or catch it with the sharp edge of the profile.
Of course, you will damage the shell itself, but nothing will happen to the cable. Well, among other things, installation in a corrugated sleeve looks more aesthetically pleasing.
The corrugated cable can be laid with equal success both on the wall and on the floor and ceiling. True, in all cases there are a number of significant differences.
Connection in junction boxes
When all the routes have been laid, it’s time to connect the wires in the junction boxes.
Since according to the PUE there must be access to distribution boxes, it is not recommended to install them on the ceiling. Boxes built flush with the walls also don’t look nice in modern renovations.
Therefore, the best option is to use special recessed socket boxes in which all switching is carried out. Most electricians use regular socket boxes with a depth of 45mm.
Some installers choose deeper options – 60mm.
However, there are even wider examples, for example from Kaiser. They are called Kaiser 1068-02 electronics mounting box.
Often, in order to leave a sufficient supply of wire, even in a regular recessed socket box there is not enough space. And this box perfectly accommodates all the wires, plus connecting terminals.
All switching in them is done in the upper part. Then the whole thing is puttied and an ordinary socket box remains.
For subsequent access to the connections, you just need to remove the electrical installation equipment (socket, switch), remove the plug, pull out the supply of wire and carry out any manipulations with the wires.
If you do not have a single block, but a double or triple one, then here too you can use in-depth options up to 60mm.
Internal jumpers in such blocks can be dismantled. Due to this, the supply of wire that remains in such a box sometimes reaches 30 cm.
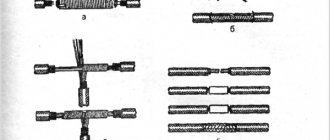
Switching wires inside can be done in several ways:
- soldering
- pre-twist welding
More details
- crimping
- Wago clamp
It is not recommended to use daisy chaining in outlet lines. Also, all outlet lines are looped. That is, an additional wire is pulled from the first socket to the very last one.
If one of the supply wires is damaged, you will be able to reach the connections and remove the shorted cable. Thus, restoring all electrical wiring from backup, without capital costs and new gating.
Rules for electrical wiring in the house
For each type of construction and installation work there are rules and standards, such as SNiP and GOST. If we take electrical installation work, then it must be carried out in accordance with the PUE - the rules for the construction of electrical installations. A person who decides to independently install electrical wiring in a house must familiarize himself with this document. In the PUE you can find a wide variety of information, for example, installation rules and principles for choosing electrical equipment.
Basic rules for electrical wiring in a private house or apartment:
- The main elements of electrical wiring in the house must be freely accessible (such elements include boxes, sockets, switches).
- When installing switches, their height above the floor should be within 60-150 centimeters; the switches themselves are located on the side of the door where it does not interfere with access to them, that is, if the door opens to the right, the switch should be located to the left of it, and vice versa. The cable to the switch is supplied from above.
- Due to the possibility of flooding of the room, the rules indicate the installation of sockets 50-80 centimeters from the floor, while the sockets should be located 50 or more centimeters from gas stoves, pipes and radiators for heating and water supply. Thus, sockets should be mounted no closer than half a meter from all grounded objects.
- The norm for installing sockets is: 1 socket per 6 square meters of room. The exception is the kitchen; the required number of sockets is installed in it, sufficient to connect all household appliances and appliances. Installation of sockets in the toilet is prohibited. It is possible to install an outlet in the bathroom, but the supply of electricity to such an outlet is carried out through a separate circuit breaker located outside the bathroom.
- Cables are laid only vertically and horizontally, the transition angles are strictly 90 degrees. All laid cables are marked on the electrical diagram.
- When laying cables, there are standards for clearance from pipes, load-bearing beams and similar structural elements of the room. The height of the cable from the floor is 15-20 centimeters. The cable must be at a distance of at least 40 centimeters from the gas pipes. The horizontally running cable should be at a distance of 5-10 centimeters from the beams and cornices, while the cable running along the ceiling should be laid 15 centimeters from it.
- When laying the wiring, it must be taken into account that the cable should not touch the metal structural elements used in the construction of the apartment or house.
- If the cables are laid in parallel, the distance between them should not be less than 3 millimeters, and each individual cable must be laid in a special cable channel: a protective box or corrugation.
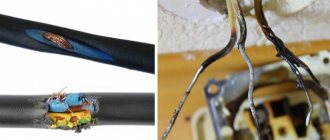
- Cable routing or connection is carried out only in special boxes, all connections must be well insulated, connecting copper and aluminum cables to each other is strictly prohibited, and even more so, so-called “twists” are prohibited.
- The grounding wire or neutral wire is attached to the grounding bus only using bolted connections.
Connecting lamps
During rough electrical installation, ceiling lamps are usually cabled. However, during finishing work, it is necessary to use junction boxes hidden behind the lamp.
More details about the correct connection of ceiling lights are discussed in the video below.
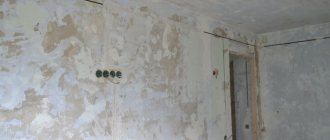
After completing the rough electrical installation, all socket boxes are covered with polystyrene foam covers. This is done so that during painting work the wires do not interfere and the socket boxes always remain clean.
Types of postings
Even before starting all work, you need to decide what type of electrical wiring will be. The type of finishing repairs in the house depends on this. The wiring can be:
- Open;
- Closed.
If the wiring is open, there is no need to tap the walls. However, you need to think about how to cover the wires on the walls. Most likely, an additional decorative solution will be required. The advantage of such wiring is the ease of repair in case of breakdown: the wires are not covered, you can easily determine the location of the damage and replace the wire.
If the wiring is closed, then it is necessary to groove the walls, make appropriate channels for the wires, and cover the wires. The advantage of this option is the complete absence of wires in the house.
However, the downside will be the need to open the walls at the slightest breakage of such wiring. There is no other way to replace damaged wires.
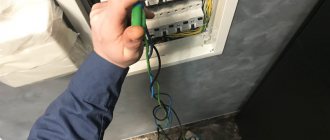
Switchboard assembly
One of the most important points in electrical installation is the electrical panel. Use here only products from proven and positively proven manufacturers - ABB, Hager, Tekfor.
The sequence of work on assembling the electrical panel, its configuration and optimal diagrams can be found in separate articles.
Installation of the panel housing into the wall:
Single-phase switchboard option:
Selecting the optimal three-phase option: