Repair and search for distribution boxes
Many people do not know what a distribution box , or as it is often called a junction box or branch box.
In any room of an apartment or private house, all electrical wiring originates from the electrical panel, in which the electrical cables are connected one by one in groups to the machine. As a rule, 3 machines are installed per apartment, excluding a separate one for the electric stove (if available).
If you have 3 circuit breakers installed , then 3 pairs of wires or electrical cables will go from the electrical panel to your apartment. They will power all the outlets and lighting in your home. Moreover, these three lines will be distributed. For example, one is for living rooms, the second is for the kitchen, the third is for the bathroom, toilet or corridor. This is done for the purposes of:
- Firstly, in order to distribute the load . To one typical line with a 16-amp circuit breaker, you can connect electrical consumers with a power of no more than 3.5 Kilowatts, otherwise the circuit breaker will trip. Accordingly, to three groups of sockets we will be able to connect 3 times more powerful household appliances and other consumers of electrical energy.
- Secondly, if one line malfunctions , you will be able to use sockets and lighting in rooms connected to other lines.
One power cable goes from the switchboard to a room or several , and there are many sockets in it. Yes, there are also light switches, lamps or chandeliers. That's why you need a junction box. All electrical wires or cables from sockets, switches, lamps or chandeliers converge into it.
In the box, all the wires or cores of electrical cables are connected according to a certain pattern. Wiring diagram in this article.
One group can have several branch boxes, which are connected to each other by a power supply jumper. Only the wires or cable to the electric stove are laid from the electrical panel directly to the appropriate outlet, because the electric stove is a powerful consumer of electricity. A 32 or 40 A automatic circuit breaker is installed on it, and wires are laid with a copper core cross-section of at least 4, more often 6 square millimeters.
Why does the box have different names?
This piece of electrical equipment goes by several names, including: distribution box, branch box, junction box. Only their operating principle is the same: the box is a center where electricity is supplied from the power source, and then it is distributed through separate channels that go to switches, sockets and other devices. Therefore, such a design is usually called “distribution”. Otherwise, the box is also called a “branch”, this is due to the fact that only one cable goes into it, but several channels come out.
Note! The boxes are also called soldered boxes, which is due to the way the wires are connected inside. So, the wires must be soldered after twisting. We will talk more about this and other connection methods below.
Among some electricians, you can find another name for this box – “disconnection box”. This word is formed from two definitions: distribution and connection. After all, first you have to distribute the wires and then connect them to consumers.
Distribution boxes installed in the wall
Accordingly, if a store consultant calls the box differently, you shouldn’t be surprised, because it’s the same product. Rather, you should pay attention to the dimensions of the box, because you will have to make a recess in the ceiling for it. As a rule, standard products are produced in the form of a rectangle measuring 10x10x5 centimeters.
Prices for distribution boxes
Junction box
How to find an electrical wiring junction box.
Sometimes it is necessary to locate a junction box , such as when troubleshooting electrical problems or if you need to add an outlet to a room. But many people, when renovating an apartment, cover the boxes with plaster, putty or wallpaper. As a result, it is difficult to find a branch box when needed. Yes, I agree that its lid does not look good against the background of the decoration. But it is necessary to take into account that you may need access to it at any time. I advise you, before starting finishing work in the premises, to take a tape measure and apply references to the diagram of the room, because in 5-10 years you will not remember where they are.
If you don’t have a diagram or you bought an apartment , then you’ll have to look for junction boxes yourself. This is how I do it:
- In 99% of cases, the box will be located above the light switch under the ceiling and at a distance of no more than 15-20 centimeters from it.
- After that, we open the box and see how many lines go to the sockets. From which they are all twisted together with the power supply into two or three (three-wire system) twists. For lamps, the phase twists will be smaller (in most cases, 2 wires). In this case, the neutral and ground from the lamp, as well as the phase to the switch, will be twisted into large twists. And they also come with one power cable or two if there is a jumper to another box.
- So, if the number of outlets corresponds to the number of wires or cables and there are no more switches in the room, then there are no more junction boxes in the room.
- If not, open the sockets and look at how many wires there are on each contact. If there are two, then the sockets are connected by a cable - one from the other.
- In new apartments, occasionally sockets can be connected from a box behind the wall, which is located closer and connected to one group.
- Often an additional box is installed on the sockets . Moreover, it will be located under the ceiling, not above the farthest outlet, but above the one that will be closer to the switch.
I recommend that you familiarize yourself with the electrical installation rules, which will help you learn the principles of electrical wiring. Always take safety precautions . Remember that 220 Volts in a home electrical network is dangerous for human life!
What is the difference between a junction box for open and hidden electrical wiring?
Junction boxes for open and hidden electrical wiring differ in the sealing of the covers and the presence of sealing gaskets in the holes for the wires.
Related articles: Electrical wiring in an apartment
In theory, a junction box for hidden electrical wiring cannot be covered with a layer of plaster and/or putty. The cover of such a box should be visible after finishing work, so that there is access to the wiring when inspecting the electrical wiring.
In practice, the lids of hidden boxes can only be seen in new buildings with finishing. Typically, distribution boxes are walled into walls. If the box is walled up in the wall, then a distribution box for open wiring can be used for hidden wiring. But, on the contrary, you cannot do it. You cannot install a junction box for hidden wiring, but put it open for wiring. And under no circumstances should hidden boxes be placed on the street.
How to make a junction box.
Malfunctions in junction boxes occur due to poor quality electrical installation or as a result of wear and tear on the wiring. This is especially true for aluminum wiring. Signs of box malfunctions are:
- Sparking and burning of twists wires emitting a characteristic odor from burnt electrical insulation.
- Inoperability of one or more electrical outlets in the room, or a non-working lamp or chandelier. But it’s not always the box that’s to blame, it’s the wiring. Read more about this in this article.
Trouble-shooting:
- If the twists are burnt, provided that the length of the wires allows, we bite off, strip and twist again together. But it is better to make a reliable connection using terminal blocks.
If the insulation is burnt , but there is no way to shorten the wire, then put a cambric on top of it. - If the wire in the box has burnt out or broken off, then you need to build it up according to these instructions.
- If a short circuit occurs between the phase and the neutral or grounding conductor, disconnect the wires and restore the insulation on each of them using cambric or CB insulating tape.
Determining the location of damage to hidden wiring – Simple Cable Company – Cable, wire
The light bulbs go out, the voltage in the sockets drops to zero, and electrical appliances turn into an element of the interior... “There is no light,” we state in this case. If the electricity goes out due to the fault of the supplier, then it is often impossible to do anything better than hope for the efficiency of the repair team.
But very often the cause of problems with light is damage to the cable that runs in the wall of the “affected” room. And then, either independently or with the help of a professional electrician, you need to look for the location of the damage and “treat” the wire. Fortunately, treatment is a matter of a few minutes, but finding where to treat is usually a problematic and time-consuming process.
We will try to figure out how to find the location of wiring damage more accurately, quickly and with the least damage to the affected premises.
In most cases, hidden wiring is carried out indoors. The cable is in a corrugated pipe
, which is laid in grooves and covered with plaster. In older buildings, the wire is laid directly in the grooves and also covered with a layer of plaster. On top - whitewash or wallpaper (paint, wall panels, tapestry, etc.).
Although the cable is hidden in the wall, there is a possibility of damage. Many reasons can lead to “injuries”: first of all, no one has canceled the natural aging of insulation and lived. Aluminum wires especially deteriorate over years of use.
. And old cables are prone to excessive heat, especially at connections and bends. Due to heating, the insulation is destroyed and bad contacts are oxidized. Systematic overloads of electrical wiring significantly accelerate the aging process.
But a new cable can also “sore”, mainly due to poor-quality installation: in places where the wires are excessively broken, which can simply overheat or burn out. Another common reason is accidental mechanical breakdown of electrical wires during repair work.
As a result of the above - a short circuit or burnout (breaks).
Exploration work
So, if an emergency occurs, you must first check the voltage at the entrance to the room and the serviceability of the plugs (automatic machines). If we find that circuit breakers or plugs are in the cocked state, then it makes sense to look for the problem inside the house. If you find the machine in the off position and when you turn it on it turns off, then there is a short circuit. You need to make sure that it is not present in sockets, switches and electrical appliances. And then there is nothing left to do but start looking for damage inside the walls.
To at least approximately determine the area for search work, logical thinking, analytical skills and minimal theoretical knowledge will be useful.
The usual correct method for constructing wiring for sockets and switches is radial. That is, a separate cable is connected from the distribution (dose) box to each socket and switch. In any case, the search will go faster and more efficiently if you have a wiring diagram or in the case when it is known for sure that the wiring was laid according to the rules
.
So, you need to find the dose box and open it. There are several twists there. It is useful to measure the resistance between all lines in the junction box. If any of them shows a voltage close to zero, this is an indication of a suspected line along which further searches are advisable. You can measure the resistance between the lines of switches and in sockets: it may be possible to reach the site of damage without the participation of dose boxes.
If there is a break, then perhaps there is light in some part of the room. This reduces the search area. If there is no voltage in one socket or one lamp does not turn on, there is a line in which there is a break.
Otherwise, it is advisable to start from the first junction box, checking for the presence of voltage on its twists. If everything is in order, you need to find the next dose box and carry out the same procedure as in the first dose. If any twist in this dose does not show signs of tension, then the break is between doses.
Restoring the wiring diagram
To find a junction box in a room or living room with good electrical wiring, you must:
- draw a wiring diagram based on the existing connections of switches and sockets;
- Using the diagram, estimate the possible number of distribution boxes in the room;
- search for junction boxes.
First, you need to either unscrew the plug on the input panel or turn off the switch corresponding to the room on it and use an indicator screwdriver to make sure that there is no voltage in the room on the sockets and switches. After this, you will need to remove the covers from the socket switches and inspect their terminals. Only two connection options are possible:
- there is one wire in the terminal and this means that it is either laid from the box to the socket or switch, or these terminals are the last in connection with other sockets or switches;
- there are two wires in the terminal, which indicates a serial connection of the terminals of switches and sockets.
Images of switches and sockets are drawn on a sheet of paper. Then you will need to clarify the diagram of their connections. To do this, you will need a tester and an extension cord, which will allow you to conveniently “ring” the wire between the terminals of different sockets and switches. You need to “ring” starting from a socket whose terminals contain only one pair of wires. The screws on the terminals with two wires must be unscrewed and the ends of the wires separated.
If there are several outlets in the room with one pair of wires, insert an extension cord into any of them. Place the extension cord near any open ends of the wires. One probe of the tester is inserted into the extension cord, and the other must be touched sequentially to the separated ends of the wires. The tester readings in resistance measurement mode will show zero resistance on the desired wire.
This will be the wire from either the series-connected terminals of receptacles and switches, or from the connection of two receptacles or a switch that is connected through one or more distribution boxes. Based on the results of testing the wiring, its electrical circuit is drawn. But at the same time, the real number of distribution boxes will remain unclear.
Detection based on the requirements of the PUE and the plan diagram in the project documentation
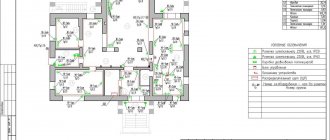
In old apartment buildings of the Soviet period, in most cases, builders strictly adhered to the requirements of the project and PUE (electrical installation rules). These documents establish the location of distribution boxes 15 cm from the ceiling, switches and sockets are installed strictly vertically under them.
Layout of wiring elements in premises
Modern installers try to adhere to these rules. Using this data, it is not difficult to guess the approximate location of the junction box.
Next, by tapping the wall with a screwdriver handle or a small hammer in the intended location, you can determine by the sound the presence of a void, which is typical for a box. Sometimes the plaster on a flat wall where the distribution box is installed has a distinct convexity, which makes it much easier to find.
You must understand that this method does not always work; it is effective on plastered walls with wallpaper. Sometimes during the operation of premises, renovations, boxes are moved, and the layer of plaster may become larger. In plasterboard walls or other decorative finishes, you can determine the approximate location of the boxes, but you cannot be sure by tapping. Other methods must be used.
Search and repair
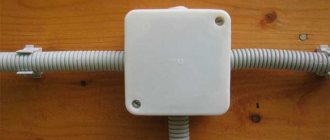
Therefore, you can find the junction box using one of the following methods. The most reliable is the inductive method. It is based on determining the location of a current-carrying wire by its electromagnetic field. To search, you will need a special device, for example as in the image below:
- step-down transformer with a power of 100 - 200 VA with a primary winding of 220 V,
- powerful ceramic resistor,
- universal magnetic head from a reel-to-reel tape recorder,
- tester,
- extension.
The resistor parameters depend on the voltage at the terminals of the secondary winding of the transformer. If the resistor overheats when connected to a transformer, it should be placed in a jar of water. The tester is connected to the terminals of the magnetic head and is used either in microvolt or microampere measurement mode. What is best is determined experimentally.
- We connect the secondary winding of the transformer and the resistor in series.
- We select those two terminals of the socket, sockets, switch or switches that are determined by the above method to be connected through the junction box.
- We connect one terminal to the free terminal of the secondary winding, and the other to the free terminal of the resistor.
- We attach the magnetic head to the wall near one of the terminals. By moving the magnetic head, we achieve maximum tester readings.
- We mark the maximum point on the wall.
- Moving away from the first point, we similarly mark the second, third, and so on until we get closer to the other terminal. In this case, you can either draw a line through the points or imagine one.
- Having switched the terminal of the winding or resistor to another similar terminal, we make markings for the next core of another wire passing through the junction box.
At the intersection of two lines passing through the points, there will be a connection of wires. If this connection is made in the box, then it is thus detected.
The methods discussed above make it possible to accurately determine the location of the box hidden under a thick layer of coating - plaster, drywall. In this case, it is not possible to find the junction box by tapping on the wall. But it also happens that the box can be found visually, using little noticeable signs.
If the house was built in the sixties of the 20th century and belongs to the so-called “Khrushchev” buildings, the distribution boxes of those years were made of iron and were always slightly raised above the wall surface with lid latches. Over the past long period of time, they have undergone corrosion, which diffuses into the surface of the wall and gives yellowness to the plaster or wallpaper around the box.
Also, when searching, you can base your search on the rules for placing electrical fittings and wiring, as shown in the image below:
After the box is discovered, its cover must be removed in order to assess the condition of the twists. A correctly made twist should correspond to one of the images:
If this is not the case, you will need to bring the existing twists in the box into compliance with established standards, as shown in the image above. Since the socket wire is loaded much more than the switch, it is recommended for sockets:
- twisting by soldering or welding for single-core copper wires;
- For stranded copper wires, crimping is preferable;
- aluminum conductors must be crimped with at least a plastic cap. But using a clamp will be more reliable:
If the box was deeply recessed and hidden under a thick layer of plaster, you must attach a cover plate to the lid before closing it with the lid again. When the box is closed, the wooden plank or foam tile overlay should be flush with the wall surface.
After this, you can cover the location of the box with wallpaper or other decor. Subsequently, it will be easily detected by tapping.
Help me find a junction box in my apartment
Explanation: a 2-room apartment adjacent to a 1-room apartment, on a staircase with four apartments, in a 9-story panel building with an improved layout built in 1984 (with nooks and crannies for a garbage chute). It is powered through a couple of automatic machines (one for the corridor, bathroom/room, bedroom; the other for the living room and kitchen). Power stopped in the kitchen and large room (after a small flood from above). The machine and the cable coming from it are in order (i.e. under voltage). I found a distribution box for the corridor, bathroom/unit and bedroom (at the top of the load-bearing wall of the corridor), as well as a box for the bathroom/unit (between the bathroom and kitchen), but the search for a distribution box for the room and kitchen was not successful. Maybe someone has a wiring diagram for such apartments? I will be immensely grateful!
2Edward Usually DEZ electricians have these diagrams (at least in our house the electrician definitely has it).
Try to find boxes strictly above switches and sockets at a height of 10-15 cm from the ceiling. Pay special attention to the spill area. Where are the group machines installed?
Just today they called an electrician - he cut the wallpaper, ripped out all the available boxes, and in the end, without finding the reason, he said that he knows exactly as much as I do, that he still has a lot of calls today, and in general, so that tomorrow In the morning we called another (more experienced) electrician from the site. If I could find a diagram somewhere, I think I could solve the problem myself (I didn’t fix it like that). However, even if someone had the same experience in finding this box, which was crowned with success, and the lucky person is ready to share his knowledge (he would simply indicate the location of the box), and no diagram is needed at all.
sergey_sav wrote: Try to find boxes strictly above switches and sockets at a height of 10-15 cm from the ceiling. Pay special attention to the spill area. Where are the group machines installed?
It was on this principle that I was looking, only. Couldn't there be a box (or just some kind of twist terminals) in the lampshade hole in the ceiling? (The machines, as expected, are in the shield, and the vapors coming from them are walled up in a gutter at a level of approximately two meters from the floor)
More questions, if you're not tired of them.
Has all the power to the indicated premises been lost (lights and sockets)? Is there a box above the machine too? Particular attention is paid to the strait area.
2Edward Have you tried tapping the walls under the ceiling? Sometimes it helps.
sergey_sav wrote: More questions, if you're not tired of them. Has all the power to the indicated premises been lost (lights and sockets)? Is there a box above the machine too? Particular attention is paid to the strait area.
Yes, all power to the room and kitchen (lighting + sockets) disappeared at once. There is no box above the machine; the wires go directly through a vertical tube along a horizontal gutter to the apartments. The spill area is the entire corridor and the bathroom/unit along the ceiling, but I didn’t see any special halos on the wallpaper.
iale wrote: 2Edward Have you tried tapping the walls under the ceiling? Sometimes it helps.
I’ve already tried everything: tapping, and probing, and under the ceiling, and below, and above the sockets, and above the switches along the entire vertical - just shit.
Then you should try to find the cable path from the machine to the first box using a field indicator (hidden wiring).
2Edward Maybe then, in problem sockets, pull the mechanism out of the wall and estimate the location of the box in the direction of the wire (if the wire is not in the groove, but goes inside the wall in a channel)?
sergey_sav wrote: Then you should try to find the cable path from the machine to the first box using a field indicator (hidden wiring).
A good indicator costs a lot of money, but a detector on a field field does not penetrate well through thick concrete -
sergey_sav wrote: Then you should try to find the cable path from the machine to the first box using a field indicator (hidden wiring).
From this point on I would like to go into more detail! Yes, but won’t the fittings interfere with the search? Will the field of the energized desired cable be detected at a current of zero amperes?
How to find and replace a junction box
A distribution or junction box is understood as a local node for switching wiring along branches. We are used to seeing round holes in the image, more often in the ceiling area (so that no one gets in by accident). In a typical apartment, there is a distribution box for one or two rooms. The search would not have been difficult if the owners had not tried to disguise it with wallpaper. Therefore, sometimes you have to rack your brains on how to find and replace the junction box.
Old distribution box in the house
We determine the presence of wiring in the wall “by eye”
One of the basic rules for installing hidden electrical wiring is: it must be located vertically and/or horizontally . Turns must be at right angles. It is best when the wiring is located vertically. A horizontal wiring arrangement is also possible, but somewhat worse.
Why is this being done? And, just so that it is easier to find it in the wall and you know that the wiring from this outlet goes strictly vertically, from that one horizontally to another outlet, etc. Knowing that the wiring was done according to the rules, you can fearlessly hang shelves where possible.
Junction box design
In old houses, the distribution box differs little from the socket boxes. This is a round recess in the wall, covered with characteristic plastic covers (see photo). Inside there are twists; according to current standards, terminal blocks of various types are often mounted. The lid is held loosely and sometimes falls out; there are usually no difficulties with access. The inside is usually a nightmare:
- Older distribution boxes are usually metal. There may also be a short to the housing.
- Inside there are twists of unimaginable shape. Not every electrician can figure it out.
- Due to such connections, junction boxes are considered a place with an increased risk of fire.
How to install a junction box
Modern distribution boxes are not always round. The walls of houses are no longer always made of concrete. It is easier to make a round hole in a monolith:
- A small diameter hole is made in the center using a concrete drill.
- Using a crown, a circular slit is cut. During the process there is a lot of dust; experienced people use special devices, including a vacuum chamber (lying around the perimeter) and a construction vacuum cleaner. Beware of silicosis and other respiratory diseases caused by excess dust in the air.
- The rest of the concrete is hollowed out using any method. A hammer drill works well.
Installation of distribution box
The depth of the hole is selected specifically. Obviously there must be enough space inside for a junction box. When purchasing, please note that products differ in depth and diameter. Ill-thought-out little things can cause annoying delays in the progress of work. For example, expanding the diameter of a hole in a monolith by 5 mm is considered a difficult task; difficulties with centering are expected. In this regard, it is better to test the junction box to see if it matches the crown. For example, in damp soil. Attention! There is no need to drill into the ground to avoid electrical breakdown in the tool and failure.
The junction box housing has break-away leads for wires. Not always where required. The plastic is easily drilled into place with the required diameter. The greatest difficulty is when the steel channel is laid by inaccurate builders and protrudes from the wall. It is extremely difficult to remove a piece of iron; there is a wire inside, but the metal tube (corrugation) needs to be grounded.
Instructions for finding a junction box
A fitting locator helps to find wires in the wall, but the cost of the device is off the charts for 10,000 rubles. Often the difficulty can be solved using a non-contact indicator screwdriver. It responds to electric fields so weak that it can sense current through a wall. Required:
- Turn proximity mode to High level.
- To increase sensitivity, press the contact button with your finger (located at the back of the indicator screwdriver handle).
- Include a surge protector for computer equipment in the network.
- All! There is no need to turn on the surge protector. If you bring the indicator screwdriver to the wire, the light will light up (see photo) and a beep will sound.
What little experience shows, what does the junction box have to do with it - readers will ask. Each wire that is under phase potential and lacks a shield radiates. This is unnoticeable when the core lies inside the wall in the cable channel. When we turn on the extension cord, we notice the radiation of energy into space. Moral: any electrical devices without a grounded shield are harmful, even dead wires.
Thanks to the described technique, it is possible to search for wiring in the wall even in the absence of a fitting indicator. To do this, you need to create a current in the wire. Its value depends on the sensitivity of the indicator screwdriver. The simple rule – the more, the better – does not work here. We recommend taking into account a simple fact: too large a signal can turn an entire wall into sources of electromagnetic radiation. If the parameters are chosen correctly, the wiring path is easily determined (plus or minus 10 cm in each direction). It will be possible to trace where the channel is going, and at the end of it the search for the junction box will end.
The useful information provided will help you find a junction box and evaluate the shortcomings of apartment electrics. For example, the lack of grounding in steel channels leads to radiation pollution in the apartment. This reduces immunity and causes disorders. Already today, the corrugation for laying wiring is often chosen not from plastic, but from aluminum. Aluminum corrugation can be grounded, making it a reliable shield.
Skillful manipulations with an indicator screwdriver will help you decide how to find the junction box. It is important to select the correct current level. A nuance: if somewhere the wiring comes into contact with the fittings, it’s easy not to notice this for years. There are no leaks if there is no grounding. But when the equipment is turned on, the wall becomes a source of radiation. Thanks to modern technology, it is possible to notice and correct this in time: localize the point of contact, replace the wiring, and take other actions.
When replacing a junction box, people will often want to run new wires to reduce the risk of fire. You will have to carefully draw the channel diagram. The method is chosen individually. For example, it is permissible to use the above method. As a result, a complete diagram is welcome in hand. Sometimes parts of the wiring cannot be replaced. For example, bathroom walls and other partitions in panel houses are often made from scrap materials on site. In this case, there is no channel, and the wiring goes anywhere. To replace it, you will need to dismantle the tiles and other construction activities of a similar nature. In this regard, touching the partitions is not always considered the best solution. Instead, the wiring is changed to the nearest junction box.
In workshops and factories there is no point in maintaining decorativeness and aesthetics. Distribution boxes are made in the overhead version. We notice a flat box with cable entries on the sides hanging anywhere. Similar devices are used for communication lines.
Despite the numerous types of distribution boxes, they are easy to recognize: rubber or plastic housing, gray or whitish color (less often orange), cables converging on all sides. These are general signs, and the search can be carried out along the route (if you don’t know the object): walk along the line, inspect where the canal passes through the walls, search.
Will it be possible to do without junction boxes during the installation of electrical wiring?
Of course, it is possible to install wiring in an apartment without junction boxes, but this is impractical - then you have to pull many cables from the main panel to the power consumers, which is why deep grooves are made in the wall, which will have to be puttied. In addition, this involves spending money on the purchase of cables, so the only rational solution is to purchase distribution boxes for premises.
Corrugated pipes for electrical wiring
However, some users mistakenly believe that the connection point, which is located inside the box, is less secure than the whole cable. In fact, with proper installation, there are no problems with the junction box and wiring connections.
In addition, if you imagine that the box is missing and a malfunction has occurred, you will have to remove the wallpaper and chisel the wall to find the damage. If there is a design, it will be enough to remove the cover and inspect the condition of the electrical wiring.
How to choose a junction box
The choice of a new distribution box is logical based on the existing one. For example, it is not recommended to use a rectangular body on a monolithic concrete wall. It's almost impossible to install. It is much easier to punch a round hole with a crown. When erecting brick walls, it is easier to make a rectangular hole during the construction phase. Modern materials like Penofol will help to maintain the required parameters of waterproofing and thermal insulation with a reasonable approach to planning.
Metal junction boxes are no longer used. If the shields carry a lot of equipment in the depths and for this reason must have sufficient strength, they are made of steel. Distribution boxes are much smaller in size and do not carry loads. The logical solution was plastic, which is used everywhere. For this reason, the junction box body is not grounded (although in older houses this was required).
We see no reason not to use socket boxes as wiring switching nodes.