Properties of the material and how to putty drywall
The first step for a beginner is to become familiar with the properties of the selected material. Drywall is assembled from two layers of construction paper (just cardboard) between which is a layer of hardened gypsum mass with fillers.
This material has been perfectly used at construction sites - it is budget-friendly, environmentally friendly, convenient and suitable for the construction of walls (partitions). However, during installation there will be seams and joints that need to be puttied.
You will also need to putty the places where the plasterboard sheet is attached to the profile frame. Thus, before final finishing, the surface is covered with a layer of putty mixture.
Which putty is better to use?
Before starting work, you should take care of the correct selection of putty. The building materials market is represented by a wide range of compositions for various purposes:
- surface decoration;
- covering up cracks;
- caulking of joints, installation connections.
You can purchase ready-made mixtures, but experts recommend dry ones. They can be stored for a long time and temperature fluctuations are not a problem for them.
Plasterboard putties from their constituent components are classified into:
- cement;
- gypsum;
- polymer.
All three types of plaster are suitable for puttying plasterboard walls, but not for every room. For rooms with constant humidity (kitchen, bathroom), the ideal option is a cement putty material. Plaster in such rooms will not withstand changes in humidity, so it will crack when it dries.
Polymer mixtures are universal, plastic, have excellent performance properties, and therefore are simply ideal for plastering plasterboard surfaces. Also, the consumption of such a mixture will be significantly less.
Differences in the characteristics of the putty, which determine their cost or scope of application, do not play a significant role for interior work. Inside the house, frost resistance or fire resistance are not important. Thus, the ideal option remains a dry mixture.
Set of working tools for filling plasterboard surfaces
You should worry in advance about purchasing tools and building materials used for puttying work.
The following working tools will be useful:
- spatulas (2 pieces: narrow plus wide);
- knife;
- roller;
- brush-brush;
- sandpaper.
Building materials:
- primer with deep penetration (corners, seams);
- putty;
- special reinforcing tape.
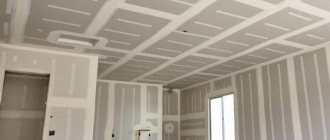
Preparing the surface of gypsum board walls and ceilings
Puttying drywall will give the base durability and smooth out unevenness.
The gypsum plasterboard primer will not only ensure leveling of the surface, but will increase the chances of changing the finish, removing old tiles, outdated wallpaper without damaging the cardboard layer of the plasterboard covering.
Is it necessary to prime gypsum board before processing?
For further work with plasterboard coating, you will need to prime the walls (ceiling) with a water-soluble compound. When dry, it forms a moisture-proof film that prevents paint or wallpaper adhesive from saturating the drywall.
Do-it-yourself drywall putty for wallpaper
We recommend applying the primer to the entire sheet. In no case should you skimp on the material, since the success of the work done depends on the primer. It will protect the walls from mold and other bacteria, and will also help prevent the wallpaper from peeling off. Recently, drywall has become often used for insulating and leveling walls. This choice is very convenient, as it allows you to quickly and efficiently level the surface.
Also, such work is considered clean and after completion you will not need to waste time removing contaminants. In this article we will look at how to putty drywall under wallpaper with your own hands. Also make sure that the screws are not screwed too deep into the walls, otherwise problems may arise with the putty. If the screw is screwed in deeply, remove it and screw in a new one a short distance away.
Since wallpaper can only be glued to a perfectly flat surface, putty walls will also need to be sanded. To do this you will need to use an emery grater. Do not forget that a lot of dust will be generated during the process, so we recommend wearing protective equipment that can protect your eyes and body. To do the work with your own hands efficiently and avoid making stupid mistakes, we recommend using the following tips:
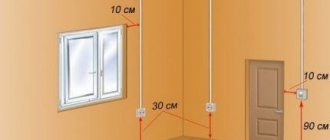
Features of reinforcement (strengthening) of seams and corners
Before thinking about how to putty drywall, you should treat the joints (corners and seams). The technology for reinforcing the area where plasterboard sheets are connected is influenced by the material chosen for the job.
There are two types of such material: a ribbon-like strip of paper or fiberglass. Both options have their advantages and disadvantages. Which one to choose depends on the characteristics required for the surface being treated. For example, paper tape will provide good seam reliability, but not fire safety. And the self-adhesive fiberglass mesh tape meets all fire safety requirements.
For both types of reinforced tape there are some differences in the execution sequence.
The technology for working with drywall sheets is simple: you should follow the sequence of actions and be patient. The durability of the work performed and its quality depend on the degree of drying of each applied layer of putty.
The sequence of work for both types of reinforcement is presented in the table.
| Steps | Type of reinforced tape | |
| Paper | Self-adhesive | |
| 1 | Prepare the joints for work, having first cleared them of construction debris (particles of putty material, dust). | |
| 2 | Prepare the putty mixture and tools. | |
| 3 | Soak the tape in a container of water. | Glue the tape to the gypsum board connection area. |
| 4 | Apply putty to the connecting seam. | Apply putty to the edges of the slabs and spread evenly over the mesh area. |
| 5 | Carefully remove the tape and press it against the putty mixture previously applied to the edges of the gypsum board. | Press the tape into the cut. |
| 6 | Apply putty plaster to the surface of the strip and leave to dry. | |
| 7 | Then the next thin ball of plaster is applied, but this layer is approximately 5-6 cm wider than the previous one. | |
| 8 | After drying, a second layer is laid, but it is 6-8 cm wider than the previous one, and the edges should be made thin. | |
| 9 | When this layer dries, it is sanded with fine-grained sandpaper. You can use a special grinding machine for this purpose. | |
Why putty drywall under wallpaper?
Is it necessary to completely putty the drywall under the wallpaper? There are at least two important reasons to perform this operation:
- If the wallpaper is made in light colors or has a small thickness, then the joints and any irregularities on the surface of the plasterboard will clearly show through. The result will be an impression of sloppiness, which can be avoided by filling the entire drywall.
- But the main reason that you need to putty drywall under the wallpaper lies in the fact that any decor on the walls can become boring over time. This means that the old wallpaper will have to be removed, which is not so easy to do if there is no layer of putty under it. When removing the old coating, the sheets of drywall can be damaged to such an extent, otherwise they will have to be leveled or even replaced. So there should be no doubt about whether it is necessary to completely putty the drywall under the wallpaper, at least to avoid unnecessary work in the future when replacing them.
Walls under wallpaper should be completely puttied if thin wallpaper is used or the surface is poorly prepared.
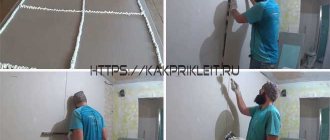
How to putty drywall with your own hands
The amount of work inside the premises is impressive. But you should start with a primer, and then by rubbing the walls and ceilings. If you consistently carry out the work step by step, adhering to the technology, you can understand how to putty drywall.
However, there are general rules that should be followed:
- begin puttying plasterboard coatings after completing installation work on the wall (ceiling) followed by priming;
- The screws should be puttyed crosswise so that the cuts in the heads are filled with the mixture;
- Before caulking the corners, they should first be prepared by gluing a metal corner for additional strength.
How to properly putty drywall before painting
After the primer has completely dried, the drywall should be prepared for the next step. Puttying the area begins with the starting finishing, in other words, processing the sheet joints and corner joints. The surface will become smooth after covering with the finishing layer. When the putty dries, a primer must be applied.
For painting drywall, special paints designed for gypsum boards are used. The use of silicate paints or dyes made from liquid glass or lime is prohibited.
Plasterboard putty for wallpaper, features of the work
The sequence of puttying drywall under wallpaper is as follows:
- prepare a putty mixture;
- remove particles of dust and alabaster from the seams;
- apply putty, be sure to use reinforcing tape;
- after drying, the surface is sanded;
- apply a finishing ball of putty, dry and sand;
- re-prime the wall.
Connecting seams and corners must be treated very well so that they do not stand out under the wallpaper.
Drywall putty
When considering the question of how to putty plasterboard walls under wallpaper, you should pay attention to three methods. The first is the simplest and most mandatory. Other options and types of work will be based on it .
Related article: Replacing the handle on a plastic balcony door
- How to putty drywall
- How to putty drywall
- Do I need to putty drywall before wallpapering?
Drywall putty base
This method is considered mandatory.
It is included in many flow charts, and in some construction organizations it is classified as an installation process that must be performed by drywallers.
- First of all, the joints should be sealed. If you look closely at a standard sheet, you will notice that it has a special recess at the edges. When puttying drywall under wallpaper, this groove will serve to form a special recess in which the reinforcing tape and a special mixture for sealing the seams will be located. You can also use regular putty for sealing.
- The joint must be grouted in such a way that the groove formed by the indentation of the sheet is filled flush with the entire surface.
- Next, you should pay attention to the connection of the sheets with the floor, ceiling and walls. Standard putty of drywall under wallpaper involves treating these areas with a thick solution and special elements. In these places, you can simply rub the connecting gap or use corners and reinforcing tape. With proper installation, these areas will be as motionless as possible, which means it’s enough to just seal them using putty.
- The last step in the process of how to putty drywall under wallpaper is to seal the recesses from the screws. It is carried out together with other work using a sealing mixture. The fact is that when puttying, a small amount of material remains, which can be used for this process by rubbing the groove with one stroke of a spatula.
Advice! After completing the work, it is recommended to apply a layer of primer to the surface. It will serve as a good binder for putty materials and drywall, which will significantly strengthen all joints and joints.
A fully prepared room with putty plasterboard for wallpapering
Surface putty
- This putty for drywall under wallpaper is based on the first method. First you need to seal the seams, joints and grooves as indicated in the basic method.
- Then a special mixture is made of dry putty, a small amount of water and primer. Its consistency should be like very thin sour cream.
- Then, using a paint roller, the resulting mixture is applied to the walls in a thin layer. This creates a thin layer of putty on the surface, which not only lies evenly, but also penetrates well inside due to the properties of the primer.
Related article: Do-it-yourself linoleum repair: what to do?
When choosing a way to properly putty drywall under wallpaper, it is best to choose this option. It will help save a huge amount of time and at the same time does not violate installation technology.
Advice! It is necessary to work quickly with the roller, since this mixture dries very quickly.
Applying a thin layer of putty using a paint roller
Solid putty
This type of work is standard for plastered surfaces and consists of applying a thin layer of material using a spatula, after sealing the seams and joints. It is this that raises the question of whether to putty drywall under wallpaper at all or whether the first two methods are sufficient.
In answering this question, it is necessary to consider several properties of the surface.
- First of all, it is worth noting that the putty surface is almost perfectly flat. However, a correctly installed sheet of drywall does not contain large flaws in the plane. Therefore, leveling the plane using the mixture would be quite wasteful and time-consuming.
- The next property that a putty wall is endowed with is its hardness. A regular sheet of drywall is a little softer, which is very noticeable when working and cutting. However, when using the second method, where a layer is applied to the surface using a roller, exactly the same effect is achieved. This is especially noticeable in video lessons that show the process of wallpapering.
- The last factor behind thorough putty is the fear that the color of the drywall sheet will be visible through the wallpaper. Some photos and video materials show that this is only possible when violations were made in the installation process. It is enough to use the second putty method to completely eliminate the likelihood of such a phenomenon.
Advice! This type of drywall putty should be used only when errors were made during installation and the surface became uneven or defective. In this case, you should not stretch the layer over the entire surface; it is enough just to correct the flaws.
A basic putty used for subsequent paint application.
Related article: Laying linoleum on a balcony with your own hands (photo)