Strengthening the foundation of a private house may be required in different cases, but most often one of the existing methods is resorted to after long-term use of the building. Any building that has served for decades needs repairs. And it is the foundation that requires special attention, since it not only bears the main load from the entire structure, but is also negatively affected by external natural factors, such as moisture, aggressive chemicals in the soil, temperature changes, wind, soil heaving, and more. All this together leads to wear and tear of the materials from which the foundation of the house is built.
Strengthening the foundation of a private house
In this regard, if repair work is not carried out on time to strengthen and strengthen the strength of the foundation, then there is a risk of its deformation. And as a natural consequence - the beginning of the destruction of the load-bearing walls of the structure of the entire house. In some cases, the strengthening process can be done on your own. But very often, in order to bring the foundation into proper condition, it is necessary to use heavy special equipment.
Possible reasons for the destruction of the building foundation
If, during a control inspection of the foundation, which good owners should carry out annually - in the spring, after the snow has melted, deep cracks are discovered on the base, then you should seriously think about urgent repairs.
Perhaps everything is not so bad - only the outer finishing layer has cracked and began to crumble. In this case, the issue is resolved quite simply. But in order to find out whether the foundation walls are affected, the cracks that have appeared will have to be widened.
Wear, deformation, and subsidence of the foundation will inevitably lead to a violation of the integrity of the walls of the entire building
So, first you need to decide in what cases cracks form in the foundation and its destruction may begin. In addition to “senile wear and tear”, that is, a clearly long period of operation of the structure, such factors include:
- Incorrect calculations and errors when drawing up the foundation design.
- Failure to comply with technological requirements when carrying out “zero cycle” work.
- When drawing up the project, no soil studies were carried out, and groundwater levels were inaccurately or incorrectly determined.
- The level of seismological activity in this region was not taken into account.
- The value of the soil freezing depth was incorrectly determined or completely ignored.
It should be noted that if the technology is violated and the calculations are incorrect, subsidence of the foundation can occur not only in an old building, but also in a newly built house.
In any case, if such a nuisance occurs, you should not give up, since almost always the foundation can be “reanimated” by using one method or another.
If you decide to carry out the process of restoration repair of the base, you must adhere to certain rules. Moreover, it does not matter which technology is chosen for this:
- The perimeter of the building is conventionally divided into sections 2–3 meters long, since the structure is strengthened gradually. First, all necessary measures are carried out on one of the sites, then on the next - and so on until the entire foundation of the building is strengthened.
- You cannot begin strengthening the foundation section on the opposite side of the building if the concrete on the strengthened side has not yet gained the necessary strength. The process of hardening of the solution must take at least seven days, and in the cold season (but at positive temperatures) - ten days.
Cement prices
cement
Connection of old and new foundation
In order for the newly formed structure to become a single whole, it is important to firmly connect the surfaces of the old and new foundations to each other. For this purpose, perform the following actions:
- Holes are drilled in the old foundation at the junction of the new structure with a hammer drill. Reinforcement bars are hammered into them and strengthened with cement mortar.
- According to the standard scheme, the adjacent foundation is poured, while at the reinforcement stage the reinforcement of the old foundation and the frame of the new structure are fastened.
It is quite possible to build up or expand the foundation with your own hands if you choose the right method for increasing the size of the foundation and follow the work technology.
Owners of a country house during its operation are wondering how to build up the foundation. In fact, this process is quite complex and labor-intensive, requiring certain knowledge and experience in carrying out construction work.
In order to build up (strengthen) the foundation, the reinforcing elements of the old and new structures should be welded together.
The main reasons for building up the foundation are:
- the need to build a second floor of the house, which entails an increase in loads on the foundation;
- errors in calculations even at the stage of designing a house, which exceeded permissible standards and the bearing capacity of the soil turned out to be insufficient.
Work on building up the foundation should not be neglected, because if this is not done and the base is not increased in height or width, then the walls of the house will “spread” and its geometry will be disrupted.
What is foundation strengthening and how to carry out this process
Strengthening building structures refers to activities and actions that change the mechanical properties of the strengthened element of the building. Or they change the structural structure of a unit that is in a weakened state, removing part of the load from it.
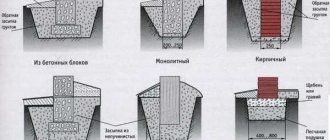
There are many methods to restore or even increase the bearing capacity of the foundation. Frequently used technologies are shown schematically in the following table (illustrations can be enlarged by clicking on them):
| Illustration | Ways to strengthen the foundation of a house |
| Strengthening monolithic strip foundations by installing longitudinal reinforced concrete beams with racks, steel longitudinal and transverse beams and transverse ties on the bottom - in the area of the transition from the plinth to the wall. | |
| Increasing the supporting platform with the installation of longitudinal beams at the level of the base of the foundation and increasing the thickness of the reinforced concrete strip on both sides, as a rule, using shotcrete technology. | |
| Increasing the foundation support area using prefabricated elements mounted using steel tie rods and installing transverse steel reinforcement beams at the transition from the plinth to the wall. | |
| Arrangement of longitudinal beams on the base of the foundation, tightened by transverse anchoring, in combination with additional reinforcement and a reinforced concrete “jacket” applied using shotcrete technology to the tape walls on both sides. | |
| The method is in many ways similar to the previous one, with the arrangement of a reinforced concrete “cage” on the walls of the belt, but without strengthening the slab part. This option can also be produced using the shotcrete method, with preliminary additional reinforcement of the walls with concrete tape. | |
| Increasing the supporting part of the foundation with supporting reinforced concrete elements with compression of the soil at the base. Reinforced concrete blocks are connected to each other with transverse anchors. Soil compaction is achieved by wedging the blocks and concreting the resulting gaps. | |
| Increasing the width of the base of the strip foundation with the arrangement of concrete tides. The tides are connected to each other by steel transverse beams. | |
| Increasing the area of a free-standing foundation support using tides with associated reinforcement cages. | |
| Injection cementation of a rubble foundation and the area of contact between the foundation and the soil | |
| Strengthening foundations with drilled injection piles, which can be done in different ways, depending on which area of the foundation needs to be strengthened. | |
| Strengthening the bearing capacity of the foundation by installing “oblique” bored piles on the street side and on the basement side of the house. |
Restoring an element and extending its service life involves bringing its appearance to its original state by plastering or shotcrete. In some cases, it is possible to improve the mechanical properties of a structure using injections or applying a deep penetration primer.
Basic methods of building a foundation
There are several methods that will allow you to build the foundation of a house with the highest quality, without significant expense and effort.
Building up the base from below
- Before starting work on building an additional part to an existing foundation, carefully inspect and determine how many sides of the structure should be reinforced - one, two or three.
- After this, special reinforced concrete jackets are installed, while the old part of the foundation is wrapped in monolithic material, which should be as close as possible to the reinforced part of the structure.
The reinforcing elements of the old and new foundations are welded to each other using a welding machine.To strengthen the base, vibrating plates can be used on one side, on opposite sides, or on three sides, depending on the nature of the damage.
Experts do not recommend strengthening the foundation by adding additional elements to the structure unless the load is redistributed from the old device.
Strengthening the foundation using gunite technology
The first step is to figure out what this not-familiar word means. Shotcrete is the spraying of construction concrete solutions under high pressure onto the surface of the foundation. Typically this application is carried out in several layers. During the shotcrete process, concrete fills all the voids and cracks of various sizes formed on the wall. To achieve a specific goal, a specific solution composition with various additives is selected. As a rule, a mixture with increased frost resistance and water resistance is selected for foundation walls.
However, this method of foundation repair is suitable in cases where cracks, cavities, and cavities have formed in it. If the base has sagged unevenly, that is, has shrunk, then simply shotcrete will not give anything, and it must be abandoned immediately.
Well, if it is necessary to strengthen the surface of the foundation walls along their entire height, filling the cracks that have formed and increasing the thickness of the tape, then shotcrete is perfect for this purpose.
Methods of carrying out shotcrete work
Spraying concrete under pressure can be carried out in two ways - “dry” and “wet”. The choice of one of them depends on the tasks assigned, the conditions for preparing the solution, as well as the operational capabilities of the installation with which the work will be carried out.
“Dry” technology of shotcrete surfaces.
- Dry shotcrete involves the process of spraying cement-sand mixtures enriched with various additives. The mixture is fed through a hose with a nozzle under pressure in dry form, and is moistened with water only immediately before it comes out. Water is also supplied to the installation with a certain pressure. When using this spraying method, the mixture obtains the required thickness and adhesion.
However, this method has its advantages and disadvantages.
The positive qualities of the method include the following:
— Ease of use of the installation and its cleaning after completion of work.
— Possibility of supplying the mixture at different distances.
— The thickness of the applied layer per pass is up to 60 mm.
— Does not require surface preparation with primers;
— High interlayer adhesion of compounds;
— High efficiency of the device, small amount of waste.
The disadvantages of the “dry” shotcrete method are:
— The need to strictly observe the proportionality of components when preparing mixtures.
— Some experience with the installation is required.
— Difficulties when performing work - dry components can bounce off the surface, getting into the face, which means it is necessary to have protective devices;
— Pollution and dustiness of the work site.
- When using the “wet” spraying method , the finished solution is supplied to the pipe nozzle under pressure created by a concrete pump.
The “advantages” of this method include the following:
— Ease of application due to the high homogeneity of the mixture.
— There is no excess dust in the area where the solution is applied.
— The remaining unused material can be used to perform other work.
— After application, the concrete layer does not require additional processing.
The disadvantages of “wet” spraying include:
— Small thickness of the layer applied in one pass, which is no more than 30 mm;
— Longer spraying process;
— More complex cleaning of the installation and supply hoses from the solution upon completion of shotcrete operations.
Work order
The shotcrete process consists of three or four stages - cleaning the surface on which the mixture will be applied, reinforcing the foundation wall, if necessary, making a mortar or dry mixture, and the spraying itself.
- The first step is to prepare the surface of the foundation strip wall to be strengthened. To do this, it must be completely freed from the soil, that is, a trench 800÷1000 mm wide is dug along the entire reinforcement area for ease of work. Then the soil is thoroughly cleaned from the surface of the wall, and the old finish is removed if there is a protective plaster layer on the wall. This process can be done manually or using special water-abrasive, sandblasting or hydrodynamic units that clean the surfaces of dirt and old coatings under high pressure. After this, the foundation walls must be thoroughly washed or blown, supplying air or water under high pressure.
Reinforcement of the foundation before shotcrete.
- A reinforcing structure is mounted on the cleaned wall, which will strengthen and determine the thickness of the sprayed layer. To reinforce the foundation, reinforcing rods with a diameter of 7–8 mm are taken, from which a lattice with cells measuring 80–100 mm is formed. The reinforcement is connected by welding or tying.
- The mortar or dry mixture is made from sand and cement in proportions that are basically standard for concrete - this is 3:1 with the atmospheric spray method or 4:1 with mechanical surface treatment. Quite often, a plasticizer is added to the prepared mixture, making the solution more plastic. The prepared solution should be used within two and a half to three hours.
Applying concrete mortar to the foundation wall using shotcrete technology
- The mixture is sprayed in layers, and the thickness of each layer can be 5÷7 mm. The total thickness of spraying depends on the type of solution chosen, the wall surface, and the method of application. The solution or mixture is applied in a circular motion, holding the nozzle at a right angle to the plane of the wall. Deviation from this angle is allowed if the surface between the wall and the reinforcing mesh is processed, when sealing deep cracks and depressions. Layers begin to be applied from the bottom of the foundation wall in horizontal stripes. The distance between the nozzle and the wall is usually maintained at approximately 1000 mm. The mixture is applied along the entire length of the area to be strengthened. If there is an area nearby where concrete has already been applied, then the joint line with it is processed with an overlap of 200 mm.
If it is not planned to add plasticizers and other additional components to the concrete solution, then each layer is applied only two hours after applying the previous one. If one of the plasticizers is added to the mixture, then the time between applying layers is reduced to 20÷25 minutes.
Upon completion of applying the composition to the entire wall, they begin to moisten it every day with water for seven days - this process will significantly strengthen the gunite coating.
This method of strengthening surfaces is suitable for any type of foundation, except for piles. However, it is inconvenient in that it will not be possible to carry out the strengthening process relying only on one’s own strength, since for this shotcreting it is clearly necessary to have special equipment and master the technique of performing the work.
Expansion of the foundation or how to properly add foundation
Quite often a situation arises when it is necessary to expand the foundation of a house in the process of performing certain repair work, or if new residential premises or utility premises need to be added to an existing building.
Sometimes it is the creation of an extension that becomes the most difficult task, especially when it comes to expanding the system. Few people know how to do this correctly, so you need to rely on the advice of experienced specialists who will help you avoid serious mistakes in your work, including building a foundation.
To work you should prepare:
- boards for formwork;
- construction equipment;
- hammer;
- perforator;
- fittings
The methods listed above will help you build the foundation yourself, but if you don’t have confidence in your own abilities, you need to turn to the services of professional builders to perform such work.
ElenaRudenkaya (Builderclub expert)
Good afternoon.
1. It is advisable not to do this, as this will create a cold seam in the poured foundation. It would have been possible to interrupt the foundation at the boiler room if such a decent load from the cladding had not been placed on this section. Still, the brick is clinker, it is heavier.
2. It is advisable for you to connect the new foundation with the old one, since it is not a separate structure in this case, but will perform the function of a single one. To do this, you will need to anchor yourself with reinforcement bars of 10-15 diameters (if you have reinforcement with a diameter of 12 mm, then you need to go 12-18 cm into the body of the old foundation). The distance between these anchors (reinforcement rods) is 1.5 m. The diagram will be something like this, sorry for its quality (drawn on the knees with children’s pencils):
Yellow color - existing foundation.
Blue is the new foundation.
Red - anchors and frame of the new part built into the old foundation.
The reinforcement should be located at least 50 mm from the edge of the concrete to prevent all kinds of corrosion. Make indents of 50 mm at the bottom and top.
3. In this case, the entire shelf of the “shoe” must be extended. For clinker this is the bare minimum, usually 200-300 mm. You didn’t indicate how much you have, but I think at least 200 mm.
4. Hammer the last anchor at a distance of 30 cm from the corner, there is no special standard in this case, but you need to make an indentation according to the rules. When making corner connections of reinforcing frames, it is necessary to leave the extension of horizontal reinforcement bars at least 20 times the diameter of the reinforcement (50 mm according to standards), that is, 25-30 cm, and then these remains are bent. It is necessary to lay the rods overlapping, hooking them to the vertical reinforcement. The rods that are on the inside of the corners should intersect and reach the outer edge of the wall. The reinforcement must necessarily have a periodic profile. Otherwise, the structure will be fragile. You can watch all this on Youtube, there are a lot of videos there. Scheme:
There are many options, but this is the most common.
5. No, it’s not needed, it will work out by itself, I already wrote to you about this, there’s no need to do it on purpose.
6. I called it “rib”, I understand that you will put it as it should be. But the facing is non-standard, only 60 mm, this is very little to make a free-standing wall. Therefore, it will be necessary to secure it using embedded parts such as directorates. Be sure to reinforce with wire with a diameter of 3-4 mm every 3-4 rows.
7. Yes, mortgages and anchors are the same thing, as well as flexible connections. You can use galvanized drywall mounting ties.
8. No, you have the wrong areas for which expansion joints are needed. You just need to tie the cladding well to the main wall and ensure its stability by reinforcing the masonry.
1. Everything is drawn in my diagram, where a piece of the foundation with reinforcement is added on the side. Just above the outer shoe. I depicted the reinforcement and anchors to you as best I could.
2. You can. But you will still need to make bubbles of glue on top of the rubber and nail them with EPS umbrellas. Each umbrella's cap is dipped in this waterproofing and nailed down.
3. Yes, you have already provided for everything. Drain the roof according to all the rules, then waterproof and insulate the entire height of the foundation, then backfill the area and a blind area of at least 80 cm. And everything should be fine.
4. No. This will not save you, you have clay everywhere and surface water in the area. This type of drainage will not work. A blind area with slopes and concrete trays along its edge to drain water away from the house work much more effectively.
5. You can use either sand or crushed stone with an average fraction of 20...40 mm and compact it well. It’s possible to do both. Crushed stone and sand work as drainage and distribute the load on the ground from the blind area itself. The layer under the blind area is usually made up to 10 cm. As for the order of laying crushed stone and sand, both ways are correct, but when the sand is poured on top of the crushed stone, this means it needs to be spilled with water to compact it into the crushed stone, if the sand is below the crushed stone, then crushed stone is well compacted with a vibrating plate or manually, and accordingly, it is sunk into the sand independently from the compaction. Ideally, they should be combined in a harmonious relationship with each other, but they cannot be mixed in advance and poured mixed, as the sand will leave the crushed stone. Both crushed stone and sand work as an anti-heaving cushion under the structure.
Accordingly, if you have weak soil (chernozem) along the blind area (it happens that people have 50 cm of chernozem and of course it won’t be possible to remove it, although it is very necessary), then crushed stone and sand are required. But since you have hard clay there, it’s enough to lay polyethylene and pour it. It is better to sprinkle the clay with sand from 5-10 cm and pour a little water for compaction.
5.6. Concrete composition for rough screed and finishing screed:
For finishing, it is advisable to make a larger grade M200, but you can use the same concrete.
7. You can't. It is impossible to lay tiles on top of EPS without a protective screed, since the mechanical strength of this tile covering will not be ensured. Everything will wobble and “boil.” You don’t have to put EPS in the blind area and then you can do it without finishing. Then the blind area pie will be like this:
1. Sand backfill. It is better not to use crushed stone here, so as not to tear the roofing material.
2. Waterproofing (roofing felt) in 2 layers with an overlap on the wall of the house.
3. You can put 50 mm EPPS (you don’t have to put it), the difference will be only a couple of degrees for freezing.
4. Then screed grade 150 from 7 to 10 cm.
5. Glue or cement composition for tiles (for outdoor use, frost-resistant), expensive, but effective for 10 years. True, the tiles can no longer be restored after it. The tiles can be laid on the surface, it is granotsiv with cement or better, fine crushed stone with cement, proportion 1:4. The blind area is well repaired, but the sandy components are quickly washed away. You will have to shift it once every 3 years.
6. Good quality paving slabs.
answer
Very often, owners of private houses are faced with a situation where it is necessary to build up or expand the existing foundation. Changing the size of the foundation may be necessary in several cases:
- When the load on the old foundation increases.
- When weak areas of the foundation or signs of destruction are detected.
- Inconsistency with the bearing capacity of the soil due to design errors.
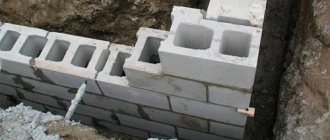
Strengthening the foundation with reinforced concrete “jacket”
A fairly effective method of strengthening a collapsing old foundation is to install a reinforced concrete “shirt” along the entire height of its walls.
The old foundation, made of brick, is completely worn out. But it can be strengthened with an external reinforced concrete “jacket”
This option of strengthening the foundation of the house can be done independently, if you have a pre-developed project, the necessary material, and experience with a welding machine. Due to the fact that quite a lot of concrete solution is required, it will have to be prepared in a concrete mixer. Therefore, if it is not on the farm, you will have to rent such a device. In addition, the tools you will need to have on hand are a hammer drill, a powerful hammer and a grinder, as well as a bayonet and shovel. A crowbar may be necessary in some cases.
Materials you will need:
— cement grade not lower than PC400;
— sand, gravel and crushed stone;
— if the foundation rises above ground level, then it is necessary to prepare boards and beams for formwork, as well as waterproofing material (dense polyethylene or inexpensive roofing felt);
— reinforcing rod with a diameter of 12÷16 mm for the frame lattice;
— steel wire for knitting the reinforcing frame;
- roofing felt for subsequent waterproofing of the foundation.
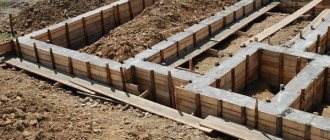
Work on such arrangement of strengthening the foundation is quite labor-intensive and will be carried out in several stages.
Prices for crushed stone
crushed stone
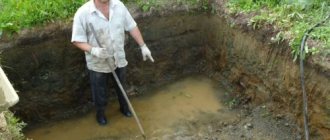
The walls of the foundation strip must be cleared down to the base - to do this, a trench is dug around the perimeter
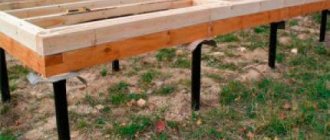
- The first step is to dig a trench around the perimeter of the entire structure, that is, the foundation walls are freed from the soil to its base. If the foundation begins to sag, then after arranging a common trench, it is necessary, starting from the corners of the building, to dig holes 400÷500 mm deep with a certain step, approximately 1500÷2000 mm, directly under the base of the tape. In these pits, support pillars will be placed, which will further strengthen the foundation of the building.
The width of the trench must be at least 400÷500 mm, otherwise it will be inconvenient to dig it. Especially in cases where the base of the foundation is located deep enough in the ground.
In cases where it is necessary to create additional support under the subsiding part of the foundation, concrete or steel supports are installed. The illustration shows a pit for pouring a concrete support at an angle with the sole of the tape.
- Further, if you plan to support the foundation from below, then in the dug pits under it you need to install one of three types of pillars - these can be steel pipes, brickwork or reinforced concrete pillars. For the latter, it will be necessary to make a reinforcement frame, which is installed on compacted pads made of sand and crushed stone, each of them should have a thickness of 50–80 mm. Then, the foundation pit with a welded metal frame is filled with concrete. Now, you need to wait for the concrete to harden and gain strength.
- Next, a layer of sand bedding 80÷100 mm thick is made at the bottom of the trench, which must be compacted well. The sand will become a good drainage layer that will remove moisture from under the structure.
- After the supports securely hold the foundation at the same level, you can proceed to installing the reinforcement cage under the strip reinforcing structure. This reinforcing belt will be located in a trench dug around the perimeter of the entire house.
Reinforcement frame structure for reinforcing reinforced concrete tape
In some cases, builders-designers, after examining the soil on the site, recommend additional waterproofing of both the old and the reinforcing foundation structure. Roofing felt is most often used as waterproofing, which is fixed to the walls of the main foundation and to the outer wall of the trench.
To connect the old and reinforcing structure, transverse horizontal frame elements can be embedded in the walls of the main foundation. To do this, holes are drilled in them and pieces of reinforcing rods are inserted into the cement mortar. Perpendicular elements of the iron base are welded to the sections protruding from the wall. The remaining parts of the frame are connected to each other using wire twists. Another option for attaching the frame to the main foundation is using anchors.
The width of the frame must be calculated and indicated in the project. It depends on the parameters of the old foundation and the nature of the soil on the site.
- If it was necessary to dig a trench larger than the required width of the reinforcing tape, or it needs to be raised above ground level, after forming the reinforcement frame, formwork from boards is mounted on its outer side, which is covered from the inside with waterproofing material. This formwork is reinforced with spacers that are installed at an angle to it. Their other end rests on the ground and is fixed in this position until the concrete hardens in the poured additional tape.
- The next step is to pour concrete into the formwork (or directly into a prepared trench with walls covered with waterproofing) with a grade strength of at least M200. When pouring concrete, it is periodically necessary to pierce it with a bayonet shovel, releasing air to the surface, in order to avoid the formation of air pockets inside the monolith, which subsequently transform into voids that weaken the structure. It is even better if it is possible to vibrate the solution using a special deep vibrator.
The foundation reinforcement tape should, after full strength gain, receive full external waterproofing
- After the reinforcing structure has hardened and the concrete has fully matured, the new reinforcing foundation tape must be covered with waterproofing. Typically, roll materials are used for this, applied to surfaces after they have been pre-primed with bituminous compounds.
- The final stage of the work involves filling the remaining voids of the ditch-pit with soil. Careful tamping and tamping is required. After this, blind areas are created around the perimeter of the building.
The importance of a high-quality blind area is difficult to exaggerate!
Many people simply forget about this element of the final arrangement of the foundation and plinth of the building, considering it a secondary matter. But such neglect can result in very serious consequences! about the importance of the blind area around the house and how to do it yourself in a special article on our portal.
How to build and expand the foundation
Changing the size of the foundation
Very often, owners of private houses are faced with a situation where it is necessary to build up or expand the existing foundation. Changing the size of the foundation may be necessary in several cases:
- When the load on the old foundation increases.
- When weak areas of the foundation or signs of destruction are detected.
- Inconsistency with the bearing capacity of the soil due to design errors.
Extension involves the use of several methods:
Increasing the width of the foundation
- Increasing the width of the foundation by pouring a monolithic concrete strip around the perimeter of the building.
- Raising the foundation in height.
- Deepening the foundation.
The use of a particular method is associated with certain conditions that are characteristic of a particular case.
Foundation expansion
You can make the existing base of the house wider using additional monolithic reinforced concrete strip. This option is considered the most accessible and less expensive.
The production of a monolithic strip foundation around an existing foundation is carried out in the following sequence:
- A trench at least 50 cm deep is dug along the perimeter of the house.
- The old base is cleaned of soil residues and holes are drilled in it in increments of up to 0.5 meters.
- Reinforcement rods are driven into the holes, leaving 15 cm long sections behind the wall plane.
- The bottom of the trench is covered with a layer of sand, on top of which a waterproofing material is laid. Waterproofing protects the foundation from soil moisture and groundwater, and also does not allow liquid to leak out of the concrete solution.
- Then formwork is made using boards or plywood.
- Next, a reinforcing frame is installed in the trench, connecting it to the rods of the main foundation.
- The concrete solution is poured, its surface is leveled and left to gain strength.
- The finished foundation is sheathed with waterproofing material and backfilled with soil.
Raising the foundation in height
To increase the height of an existing foundation, perform the following steps:
Increasing the height of the foundation
- Installation of formwork is carried out. To do this, boards with a thickness of 2.5-5 cm are knocked together, the height of which corresponds to the parameters for building the foundation.
- The panels are installed on both sides of the existing base, checking the parallelism of the arrangement. To secure the shields from the outside, wooden stakes or metal rods are driven into the ground. To prevent the formwork from deforming under the action of the concrete mass, transverse beams are installed between the panels. In both cases, the distance between the fixing elements should not exceed 1 meter. This allows you to prevent deformation of the formwork, which can cause cracking of the growing part of the base.
- The walls of the formwork are covered with plastic film, which will make the surface of the new part of the foundation even and smooth, and also prevent liquid from leaking out of the concrete solution.
- We must not forget about the reinforcement of the foundation being built up. The size of the cells of the reinforcing frame should be no more than 10*10 cm; it is best to use knitting wire to connect the rods.
- Next, the surface of the old base is generously moistened with water and notches are made using a hammer drill. This will increase the adhesion between the old and new base.
- Then the reinforcing structure is laid, if possible connecting it with the reinforcement bars of the old foundation.
- After this, the concrete solution is poured. The surface of the poured concrete is carefully leveled, checking the horizontality using a building level.
- During the process of gaining strength, the concrete part being built up requires protection and constant care. In hot weather, the surface is regularly moistened with water and protected from precipitation with ordinary plastic film.
This simple algorithm of actions solves the question of how to build a foundation.
Deepening the foundation
There are several ways to increase the depth of the foundation, among which deepening the foundation using monolithic concrete is more effective. The work process in this case looks like this:
- A trench is dug along the perimeter of the house, the bottom of which is located 0.7-1 m below the base of the foundation being built up.
- The walls of the trench are reinforced with shields.
- Next, a frame is assembled from timber or logs and installed at the front of the wall, while the upper crossbar of the frame should not fit tightly to the base of the foundation; a gap of about 5 cm should be left.
- Boards are hammered into the resulting gap, which serve as a kind of support for the foundation being built.
- Then a well is dug under the base of the old foundation and filled with concrete mortar, leaving a distance of 30-40 cm to the base of the foundation. The concrete is left to gain strength.
- After the concrete solution has hardened, jacks are installed in the gap between the concrete surface and the base of the old base and the new base is compressed using the load from the existing structure.
- Next, the jacks are removed and the gap is filled with concrete. To ensure tight contact between the new and old base, it is recommended to pour the concrete solution approximately 10 cm above the base of the old base.
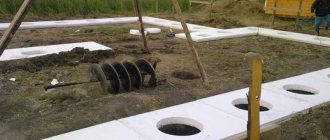
Strengthening the foundation using drilling injection method
This method of strengthening the foundation of a house is one of the most modern and effective. It consists of installing piles under the base of the house or directly through the wall of the foundation strip, to the required depth, which is determined by soil surveys. A reinforcing structure is installed through the upper hole in the pipe piles. Then, through the same hole, a concrete solution is poured into the pipe, which, after hardening, strengthens the pile. As a result, the foundation receives reliable additional support points, eliminating the possibility of it subsiding into the ground.
When choosing to strengthen the foundation with piles, you need to know that several methods are used to install them in the ground. However, almost each of them will require the use of specialized equipment.
Pile installation methods
- The screw method of installing piles can be called the most commonly used when strengthening foundations, and also the most effective. In this case, the piles can be screwed in using special equipment, and sometimes even manually. However, if you choose the second option, you will have to hire assistants for this work. The piles can be placed at an angle, “piercing” through the old foundation strip. If the piles are installed parallel to the walls, that is, vertically, then they are sometimes secured to the old foundation surfaces using anchor bolts or using welding.
Piles are screwed obliquely into the ground along the perimeter of the reinforced foundation
- Indentation of piles. This method is used in cases where it is necessary to strengthen the old foundation, where vibration and impact processes are unacceptable, that is, piles cannot be driven or screwed in. Therefore, these reinforcing elements are gradually, slowly pressed into the ground. This process can only be carried out using special machines.
Prices for screw piles
screw piles
Drilled method - drilled holes are reinforced and filled with concrete, after which it hardens they turn into piles.
- Bored method. The technology for installing piles using this method involves drilling wells with a certain pitch, which is most often 1500 mm, along the entire perimeter of the building. Wells are installed under the walls of the old foundation and can be deepened into the ground up to two meters. After laying the reinforcement frame, the cavities of the wells are tightly filled with concrete mortar.
Possible options for the location of additional pile foundation supports
So, no matter what method of installing piles in the ground is chosen, they can be deepened at an angle to the structure or vertically. However, most often the option of placing piles at an angle is chosen, since it is not only more effective, but also simplifies the process of installing reinforcement in them and pouring concrete mortar. To strengthen the foundation structure, piles with a diameter of 150÷250 mm are used. And at what angle they will be installed under the base wall is, by and large, not of decisive importance.
Strengthening the foundation with “oblique” piles can be done only from the outside of the tape, or from both sides, that is, both outside and inside. Of course, if the size of the basement allows, since it will be necessary to place a special installation for deepening piles into the ground.
Advantages and disadvantages of the drilling injection method of strengthening the foundation
This technique of strengthening the foundation of a house is used not only for residential buildings, but also for the restoration of architectural monuments that have stood for several centuries. The advantages of this method include the following advantages and results that are achieved when using it:
- Not only the foundation of the house is strengthened and strengthened, but also the walls and ceilings of the building.
- The drilling injection method is applicable for restoration work for buildings of any type.
- Strengthening can be done on buildings of almost any size. The main thing is that there is enough space to accommodate the required special equipment.
- This technology of strengthening the foundation of one building does not cause any damage to buildings located close to it.
- We can use this strengthening option for houses built on any type of soil.
- When installing piles under the foundation or in its walls, the load from the structure is evenly distributed on the ground.
- If groundwater passes close enough to the soil surface, then the drilling injection method of strengthening the foundation with immersion of metal piles can be called the only one capable of saving a house from destruction. The pipe, passing through groundwater, will become a reliable protection and formwork for the concrete solution. Without it, the solution will not have the opportunity to set and gain the necessary strength, since its water will simply wash it away.
This method of strengthening has, in fact, one, but very significant drawback - the cost of the work. However, as mentioned above, in some cases such technology becomes indispensable and the only possible option for strengthening the foundation and saving the walls of the building from further deformation and destruction.
Features of the use of pile technology
Drill injection technology has passed quite serious research tests under high loads. However, you should not experiment, doing work at random, in order to avoid mistakes and miscalculations. Therefore, it is necessary to note some factors that should be taken into account when carrying out work:
- As mentioned above, the slope angle of the installed piles does not in any way affect the reliability of the created structure. Practice shows that a strong increase in the installation angle of piles increases their internal stress, and is completely unnecessary.
Gravel prices
gravel
- If you plan to mount piles directly through the wall of an old foundation, you need to make sure it is strong enough. If it is not enough, then additional strengthening of the walls will have to be done. For this purpose, a cement-injection method of strengthening load-bearing structures is often used.
- For complex soils, inert materials such as sand or a sand-gravel mixture can be used in combination with the solution that is poured inside the pile.
- When strengthening foundations using this method, the technology allows the use of metal profile pipes, round pipes of different diameters, as well as reinforcing rods of different sections. It is important to achieve maximum strength of the structure that reinforces the base.
- The length of the piles selected for installation will directly depend on how deep the dense layers of soil lie.
- The diameter of the piles depends on the strength of the foundation of the house being strengthened.
- The solution with which the pile cavities will be filled must be homogeneous, without large inclusions of crushed stone, as they can contribute to the formation of voids in the concrete monolith and reduce the strength characteristics of the support being created. Therefore, the concrete mixing process must be monitored.
Extending the foundation from the side
Scheme of building a foundation from the side.
If the acquired land plot already has a poured rubble accessory at ground level, then the foundation must be increased so that the house does not warp over time.
The foundation should be thoroughly inspected, for which purpose several holes are dug near it in different places to the full depth of the existing foundation. This is necessary to ensure that there is no sand.
In this situation, adding a new part to the existing one means arranging a base. Before starting work, determine:
rubble stone components - large crushed stone, brick or other materials;
After all the preparatory work has been done, you need to decide whether this foundation can be used in the future. If operation is possible, then formwork from boards is constructed along the contour of the existing base on both sides.
The design is made in the form of panels, which in height coincide with the dimensions of the base being built. The panels are mounted parallel to each other.
They are fixed with stakes, which are metal pins or scraps of reinforcement driven into the soil. The stakes are fastened together with transverse beams. The side or transverse elements are installed from each other at a distance of no more than 1 m. This is necessary so that during the process of pouring the base there is no break in the formwork structure and cracking of the concrete.
Scheme of building up the foundation from below.
The top layer of the already poured mortar is leveled using a level and a rule. If work on building the base is carried out in the warm season, then it is covered with a tarpaulin and regularly, throughout the day, moistened with water. This method of adding a foundation to an existing one makes it possible to construct a base made of cement mortar or rubble with concrete. But in any case, reinforcement of the building part of the foundation is a prerequisite. Despite the fact that building a foundation is a rather difficult process, there is always the option of doing it yourself.
Another way to restore an old foundation
To save a sagging foundation, you can use technology that is developed for the restoration of old architectural buildings that have historical value. Moreover, this method makes it possible to strengthen the foundations of buildings of any number of storeys.
| Illustration | Brief description of the operations performed |
| The first step along the foundation wall, in the area where the work will be carried out first, is to build a technological pit. Simply put, a trench is being dug for unhindered access to the lower part of the wall of the foundation strip and for placing there technological equipment that will be used during the work process. Next, the wall is thoroughly cleaned of soil. | |
| Next, using a diamond drilling installation, without strong dynamic influences (which is extremely important if a very old building is being restored), sections of the foundation wall are cut out. These openings should be located with a pre-calculated step - this way you can achieve uniform distribution of the load on the foundation wall. | |
| If the work is done with your own hands, and there is no high-tech equipment at hand, then the process can be done with the tools that are available, but you must act very carefully. For example, cutting out part of a wall using a grinder. It is not recommended to use a tool with impact or vibration (such as a hammer drill or jackhammer). The drilled or cut pieces of the wall are removed in parts. | |
| Further, in order to avoid the penetration of moisture into the remaining upper part of the foundation, as well as into the lower masonry of the walls in contact with the reinforced concrete structure during its further arrangement, the ceiling surface of the drilled opening is covered with a waterproofing compound. | |
| To avoid settlement of the wall masonry, spacer devices are installed in the prepared openings. These elements will become additional reinforcement for the foundation of the house, so they are made from a durable metal profile. For example, they can be used as pipe sections of the required height, which are installed by surprise. | |
| The next step is to stop at the openings of the reinforcement cage. Lattices are knitted from rods to cover the entire thickness of the foundation wall. | |
| Then the upper reinforced concrete belt is concreted using grips. The joining of reinforcement frames of adjacent grips is carried out using threaded connections of the “Lanton” type. | |
| Now that the walls of the house have been provided with the necessary support, they proceed to installing piles. To do this, the lower part of the foundation is dismantled, freeing up space for installing pile supports. | |
| Installation of piles is carried out using indentation technology using composite reinforced concrete elements, from which the piles are made. Special equipment is used for this process. This technology is gentle on the entire structure and its operating mode. If it is not possible to use this option for installing piles, you can use another technology, in which a pit is opened in the freed space in the ground, in which a monolithic reinforced concrete support is installed. This design can also involve piles in conjunction with the main foundation, that is, they are installed in a monolith. From the classical method of pressing piles, we can take the fact that the piles are mounted in separate segments. | |
| In order to avoid weakening of the piles during the operation of the building, each of them is immediately loaded, that is, with the help of spacer elements a certain support tension is created. | |
| The piles supporting the foundation and walls are installed in the same order using the method of sequentially bringing them closer together. That is, starting from the corner of the building under one of the walls, and the other wall is strengthened in parallel in its central part. | |
| Then, work is carried out to bring them closer together until the entire foundation has reliable support. | |
| Soil removed from technological pits is not returned to its place. In the area freed from it, a layer-by-layer protective structure is formed - reservoir drainage, consisting of the following materials: underlying geotextile, drainage layer of crushed stone, another layer of geotextile, concrete preparatory layer, primer impregnation and installation of roll waterproofing, power floor and lower reinforced concrete monolithic belt. Thus, the upper part of the piles, deepened into the ground, will be covered by a concrete belt, which will make the support more durable. | |
| The result of strengthening the foundation using this technology will be the stabilization of the building's settlement and the creation of a single pile foundation on a concrete slab grillage. Of course, at first glance the technology seems complicated, but upon closer examination and a more careful approach, one can be convinced that when using it it is quite possible to do without complex equipment. However, you need to prepare for the fact that you will have to put in quite a lot of effort, so it is best to enlist reliable assistants with experience in the construction of engineered concrete structures. |
* * * * * * *
A few final words. The use of any of the technologies described above must be justified by special studies, measurements and calculations. It is almost impossible to produce them yourself with the required degree of accuracy, and acting at random can aggravate the situation to the point where weak sections of the walls may collapse. Therefore, restoration with strengthening and strengthening of the foundation is best entrusted to qualified specialists who are able to objectively assess the situation and make a decision on one way or another of carrying out the work.
And to supplement the information received, watch a video in which an experienced master shows the process of strengthening a strip foundation.
Step-by-step instruction
When purchasing a plot of land with a flooded ground level, you must take into account that the foundation will initially need to be built up. Otherwise, the house will warp.
Initially, it is necessary to carefully examine the base. To do this, it is recommended to dig several trenches or holes next to it in different places. You need to dig to the full depth of the foundation to ensure the presence or absence of a layer of sand.
In this case, building up the base means building a base. The preparatory stage consists of clarifying the following nuances:
- location - plane, slope, etc.;
- the nature of the soil - rocky, sandy, etc.;
- composition of rubble stone - brick block, large crushed stone and other components;
- proportions of the composition - concrete, sand, rubble, and so on;
- presence of reinforcement;
- the presence of a compensation layer of sand under the base;
- sizes.
Combined type device
Taking into account these nuances, it is decided whether it is possible to use the foundation in the future or not. If the answer is positive, it is recommended to carry out the following mandatory work. Formwork is installed on both sides of the contour of the previously poured base. For this, boards with a thickness of 25-50 mm are used. This design is presented in the form of panels, the height of which coincides with that of the future base (0.5-1 m).
The panels are mounted parallel to each other. To securely fix them, experts recommend driving stakes (this can be reinforcement or metal pins) into the soil to a depth of 30-50 cm. Next, they are fixed to each other using transverse bars. Transverse and side elements should be installed at a distance of no more than one meter. Otherwise, during the process of pouring the base, the formwork will break and the concrete will crack.
To obtain a perfectly smooth surface of the plinth, plastic film is fixed along the inside of the boards using a stapler. Ventilation holes in the base should also be provided. For this, an asbestos-cement pipe with a diameter of 100-150 mm is used. It is necessary to build up such a foundation taking into account its reinforcement. For these purposes, knitting wire is used. The distance between the rods should not be less than 100 mm.
Owners of a country house during its operation are wondering how to build up the foundation. In fact, this process is quite complex and labor-intensive, requiring certain knowledge and experience in carrying out construction work.
In order to build up (strengthen) the foundation, the reinforcing elements of the old and new structures should be welded together.
The main reasons for building up the foundation are:
- the need to build a second floor of the house, which entails an increase in loads on the foundation;
- errors in calculations even at the stage of designing a house, which exceeded permissible standards and the bearing capacity of the soil turned out to be insufficient.
Work on building up the foundation should not be neglected, because if this is not done and the base is not increased in height or width, then the walls of the house will “spread” and its geometry will be disrupted.
Methods used
There are several ways in which you can build up your base.
Building up the foundation from below.
For example, special reinforced concrete jackets are installed. The old foundation is wrapped with monolithic material. At the same time, it must be in contact with the reinforced structure as accurately as possible. Using a welding machine, reinforcement structures of the new and old foundation are welded. Vibrating plates can be used for these purposes. Such work is carried out on one, two opposite or three sides. It all depends on the degree of damage to the base. Building up by adding new elements to it is considered ineffective if there is no redistribution of the load previously exerted on the old foundation.
Depending on the chosen method, to build up the base, you will need the following tools: level, welding machine, concrete mixer, trowel, buckets, shovel, construction mixer with nozzle, stapler. The following materials will also be required: metal beams, vibrating plates, sand, cement, crushed stone, monolithic product, reinforcement, stakes, boards, plastic film, pipe.
Instructions for marking a rectangular foundation
Method 1. Rules of the golden triangle (i.e. Pythagoras)
Let's look at the example of building a rectangular foundation with dimensions 6x8m using the golden triangle (so-called Pythagoras).
1. Mark the first side of the foundation. This is the easiest part in constructing our rectangle. The main thing to remember. If we want our foundation (house) to be parallel to one of the sides of the fence or other object on the site or beyond, then we make the first line of our foundation equidistant from the object we have chosen. We described this procedure above. To place the first string, you can use pegs firmly fixed in the ground, but ideally, use cast-offs for this purpose. We will use it. We will make the distance between the cast-offs for this side 14 m: between the cast-offs and future corners, 3 m and 8 m under the foundation.
2. Pull the second string as perpendicular to the first as possible. In practice, it is difficult to pull it perfectly perpendicular, so in the figure we also showed it slightly deflected.
3. We fasten both strings at the intersection point. You can fasten it with a staple or tape. The main thing is to be reliable.
4. We begin to form a right angle using the Pythagorean theorem. We will build a right triangle with legs 3 by 4 meters and a hypotenuse of 5 meters. To begin with, we measure 4 meters from the intersection of the strings on the first string, and 3 meters on the second. Place marks on the lace using tape (clothespin, etc.).
5. Connect both marks with a tape measure. We fix one end of the tape measure at the 4 meter mark and lead it towards the 3 meter mark on the other string.
6. If we have a right triangle, then both marks should converge at a distance of 5 meters. In our case, the marks did not match. Therefore, in our case, we move the string to the right until the 3 m mark coincides with the 5 m division of the tape measure.
7. As a result, we got a right triangle with an angle of 90⁰ between the two strings.
8. We don’t need any more marks and they can be removed.
9. Let's start building a rectangle. We measure on both strings the lengths of the sides of our foundation to be 6 and 8 meters, respectively. We put marks on the strings.
10. Pull the third string as perpendicular to the first string as possible. We fasten both strings at the 8 m mark.
11. Pull the fourth string as perpendicular to the second string as possible. We fasten both strings at 6 meter marks.
12. We make marks on the third string 6 meters and on the fourth 8 meters.
13. To get a quadrilateral with right angles in our case, it is necessary that both marks on the third and fourth strings coincide. To do this, move both strings until the marks connect.
14. As a result, if everything was measured correctly, then we should get a regular rectangle. Let's check if it turned out by measuring the diagonals.
15. We measure the lengths of the diagonals. If they are the same, as in our case, we have a regular rectangle. The diagonals have the same length in an isosceles trapezoid. But we know one angle of 90⁰, and in an isosceles trapezoid there are no such angles.
16. Ready marking of a rectangular foundation using the Pythagorean theorem. © www.gvozdem.ru
Method 2. Web
A very simple way to make markings in the form of a rectangle with corners of 90⁰. The most important thing we need is twine that does not stretch, and the accuracy of your measurements using a tape measure.
1. Cut the pieces of twine that we will need to form the markings. In this example, we are building a foundation with sides of 6 by 8 meters. Also, to correctly construct a rectangle, we will need equal diagonals, which for a 6 by 8 meter rectangle will be equal to 10 meters (i.e. Pythagoras is described above). You also need to take a reserve length of string for fastening.
2. We connect our “web” as in the picture. We fasten the sides with diagonals in 4 places in the corners. The diagonals themselves do not need to be fastened at the intersection point.
3. Pull the first string (points 1,2). We will secure it with pegs. The main thing is that the pegs hold firmly in the ground and do not move away when our structure is pulled. This important point must be taken into account.
4. We tighten corner 3. The main condition is that string 1-3 and diagonal 2-3 do not sag and are as tight as possible. After fixing with a peg at point 3, we have an angle at point 1 of 90⁰.
5. Pull corner 4 and install the peg. We make sure that the twine at points 2-4, 3-4 and diagonal 1-4 do not sag and are as tight as possible.
6. If all conditions are met, then the result should be a rectangle with angles as close as possible to 90⁰.