Installation
Date of publication: 08/03/2015
0
11274
- Construction Basics
- Construction technology
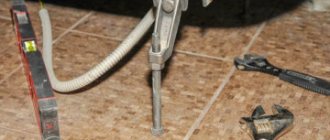
- What is needed for installation
- Construction stages
- Exterior finishing
- How to avoid a cold bridge
If we turn to the dictionary, we learn that a pediment is the completion (most often triangular, sometimes semicircular) of the facade of a building. The pediment is limited by two roof slopes on the sides, and at its base there is a cornice. There are more than 10 types of pediments that can be found on various buildings, both historical and modern. But today we will look at the frame pediment.
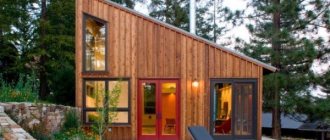
The frame pediment looks very advantageous if it is trimmed with glass
Probably, even at the project development level, you had a question about how to make every element of your home safe, durable and strong. As for the frame gable, this is doubly correct - a poorly designed part of the house can lead to uneven shrinkage of the building, causing weight imbalance and cracks in the walls. The pediment must be designed in such a way as to evenly distribute the loads on the frame of the entire building.
Modern technologies today have greatly simplified the construction of a pediment. The rafter system with accompanying elements is a single structure that lowers freely and evenly during the shrinkage of the building.
It is frame construction that allows you to create roofs of various shapes, sizes and devices.
You can build an attic or attic, or use the free space under the roof in another way. The construction of the entire structure is simple and convenient, but requires some experience and knowledge.
The frame type of construction, due to its lightness, can be considered the simplest to implement, durable and reliable. The main thing is that its elements are properly and efficiently treated with wood protection.
The role of gable walls in creating an attic
The attic space is formed by the roof slopes and the upper part of the facade of the house above the level of the upper floor. This part is called the attic pediment. When designing a house with an attic or attic, gable walls most often act as supports for the rafter structure. The pediment is of great importance, since with its help the weight of the rafters and roof is evenly distributed on the walls and ceiling.
The convenience of being in the attic largely depends on the height of the pediment. When the height of the gable walls is up to 70 cm, creating a living space under the roof is irrational. The height from 80 to 210 cm is sufficient for arranging a full-fledged comfortable room. The latest parameters allow you to create a living space with almost full height. The distance from the floor to the highest point of the attic should not be less than 250 cm. The choice of the height of the attic gable is determined not only by the needs of the home owners, but also by the need to respect the general proportions of the entire building.
The construction of side gable walls can be avoided if the house has sufficient width and a significant slope of the roof slopes. One of the most convenient options for arranging a spacious and comfortable attic is a gable sloping roof. The roof slopes form the side walls of the attic. In this case, the pediment will represent part of the facade of the house between the roof slopes up to the level of the ceilings of the upper floor.
Varieties of frontispieces
The classification of pediments is carried out according to several criteria:
- geometric shape;
- method of construction depending on the rafter system;
- material of manufacture;
- finishing options.
The pediment design is developed in advance, since this part of the building affects the total weight of the house, which is taken into account when arranging the foundation. The sequence of work when arranging the roof also depends on the chosen design option.
Pediment shapes
Mansard type of pediment
Architects and designers identify several options for the geometric shape of pediments:
- Triangular is the most common type in private construction. It has the shape of an isosceles triangle, where equal sides are limited by the roof slopes. To protect the wall from precipitation, it is often built with overhangs.
- The trapezoidal option is suitable for a sloping roof, where the angle of inclination of the slopes changes. It has become widespread in private homes, as it allows you to equip an attic floor with a sufficient height of rooms at a lower cost.
- Semicircular, the upper part has the shape of a circular arc. It involves the arrangement of a roof with a complex curved shape, which sharply increases the cost of construction.
- Luchkovy is a type of semicircular, but with a smaller height, reminiscent in shape of a bow with a string.
Pediments are rarely used in mass construction:
- stepped;
- keeled with complex shapes;
- uninhibited, characteristic of expensive housing and requiring great skills in construction;
- interrupted ones are used to install any building structures;
- torn.
Triangular
Keeled
Torn
Luchkovy
There are also male pediments, which during construction are made as a continuation of the main wall, for example, in houses made of timber, brick, and blocks.
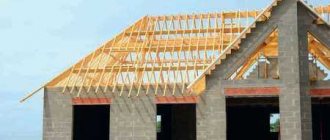
The influence of the rafter system on the structure
Types of rafters on which the pediment is attached.
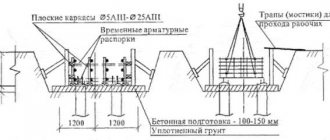
Foundations for pitched roofs are made using the technology of layered or hanging rafters.
In the first case, before installing the rafters, a pediment is built on which the longitudinal beam of the ridge rests. It is on this element that the rafters are attached with the upper edge.
The hanging rafter option provides support on the walls of the house and can be made without a ridge beam. In this case, the pediment must be specially attached to the rafters or strengthened in another accessible way after the roof construction is completed.
Rules and methods for constructing an attic pediment
Since the gable part bears significant loads formed not only by the weight of the rafters and roof, but also by environmental influences: wind, snow, its construction requires strict implementation of technologies and additional strengthening of the structure. In addition, we should not forget about the aesthetic function of the pediment, which largely depends on the choice of material for the construction and finishing of the pediment.
There are two main ways to construct the gable part: before installing the rafters or after. If you plan to use the pediment as a support for the rafter structure, then first build a wall. The advantage of this method is that the rafters will not interfere with the work. However, there are significant arguments in favor of installing and covering the pediment after the construction of the rafter system. In this case, the risk of roof distortions due to errors in geometric shapes that are possible during the initial construction of the pediment is significantly reduced. Errors in design can cause cracks or destruction of the wall. This method of creating an attic gable is also used to lighten the structure of the house.
Choosing a pediment design - brickwork or wooden frame
To create a pediment, either brickwork is used, which is like a continuation of the main building, or a wooden frame followed by sheathing with sheet material. Brickwork does not require subsequent external finishing. In the case of creating a frame for the attic gable, the ends of the beams can be brought out. The frame method allows you to avoid problems with distortion of structures when the building settles. After installing the wooden frame, it is sheathed with sheet materials: plywood, cement-bonded particle boards, fiberboards, plasterboard.
Pediment calculation
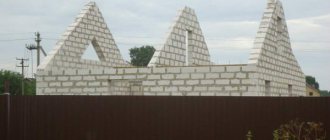
Such a case is rare
Some steps need to be taken before the construction of the gable even begins.
- The pediment is almost never erected before the rafter system is ready and the roof is covered. In this case, it is very difficult to accurately calculate its size and ideal shape. If you do this ahead of time, then there is a danger of its collapse, which can cause quite serious damage to the entire structure. Typically, this step is taken when in some nodes the rafter system will rest on the gable wall structure.
- You need to decide on the material from which the structure will be built. If the building is wooden, then there will be no questions - wood will definitely be used.
Sometimes an armored belt is requiredCheck the quality of the constructed walls and foundation thoroughly. If the roof is hip and four brick masonry gables are planned, then this will add significant weight, which can be critical. You may have to make an armored belt.
- It is important to accurately determine its shape and size. The height will depend on the type of roofing system. The greater the roof angle, the greater the height. Determining it is quite simple - you need to measure the distance from the ridge beam to the top of the wall with a tape measure. The optimal value for an attic attic is 2.5–3 m.
- Based on these values, it will be possible to calculate the amount of material needed. To do this, you need to calculate the area of the figure that is placed at the base of our pediment. If this is an isosceles triangle, then this can be done using a geometric formula. When a figure is quite complex, it can be divided into several simple ones, their areas can be calculated and summed up to obtain the desired result.
- It is worth considering whether the gable will need reinforcement. This can be achieved by making additional concrete columns and strengthening the structure with vertical wooden beams. In the past, a very popular method was to build a wall that ran through the entire attic and divided it into two parts. It served as a perpendicular support for two gable structures at once.
- Will there be a manhole or window in one or more gables?
- Also at this stage, you can decide whether the gable walls will be sheathed, and what kind of cladding will be used for this.
- Before erecting the gable, you can ensure that a stormwater system is already installed.
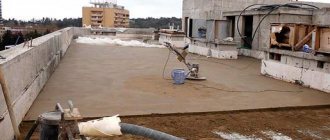
Calculations
Note!
If the gables are turned to the leeward side, then in this case it is better to avoid making any holes in it. This can lead to the destruction of both the pediment itself and damage to the roof during large gusts of wind.
How and with what to insulate the attic gable
An important condition for creating any habitable space is the insulation of room surfaces. The use of thermal insulation materials will help to significantly reduce heat loss and create a comfortable microclimate inside the house. Knowing how to properly insulate an attic gable and what materials to choose, you can carry out the entire technological process yourself.
The choice of thermal insulation materials for insulating the attic gable is quite wide. The most commonly used roll insulation material is mineral wool. High heat and sound insulation characteristics and low cost make it very popular. Polystyrene foam and other foamed polymers are also often used to insulate the attic. A modern, effective, but quite expensive method of insulation is the use of polyurethane foam. This is a liquid thermal insulation material that is applied directly to the surface without prior preparation.
Insulation of the pediment can be done both from the outside before finishing the cladding, and from the inside. To insulate the attic gable from the outside, it is necessary to perform a series of sequential actions.
- First, a layer of waterproofing layer is laid on the surface. For wooden surfaces, roll material, such as a polymer membrane, is used. For a concrete or brick base, it is preferable to use coating waterproofing.
- Then a metal or wooden sheathing is installed, in sections of which pieces of insulation of appropriate size are installed. Wooden elements must be treated with an antiseptic to protect against rot.
- A vapor barrier layer is placed on top of the insulation. The top is covered with facing material.
The decision of how to close the attic gable depends on the material from which the house is made or with which it is lined. Also, the choice may depend on the design decisions of the external design of the country house. Wooden materials are traditionally used for wooden houses - block house, imitation timber. The use of siding in cladding the external surfaces of a house is popular. It can be metal, wood, vinyl. Combining various materials for finishing the gable and lower floors can give the house an unusual and attractive look.
- Waterproofing the basement of a private house - solving the problem of protection from dampness ::
Close contact with the soil makes water penetration into the underground room a real threat.
“>Waterproofing the basement of a private house - solving the issue of protection from dampness - 02/17/2015 05:39 Insulating a house with mineral wool - solving the issue of protection from winter cold::
To insulate a country house, different materials are used. The industry offers a lot.
“>Insulating a house with mineral wool is a solution to the issue of protection from winter cold - 02/16/2015 05:30 Technology for insulating a well for the winter for its safety::
Construction of a well or borehole on a site is one of the convenient and reliable ways to provide for yourself.
How to sheathe the gable of a house cheaper and more beautifully
The pediment is the face of the house, so the issue of its cladding is of particular importance.
Experts suggest how you can cover the gable of a house beautifully and cheaply. The lining is installed on the pediment horizontally, diagonally, vertically or herringbone
The lining is distinguished by the texture of natural wood and a pleasant color. At the same time, it is a relatively economical finishing material. The lining is fixed to a special frame made of wooden blocks using nails and self-tapping screws.
When facing the pediment with clapboard, a number of features should be taken into account:
It must be used in combination with protective materials that will prevent the formation of mold and mildew on the surface. It is important to use a paint coating that repels moisture. This will protect the material from negative external influences. The use of lining increases the risk of fire since it is highly flammable. Protective coatings must be systematically updated to prevent the negative effects of moisture and microbes
On average, work should be carried out once every six months.
It is easier for an inexperienced craftsman to implement planking vertically or horizontally. In addition, there will be significantly less scraps, which means you can “fill your hand” with minimal expense.
The good thing about siding is that it is easy to level the surface of the finished gable
This is the most inexpensive and at the same time practical material of all possible. The siding is installed on the pediment using a metal profile frame.
Siding is durable. It does not change its technical characteristics and does not lose its visual appeal for 50 years or more. The material can be painted in absolutely any color. The texture of the paint also does not matter. This allows you to design the pediment in the same style as the walls and roof of the house.
Unlike lining, siding is resistant to moisture. This eliminates the need for systematic application of protective agents. To update the appearance of the coating, it is enough to wash it with soap and water when it gets dirty. This can be done using a hose.
The most economical siding options are plastic panels. They differ from more expensive models only in the limited color palette.
Do-it-yourself gables: subtleties of constructing frame roof end walls
The installation of gables is an important part of the roof construction work, which ultimately determines the aesthetic and operational parameters of the structure. You should not rely on the erroneous opinion of self-taught builders who claim that the end walls limited by slopes can simply be covered with boards or covered with siding.
In order to correctly arrange the gables with your own hands, you need to take into account a number of technical nuances and familiarize yourself in detail with the technological rules of their construction, fastening, and finishing.
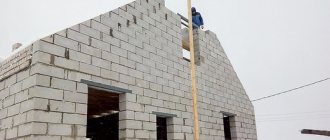
Foam block pediment: how to lay it out yourself – Beton Stroy
28.06.2019
March 20, 2021, Vasya
Our neighbors were building a house of this type - they laid it out in blocks, the pediment was also in blocks, they began to install the rafter system, and that day the wind was very strong. The pediment could not bear such pressure and fell, so I advise you to monitor the weather forecast. I also recommend nailing the strips for rigidity.
Alternatively, you can foam while installing the first rafters for better stability. You will have to fasten the entire system through the Mauerlat, and it, in turn, is fastened with anchors. Regarding the armored belt, I’m not entirely sure whether it is needed, since I haven’t even seen it. The neighbor didn’t even have extra fittings.
Either the reinforcement was carried out only along the foundation, or the pediment was reinforced when I was not there.
To be honest, I’m more accustomed to seeing a wooden pediment, but many people prefer a block one - the only question here is the price, since both will have enough strength, they just achieve it in different ways.
The pediment is usually called the end part of the roof located between the slopes. I will not say that making a pediment with your own hands is easy, but believe me, such a task is quite within the capabilities of an ordinary home craftsman.
Without going into architectural subtleties, we will step by step analyze the technology for constructing the gable roof gable for a house made of aerated concrete, plus I will give a simple calculation of this sector of the roof structure.
A three-gable roof at the ends is arranged in the same way as a gable roof.
Specifics of the construction of frame gables
Pediments are the vertical walls of a pitched roof, bounded above by its inclined planes and below by a horizontal ceiling. In the construction of gables, all types of building materials used for the construction of standard walls are used: brick, foam concrete blocks, similar flat panels with a locking mounting connection, logs with beams.
If the gables are built as extensions of walls made of stone or wood, then structurally they become gables, and the roofs resting on them are called gables.
However, frame gable structures are rightfully considered the most common option. These are triangular or pentagonal end walls with a frame made of timber or paired boards, covered with natural or artificial facing material.
The list of advantages of constructing pediments using frame technology includes:
- Minimum weight . Frame gables weigh significantly less than their counterparts made of stone and lumber. Lightness allows you to save on the construction of the foundation of the house by choosing an inexpensive pile type of foundation.
- Simplicity of the device . An inexperienced contractor can handle the construction of the frame and sealing the ends of the roof without any problems. Cutting, installing and fastening parts does not require in-depth knowledge and skills.
- Economic effect . Using the frame method in the construction of gable walls will provide a significant reduction in costs. In addition, to deliver building materials to the construction site, you will not need to rent special equipment.
Frame technology is ideal for the construction of gables of both insulated mansard roofs and cold structures erected above seasonal country houses and change houses. This is the easiest way to achieve the necessary heating engineering parameters and protect the structure from rain and wind.
True, the lightness of the end walls of gable structures does not always benefit the structure as a whole. The disadvantages of lightness are especially evident in regions with increased wind activity: in the steppe, mountain and coastal regions.
The walls, which do not have sufficient mass to resist gusty winds, are subject to an impressive horizontal force. On the windward side, it strives to overturn a vertical obstacle that stands in the way. Downwind, i.e. on the opposite side, during the period of exposure to wind, a suction is formed due to a significant vacuum, due to which this part of the roof is given the opportunity to take off.
Roofs with low gable walls, but wide eaves overhangs in areas with a similar climate also do not behave well. Therefore, it is not customary there to get carried away with the width of the gable and eaves roof extensions. Usually no more than 30 cm of the slope along the perimeter of the roof protrudes beyond the perimeter of the house.
In addition to the horizontally directed force, the gable walls are subject to a vertical load, consisting of the sum of permanent and temporary loads. Constant loads include the weight of the truss resting directly on the pediment, the weight of insulation, sheathing and the roofing itself. They are determined during calculations for selecting the cross-section of the rafters.
Temporary loads are represented by snow deposits and the effects of winds. They are found using maps - graphic appendices to SP 20.13330.2011 and used in calculations according to the recommendations of the specified reference book.
It is not necessary to use accurate calculations in calculating the cross-section of racks for the frame of gable walls. There are simplified formulas focused on lumber produced in the country, and software products that allow you to select material for constructing a pediment and calculate consumption in a matter of minutes. Only without knowledge of the principles of calculations is it difficult not to get confused in their algorithm, which we will now thoroughly analyze.
Calculation of the cross-section of frame supports
The principle of frame construction is to install vertical supports that determine the configuration of the wall and then attach the facing material to the same posts. Craftsmen who want to install and sew up gables with their own hands need only adhere to generally accepted rules for constructing frame walls.
Suppose that we calculate the dimensions of the racks for the gables of a private residential building up to 9 m wide, two floors or one with an attic. The maximum ceiling height should not exceed 2.4 m. For the attic floor, the ceiling height is considered to be the distance from the subfloor to the ceiling beam, which can serve as a truss crossbar.
In most cases, in low-rise construction there is no point in performing highly complex calculations. It is better to take advantage of the existing experience of builders who have been designing and constructing frame houses for many years. For example, there is a table from Norwegian engineers with recommended timber sizes for constructing frame walls.
If the width of the building is more than 10 m, and the height of the central pillar of the frame gable is more than 3 m, then Norwegian builders do not have the right to independently determine the cross-section of building materials for frame structures. This work must be carried out by a design engineer, taking into account the number of floors of the building and local conditions.
We do not have equally strict requirements for the design and calculation procedure. The cross-section of the support for a high and wide pediment can be calculated independently. They are calculated as compressed structural elements, i.e. They check only for compression resistance.
The minimum rack size is 100×100 mm. If a support of this size does not meet the technical requirements, enlarge one of the faces of the block and again check for resistance to bending. If necessary, the calculation process is carried out again until a cross-section of lumber that can easily withstand the load is obtained. Do not forget that a paired board can be used instead of a block.
Rack installation step
It should be remembered that with an increase in the number of frame supports, it becomes possible to reduce the cross-section of lumber used for their construction. This does not mean that instead of a frame you can build a “picket fence” from a thin block, because in the majority of situations, the pediment frame must resist vertical compressive force and support the door and window frames.
The choice of distance between racks is influenced by:
- Width of the insulation mat. The insulation must be firmly fixed in the cell between the rafters.
- Sheathing sheet width. For example, OSB or plywood or plasterboard panels must be supported by at least three vertical bars. This means that the installation step will be equal to half the width of the panel minus 5 - 7 cm to fix the edge of the slab.
- The width of the window or door frame. It is desirable that in order to arrange the openings it is not necessary to cut the frame supports, because the resistance of the structure to compressive and horizontal loads will decrease.
When constructing the pediment of a frame house, the supports of the end walls of the attic are installed directly above the racks of the frame walls of the first floor.
In principle, cutting supports to install boxes after constructing the frame is practiced among craftsmen. However, such methods require strengthening the structure with additional racks on the side of the installed box and horizontal lintels placed above the opening.
Insulation from steam and winds with rain
A barrier from the wind from outside the structure and from the effects of household fumes from the inside is constructed if the use of the attic space is planned. Such gable frames are insulated in accordance with the rules for thermal insulation of frame walls.
The thickness of thermal insulation is taken in accordance with the instructions of the collection of standards for building climatology. Mineral wool mats are used as insulation, the width of which is 1–2 cm greater than the distance between adjacent rafters. Thermal insulation is installed by surprise into a cell limited by the rafters, straightens out in it, and then tightly fills the entire space.
If the calculated thickness of the thermal insulation layer for the attic gable is greater than the adjacent size of the support, then the missing distance is increased by lathing. In addition to compensating for the missing thickness of lumber, the slats are designed to perform another important function - they form a ventilation gap between the insulation layer and the wind protection located on the outside.
Two schemes for organizing ventilation of insulated gables are used:
- Two-level. This type involves the formation of two ventilation channels 2–3 cm wide. The first of them is arranged between thermal insulation and wind protection, if it is made of reinforced polyethylene film. A second channel is created between the windbreak and the external cladding of the gable.
- Single-level. It is assumed that only one ventilation duct will be installed between the façade finishing and the wind protection. The scheme is applicable if a diffusion membrane is used as a wind barrier, which can be in contact with thermal insulation without a ventilation device between them.
The laths are attached to the posts of the pediment frame along their direction if it is necessary to increase the thickness of the bar for laying insulation in one layer. The same method is used to form vertical ventilation ducts. If thermal insulation is constructed in two layers, then the laths and the outer layer of insulation are installed in a cross to the racks.
A vapor barrier layer is attached in the same way to the inside of the attic gables. A ventilation gap is also required between it and the inner lining of the attic.
The gables of cold roofs are insulated according to a different scheme. Because Living within uninsulated attics is not planned, then the need for a vapor barrier automatically disappears, but wind protection is installed. Ventilation of cold attics is constructed according to a single-level scheme, regardless of the type of insulating material used.
Attaching frame supports
The method of fixing the frame supports depends on the type of base to which the fastening is made. They are placed on floors made of reinforced concrete slabs or beams made of timber, logs, sewn boards, or pressed wood. In all cases, the racks are in direct contact only with wooden parts. When installed on a reinforced concrete base, brick or concrete walls, the supports are attached to the mauerlat bars.
When fixing to horizontally laid structural elements, a T-shaped frontal fastening scheme is used. A perfectly trimmed rack is installed perpendicular to the mauerlat or ceiling beam, its position is reinforced by side plank overlays. Instead of overlays, metal toothed corners and plates can be used.
Installing gable wall supports on a log is somewhat more complicated. To implement it, you must first select nests in the end logs of the upper crown for installing racks. Marking of nests and subsequent installation of frame elements is carried out using a control cord. Then, lower teeth are selected on the support blanks, complementary in size and shape to the sockets arranged.
After forming the elements of the locking connection on the log and blanks of the racks, the line of the upper gash is determined. The search for it is carried out during the fitting of each workpiece to the installation site. The gash line is outlined by placing the tooth in its intended socket. According to the markings, they are filed down, returned to place and fixed at the top with one wooden overlay to the rafters from the attic side.
Anchoring the gable wall
Low-rise buildings are not very resistant to wind loads, especially if they are fully or partially made using frame technology. A gusty wind can easily not only overturn light structures, but also carry them away. For gable roofs with framed gables, aerodynamic rules apply by analogy with airplane wings.
Often news reports about hurricanes that have occurred somewhere indicate the number of roofs that were torn off. To prevent such situations from happening, the rafter structure is attached to the walls of the building with wire twists to metal ribbed pins hammered into them - ruffs.
The supports of the gable frame also need to be strengthened and connections to the foundation through the walls be formed. Those. the pediment posts must be connected to the walls, which in turn are fixed to the base of the house, because a lightweight frame structure requires not only spatial rigidity, but also reliable fixation to stable structures.
To ensure spatial rigidity, it is recommended to take the following measures:
- It is advisable to sheathe the gable on the windward side with rigid slabs.
- In regions that require increased structural rigidity, it is better to construct the subfloor over the attic beams from tongue-and-groove boards rather than from sheet material.
- If the gable is installed for an uninsulated roof, then spacers should be installed to increase the rigidity of the gable frame.
In order for the load to be redistributed to the walls and foundation, all structural elements must be firmly connected to each other. Connections are made by anchoring, the need for which increases acutely during the construction period, when the walls and roof of the house have already been built, but the door and window openings have not yet been equipped. It is needed to withstand both horizontal and vertical influences.
The size of the anchor bolts and the distance between the fastening points are determined based on their slope of the structure, the size of the covered span and the width of the overhangs. In order not to get involved in mind-numbing calculations, you can use the tables of Norwegian engineers, compiled on the basis of many years of practice in low-rise frame construction.
Anchoring of gable walls is carried out:
- To concrete floors. Anchor bolts for resistance to horizontal loads. Anchor bolts paired with metal corners to resist vertically directed forces.
- To wooden floors. Metal perforated tape and slats nailed to the post and the upper ceiling to resist vertically acting force - winds.
Strengthening the fastening of gables to wooden floors against horizontal load is carried out during the installation of supports; it is believed that the fasteners installed during the assembly of the frame are quite sufficient.
Before installing gable overhangs, if they are included in the project, and performing cladding, door and window openings are arranged, boxes are constructed in which frames with opening sashes will be mounted. If you plan to install only dormer windows in a non-residential attic, then you can cut holes for their installation after installing the board cladding.
Construction of a gable overhang
If it is planned to install a gable overhang to protect the wall from the harmful effects of slanting rains, it is constructed from shortened rafters. Naturally, no insulation or special calculations are needed for this. It is only desirable that the width of the gable extension be approximately equal to the width of the cornice.
The outer rafters are nailed to the vertical supports and the upper crown, trim or mauerlat, between which the lace is pulled. These mini-rafters are first only attached, and after determining their optimal position they are finally fixed. To ensure rigidity, each element of a kind of canopy is equipped with a rafter leg of the appropriate size.
Ordinary mini-rafters are installed according to indications with laces and fastened in the same way. It is not necessary to mount them near each frame post. The distance can be approximately 1 m, because there is no serious snow load on the gable overhangs.
After installing the rafter system, a sheathing is installed under the gable overhang along the shortened legs with a pitch corresponding to the material chosen for installation. Then you can safely begin the finishing and cladding work: make the gable cladding as presented in one of the methods described on our website, lay the roofing material on the overhang and place a tin flashing along the line where the gable wall and overhang meet.
Video with an example of assembling a frame pediment:
Covering the gable wall with corrugated sheets:
How to cover the ends of a pitched roof with siding:
As it turned out, installing gable walls is not an entirely simple matter. To construct them competently, compliance with the technological rules that we introduced you to in the article is required. If you adhere to building regulations, the result of the investment and effort will look impeccable and last a long time.
Pediment cladding: step-by-step instructions
Let's look at how to sew up a pediment with your own hands using the example of a wooden house.
- Preparation. Finishing the gable of a house begins with a visual inspection. Then the scaffolding is installed. A base of timber is prepared for the scaffolding posts; they are attached to the wall with dowels, nails and brackets. For the gable of a two-story house, scaffolding can be secured with nails and wire. All old casing is removed. If there is a window, then the mounting foam is cut off along its perimeter. All gaps between the boards of the supporting frame are sealed with polyurethane foam. Before sheathing the gable of the house, they are treated with an antiseptic.
- Installation of waterproofing. To protect the pediment frame from moisture, it is sheathed with a special film. This can be ordinary polyethylene or a special membrane that removes moisture from the walls but prevents them from getting wet. The film is attached to the wall with a stapler. The joints between pieces of waterproofing are taped.
- Frame installation. Before closing the pediment, a supporting frame is installed. It consists of horizontal guides, vertical posts and U-shaped hangers. First of all, the upper and lower guide profiles are installed. If the wall is uneven, then it is attached not to it, but to hangers. Due to them, the difference is leveled. The supporting profile is attached perpendicular to the guides. Installation step 500-600 mm. If you plan to install the siding vertically, then the supporting profile is installed horizontally.
- If the pediment has a window, then it is framed by a profile. Then the frame is sheathed with metal slopes. For fastening, metal screws with a drill at the end are used. A galvanized flashing is installed at the bottom of the window.
- Siding installation. A starting strip for siding is attached to the lower profile. It is screwed with 80% force. This is important to compensate for temperature deformations.
In addition to the starting bar, all the necessary additional elements are installed. An edging strip is installed along the roof overhangs.
After installing all the additional elements, the first strip of siding is inserted into the guides. Through special holes it is secured with 25-30 mm metal screws to the supporting profile. There is a 1-2 mm gap between the profile and the siding mounting arm to compensate for temperature deformations.
Frame mansard roof pediment
In the process of developing a project and building a house, minor or unnecessary details simply do not exist. After all, absolutely every element in the structure is precisely calculated in order to ensure the required level of safety and durability of the building. The same principle applies to gables. Miscalculations in the design process of the pediment can provoke uneven shrinkage of the building, which in the future can cause the appearance of cracks, as well as uneven distribution of the load on the structure of the building system, including possible deformation and sagging.
Plan for building a pediment.
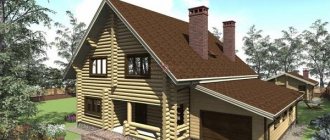
Pediment is the completion of the facade of a building. Most often it is made in the shape of a triangle and is limited on the sides by the roof slopes. The pediment can be made as a frame, for example, sheathed using lining or house blocks, or using the chopped method. It is important to remember that the house must be given some time to settle before further work can be carried out.
Materials for cladding the pediment of a private house
Almost all modern finishing materials can be used to cover the front part of the facade. Finishing the pediment of a wooden house and finishing the pediment of a brick house are very similar in terms of the technology of work and the materials used. You can decorate a red brick house with a beam-like pediment, and cover a wooden house with metal siding or corrugated sheets. Let's consider the main finishing materials:
- Lining.
- Block house.
- Planken.
- Imitation of timber.
- Siding.
- Profiled sheet.
Lining
This is a high-quality, natural finishing material. It “breathes”, providing a pleasant microclimate inside the house. Wooden lining needs protection from precipitation and sun. Before installation, it must be treated with a wood antiseptic. The lining is easily mounted on a frame or bare wall. It is not recommended to varnish it. It will quickly peel off under the influence of ultraviolet rays, and the appearance of the house will become worse.
The clapboard pediment goes well with a wooden house. Fitting is rarely used for cladding brick houses.
Block house
Decorating the gable of a house with a blockhouse is a good way to decorate a stone house with wood. It imitates a log house. A block house is a log cut in half. The flat side is attached to the wall, and the semicircular side goes outside the house.
Unlike solid logs, a block house is ready for installation. Its front part is absolutely smooth, there are no cracks or chips. During operation, the panel does not deform or crack.
The panels are very light and do not create a serious load on the foundation. In addition to wood, there are options for vinyl and metal block houses.
Planken
A planken pediment is a good alternative to lining. Planken or façade board is made from hardwood. It is a strong, durable finishing material. Used for finishing wooden log houses.
A gap of 1-2 mm is left between the boards to compensate for seasonal changes in the size of the wood, as well as for ventilation.
Imitation of timber
Used in finishing only wooden houses. Often, imitation timber serves as a building envelope, and not just as a finishing cladding. It is suitable for the construction of a second, often unheated, floor of a country house.
Siding
Finishing siding on the pediment of a wooden or brick house is deservedly popular. This is a classic material for cladding houses of “one-story America”.
There is wood, vinyl (plastic) and metal siding. Wood panels are gradually going out of fashion due to poor performance.
Most of the houses are lined with plastic siding. This is an easy-to-install material. It does not collapse under the influence of precipitation and does not crack from ultraviolet radiation.
Well protects the wall from destruction. An attic wall made of siding can be easily repaired. You can replace one panel without destroying the entire coating.
Siding is available in different color and texture options. With its help, you can decorate the pediment to match any natural finishing material. The light weight of the panels makes it possible to install siding on houses made of brick and wood with a weakened base.
Metal siding is not often used for gables. It costs more than plastic. Its performance characteristics are much higher. Metal siding is stronger and also better protects the wall from mechanical damage.
Profiled sheet
Finishing with corrugated sheets is a good option for cladding a brick house
The profiled sheet is made of high-quality galvanized steel. Using the perforation method, stiffening ribs are extruded onto it, which increase strength.
A thin layer of polymer coating is applied to the outside of the sheet. It protects the metal from corrosion. The corrugated sheet gets very hot in the sun and does not protect against external noise.
Frame type pediment
Scheme of gable cladding with vertical siding.
Today, the frame-type pediment is a fairly popular design, the structure of which is simplified. This is explained by the fact that the rafter system and accompanying elements represent an integral system that is capable of lowering evenly and at the same time freely during the shrinkage of the house. Quite often, gables are sheathed using house blocks, the physical characteristics of which are much better than conventional blocks, or with imitation timber so that they blend as best as possible with the walls. If you plan to use the attic as additional living space, insulation is required. The frame structure is considered the most universal, since it makes it possible to build roofs of various shapes, as well as to avoid problems that arise during the shrinkage of the house. Thanks to this, it is possible to build an attic using the free space that is under the roof, without waiting for the frame to shrink. This design is also distinguished by the fact that its structure is very simple and convenient to construct. The frame type of pediment boasts particular durability and reliability.
Today, there are several options for making the pediment of a mansard roof. The first option is that, due to the brick inlay, you can increase the area of the first floor. The second is the use of a wooden frame device. Experts do not recommend carrying out such work on your own, since there are a lot of difficult tasks to complete.
How to make a roof gable
The time of construction of the roof gable does not play a significant role. You can fold it both before and after erecting the roof.
With the first option, there will be no interference from the roof structure. Each type of mansard roof involves its own construction technique, and, consequently, its own difficulties. Remember that before laying the rafters on the pediment, you first need to equip it in all respects.
With a finished roof, gables are erected in limited areas, for example, attics
It is very important not to make any mistakes. If you are planning to equip an overall pediment or plan to fill along the upper part of the reinforcement belt, then create a pediment urgently
As you know, the rafters are located on the Mauerlat in both directions. That is why this element must be quite rigid over its entire area.
Differences between frame and brick pediments
When installing a pediment, it needs to be covered with sheet material. A cement bonded particle board is best suited for this. Then it is necessary to prepare the final coating, as well as install insulation and finish the interior of the room. For a brick pediment, the same masonry that was used for the first floor is perfect. For the interior of the room, no finishing is required at all, you just need to plaster it.
Before laying the roof, you will need to close the gables in order to protect it from various external influences, for example, a hurricane. It is recommended to close the first gable using cement-bonded particle blocks. Others can be covered with ordinary boards. This is done in order to simplify the already quite complex work, as well as save effort and time. When working with cement-bonded particle boards, experts recommend initially drilling holes and then hammering nails. It is best to saw them using a grinder, as this helps to rationally use your own efforts.
How to calculate area and dimensions
The need to calculate the area of the pediment may arise when determining the amount of building or finishing materials for its construction.
The calculation of the area and size of the pediment is based on geometry and is based on the house design data.
We can find out how to calculate the area of the pediment using the formula for the area of a triangle - the product of the base and the height divided in half , where the base is the width of the end wall of the house, the height is the height of the roof from the ceiling to the ridge.
If the height is unknown, but the width of the wall and the angle of inclination of the slopes are available, then the height can be determined by multiplying the width of the end (gable) wall by the tangent of the inclination angle, determined from the Bradis tables. Most often, the height of the future roof is known in advance, so complex calculations are rarely necessary.
IMPORTANT!
When designing a house, it is important to calculate the load on the foundation , since the weight of brick or cinder block gables makes serious adjustments to the distribution of the load. Therefore, all dimensions are most often calculated at the project development stage.
Pediment calculation
Installing an insulated frame pediment
If we turn to the dictionary, we learn that a pediment is the completion (most often triangular, sometimes semicircular) of the facade of a building. The pediment is limited by two roof slopes on the sides, and at its base there is a cornice. There are more than 10 types of pediments that can be found on various buildings, both historical and modern. But today we will look at the frame pediment.
The frame pediment looks very advantageous if it is trimmed with glass
Probably, even at the project development level, you had a question about how to make every element of your home safe, durable and strong. As for the frame gable, this is doubly correct - a poorly designed part of the house can lead to uneven shrinkage of the building, causing weight imbalance and cracks in the walls. The pediment must be designed in such a way as to evenly distribute the loads on the frame of the entire building.
Modern technologies today have greatly simplified the construction of a pediment. The rafter system with accompanying elements is a single structure that lowers freely and evenly during the shrinkage of the building.
It is frame construction that allows you to create roofs of various shapes, sizes and devices.
You can build an attic or attic, or use the free space under the roof in another way. The construction of the entire structure is simple and convenient, but requires some experience and knowledge.
The frame type of construction, due to its lightness, can be considered the simplest to implement, durable and reliable. The main thing is that its elements are properly and efficiently treated with wood protection.
Advantages and disadvantages of frame gables
Advantages:
- fast construction times;
- There is no shrinkage at all;
- light weight;
- thermal insulation properties can be adjusted by selecting the thickness of the insulation;
- exterior decoration can be chosen to suit every taste;
- lower construction costs;
- roof installation is simpler, since there is no shrinkage;
- the possibility of displacement of the pediments relative to the load-bearing walls of the log house.
Flaws:
- furnishing a residential attic using thick insulation is not that cheap;
- no matter what material is chosen for cladding the gables, the difference between them and the walls of the log house will be visually noticeable;
- frame gables “do not breathe,” which means a ventilation system is needed to regulate the microclimate and remove moisture.