It doesn't always make sense to renovate an apartment at a five-star hotel. There can be countless reasons for this, from plans to sell your home to a simple lack of funds. If you wish and have the opportunity to spend a couple of free evenings, you can find a good option for a budget bathroom renovation with your own hands photo.
At the same time, the costs of materials and work will not be so frightening, and the decrease in quality to the budget level will be almost unnoticeable.
What does "budget" mean?
Under the word “budget”, the article will consider finishing options with the most affordable materials:
- paint and varnish;
- PVC panels;
- wallpaper.
In addition, the secret of creating a loft-style interior will be revealed and it will be proven that brick as a finishing material in the bathroom is not inferior to other materials. After all, “budget renovation” can also be stylish.
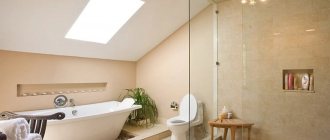
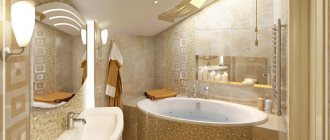
Budget bathroom design
Loft style in the bathroom
Vintage bathroom
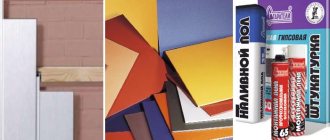
Plastering works
Before starting plastering work, glue the protruding waterproofing to the wall using construction tape; as already mentioned, it cannot be cut. The bathroom is a cramped space, so when applying plaster we recommend using half a rubber ball rather than a trowel. It can be used for any type of work with alabaster, gypsum or hardening compounds. It will be easier to work this way.
The plastering itself must necessarily be carried out along the beacons - for subsequent wall cladding a flat surface is required. It is best to use beacon profiles, which are easy to get at any hardware store. Making beacons yourself is not worth it, you will only waste time and will hardly be able to achieve a smooth surface. The plastering sequence is usual, from the floor to the ceiling. Apply two layers - for the conditions of the bathroom with its changes in humidity and temperature, this form will be the strongest.
DIY wall painting
Painting walls is considered one of the easiest and least expensive finishing methods. It is important to choose the right paint and prepare the surface of the walls.
Painted walls in the bathroom
Bathroom decoration
Advice! Create a design project for your bathroom. It is not recommended to paint absolutely all surfaces; it is advisable to cover the areas near the bathtub and sink with moisture-resistant panels or trim them with an apron made of inexpensive ceramic tiles.
Step 1. Choosing paint for the bathroom
Bathroom paint should have antibacterial properties and be moisture resistant. Otherwise, the appearance of fungus and peeling of the coating cannot be avoided.
Moisture resistant paint
Moisture-resistant paint for walls and ceilings
Moisture-resistant paint for walls and ceilings “Optimum”
Moisture-resistant paint for walls and ceilings matte Tikkurila Luya (Luja Tikkurila)
Due to their low cost and excellent performance characteristics, latex, silicone, and acrylic paints are most widely used. At the same time, water-based mixtures do not have an unpleasant pungent odor, and silicone paints can act as a water barrier.
NovaTech Interior paint for walls and ceilings
Traditional oil paints do not have this advantage, and also quickly become covered with cracks, so it is better to immediately abandon this option.
Oil paint
When choosing shades, remember that it is inappropriate to paint small bathrooms in dark colors, as this will visually reduce the space even more. Do not overdo it with the number of bright spots or complex patterns and their quantity so that the interior does not look vulgar. Soft pastel colors will visually expand the room and fill it with light.
Choose shades from the manufacturer's catalog
Please note that paints can be matte, glossy or semi-gloss. Of this variety, it is matte enamels that best hide small defects on the walls, while drops and streaks are clearly visible on glossy surfaces. However, if you cannot make a choice, consider a combination of glossy and matte surfaces. This technique will make your bathroom modern and stylish without significant costs.
The photo shows a combination of matte and glossy paints
bathroom paint
Step 2. Preparing the walls for painting
Don’t forget to remove all the furniture from the bathroom, remove the mirrors, cover the faucets with masking tape, and cover the plumbing fixtures with film or newspaper, because preparing the walls for painting is the dirtiest and most time-consuming stage.
You should not apply new layers of paint over the old peeling one, nothing good will come of it. If you have a drill in your arsenal, get a couple of sanding attachments for it and clean off the old paintwork from the walls. Remember safety precautions.
Removing paint with an angle grinder
Don't have a drill? Use paint strippers, a scraper and a putty knife. The method is effective, but it is better to work with a respirator and thick rubber gloves.
Remover for old paint
Chemical paint removal
Scraper
If the paint on the walls was applied a long time ago, chemicals will not cope with it.
You can remove paint using thermal methods, for example, using a torch or a hair dryer. Heat a section of the wall and scrape off the peeling coating with a narrow spatula.
Removing old paint from walls using a gas torch
When all the old paint has been removed from the walls, it is necessary to repair cracks and potholes and knock down protrusions.
Fill cracks and gouges in the wall
Crack repair
Step 3. Preparing materials and tools
Prepare paint and tools, follow manufacturer's instructions. To apply paint you will need a roller, brushes, if you have a spray gun - great. Before purchasing, measure the area of the surfaces to be coated and adjust the amount of material taking into account the volume. For high-quality painting, it is better to apply two layers, keep this in mind when purchasing.
Brushes, rollers, cuvette
Step 4. Preparing the workplace
Clear the work area near the walls of unnecessary objects; if you are not going to redo the flooring, then cover it with film or paper. Carefully protect the bathtub and sink from contamination.
Protect surfaces with masking tape
Surface protection when painting walls
Start your work from the most inconspicuous corner, in this place you can learn the properties of the paint in practice and, if necessary, dilute it to the optimal consistency. We recommend painting the walls with a roller, and using a brush to treat only hard-to-reach areas, corners and borders of joints of different colors. Panels in the bathroom are still in fashion; if you plan to make them, mark the height on the wall and draw a horizontal line.
Step 5. Start coloring
Apply a deep penetration primer to the wall. It will not only improve the appearance, but also increase the durability of the coating and reduce the likelihood of paint peeling.
Applying primer
Allow the primer to dry for 3-6 hours
Apply a second coat of primer over the first and wait 24 hours
Pour a portion of paint into a special plastic tray for rollers. Dip the roller into it, turn it several times, remove excess paint on a horizontal surface.
Practical advice. To minimize the chance of paint getting on the floor, give the roller a spinning motion before blowing it out of the tray.
Step 6. Painting technology
First paint the surface with a brush along the edges
Start painting from top to bottom, this method reduces the likelihood of drips forming, they are immediately smeared, and the roller “rolls” over them. Paint carefully, do not allow any omissions. Don't be upset if the first coat looks ugly, this is expected. The fact is that there are areas on the wall with old and new plaster, remnants of un-removed coating, etc. They all absorb paint differently, which is reflected in the appearance. The second coat will correct all problems, the finish will be uniform.
Apply the first coat
How to paint walls with a roller
Paint in small areas, correct difficult areas immediately with a brush. The paint should smooth out lint marks on its own. If this does not happen, add solvent to it. Pay attention, so that he is conscientious, read the instructions for use. If in doubt, test the solvent for compatibility with a small volume of material; if the paint has curled, change the solvent.
It is advisable to apply the second layer when the first one is not completely dry, this increases the adhesion coefficient between them. It’s easy to check the readiness of the surface - run your fingertips along it, they should not get dirty, but only “creak” a little.
Paint application scheme
Level the paint along the ceiling by rolling the roller long horizontally without loading it with paint.
If you are making a multi-colored panel, then you need to paint the surface in the second color only after applying two layers of the first. In this case, start working from the top of the wall; the panel is finished last. This way you will be protected from paint getting onto finished areas. Apply masking tape along the border line. Make sure that the paint does not flow under it; paint only with a brush, moving in the direction opposite to the tape. Never apply tape to paint that is not completely dry, this is very important. If you glue it to a freshly painted surface, then during removal it is likely that part of the paint will be removed along with it, and you will have to redo everything.
Marking a wall for striped painting
Apply masking tape
Apply paint
Creating stripes
Stripes can also be horizontal
Original wall decoration
The color transition is achieved by using color and a regular sponge
Example of non-standard wall painting
Ready-made interior ideas
Redevelopment of an economy bathroom is carried out without major changes in the communications connected to it: water supply and sewerage; instead of outdated devices, modern ones are installed and inexpensive finishing of the room is carried out.
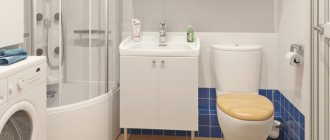
Options for completed economy class bathroom projects:
- Washbasin with solid countertop. You can place bath accessories, perfumes, and things on it. Below them is a top-loading washing machine. There is a mirror above the washbasin. The toilet is corner, in the other corner there is a shower stall with a plastic sliding door.
- In Khrushchev-era apartments, the bathroom is adjacent to the kitchen. To save on electric lighting, you can make a large window opening with translucent frosted glass in the adjacent wall. The incoming natural light is enough to perform personal hygiene in the bath without turning on the electricity (during the daytime).
- To add lightness to the room, you can make a false window on the wall above the bathroom with a picture of a pleasant landscape inserted into it.
- The walls are covered with photo wallpaper (washable) with an image acceptable for such a room.
- Art lovers can paint the walls themselves. They are pre-processed: stripping, priming, etc. After applying the desired image, a layer of varnish is placed on top of it.
- Retro style "Old Moscow". The walls are painted to resemble brickwork and fragments of decorative stone are glued on. Plumbing fixtures made in the old style are installed: copper (or brass) taps with large “Steerwheel” type valves, etc. accessories.
Using various combinations of raw materials and devices, each owner can create his own unique style.
Wall decoration with PVC panels
The cost is slightly more expensive than the first method, but in terms of design indicators it is much better. And the preparatory work is greatly simplified; there is no need to remove old coatings, level the walls and seal cracks in them. The sheathing for the panels can be made from wooden slats or special plastic profiles with clips. We recommend using the second option. The cost of plastic additional elements has almost no effect on the cost of repairs, and the work is greatly simplified. In addition, the plastic profile is not afraid of moisture, which is very important for bathrooms. Wooden slats need to be impregnated with antiseptics - an additional waste of time.
Selecting panels for finishing
Calculate the number of panels needed, make a reserve of 5–10%. If you have little experience, and the bathroom has a lot of utilities, to close which you will need to trim the panels, then take a reserve of 10%. At the same time, estimate the number of starting profiles, external and internal corners. They are sold at a standard price, cost a penny, and there is no need to save money.
Parts for mounting plastic panels
Step 1. Installation of the sheathing
The panels are arranged vertically, the sheathing must be made horizontal. The distance between the planks is 50–60 cm. Make markings on the wall, making sure that the lines are parallel. The sheathing is fixed with dowels, drill holes with a drill and hammer drill, use drills with pobedite tips. To prevent the floor from getting dirty with construction dust, cover the area near the wall with film or paper. Once all the holes are made, remove it immediately. Don’t leave cleaning for later; practice shows that no matter how carefully you work, garbage will definitely spread throughout the bathroom.
Make the holes a few centimeters deeper than the length of the plastic part of the dowels, otherwise you will not be able to insert them all the way, dust will interfere. First, drill the two outer holes, attach the profile, then fix it in several more places. The horizontal distance between the dowels is 60–70 cm.
The pitch of the lathing along the bathroom wall should be 40-50 cm
How to fix elements in one plane?
- Check the condition of the wall with a plumb line, pay special attention to the places where plastic profiles or slats are attached.
- Fix the two outer elements below the level and re-check their position. If there are large recesses where the profiles are attached, then use pads made of different materials. The dowels must attract the profile along the entire plane; there cannot be a gap between it and the wall at the attachment point.
- Stretch ropes between them, two at the ends of the profiles or slats are enough.
- Install all other profiles under the rope; use it to control the position of the slats.
Step 2. Installation of plastic panels
Installation of PVC panels for walls
Panel installation diagram
Take measurements of the wall in at least three places. If they have a spread of no more than a centimeter, then the work is noticeably simplified - all panels can be cut to size at the same time. To do this, you need to find out the shortest one and use it to cut all the others. Stack the panels in stacks of 5–10 pieces. on a flat plane and use a grinder with a metal disc to cut it. A discrepancy of up to one centimeter will be hidden by the ceiling and floor profile. It is installed at the top between the wall and the stream and at the bottom at the junction of the wall and the floor. Place plastic corners on the sides.
The starting angle is set in the corner
Fastening the starting profile with a stapler
Installation of PVC panels
The installation of panels in the opposite corner is completed by installing a special part - the finishing corner
Professionals finish walls without corners and very precisely cut panels at an angle of 45°. But for this, in addition to extensive practical experience, you need special tools. They are expensive, and it is not economically feasible to buy only for finishing one bath.
Place the first panel and check its position. Everything is fine - secure it with clips. If you have wooden slats, then secure them with staples. Both options provide sufficient reliability of fixing the panels. The first one is mounted - install the second one, press it against the first one until it clicks. It indicates that the elements are connected by a lock. Continue working using this algorithm until the last plastic panel remains. Immediately insert the ends into the corners.
How to attach panels to clamps
Take the exact dimensions of the last panel and cut it lengthwise. You can cut with a mounting knife or grinder. If you use a knife, the operation must be done in two stages. First, cut the top and transverse stiffeners. Second - bend the panel, at the bend on the second side, use a mounting knife to completely cut off the required part.
Finish the remaining walls in the same way. Practice shows that it is better to make the area near the bathtub from ceramic tiles. You don’t have to cover the entire wall, just an apron. The main thing is to close the area that constantly gets water during water procedures.
Wall paneling
Video: Finishing bathroom walls in 1 day with plastic panels. Inexpensive DIY bathroom renovation
Floor, covering
There are two tile options for the floor - the reasons why porcelain tiles are better than tiles or wooden floors have already been explained.
In the case of a wooden floor, the procedure will be more expensive, but the result will be more pleasant. The boards should be selected tongue-and-groove; the installation procedure will be similar to the ceiling, but leaving a distance of 2-2.5 centimeters from the wall. This space is designed for swelling of the boards. Do not leave cavities; fill the gaps with polystyrene foam before installing the baseboard. A wooden floor coated with PVA emulsion and liquid acrylic varnish will last a very long time.
Regarding tiles, installation should be done from the door so that the cut tiles are located under the slope or bathtub, where they will not be visible. This last row of cut slabs is laid last after the glue has hardened under the other slabs, so as not to disturb the previously done work. The only difference from laying on the wall is the absence of seams - the tiles are adjusted to each other.
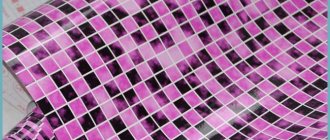
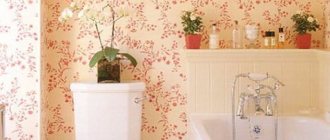
Wallpapering walls
Wallpaper for the bathroom
Wall decoration with wallpaper
For wallpapering, you can use only waterproof types. This finishing method has a number of undeniable advantages.
- Low cost allows you to have exclusive and reliable coverage with small material losses.
- High technology. Of all the possible ways to decorate walls in a bathroom, wallpapering is the simplest. The work is completed within a few hours, the room can be used for its intended purpose the very next day.
- It is possible to frequently change the design of the premises. In some cases, re-pasting can be done without removing the old one - the repair time is significantly reduced and the amount of construction waste is minimized.
Washable wallpaper
Waterproof wallpaper
Disadvantage: in terms of physical strength, wallpaper is inferior to traditional materials. But, if you behave carefully and avoid mechanical damage, the period can be calculated in many years. In addition, defects on wallpaper can be easily eliminated; after pasting there will always be a small amount of material left. Don't throw it away, keep it “just in case” for repairs.
Which wallpaper to choose for a bathroom
It goes without saying that only waterproof ones. When purchasing, pay attention to physical strength, and it depends on the material of manufacture.
| Wallpaper type | Brief performance indicators |
Vinyl on non-woven base | The most modern ones are distinguished by high levels of mechanical strength and can have long-term direct contact with water. They are produced in a wide range of colors, can be plain or with various patterns and ornaments, with a structured or smooth front surface. Disadvantages - relatively high price, the need to use special glue. |
Washable | The cheaper segment is inferior in performance characteristics to vinyl. It is recommended to use in areas of the wall that are not exposed to splashes of water. |
Self-adhesive | They are made from a special polymer film and have a huge number of design solutions. Disadvantages - relatively high price and complexity of finishing. In addition, they can only be used on perfectly flat surfaces. |
How to glue wallpaper correctly so that you don’t have to constantly re-glue the peeling areas?
Step 1. Surface preparation
The most important point in the production of work, of course, is not counting the correct choice of wallpaper. The linearity parameters of the wall affect not only the appearance of the wall, which is very important, of course. It is even theoretically impossible to stick waterproof wallpaper on an uneven wall. This means that there will definitely be air pockets and other places where the wallpaper is not glued. While using the bathroom, these areas constantly increase in size, and this continues until the peeling becomes noticeable. Repair will be required; perfectly aligning the wallpaper after repair is quite difficult, and in some cases impossible. What are the requirements for the wall surface?
- Roughness cannot exceed ± 1 mm. Run your hand along the wall, your palm gets scratched badly - that’s a problem. Use a strong steel scraper to cut off any protrusions.
Sand away any rough edges
- For plastering, only durable cement-sand mixtures should be used. All others, under the influence of moisture, significantly reduce their strength indicators, the glue falls off along with the smallest pieces of the solution, and the wallpaper sag.
- The surface must be perfectly dry. There is no air gap between the wall and the wallpaper; natural ventilation is completely absent. Fungus will inevitably appear on a damp wall, and it will certainly destroy the plaster. You will have to make expensive repairs, remove the old plaster, saturate the surface with special chemical compounds (very poisonous, by the way), and plaster and paper the walls again.
- The maximum size of recesses and protrusions cannot exceed several millimeters. Manufacturers tell the truth that some types of wallpaper hide small irregularities. But they don’t say anything about the fact that unglued areas appear in these places with all the negative consequences described above.
Surfaces must be primed in two layers, this increases the reliability of adhesion and serves as additional protection against moisture penetration.
Wall primer
Calculate the surface area, make a small reserve. Each roll of wallpaper is indicated on the length, width and total area. Use this information when purchasing materials. Do the same when choosing glue.
Step 2. Algorithm for gluing vinyl wallpaper
Prepare your tools
Pay attention to the manufacturers' recommendations on which side to apply the glue. There are options for spreading it on the wallpaper, on the wall, or on both surfaces, it all depends on the specific characteristics of the wallpaper.
Glue preparation
Mix thoroughly
Ready-made wallpaper glue
Measure the height and width of the wall, cut the required number of strips. The stripes, depending on the pattern, can be applied end-to-end or overlapping. Cut with a small margin in length, it will then be removed with a knife, the uneven cut will be buried in the ceiling and floor skirting boards.
Cut a strip of wallpaper with scissors or a decorative knife
Make sure that the cut is strictly at right angles
Practical advice. It is most difficult to glue wallpaper in the corners of the room. The fact is that they can have slopes, and this has a negative impact on quality. To prevent such consequences, never make strip joints at the corners; try to have them in the middle in these places.
Next you need to do this.
- Glue the strip coated with glue to one wall of the corner, align it strictly vertically.
- Carefully bend the wallpaper, but not all the way into the corner, lightly glue the strip to the second wall.
- Slowly begin to bend the wallpaper towards the corner, while constantly monitoring the displacement of the second edge, it should always be in a vertical position. An uneven wall angle is not a problem; even if there are air pockets in some places, the main thing is that the edge of the wallpaper on the second wall is vertical.
Definition of vertical
Apply a thick layer of glue evenly with a brush
After applying the glue, fold the left edge of the wallpaper strip towards the middle
Read the wallpaper label to see how long the glue needs to sit on the wallpaper before it sticks to the wall.
If you do not pay attention to this nuance, then on the entire adjacent wall the stripes of wallpaper will be slanted, and this is a big waste.
To apply glue you will need a large room; the bathroom, as a rule, does not have such dimensions. Decide where exactly you will prepare the wallpaper. Take measures to prevent contamination of floor coverings, do not allow glue to get on the front surface. When wallpapering walls, accuracy is one of the important conditions for quality work.
Gluing the first wallpaper
Smooth out wrinkles and bubbles under wallpaper
Cut off the excess
Immediately wipe off excess glue with a damp sponge.
Gluing the second wallpaper
Smooth out wrinkles and bubbles
Carefully squeeze out the air from under the wallpaper. You can use rubber spatulas or rollers. But it is best to do the work with clean, dry hands. This way you will feel the irregularities and be able to eliminate them in a timely manner. It happens that an air pocket is discovered late, several strips of wallpaper have already been pasted. It's not a problem. Poke the air bubble in 2-3 places with a needle, after which you can press the wallpaper again, it will take the desired position.
In the inner corners, stick one strip so that it overlaps the corner by 1-2 cm
Apply the wallpaper across the outer vertical edge of the door frame with a slight allowance, immediately smooth or trim the allowance
Also glue the next strip on top of the frame, smooth it out and cut off the rest from the bottom
Without pressing, cover the switch with wallpaper and make a diagonal cut through it. Carefully cut out the edges and press the wallpaper to the wall
Once the glue has completely dried, cut off the excess length and attach the baseboards. Skirting boards are fastened with liquid nails or other methods, taking into account the material they are made of.
Wallpaper in the bathroom
Insulation and ceiling covering
Ceiling insulation is required not to maintain temperature conditions, but to prevent future problems that will certainly arise if condensation deposition is not stopped. The best option would be to use a glass-magnesite sheet; unlike the floor, the LSU will be bonded to the surface of the ceiling with silicone or assembly adhesive. While working, use slats as supports, about 1-2 per meter of ceiling. Do not remove them before the glue dries.
Having finished with insulation, we move on to adding gloss, although this gloss has a functional meaning as condensation. A good option is a material such as plastic lining or laminate. Don't worry about the reliability of the material. Moisture-resistant glue, even if it peels off in part of the ceiling, will not lead to collapse - since the boards are connected to each other, forming a single integral structure. After completing the ceiling work, you will begin cladding the walls. The laid tiles will serve as a support for the laminate.
When preparing the material, follow these points:
- processing the reverse side of the PVA material with emulsion;
- the installation itself is carried out using assembly adhesive or construction silicone;
- the ridge of the tongue, which refers to the protrusions by which the boards are connected, as well as the method of such connection itself, a thin layer of glue is applied, its drips must be removed immediately.
Table vinegar is suitable for silicone; solvent is suitable for glue. Please note - the last two laminate boards should be laid together, fold them like a house and insert, pressing on the joint until it snaps into place. Don't forget about supports until the glue hardens.
Corners should be sealed with silicone to prevent moisture from penetrating under the ceiling sheathing. When making holes for wiring, do not make them at the junction of laminate boards. I think you understand why. Once you've finished covering the ceiling, foam the hole or fill it with silicone.
Of course, there are other options. But making suspended ceilings yourself is often unjustified, and we will not describe its methods here. If you wish to do this, please read the selection criteria. A slatted ceiling is also possible - also a very common option, but its manufacture is the topic of a separate article.
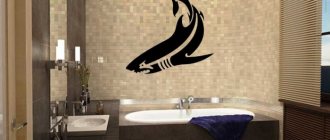
How to renovate a bathroom in loft style
The style is quite fashionable among young people, but it is difficult for older people to get used to it. The loft style is a method of renovating various premises, including industrial ones, with minimal financial losses. All structures remain in the same place, construction work on surface finishing is carried out without the use of additional materials. Leave old water and sewer pipes in the same place; you can remove the old paint from them and apply new paint. There is no need to try to make them match the wall; on the contrary, use contrasting colors that emphasize the placement of pipelines. If problem areas are identified, correct the problem immediately.
Bathroom interior in loft style
As for the walls, you can remove the old plaster down to the brick, fill large depressions with cement-sand mortar, but do not level or rub it. Wipe the brickwork with a wire brush, trying to highlight the position of each brick. The older the seam and brick, the better, the more modern the loft will be considered. Everything should be simple and natural, no plastic sheathing, plasterboard or other finishing materials.
Brick wall
Brick goes well with wood
To protect the surfaces from inevitable gradual destruction, it is recommended to cover them with moisture-resistant varnish. Before varnishing, carefully remove dust; it is advisable to vacuum the surfaces with a powerful unit. Use only clear varnish. It is advisable to varnish using a pneumatic spray gun. The air jet allows you to process even hard-to-reach areas of the seams, and the strong impact of the varnish drops on the surface increases penetration and adhesion. In addition, repair work is significantly accelerated. And one more plus - old seams can be destroyed while working with a brush, sand will get into the varnish. This is very noticeable on the front surfaces of bricks.
Dismantling work on knocking down old plaster
Apply varnish only to a clean wall
Types of waterproof varnishes
| Type | Performance characteristics |
| Polymer | It has excellent adhesion to brick and concrete, is characterized by high mechanical strength, and due to its plasticity it compensates for dynamic loads. It can be one- or two-component; solvent or toluene is used as solvents. Complete drying time is no more than two hours. |
| Polyurethane | An oligomer containing polymer components was used as a base. Modern coating, occupies a leading position in quality. It is possible to add mineral dyes to change the color. |
| Silicone | The most affordable ones have satisfactory physical and operational characteristics. Prolonged direct contact with water is not recommended. They are odorless, the safest coatings for health, and are approved for use by regulatory government organizations without restrictions. |
Varnish for stone and brick
Professional builders recommend finishing the section of the wall directly next to the bathtub with ceramic tiles, and making the remaining surfaces look like a loft. This approach will allow you to combine modern, fashionable interior design while maintaining the usual level of amenities. Read the link to install the screen under the bathtub.
Room decor
This procedure is not mandatory: even standard finishing can be done neatly and stylishly.
Decor options:
- Decoupage. It is applied to heating elements (pipes, radiators) and ceramic tiles. It goes well with accessories and fittings in a retro style.
- "Under the sauna." The walls are “sewn up” with clapboard, laminated fiberboard or MDF. Handles, hangers and shelves are made of wood (with mandatory water-repellent impregnation or varnishing).
- Modern. The entire interior is decorated in a techno style: heating elements (radiators and a heated towel rail), the washbasin is made of stainless steel. The finishing and fittings of the shower cabin are made of aluminum, the sliding doors are made of safety glass or plastic. It is possible to have 2-3 mirrors in the room.
We update plumbing
Most often the bathroom needs updating. It can be repaired in two ways:
- using liquid acrylic;
- using enamel.
Restoration with enamel will cost more, but the result will last longer. If the structure is in very poor condition, then you can purchase an inexpensive acrylic liner. It is mounted using sealant. Many may think that such methods are not budget-friendly. However, it is not. Do-it-yourself restoration will cost much less than completely replacing the structure.
You can repair a bathtub using enamel or acrylic
What will the main costs be?
To renovate a bathroom and accurately invest within a certain financial budget, you need to carefully work out a plan. You should consider finishing options, select consumables and decide on the scope of the task. What will be the main costs? Three points can be highlighted:
- cost of building materials;
- fare;
- price of installation work.
As noted above, saving on materials is quite possible. It is worth choosing economy class products that are of good quality and affordable price. If you cannot find such materials on your own, you can ask consultants for help. They will tell you which of the presented products is more accessible and convenient to use.
You can also save on transportation costs if you have friends with a car. Some building materials simply cannot be transported by public transport, so you will have to use either a delivery service or the help of friends.
You can also take on many installation and dismantling tasks yourself. However, you should adhere to several rules. First, you should study safety precautions. This is the most important thing, because you can get serious injuries during work. Secondly, you need to strictly follow the instructions for any work. This will be the key to getting an excellent result. Thirdly, it is still better to entrust a complex range of work to professionals.