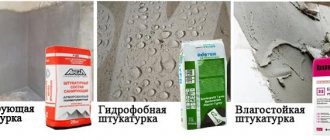
Bathroom tiles are glued using a cement-sand mixture or cement-based adhesives. They provide reliable adhesion to the base surface. The finish is held so tightly that if it becomes necessary to dismantle it, it cannot be done without physical effort and tools.
Removing old tiles in the bathroom can be done in several ways. Some of them allow you to keep part of the tile intact and suitable for subsequent use, others are faster and easier to implement, but the material becomes unusable.
Assessment of the quality of old coating
The duration and complexity of dismantling will directly depend on the quality and method of laying the old tiles. Therefore, first you need to evaluate the previous coating and find out what products were used for installation. If the tiles were laid with an adhesive composition, then there should be no difficulties with removal.
If you make every effort, you will be able to keep all the elements intact.
If the tiles were set on cement mortar, you will have to tinker - you cannot do it without special equipment and certain skills. The overall dismantling process will take much longer, and the chances of saving the entire tile are minimal.
Advice! To understand how firmly the tile adheres to the base, you can try tapping it with a rubber hammer or the handle of a spatula. A dull sound upon impact will be a sign of voids in the base.
Preparing for the dismantling process
Dismantling tiles is certainly accompanied by increased dust levels and large accumulations of debris and waste. Therefore, first of all, it is necessary to take care of the safety of the premises and minimize the damage that unforeseen situations may lead to.
It is recommended to cover the floor with plastic film or any other material intended for construction work. You need to wrap a soft cloth around the plumbing fixtures. Wall items that cannot be removed can be hung or wrapped in rags.
Don't forget about the respirator!
Preparing tools and materials
As a rule, dismantling work does not require complex “exotic” tools - almost all of them can be found in the arsenal of a home craftsman.
What exactly you will need:
- two hammers - one medium and the second heavier;
- several spatulas - it is better to choose devices with a narrow but durable blade;
- chisel - for working with the space between tiles;
- construction knife with a set of interchangeable blades;
- chisel - will become a basic tool;
- a screwdriver with a special handle designed for striking.
If you plan to work with tiles laid on cement mortar, a grinder and a hammer drill may be useful.
For hard-to-reach areas, you need to select attachments for the hammer drill in the form of a chisel, bit, drill or pick.
Pre-treatment of seams and surfaces
Dismantling work will be carried out faster if the seams between the tiles are well prepared for removal:
- moisten the space between the tiles around the entire perimeter with warm water and soap - it is most convenient to use a foam sponge for this purpose;
- when the contents of the seams become soft and plastic, the old grout can be removed by scraping it out with a thin spatula, knife or chisel;
- After removing the grout, the edges of the seams are treated with a special brush mounted on a household drill.
If you can’t find a nozzle for sanding the seams, you can treat them again with soapy water, removing any remaining grout.
What should be done to preserve the original appearance of the tiles?
Damaging tiles is a simple matter, and we will present you with a sequence of actions for carefully removing tiles:
- Clean the grout. If that doesn’t work, then we’ll use water. We spray it, wait a little - 5-10 minutes and spray again. After this, the grout will clean up a little better.
- Replace the chisel with a chisel or spatula. When using such materials, the tiles will not crack, but you should be extremely careful
- As soon as two-thirds of the work is completed, the most difficult stage begins - previously the wall was a solid structure, and now the remaining elements weakly hold each other
Dismantling process
The choice of dismantling method will depend on two factors: what material the previous cladding was installed on, and how urgent the need is to keep the tile intact.
How to remove tiles without damaging them
The tiles that were secured with special glue will most likely remain intact. It is recommended to start work by tapping - this will help to identify places where there are voids and where the tiles are weak.
These areas should be dismantled first - this way the work will go faster and a sudden collapse of the whole piece will be avoided.
It is recommended to pre-treat and scrape the seams using the method described above. Then, prying the edge of the tile with a chisel, they carefully chip away the product, being careful not to damage it.
Advice! If “weak” spots and voids are not found in the cladding, dismantling begins from the top row of masonry.
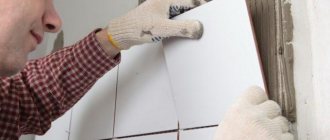
Using a hammer and chisel
Dismantling with a chisel is a universal and reliable method that, with some skill, allows you to partially preserve ceramic products intact. But to do this, you need to “feel” the tool, find the angle at which it will best pry the tile.
As a rule, the optimal angle is 45° - in this case, the chisel will act as a spacer between the plane of the wall and the tile.
The chisel is inserted between two horizontal rows so that it is possible to pry off the top tile. First, make a notch in the center of the tile end, then on the left and right sides at the edges.
When the recesses are ready, the chisel can again be slipped into the central part of the tile - the tile should come off.
If you fail to remove the facing element the first time, you will have to help yourself with a hammer. They hit the chisel several times, each time increasing the force of the blow and trying to break the tiles off the wall.
If the tile does break, it should be cut diagonally with a tile cutter and safely removed with a power tool.
Hammer
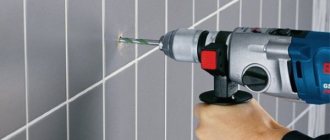
The use of a hammer drill significantly speeds up the dismantling process. However, in this case you will have to forget about the safety of the tiles - the coating is removed once and for all. From the nozzles, it is best to choose a chisel - this way the tool will work in a similar way to the previous method.
After turning on the hammer drill, the nozzle is gradually driven into the gap between the tile and the wall.
By adjusting the speed of rotation of the nozzle, you can more accurately calculate the impact force without damaging the wall.
Using metal hooks
Even the most convenient and modern hammer drill will not help if you have to dismantle it in inaccessible places. Metal hooks prepared with your own hands, bent in the letter P, will help you cope with the task.
Advice! You can make hooks from old knitting needles, strong wire and even old thin screwdrivers.
Dismantling is carried out after the joint grout has been soaked and removed. One edge of the hook is slipped under the bottom of the tile, and the edge of the second hook is placed under the top. By pulling the hooks towards you, you can easily break off the element and even leave it intact.
But this method is only good for adhesive, high-quality laid cladding.
Replacing one tile
Sometimes it is necessary to replace only one fragment of masonry, for example, if it has a defect. Also, communications can pass behind the tiles and if they are damaged, dismantling is not necessary. To carry out all the work with minimal damage, you need to remove one or more tiles without damaging adjacent ones.
It is recommended to proceed as follows:
- Separate the tile to be removed from the rest of the tile. To do this, you need to clean the grout using any method indicated above, taking into account the hardness and composition of the mixture.
- Tap the tile. If there are voids underneath, you can simply break the fragment with a hammer. If there are no voids, drill a hole in the center of the tile with a diamond crown (or use a drill to make several holes over the entire area) and knock down the finish with a hammer and chisel.
- To put a new fragment in its original place, you will need to remove the old glue. Removing the adhesive is necessary to ensure that the new tile is in the same plane as the undamaged areas.
- Prepare the surface for installation of new tiles: sweep away dust and prime.
If it is not possible to purchase a replacement tile with the same design and color, we recommend using decorative tiles with a pattern that will match the bathroom interior.
Dismantling nuances
These are just general principles for working with ceramic tiles. But it is necessary to take into account some nuances regarding the type of base coat and the pitfalls of the dismantling process.
Off the wall
When removing tiles from a wall, the most important thing is to follow the direction of movement. Masters advise dismantling with a hammer drill from left to right and from top to bottom. But if the work is carried out manually with a chisel and hammer, they move from right to left, starting from the first row.
This principle is relevant for right-handed masters. Lefties should act in a mirror manner - from left to right, but in any case the top row will start.
Work is carried out especially carefully with mirror tiles - they are more susceptible to damage and leave behind sharp fragments.
From the floor
Floor tiles are usually thicker than wall tiles, which is accompanied by a number of difficulties in removing them. Dismantling work can be carried out in two ways, described above - with a chisel or a hammer drill.
If the base is cement, and the ceramics need to be left intact, use a grinder with a stone disc.
Using a disk, cut the seams to the base, clean and rinse them with water. Then, using a chisel with a wide blade and a hammer, tap the tiles around the entire perimeter, trying to pry and lift each tile.
If the tiles are installed with glue, a regular spatula dipped in water will help. The adhesive layer is scratched around the entire perimeter with a spatula, and the tile is pryed off from below.
Advice! To protect the edges of adjacent tiles from chips and damage, they can be glued in several layers with masking tape.
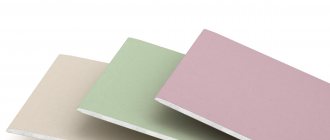
From a plasterboard wall
A plasterboard wall is an ideal surface for tiling due to its high adhesion ability. But with dismantling there are enormous difficulties. Sometimes the tiles on a plasterboard wall are held so tightly that they have to be removed along with the partition.
The only exception is when the plasterboard sheet has been plastered.
The following instructions will help you keep the partition intact and remove the lining efficiently:
- Completely free the seam from the putty with a spatula or knife.
- It is good to wet the adhesive mixture or solution with a sponge and soapy water.
- Pry up the ceramic with a chisel and carefully chip it together with the plaster.
- Clean the remaining base with a scraper, prime and putty.
If the tile does not lend itself to a chisel, the seam can be cut with a grinder at an angle of 45° to the center of the tile. In this case, the depth of the cut should be a couple of millimeters greater than the thickness of the tile.
At the moment of cutting, it is better to use an assistant who will hold a vacuum cleaner that will suck up flying debris.
Replacing multiple items
Removing one or more tiles may be necessary when repairs of communications, replacement of taps or wiring are required. It is very important here to maintain the integrity of the tiles - after all, choosing a new tone-on-tone can be difficult. Dismantling can only be done with a chisel - a hammer drill or grinder will not work.
The seams must be cleaned of grout and moistened with soapy water. You need to pry the tile with a chisel (spatula) from all sides until it begins to move away from the coating. Another option is to use metal hooks, the same ones used for hard-to-reach areas.
Important! When dismantling with hooks, the force must be applied perpendicular to the wall.
Particularly difficult cases
Particularly difficult cases include work:
- with drywall - the partition is very easy to damage even using gentle methods;
- in areas with poor access it is difficult to leave the tiles intact;
- to remove one or more tiles - high precision of manipulation is important.
For each case, it is necessary to apply an individual approach, test several methods in search of the optimal one.
You need to work very carefully in areas where communications pass through - pipes and electrical wiring.
Safety precautions
How to carry out dismantling work safely:
- wear a protective suit, shoes with anti-slip soles, thick gloves, a respirator and construction glasses;
- de-energize the room, cover communication pipes with plywood;
- It is prohibited to use any power tools in areas with communications;
- make sure that power tools are in good working order and that the housing prevents electric shock;
- There should be no unauthorized persons in the bathroom without protective equipment;
- close the door to the room tightly - if there is no door, the opening can be covered with a wet cloth.
Neglecting safety precautions can be dangerous to health and even life!
Preparatory stage
Removing outdated ceramics from a wall or ceiling always results in the formation of dirt, dust, and construction debris. In order to avoid, or rather, reduce the damage caused by the negative consequences of repair work, it is best to cover the surrounding area with plastic film. Plumbing fixtures should be wrapped in soft cloth, and old rags should also be hung on other fragile items to soften the fall of tile fragments.
Film for easy cleaning
Need to know! At this stage, work should be carried out in special clothing with long sleeves, as well as safety glasses and a respirator.
How to remove mortar and glue residues from the surface?
After dismantling, you need to remove any remaining adhesive not only from the surface of the wall, but also from the back of the tile. To ensure that the glue comes away from the surface well, it is recommended to immerse the tiles in water for several hours.
If there are a lot of tiles, and cement mortar was used for installation, the easiest way is to use a grinder equipped with a special attachment.
The work will be dusty, so it is better to carry it out outdoors.
You can also remove mortar or glue from the wall with a grinder. An alternative to a grinder is a hammer drill or scraper.
In any case, cleaning cannot be carried out dry - the surface must be abundantly moistened with water. Final cleaning is carried out with a wire brush.
It is not necessary to peel off the thin adhesive layer - it will be enough to prime the wall and smooth out any unevenness with putty or a thin layer of plaster. And finally, one more piece of advice: you can remove tiles in the bathroom efficiently and accurately only if you are not in a hurry.
The more carefully all the work is planned, the higher the concentration of attention at key moments, the more successful the dismantling will be.
Using metal hooks
In some cases, the tile does not hold tightly. You can use hooks made of steel wire. First, remove the grout. The first step is to remove a few pieces; dismantling the rest will be easier.
Place a hook under the tile and pull. A characteristic sound will be heard.
This method is perfect if there are significant voids under the tiles. You can check this by tapping on the surface. If there is air between the material and the wall, a characteristic sound will be heard.