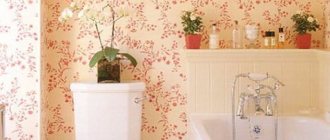
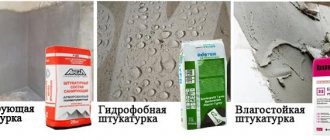
The only room in the apartment where the owners think least about the material for wall cladding is the bathroom. In 9 cases out of 10, these are ceramic tiles, which is due to difficult operating conditions: high humidity and temperature changes. Otherwise, it can be paint, PVC panels or waterproof wallpaper. At the same time, laying tiles, painting, and wallpapering is impossible without preparatory work, among which leveling the walls in the bathroom takes a leading place (for plastic panels, this operation can be skipped).
What kind of drywall should I use?
The sheet has a smooth surface. From this point of view, it is the most suitable basis for laying tile coverings. If the walls in the room are uneven, then this finishing material can be used after leveling with plaster or drywall. The last option is easier to install. It is used for finishing premises for various purposes.
The drywall + tile material combination is common in commercial properties. In offices, partitions and walls are finished using this method.
However, drywall is susceptible to moisture. There are different types of this material. The option with the simplest properties is gradually destroyed upon contact with water. For this reason, you should choose plasterboard for bathroom tiles with improved properties.
Exposure to moisture is due to its composition: the material is produced using pressing technology using gypsum and cellulose (cardboard, waste paper).
Standard sheets (GKL) do not stand out from a number of other materials. However, there are fire and moisture resistant drywall: GKLO and GKLV. The last option is preferable when finishing is done in the bathroom. It does not deform even in direct contact with water.
Sheets that are characterized by moisture resistance can also be used as a heat-insulating screen. This property manifests itself provided that the coating is dry. Under the influence of water, the material swells, the lining is deformed, and such a structure will no longer retain heat.
To improve its properties, gypsum is mixed during production with various additives that provide rigidity and moisture resistance.
Properties of drywall
Different types of material differ from each other in some respects. In addition to markings, they also note the difference in shade between standard and moisture-resistant sheets. For example, gypsum plasterboard products are characterized by a gray color. The material with hydrophobic properties is colored green. Other properties of moisture-resistant sheets:
- standard thickness - 12.5 mm;
- inside contains additives that provide moisture resistance, the outer layers are also impregnated with hydrophobic solutions, which contributes to an increase in weight: gypsum board is 2 kg heavier than gypsum board;
- length and width of sheet with hydrophobic impregnation - these parameters do not differ from the parameters of standard material;
- GKL can withstand humidity of no more than 70%, while GKLV is produced for the purpose of installation in more difficult conditions (humidity up to 85%);
- permissible limit of moisture absorption - up to 10%;
- Considering that there is a gypsum layer inside, and the degree of adhesion between this material and cardboard is so high that it is not possible to separate the layers, this means that the strength of gypsum plasterboard is not inferior to some other types of coatings, so it will last a long time (in suitable conditions).
The nuances of working with different surface materials
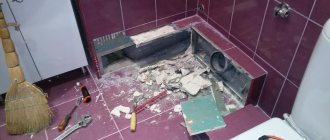
There is no fundamental difference in the technology of leveling walls, depending on the material from which they are made, in modern buildings. The exception is old brick houses, where the walls of the bathroom and bathroom are laid out in one brick, and the plaster is made over a metal mesh.
It is very difficult to remove the plaster layer, since there is a high probability of destroying the wall. Therefore, they resort to partial cleaning of the peeling plaster after tapping the walls.
If you had to remove the mesh and remove the plaster completely, the brick must be treated with coating insulation before plastering. This way the wall is protected from destruction due to high humidity.
If the walls are made of plasterboard or wood, they are easier to replace.
Advantages and disadvantages
If the possibility of laying tiles on drywall in the bathroom is being considered, not only its properties are studied, but also its positive and negative qualities are taken into account. Advantages of the technology for installing ceramic coating on gypsum boards:
- Drywall allows you to hide defects, not only small ones, but also quite large ones. Walls and partitions do not have to be leveled, this is due to the fact that the sheets are installed next to a vertical structure, as a result, the cost of building materials is reduced, because sometimes, in order to level the surface, it is necessary to apply several layers of plaster and putty.
- GKLV is mounted on a metal frame, which additionally contributes to strengthening, while a gap remains between the wall and this structure.
- The sheets are durable and moisture resistant, which means that in terms of key properties they are not inferior to other materials that are used as a base for tile coverings.
- Due to the fact that gypsum board can be used as thermal insulation, it becomes possible to additionally insulate the structure, which will help reduce heat loss and space heating costs.
- It is possible to adjust the plasterboard for the bathroom to match the tiles in accordance with the project, and you can get a product of any size, since the sheets are easy to cut, in this case a sharp knife is used.
- Saves time during installation.
The disadvantage of moisture-resistant sheets is their higher price compared to standard drywall. In addition, installation reduces the free space in the room. This minus is significant if the bathroom is small. Otherwise, covering the walls with gypsum board sheets will not greatly affect the total area.
Despite good moisture resistance, the coating absorbs some moisture, but within normal limits.
Preparing walls for tiles: solutions for the bathroom
Peculiarities
Modern tile adhesive allows you to stick it to almost any surface, even paint. But the peculiarity is that high-quality repairs do not depend on glue and tiles, but on the preliminary preparation of the walls. They should be close to a perfectly level state, without any “wobbly” areas. Only after this can you begin laying the tiles.
Thus, despite the fact that minor differences not exceeding 5 centimeters can be leveled with cement-based glue or a special mortar, it is still recommended to take a spatula or sandpaper and clean the surface of dust, dirt, “hanging” plaster or paint. In addition, so that your work does not turn out to be in vain, do not forget to cover up seemingly insignificant defects (cracks, etc.).
If the wall is significantly uneven, leveling must be planned either using plaster , which requires a large consumption of material, or you will have to do plasterboard cladding (gypsum plasterboard), which sometimes significantly reduces the space of the room. It all depends on what cladding method you decide to use: gypsum board sheets can be glued, or you can erect a frame structure.
How to choose tiles for drywall?
A metal frame is used during installation, but the structure still does not withstand the effects of excess weight. For this reason, it is not recommended to consider products of large thickness for laying on gypsum boards.
It is better not to overload the moisture-resistant drywall in the bathroom under the tiles, since the weight of the entire tile covering and adhesive solution will be significant.
Other selection criteria:
- Quality of tiles: products must be smooth, since installation will be carried out on a smooth gypsum board surface. If you do not pay attention to this parameter, glue consumption will increase due to the need to compensate for material errors by increasing the thickness of the adhesive mixture.
- Products must have a high-quality pattern. If the drawing on the front side is blurry, there are stains, the lines do not match, it is better to refuse the purchase and consider other options.
- It is recommended to use reliable tiles, as this further strengthens the structure. You can identify low-quality products by paying attention to the reverse side - it shines, but on the front side the color is uneven.
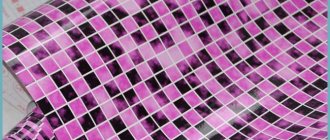
- The tiles are selected taking into account the color scheme of the room. It can match other surfaces or contrast, in which case a bright accent is created in the form of a tiled covering on one of the wall sections.
Finally, a few tips
When working independently, nuances always arise that can affect both the quality of the work and the speed of its completion. Professionals advise:
- Walls under plaster must be thoroughly cleaned. Any negligence can lead to peeling of the plaster layer along with the tiles;
- to avoid mistakes when preparing the solution, it is better to buy ready-made mixtures;
- the plaster must match the material of the walls;
- when choosing a mixture, you should pay attention to what phase of plastering work it is intended for (spray, primer, covering);
- You cannot experiment when preparing the solution - strictly follow the instructions;
- treating walls against fungus and mold is mandatory;
- It is advisable to buy primers and mixtures from the same manufacturer.
How to choose tile adhesive?
If it has already been decided which drywall to use in the bathroom under the tiles, proceed to the next stage - choose an adhesive composition, while considering the varieties:
- Polymer mixtures . They are characterized by increased elasticity, which makes them resistant to temperature changes and constant exposure to moisture. This adhesive is suitable for installing tiles on walls made of different materials. It is distinguished by high adhesion.
- Cement compositions . They are characterized by durability and are relatively inexpensive. However, cement without additives does not last long. It is recommended to consider cement-sand or cement mixtures with various additives. Due to this, the elasticity of the material increases.
- Liquid Nails . This option has a high price. It is used when it is necessary to return a tile that has fallen off to its place. In this case, moisture-resistant liquid nails are considered.
Read more about tile adhesive in the article - Knauf tile adhesive: varieties, application
Care
A plasterboard wall does not require special care.
The tiled wall should be wiped clean from water droplets and water should not be allowed to collect on the floor. You can use non-acid detergents as they will corrode the grout between the tiles.
If the wall is painted, you must avoid getting water on it. Otherwise, wipe immediately. Do not use detergents containing acids and alkalis.
Moisture-resistant green plasterboard is installed in the bathroom. It is fixed to a frame base made of galvanized profiles and the frameless method is not used.
Proper installation of the lathing and gypsum boards will make it possible to cover the wall with tiles and hang shelves or drawers for bath accessories on it.
Step-by-step instructions for tiling drywall
If you plan to finish the gypsum board walls in the bathroom, special attention is paid to surface treatment. The reliability of the coating and the duration of its use will depend on this.
It should be taken into account that with constant exposure to hot steam and moisture, direct contact with water, drywall may swell slightly.
To compensate for this disadvantage, elastic adhesive is used, which will not allow the tile to deform when the size of the base of the coating changes.
Calculation of required materials and layout
Before tackling the question of how to stick tiles onto drywall in a bathroom, it is recommended to decide on the type of finishing material. It is important to know the dimensions of the products. To determine the required number of tiles, measurements are taken on each wall separately. Instructions:
- Determine the length of the surface. 3 mm (average seam thickness) is subtracted from this value, since only internal spaces are taken into account.
- The resulting number is divided by the width of the tile + 3 mm to the size of each product. The result is the amount of finishing material.
- The same principle is used to calculate tiles vertically. However, in this case, the height of the product is taken into account, not the width.
If the calculation results in a fractional number, it must be rounded up. When purchasing, a small margin (10-20%) is added to this value in case the tiles become deformed during installation.
Possible layout options for finishing materials:
- in a straight line, plain tiles are often laid;
- diagonally;
- in a checkerboard pattern;
- alternate wide and narrow tiles.
Preparing the necessary tools
To work you will need:
- rubber spatula;
- cross-separators - allow you to form seams between tiles;
- notched trowel - used to apply the adhesive mixture;
- construction level, the most convenient to use is the laser version;
- tool for cutting tiles according to size: tile cutter, grinder;
- electric drill and a special attachment (ballerina) for making holes;
- construction mixer;
- container where the solution will be mixed;
- a narrow spatula for working with a toothed comb;
- roulette;
- sponge and rags to clean the surface of glue.
Installation of plasterboard sheets
First, metal profiles are installed. They will provide sufficient structural rigidity. The installation step of vertically or horizontally oriented profiles is 40 cm. Then the sheets of drywall are fixed. For this, self-tapping screws and staples are used.
It is recommended to install the tiles on a double layer of drywall.
However, the profile frame must be common.
To strengthen the structure, a reinforcing mesh is used. It is attached using PVA glue and additionally secured with staples.
Surface preparation
The quality of the drywall installation is checked. Using a building level, errors are determined. If there is dust or dirt on the surface, you need to clean it.
However, it is not recommended to use a damp cloth, since contact of the sheets with water should be avoided during the installation process.
The use of reinforcing mesh will not only increase the strength and reliability of the structure, but will also improve the adhesion of the tiles.
To improve the quality of adhesion of materials, a primer is prepared. It is applied to the surface of drywall. A spatula is used for this. Moreover, this procedure is repeated several times. This will enhance the effect of the primer, since the material is partially absorbed and its properties are not strongly expressed.
The break between applying each layer is several hours. The primer must dry. Then work resumes.
Plasterboard putty
The coating should not be completely treated with this composition. Putty is used to fill small cracks in areas where gypsum boards are joined. In these places, the material is easily exposed to moisture, which leads to deterioration of the coating.
You should purchase putty designed for processing drywall sheets.
The result is a monolithic structure with no leaks.
At the next stage, the coating is additionally treated with a primer. However, in this case, the material must correspond to the properties of gypsum board and tile adhesive. The primer is applied twice.
Preliminary marking
It is recommended to start installation from the second row at the bottom of the wall. Mark the line where the tiles of the first row should end, taking into account the gap of +3 mm. Then the number of products in the row is determined. If part of the tiles will be located at the end, it is recommended to start laying from the most open section of the wall.
A laser level is installed along the intended line. Using the resulting mark, a metal profile is mounted. After this, you can proceed to laying the tiles. Installation begins from the second row: the lower edge of the products should be located on the metal profile.
Laying tiles
Immediately before starting work, the adhesive mixture is mixed. It is prepared taking into account the manufacturer's instructions.
It is recommended to use a small amount of glue, then mix the components again and so on until the end of the work, until the wall is finished.
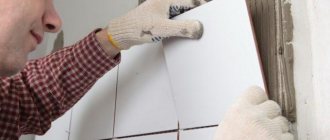
A toothed comb is used to apply the glue. Use a narrow spatula to regulate the amount of composition. The mixture is applied to the wall. Then install the tile and press it to the surface. Use a sponge to remove any remaining glue. As the installation progresses, crosses are used; they help adjust the position of the tiles and the width of the seams.
In difficult areas, cutouts are made on decorative material using an electric drill with an attachment, a glass and tile cutter, and wire cutters.
Grouting joints
They begin work after a few hours, when the glue has dried. For this purpose, it is recommended to use a mixture that is characterized by moisture resistance, sufficient elasticity and strength. A rubber spatula is used to apply the grout. The mixture is applied across the joint. Excess must be removed immediately.
Don’t forget to also look at - Grouting tiles in the bathroom: types, how to choose and use
Installation of beacons on the wall
It is necessary to level the walls under the tiles using beacons. This stage of work will look like this:
- After a certain distance on the wall we install beacons from the profile. The outermost beacons must retreat from the corner at a distance of at least 10 cm.
It is better to choose the distance between adjacent profiles on the wall so that it is slightly less than the length of the existing rule.
- The beacons are secured to the wall with piles of quick-drying mortar or plastic fasteners.
- The profile is pressed into the solution, following the readings of the level and plumb line and focusing on the previously stretched string. In plastic fasteners, the necessary adjustment is made by tightening the screws connecting the profile and the dowel in the wall.
- After all the slats are installed, you need to check again that they are located in the same plane.
USEFUL INFORMATION: Bathtub design with shower: small bathtub with shower corner and separate stall
Seam treatment, priming and waterproofing
When the grout has dried, you can move on to the last stage - applying a primer, which ensures moisture resistance of the joints.
Treatment is carried out only in the area where the tiles are joined.
Use a deep penetration primer. It is applied twice with some interruption. The corner sections of the plasterboard structure are insulated using moisture-resistant tape and cement mortar with waterproofing properties. It is advisable to carry out these works at the initial stage.
Preparation of the solution
When the beacons are securely attached to the wall, you can begin preparing the solution. How to line the walls in a damp room like a bathroom? Only with cement mortar, because gypsum mixtures are afraid of water. Craftsmen prefer to prepare the plaster themselves, mixing cement with sand in a ratio of 1:2 or 1:3. But for an amateur, it’s easier and faster to use ready-made dry construction mixtures.
- First of all, you need to carefully read the manufacturer's instructions. They are located on the outside of the bag.
- If the solution for leveling the wall is prepared from cement and sand, pour the dry ingredients into a container and add water little by little, while simultaneously stirring the solution with a construction mixer or a drill with a special attachment. When using a dry plaster mixture, water is first poured, and the plaster is poured into it.
It is important not to overdo it with water: a solution that is too thin is inconvenient to work with, and the mixture will always slide off the trowel or down the wall. Subsequently, such a solution is subject to significant shrinkage. Ideally, the solution should be slightly thicker than thick sour cream.
It is necessary to use up the prepared plaster within half an hour, so you should not pour the entire bag into the container at once. It is better to prepare a new portion after the finished solution runs out.
After mixing, the solution must be allowed to stand for a while. The time period is usually specified in the manufacturer's instructions.
How to avoid mistakes when laying tiles on drywall?
It is recommended to use the required amount of metal profile, which ensures the reliability of the entire structure. Without this, the drywall will not be attached securely. It is necessary to choose the right materials: tiles, drywall, primer, putty.
In the process of mixing glue, you need to use the exact amount of components and follow the technology.
Additionally, it is necessary to ensure that there are no voids left between the tiles and the gypsum board. Premature commissioning when the glue has not yet dried will shorten the service life of the coating. They also note the importance of protecting seam joints. After installing the tiles, these areas are more exposed to moisture than the rest of the coating area, which means they require more careful treatment.
Determining the thickness of the plaster layer on the wall
To ensure that the base for the tiles is absolutely level, you cannot do without hanging it before installing the beacons. For this you will need:
- plumb line;
- nails;
- strong thread or twine;
- beacons - smooth slats made of wood or metal profile;
- special clamps for attaching beacons to the wall or quick-drying mortar based on gypsum or alabaster.
The technology is as follows:
- We drive a nail into the upper corner of the wall, leaving the head sticking out to the approximate thickness of the leveling solution.
- Using a plumb line, the cord of which is attached to the head of the nail that was just driven in, we drive the nail at the bottom of the wall so that its head also touches the cord.
- We repeat this procedure in the opposite corner of the wall.
- We connect all four nails together with a tightly stretched thread horizontally and crosswise.
In this way, you can determine the thickness of the plaster over the entire wall area. If the layer turns out to be too large or, conversely, somewhere the old surface protrudes beyond the plane of the stretched string, then we make the necessary adjustments.
Applying mortar to the wall
How to properly level walls for tiles? The process goes like this:
- The plaster is thrown into the space on the wall between the two beacons so that its surface protrudes slightly above the surface of the beacons. Usually a trowel or wide spatula is used for this.
- Then a rule is taken, pressed tightly against the profiles, and with wave-like movements in the direction from bottom to top, the solution is leveled along the wall. Excess is sent back to the mixing container.
- By repeating this operation the required number of times, all the gaps between the beacons are filled. It is easier to leave the latter in the walls, but if there is a desire to use them again, then the profiles are removed, and the voids are filled with plaster and smoothed with a spatula.
USEFUL INFORMATION: Do-it-yourself airbrush on a wall in an apartment: how to learn (9 photos)
[smartcontrol_youtube_shortcode key=”plastering walls in the bathroom” cnt=”4" col=”2" shls=”true”]
You may find recommendations to treat the surface that has not yet hardened with a float, but this is only necessary before gluing the wallpaper. We are leveling the wall under the tiles, so we can skip this operation.