How to install a leaking and non-leaking floor in a bathhouse
The leak-proof floor is made of tongue-and-groove boards. They are laid in such a way that the grooves face the inside of the room. But before this, a subfloor is made: beams with a cross-section of 5 × 5 cm are attached from below to the ends of the joists. Cutting boards or slabs are placed between the joists. After which the floor is waterproofed with roofing material or a special film. Then the structure is insulated by pouring expanded clay between the joists. It is covered with a second layer of waterproofing. And only after that the finishing floor covering is laid.
It is advisable not to secure the boards in the washing and steam rooms with nails, which will allow them to be lifted for quick drying. Bars with a cross section of 2 - 3 cm are used as fasteners. They are screwed to the joists with screws - “wood grouse”. The floor can be easily removed later. Space is left between the final coating and the subfloor for ventilation.
Pipes made of asbestos cement, steel or PVC can then be inserted into these holes. The diameter of such pipes varies from 5 to 10 cm.
The boards are laid in such a way that there is about 2 cm between them and the walls for a ventilation gap. They are knocked down starting from any wall. The main thing is that it is parallel to the direction of installation of the boards.
Wood floors in a steam room or washing room cannot be varnished or painted, since such coatings emit harmful substances when heated. In addition, the varnish quickly deteriorates under the influence of constant humidity and high temperature.
Once the first floorboard is laid, it is secured with nails. The length of the nails should be twice the thickness of the boards. They are driven into the floorboards at an angle of 45° along the desired edge, retreating about 15 mm from it. Each board is nailed to the beam with at least two nails.
The second and other boards are fastened at a distance of 3-5 mm from each other. A piece of plywood or a sheet of fiberboard is suitable as a template here. And such a floor arrangement is required in the washing compartment and steam room. In the remaining rooms of the bathhouse, the boardwalk can be continuous.
Below is a video on how to make floors in a bathhouse of a leaky and non-leaky design:
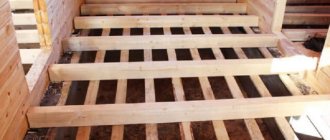
Installing floors on joists
To create a ventilated space under the floor with a drain, you will need logs with a cross section of 100x200 cm, which will be laid at a distance of 55 cm from each other. From below, bars are nailed to the installed joists, which serve as the basis for creating a subfloor. The thickness of the floor boards in the bathhouse should be approximately 20-30 cm.
Waterproofing material is fixed on top of the installed subfloor. When building a concrete floor on joists, it is better to choose more plastic materials than roofing felt. Then the heat-insulating material is laid. As when creating a concrete base on the ground, a reinforcing mesh is laid on the insulation.
The final stage is pouring the floor and finishing it with tiles or wood. When installing a wooden structure, it is necessary to take into account that the distance between the boards should be about 1 cm. This will facilitate the rapid flow of water into the drain.
Selection of materials
For the drain line, as a rule, a PVC sewer pipe with a standard diameter of 100 mm is used. The mainline is assembled from two-meter or meter sections, which are joined together using the existing sockets at the ends.
To connect a simple drain that does not have a side outlet, you will need to use a standard elbow to the drain pipe.
There should be an O-ring inside the elbow
At the same time, the sewer drain itself has a standard design in various variations. For a bath, you can choose either the simplest or the most complicated, since such products come with various additional functions.
The tightness of the device is of great importance for the operation of the drain system, so before purchasing a drain it is recommended to assemble the device and evaluate the tightness of the parts
Also, to construct a drainage line, you may need a sewer tee with a branch at forty-five or thirty degrees.
You will need a tee if you want to make additional drainage from the sink
In addition to PVC parts, we will need “cold” mastic to seal cracks if the sewer pit is equipped with an iron barrel. This material is sold in metal cans in construction hypermarkets. Before purchasing all the parts and consumables, it is better to make a list.
Mastic can be purchased at any hardware store
Selection of sewer pipes
A correctly made slope at the base of the ladder does not guarantee the rapid evacuation of water masses from the room. In this matter, the choice of sewer pipes is not the least important. Since the bathhouse uses a non-pressure liquid discharge system, it is advisable to use the following pipes to install the hydraulic apparatus:
- The minimum diameter of the pipe should be 50-60 mm, and the thickness of its walls should be at least 3-4 mm;
- It is advisable to assemble the external pipeline from PVC materials, since they are more frost-resistant;
- During the installation process, pipes are laid in the soil at a level that is below the freezing point.
Soil filtration method
The most important part of such a system is an autonomous septic tank, which is both a septic tank and a distribution well. Sewage pipes extending from it distribute filtered water to different places on the site.
You can buy a septic tank in one of many stores, or you can make it yourself. If you choose the second option, it is best to make the structure from metal or plastic tanks. A structure made of concrete rings, as well as any other structure made of brick or concrete, is also effective.
First of all, a septic tank is installed. The container is dug to a depth of 1 to 2.5 meters. There is no need to install a tank lower, as problems may arise during wastewater treatment. Next, a sewer pipe is laid to the septic tank, which goes deep below the freezing depth of the soil. Now you can start preparing the drainage pipes.
The length and thickness of the pipes are determined by the amount of wastewater discharged. Often, 11 centimeter plastic sewer pipes are sufficient. Holes are made in them, taking into account that they should be smaller at the top than at the bottom. This is necessary to ensure that the water drains evenly. In addition, at the beginning of the pipe, holes are made more often, and then as they move towards the end of the pipe, they are made less and less often.
For a more correct construction of the drainage system, you need to adhere to a number of rules:
- the length of each drainage pipe should not exceed 25 meters;
- pipes should be laid to a depth of about 150 cm, but below the depth of soil freezing;
- the distance between drainage pipes must be at least 150 cm;
- the ditch for laying pipes must have a width of at least 50 cm, preferably 100 cm.
After preparing the pipes, you can begin laying them in the following sequence:
- We dig ditches of a certain size. We take into account the slope of 1.5 degrees, from time to time we control the desired slope, for example, with a building level.
- Depending on the type of soil, we prepare the base of the trench. If the soil is clayey, then at the bottom we make a 10-centimeter sand cushion, and on top of the same thickness a layer of gravel. To prevent pipes from silting on loam soils, they need to be wrapped in a layer of some filter material. A gravel cushion is optional in this case. For sandy soils, cushions of sand and gravel are laid, and the pipes are wrapped in geotextiles.
- Next, the drains are filled with a 10-centimeter layer of gravel, and the entire trench is covered with earth.
- The filtration system must be equipped with ventilation. To do this, we install a ventilation pipe approximately 50 cm high at the end of the drainage pipe. A protective element is mounted on top of it to prevent various debris from getting into the pipe.
A properly designed and installed drainage system will ensure its long-term and trouble-free operation. The bathhouse will thus be maximally protected from such adverse effects of moisture, and there will be no pollution of the area by wastewater.
In any case, it is necessary to install a sewage system in the bathhouse. This means that this issue must be taken extremely seriously, without ignoring any nuances. Only in this case will the bathhouse please the owner with long-term and trouble-free operation without the need to invest more and more funds into it.
How to make a wooden floor in a bathhouse with drainage
Do-it-yourself bathhouse floors are most often made of concrete or planks. Wooden floors in the bathhouse are laid out from boards with a cross-section of 15x5 cm, attached to logs (logs with a cross-section of 14-18 cm or timber 15x15 cm).
Before making a floor in a bathhouse, keep in mind that they can be leaky or non-leaky. For leaking wood floors, slots are provided to allow water to drain, which will subsequently be absorbed into the ground under the bathhouse. The floor is removable because after visiting the bathhouse it is lifted and dried. It cannot be insulated, so it is suitable for areas with warm climates.
Non-leakage wood floors have a structural slope: along it, water flows into a drain, from where it enters a drainage basin and then drains into a settling tank through a special outlet. This design is possible with insulation, but is quite expensive.
Before making a wooden floor in a bathhouse, a frame is created from logs (type of wood - pine or larch). Be sure to provide for a slope of the floor to drain the water in the bathhouse, and to avoid sagging of the logs under load, columns of brick or concrete are placed under them. If the supports are brick, you need to make reinforced concrete platforms more than 20 cm thick and 5-7 cm larger than the perimeter of the column itself on each side.
For concrete supports, prepare holes about 40 cm deep, carefully compact their bottom, pour a 10 cm layer of sand, then compact it, after moistening it with water. Then crushed stone is poured in a layer of 15 cm. A formwork is constructed that protrudes 5 cm above the ground.
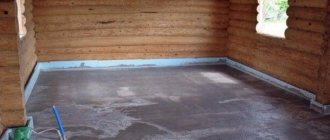
Before making a floor in a bathhouse with a drain, be sure to provide a slope towards the drain hole. If the floor is leak-proof, the slope is not necessary. The edges are insulated with roofing felt. Pour a thick concrete solution in the following proportion: 1 part cement, 5 parts crushed stone and 3 parts sand.
A reinforcing mesh is laid above the crushed stone at a level of about 5 cm, the concrete is evenly distributed by bayonet, then a layer of concrete is poured again and compacted again.
To waterproof the site, after the concrete solution has completely dried, it is treated with molten bitumen and roofing felt is glued onto it.
In the process of laying the floor in a bathhouse, remember that the top cut of the support column must be at the same level as the top cut of the foundation if it is strip. With a columnar type of foundation, the logs are supported on the beam of the embedded crown, therefore, the upper cut of the supporting columns is flush with the beam.
How to arrange floors in the washing area of a bathhouse
This is a room with a constantly high level of humidity, which means the flooring in it must:
- breathe and dry quickly;
- withstand temperature changes;
- not be prone to drafts;
- well ventilated.
Let's consider options that meet these requirements.
Floor structures for washing area
They should not be synthetic - chemistry is unacceptable where surfaces are heated. Clay is morally obsolete: it is environmentally friendly and does not need protection from water, but it cracks easily. But concrete, with its moisture resistance and strength, is relevant today. It is not inferior in popularity to oak, alder, and larch with their excellent thermal insulation and beautiful appearance.
Wooden floor
It is better to make it from coniferous wood, because the resin it secretes, firstly, has a healing effect on the body of the steamer, secondly, it will protect the feet from slipping, and thirdly, it will extend the service life of the flooring. Naturally, in such a room it is better to impregnate it with compounds that protect against fungi, rot, and water.
Selection of drain pipes
Here it is important not to save money, but to use high-quality plastic, because it is not afraid of corrosion, does not get wet, is easy to process, and lasts 50 years or longer. Therefore, buy pipes made of PVC, PVC, HDPE, corrugated and smooth, with a diameter of 50 mm (for moisture removal) and 100-110 mm (if several drain points are planned).
Material calculation and tools
In addition to the communication elements already mentioned, a professional will need:
- adapters with a section of 50 to 110 mm - for connection;
- 3 elbows with an angle of 90 degrees;
- 3 tees 110 by 100 by 90;
- vertical pipes - to organize receivers;
- sand-cement mixture.
To carry out the work you will need:
- Bulgarian;
- level-level;
- bayonet shovel.
How to properly pour a concrete floor in a washing bath
Specialists work according to the following scheme:
- lay a 15-centimeter gravel layer;
- insulate the area with felt 3-5 cm high or pearlite-cement screed;
- create a surface of concrete, and when it sets, cover it with a self-leveling compound.
After complete hardening, decorate with finishing and install the drain.
Other types of coatings
You can also make an earthen one: to do this, just cut off the top layer of earth (15 cm) around the entire perimeter of the future room, and compact the rest.
Another option is clay, which quickly absorbs and releases heat and is environmentally friendly. But, having coated a room with such material, be prepared for cracks on the surface and the appearance of a swampy smell.
Also, following long-standing customs, you can dig a pit, fill it with sand and gravel, place boards on top - you get a minimalist design.
Coating
Wooden elements should be protected with an antiseptic - such that it does not contain salts and heavy metals, does not change the texture of the board and reliably protects it from rotting, fungi and other biological damage. Upon completion of all installation work, it is also necessary to carry out varnish treatment, properly preparing the surface for it, that is, clean it, sand and dry it. It is worth applying in several layers (2-3 will be enough), and after waiting for complete drying, be sure to heat and ventilate the room. Painting is also permissible, but only with a composition that does not release any harmful compounds when heated.
You can also use folk remedies, for example, sunflower oil squeezes. They cover the boards 2-3 times (each after 2-3 days), as a result of which the wood receives an aesthetically attractive shade.
Why is concrete flooring preferable?
Installation of beacons and creation of screed with a slope towards the drain
How to pour concrete floors correctly? It is worth considering that non-leaking floors must have a slope. Otherwise, the water will not go down the drain without “help.” What should be the structure of the concrete base in the bathhouse? To properly pour the cement mortar and make the desired slope in the floor, you should adhere to the following recommendations:
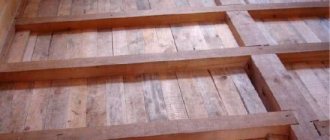
- In the case of arranging the foundation on a strip or pile foundation, first of all, floor joists are laid;
- The subfloor is subsequently attached to the joists. Skull blocks are nailed to the bottom of the joists, onto which boards are thrown;
- Heat-insulating materials (foam plastic, polystyrene, mineral wool) are placed in the sections between the joists;
- Then a sewage system with a siphon is installed in the washing department;
- After installing the hydraulic component of the floor, the wooden sheathing is sheathed with DSP sheets;
- The slope of the base for normal water drainage should be approximately 30 mm per m2;
- Cement mortar is poured onto the prepared subfloor;
- After the screed has hardened, a drain ladder is installed and a finishing coating (wood, tile) is laid.
Many experts consider installing a concrete floor in a bathhouse to be an economically correct and profitable solution. This method of flooring is supported by the long service life of concrete. A high-quality screed can last more than 30 years. Among the advantages of this floor it is worth noting:
- Resistant to temperature changes and high humidity.
- Doesn't rot.
- Harmful microorganisms and fungi do not develop on concrete.
To care for a concrete floor, you do not need to buy expensive household chemicals. In addition, you have the opportunity to decorate the floor, for example, with tiles.
Drainage arrangement
A lot of water is used in the bath. This suggests the need for drainage facilities. Before concreting the floor, a drainage system should be designed and implemented. To do this, you need to determine the point that will allow you to most easily equip the sewer system. At this point, an intermediate tank should be placed, which can be made in the form of a small pit with a size of 40x40x30 cm. The simplest method of treating a pit is concreting, with a layer of at least 5 cm.
Then a drainage system should be made from this reservoir into a sewer hatch/septic tank. For these purposes, you can use a fan pipe with a diameter of 200 mm.
The soil should be leveled and then compacted. Then fill the floor with coarse gravel 15 cm thick. The gravel can be replaced with broken bricks. The next layer is crushed stone 10 cm thick.
Insulation
To significantly reduce heat loss in a bathhouse, the concrete floor should be insulated. This is done after the first layer of concrete has hardened. Expanded clay can be used as insulation. It needs to be covered with a layer of 5–8 cm.
This is not the only insulation that is suitable for arranging a concrete floor. Often construction felt or mineral wool is used for these purposes. But, it is worth considering the fact that when installing mineral wool as insulation, you will have to additionally waterproof it. Roofing felt can be used as a waterproofing layer.
Another option for floor insulation is pouring cement mortar with perlite (a rock of volcanic origin). It began to be used in this direction relatively recently. The advantages of this component are high water absorption and thermal insulation characteristics.
Mixing is done in a concrete mixer
A second concrete layer should be poured over the insulation or waterproofing (this depends on the insulation material you installed). In this case, it is necessary to lay a reinforcing mesh (this can be wire or reinforced mesh) before pouring concrete. In order for the resulting concrete to be strong, it must be compacted, leveled, and tension concrete poured on top.
The screed needs to be poured in one go, so you need to act quickly. Start pouring from the far corner, leveling the solution with a trowel. You need to tighten it with a rule in a circular motion, which would be directed towards the exit from the room. After the screed must harden, this process takes several days.
With the addition of plasticizers, the hardening process of concrete is accelerated. They, among other things, increase the strength of concrete, reliably connect the components of the mortar together and prevent the possibility of cracks.
The quality of the surface is determined after the concrete has completely dried. If the screed has a uniform gray tint, this indicates its uniformity. In addition, durable and high-quality concrete will not show noticeable marks from a hammer blow.
Finishing
Ceramic tiles are most often used to finish concrete floors in bathhouses. The tiles will also look impressive. A significant drawback of tiles is that when wet, they become slippery, which increases the risk of injury. Therefore, from a practical point of view, it is better to lay Metlakh tiles on the concrete floor.
today are considered the most appropriate option.
We invite you to familiarize yourself with the Bathhouse with barbecue and swimming pool
For a bathhouse, one of three floor options is usually chosen: adobe, wood and concrete. To understand why the latter option is preferable, it is worth taking a closer look at the features of all materials.
What kind of floors can be made in a bathhouse:
- Clay - the oldest option, made in the format of a compacted dense layer of clay and acting as a water seal, where a drain was created outside the building. A layer of wood was laid on top of the clay, which had to be dried and ventilated after each visit to the bathhouse. Today, clay is no longer relevant, as it is not very comfortable to use.
- Wooden floors are made from species that are resistant to water. They are easy to install, warm, and make it easy to install a water drainage system. But in any case, wood and water interact poorly - wood is susceptible to the spread of insects, rodents, and microorganisms. It would be possible to protect the material from these influences with special impregnations, but they can be dangerous to human health.
- A concrete floor on the ground in a bathhouse is the most relevant option today: it demonstrates excellent strength, resistance to moisture, lasts a very long time, provided that a layer of thermal insulation is installed or a floor heating system is installed, it is comfortable to use. You can lay any coverings on concrete or leave the surface in its original form by installing wooden flooring.
Prepare materials, tools and equipment. For pouring you will need gravel, sand, cement, a concrete mixer, usually a container for mortar, a trowel and a level. The amount of materials depends on the size of the bathhouse and the thickness of the concrete. The minimum pouring height cannot be less than 10 cm. To increase the stability of the structure, it is recommended to use building reinforcement of a periodic profile with a diameter of 6–8 cm or metal mesh.
Step 1. Remove fertile soil and large construction debris from the site. If possible, treat the soil with special products to prevent weed growth.
It is necessary to remove grass and large stones
Prepared base
Step 2. Using a laser or water level, make a zero floor mark along the perimeter of the foundation. It is from this mark that the depth of concrete placement and the thickness of all layers will be controlled. Calculate the parameters and, if necessary, deepen the pit. The soil can be removed manually, but you should constantly check the horizontal surface of the bottom.
Step 3. Begin filling the pit with gravel.
Beginning of backfilling, first layer
The thickness of the material is within 15–20 cm. It should be filled in layers of approximately 10 cm, then the gravel is leveled and compacted. Leveling is much easier with an ordinary metal rake.
Backfilling in layers of 10 cm
It is recommended to use screenings with fine crushed stone for the first layer; it compacts better and holds loads. If the floors are poured in several rooms of the bathhouse, then work should begin with the most distant one; the material can be transported along wooden ladders. Due to this sequence, the need to re-level the bedding is eliminated.
Step 4. Each layer of bedding must be compacted separately. This can be done manually or using a special unit. Working manually is long and difficult, and the quality may be unsatisfactory; professionals recommend using vibrating plates.
Tamping with a vibrating plate
You should go over one place at least three times, fill large depressions immediately, and remove the mounds. The smoother the bedding, the less expensive concrete will be needed to fill the floor.
Step 5. After tamping, you need to pour a layer of crushed stone of fraction No. 10–20 with a thickness of 10–15 cm. After leveling, tamping follows, the algorithm for performing the work is the same as for fine crushed stone with screenings.
Loading crushed stone
Another layer is filled
The thickness of each layer should be controlled according to the marks previously made on the foundation tape.
Leveling the crushed stone layer
Step 6. Prepare the last layer; you can use sand or fine screenings for it. Choose the material that is cheaper in your region; from a practical point of view, there is no difference. After leveling, tamp down thoroughly. It is advisable to moisten the last layer with water and let it stand for at least one day, during which time the bedding will shrink and gaps and other problem areas will be revealed. They must be removed immediately and compacted again.
Sand filling
Elimination, backfilling
Step 7. Install the beacons according to the selected thickness of the screed. Beacons are much easier to install using a laser level. Drive wooden pegs or pieces of metal rod into the bedding along the beam line. If there is no laser level, then the outer beacons can be set at the water level, then stretch a rope between them and adjust the height of all the remaining ones. The distance between the beacons is 40–50 cm. The width of the lines should be 15–20 cm less than the dimensions of the plaster.
Step 8. To increase the strength of the concrete floor, use reinforcing mesh. Raise it above the bedding; the mesh should be located approximately 1/3 of the height of the concrete. Building codes prohibit placing it in the middle of concrete; in this position it does not strengthen the structure. To raise the mesh, you can use various supports or pour a little concrete under it with a shovel and lift it off the ground with your hands.
Welded mesh laid
What should the floor be like in a bathhouse?
The floor in the bathhouse is subjected to serious loads, namely the effects of water, hot steam and temperature changes. Therefore, the floor in the bathhouse must be not only durable, but also functional - with an effective drainage system. The durability of the bathhouse and the correct microclimate inside depend on its quality.
Regardless of the chosen method of arranging the drainage and drainage system in the bathhouse, the floors must meet the following requirements:
- The floor must be strong and reliable;
- When moistened, the material should not slip, and when exposed to high temperatures, it should not overheat.
- When using a bathhouse in the cold season, the floor surface must be warm.
- The flooring material must be moisture resistant and easy to maintain.
- Water from the surface must be removed as quickly as possible.
A practical option for installing a floor in a bathhouse is ceramic tiles
Wooden floor
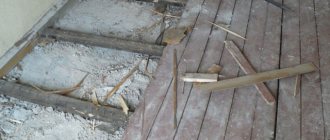
Wooden floors in a bathhouse may or may not leak. Floors of non-leakage construction are installed on a concrete screed that has a slope towards the drainage of water. Such floors take a long time to dry, so they quickly rot.
A leaky floor is much easier to operate and install. To drain the water in a wooden bathhouse, in this case the flooring of the boards is not nailed to the joists. It is simply laid, leaving a gap of 5 mm between the flooring boards. Water leaves the floor surface through these gaps, which also act as a kind of fan. These floorings can be removed and dried at any time.
In case of a leaking floor, it is necessary to organize a sealed pit under the bathhouse. from which water will then be drained through a pipe, for example, into a drainage pit. Also, you will need to make a water seal in the pit to prevent unpleasant odors from entering the room.
Concrete floors
The construction of a concrete floor requires the following layers:
- compacted layer of crushed stone;
- sand-cement mortar;
- a layer of vapor barrier material;
- insulating layer made of expanded polystyrene;
- cellophane film for waterproofing;
- another layer of sand cement;
- mesh of reinforcement covered with concrete screed.
Finish coating
It is allowed to use a special stable varnish as a finishing coat. Before application, the surfaces should be sanded and the dust thoroughly vacuumed. For grinding, it is better to use an electric machine; it not only makes the work easier, but also significantly improves the quality. You can never make such a smooth surface with your hands.
Floor sanding
Alternatively, you can sand the floor by hand.
Acrylic wear-resistant varnishes have proven their good performance in practice. If the manufacturers are responsible, then the floor will be used for a long time; no periodic repair work will have to be done due to wear and tear of the finishing coating.
You can cover it with an ordinary paint brush, the number of layers is at least two. Moreover, when covering with the second layer, the brush should move in a perpendicular direction to the first. For steam rooms, it is recommended to apply three or four layers of varnish, which increases the service life. Each subsequent one is applied only after the previous one has completely dried; there is no need to try to reduce the number of layers by increasing the thickness of each. Such a gross violation of coating technology has extremely negative consequences.
The floor is covered with wear-resistant acrylic varnish
After completing the work, it is recommended to ventilate the steam room for several days, during which time unpleasant odors and harmful chemical compounds will be completely removed. After the first warm-up, ventilation also needs to be repeated, and only then is it allowed to enter the steam room.
Drainage arrangement
Layout of the drain for draining water in the floor
There are recommendations from some builders to make the floor in the bathhouse heated. Of course, you can listen to them, but we do not recommend doing so. Why? Firstly, the floor in the bathhouse is already warm; in principle, it cannot be cold. Secondly, electrically heated floors require special wiring; the total installation power exceeds 5–7 kW.
We invite you to familiarize yourself with Do-it-yourself soft roof repair
For rooms with high humidity, there are very strict safety requirements of the PUE; it is difficult and expensive to comply with them in full. Thirdly, if you are afraid that your feet will freeze, then it is much easier to make wooden grates. Place them not only in the bathhouse, but also in the dressing room and other rooms. It will be very cheap and will make washing comfortable.
Wooden grate on the floor
Drawing of a wooden grate for a bath
Keep in mind that the larger the tiles, the more difficult it is to lay them on a slope. All corners are located in different planes; it will not be possible to make the joints smooth. The best option is to use mosaic tiles. This material makes it possible to make any turns and tilts; a large number of small plates correct minor errors.
Step 1. Take four tiles, place them with corners on the drain and mark the diameter of the hole on them. Using a grinder with a diamond blade, carefully cut out the holes.
Step 2. All tiles near the drain should have a slope in two directions. We have already mentioned that there is no need to make a large angle, a few millimeters are enough. Small slopes can be made with glue; for larger ones, you will first have to screed or use cement-sand mortar for gluing.
Step 3. Throw the material under the surface of the first tile, put it in place and gradually push it in with your hands so that the drainage point is the lowest. Immediately control the amount of tilt. Place the remaining tiles near the drain in the same way, making sure that they all slope towards the hole.
Checking the levelness of the floor
Application of the solution
Leveling the solution
Step 4. Finish the first row, while controlling only one plane between adjacent tiles. This is much easier than setting two planes at the same time.
Applying mortar to tiles
Tile laying process
Step 5. The position of the tiles of the second row must be controlled according to two parameters. The edges must be located in the same plane as the first row and be parallel to each other.
First, it is recommended to lay four tiles around the perimeter of the drain and allow time for the glue to harden. The fact is that these tiles will be used as a template in the future; any displacements are strictly not allowed. The position of the others is constantly monitored using the first tiles; the load on them during the work is the greatest.
Trimming tiles
Slope check
Step 6. It is recommended to continue further work in parallel rows. If you have concerns about your qualifications, you can increase the area of the square plot by alternately laying tiles on each side of the square. This algorithm requires much more time, but allows you to correct mistakes in a timely manner. For beginners, it is advisable to first lay out the tiles dry and use supports of varying thicknesses instead of glue.
Tile marking
The process of laying tiles near the ladder
Tiles laid near the ladder
Laying is controlled by level
Drain in the corner, tiling completed
The larger the floor area, the longer the level should be. The tool must simultaneously control the position of at least three tiles; this is the only way to avoid kinks. The seams are sealed after the glue has completely hardened; with their help, you can slightly smooth out the sharp joints of the tiles.
Tile grout
At this point, the work on pouring the concrete floor in the bathhouse is completed, and you can begin finishing the interior surfaces of the room.
Installation of the log system
A mandatory stage in the construction of floors in a bathhouse, in which experts recommend laying the beams horizontally (if there is already a layer of waterproofing), and at a slope of 3 to 100.
Before making the flooring, the master must make sure that the levels of the foundation and coating match. If a leak-proof design is chosen, it is permissible not to fix the floorboards on the joists; in other cases, they need to be secured - each with a pair of nails (on both sides of the plank, driven in at 45 degrees)
Attention, it is advisable to tighten the tongue and groove boards first, and they should be finally hammered in only after finishing and drying. At the final stage it is necessary to frame it with a plinth.
Floor level
The concrete floor in the bathhouse can be created on the ground or on a structure made of logs. In the first case, its level will be located significantly lower. The height can be calculated based on the thickness of the sand cushion, insulation and concrete layer. It is worth remembering that the concrete floor should not be located higher than the top of the basement of the bathhouse.
When creating a concrete floor using joists, it is necessary to make holes in the base so that the underground space can be ventilated. If this is not done, the joists may begin to rot. To properly make a concrete floor with a drain, you need to consider each option for creating it.
Drainage well
This system can only be installed in an area where groundwater flows at great depths. Otherwise, due to its design, such a well will always be filled with groundwater, which will make it impossible to collect wastewater in it.
First you need to decide on the location of the well; it’s good if the gap between it and the bathhouse is about 2 meters. At large distances, problems may arise when creating the desired slope of the drain pipe. At the same time, placing the well too close will lead to the foundation getting wet and subsiding in the future.
Now you can decide on the material for installation. This will usually be affected by the type of soil, because if the soil is crumbling, the walls will need to be reinforced, and this is a fairly common occurrence.
You can strengthen walls using the following methods:
- Dig a container made of plastic or steel that has no bottom. Holes will need to be made in it to allow water movement.
- Lay the masonry in half a brick, taking into account the gaps for water drainage. Alternatively, you can use wild stone for installation.
- You can take tires and stack them on top of each other. They need to cut off the edges and cut holes for water to escape.
- If the well is rectangular, its walls can be reinforced with sheets of corrugated slate. The laying should be such that the waves of the next sheet look perpendicular to the waves of the previous one.
Sequence of construction work:
- We make a hole for the well. It is better if its shape is in the form of a cylinder, in which case the pressure on the walls in all places will always be the same. Also, such a pit will be repaired noticeably less often.
- We strengthen the walls using one of the methods described above.
- Prepare the layer for filtration. At the bottom of the well we make expanded clay, crushed stone backfill, or a cushion of broken brick. A layer of sand is poured on top.
- Now you need to install a sewer pipe. To do this, you need to dig a ditch with a slight slope towards the well. A slope of 10 mm per meter of length is considered sufficient. It is worth remembering that the pipe must be laid below the freezing depth of the soil. Next, the pipe outlet can be inserted into the well.
- Install the well cover. It can be either concrete or steel, but it must be removable, because about once every 6 months the well will need to be cleaned and the filters replaced. Now cover the lid with film and fill it with soil.
The drainage well is now ready.
Devices for receiving wastewater
In former times, wastewater went through cracks in the floorboards under the floor, and from there seeped into the ground. If the bathhouse is used occasionally, for example in a country house, and the number of people steaming is small, this technique can still be used now. But this option is only suitable for summer, since cold air will flow into the bathhouse through the cracks in the boards.
Therefore, a drain well is much more often used, which is placed near the bathhouse, if possible in the lowest place. Dig a hole no closer than 1 m from the bathhouse and 1.5 m deep. Effluent will flow into it through a sewer pipe laid under the floor
It is important that the sewer pipe is laid at a level where the water does not freeze, that is, from 0.5 m in the southern regions to 1.5–2 m beyond the Urals and in Siberia
Sealed pits
It is advisable to install such wells on clay soil, which prevents the movement of wastewater deeper. When constructing wells, the bottom is additionally concreted to create an airtight container. After the concrete has hardened (which will take four weeks), concrete rings are installed and the hole is covered with a lid.
Good sealing is ensured by a large plastic container. A hole is cut in the side for a sewer pipe with a diameter of 100 mm, coming out of the foundation of the bathhouse. At the top you should make a smaller hole for ventilation, into which a small piece of pipe is inserted.
There are two ways to remove wastewater from a sealed pit: scoop it out with buckets or call a special sewer truck. This is troublesome, therefore, if the soil allows, it is preferable to make a well, the waste water from it will go into the ground.
Drainage well
If the bottom of the well is sandy and the groundwater is deep, make a well without filling the bottom so that water flows into the hole and goes into the ground. In this case, its walls can be strengthened with old tires from car wheels, and a layer of crushed stone, broken brick, and pebbles can be poured onto the bottom as drainage. Then the wastewater will go underground, undergoing treatment. In addition, the walls and bottom of the well will become covered with silt, and bacteria will settle in it, which will also contribute to the biological treatment of wastewater.
The simplest drainage well can be a pit under the floor, located near one of the walls of the bathhouse. Its dimensions are small: 50 cm wide and 60 cm deep. Through pipes or gutters, water flows into it from the washing room and goes into the ground. It is necessary that it has good throughput, that is, clay is absolutely not suitable for constructing a pit. There is one more limitation: the pit can only be constructed with a pile foundation.
Drain into the ground and filtration
In those days when there was no sewage system, the water in the bathhouse did not stagnate and was not scooped out with buckets. It went under the floor through cracks in the floorboards and was absorbed into the ground. The only important condition was that the building should not be built on clay soils, which would prevent runoff from penetrating into the ground.
To filter the flowing water, you additionally need to pour drainage with a 50 cm layer of crushed stone or expanded clay and sand in the space under the washing room floor. Thus, drainage will be carried out from the bathhouse, which does not have a sewerage system. Another option, more complex, is the drainage well described above.
Main stages of floor construction
Upon completion of the arrangement of the drainage and sewer system, we begin to form the foundation for the future floor. For this:
We create a cushion for pouring concrete mortar, which allows us to limit heat loss. We deepen the soil by 50 centimeters. Three quarters of the total volume is filled with construction waste that is not subject to rotting processes. We cover the resulting surface with clay and, after drying, pour a fifteen-centimeter shock-absorbing layer of sand with fine gravel or crushed stone. This level will allow the absorption of moisture that results from temperature changes. We carefully compact the layer, maintaining the slope specified by the project. Pour the first layer of concrete mortar. If possible, we use perlite additive - an excellent heat insulator.
When working with perlite, pay attention to its properties - especially fine fraction and minimal weight. When mixing the concrete solution, use a room protected from the wind to avoid increased dust formation.
The thickness of the first layer of concrete when pouring the base should not exceed 4-6 cm. We isolate the joints between the base and the walls from moisture penetration with bitumen. We wait for the solution to dry. It depends on weather conditions, the period ranges from several days to 2-3 weeks. We lay thermal insulation material. To prevent it from being damaged by moisture, it is advisable to additionally use roofing felt for insulation.
The next stage is pouring the floor in the bathhouse with a second layer of concrete mortar. At this stage of work, a reinforcing mesh is used to protect the cement base from cracking during operation. We compact the concrete, trying to get rid of air cavities as much as possible. Leave the surface alone until completely dry. To ensure that concrete sets evenly during the hot season, we moisten the base using a sprayer.
The final stage is applying the cement mixture to the entire surface and leveling the concrete according to the rule. Make sure that the slope of the covering is correct towards the drainage hole. Apply deep penetration waterproofing impregnation to the finished base.
We would like to focus your attention on the fact that if you do not plan to use the bathhouse during the cold season, then when mixing the concrete solution, you can exclude perlite from the recipe. Use the usual cement-sand composition of one to three, adding 1/10 of lime
This will reduce financial costs without reducing the strength of concrete.
How to fill floors
Casting a waterproof screed is the main stage in the construction of floors with a drain. Afterwards, all that remains is to make a light wooden flooring or lay tiles. Before pouring the screed into the bathhouse under the drain, formwork must be made.
If conventional screeds are cast from liquid concrete (its fluidity is used to level the front surface), then for a floor with a funnel-shaped recess or slope this is unnecessary. The solution is mixed to become thicker. It is permissible to use various lightweight screeds with porous filler if the manufacturer of the mixture provides this.
Important! Pay attention to the finishing grouting of the inclined screed. Water will not stagnate on a smooth surface. This will protect you from the appearance of an unpleasant odor in the bathhouse.
The slope of the floor in the bathhouse for water drainage should not be made too large. This is a common mistake that results in unnecessary loss of height in the room (increasing the distance between the number floor and the drainage screed). A slope of 1-5 degrees is sufficient. To measure, use a two-meter ruler (the rule for leveling screeds) and a funnel surface template.
The values are calculated in advance.
For example, for a 2x2 m sink, the recess in the center of the floor will be about 7 cm.
The thickness of the screed will be 14 centimeters.
You should not make the screed too thin in the center, but if you lay a reinforcing mesh (for example, a plaster mesh made of thick wire), then the thickness of the concrete in the thinnest place can be 3 cm.
Concreting a bathhouse drain using these methods implies that a wooden flooring will be placed on top of the concrete.
Its structure is described in detail in other materials on our website on floors in the washing room and steam room.
A leaking floor is made in the same way as a regular floor, only the boards are laid with a small gap. Too large gaps make the floor uncomfortable and increase heating costs.
Information. To fill the waterproof screed, you can use ready-made factory-made formwork elements. Shields are used for the floor. Leveling the front surface with a slope is carried out using a vibrating screed and manually.
Draining water in a bathhouse with concrete floors
Sometimes even in the steam room, not to mention the washroom and rest room, solid floors are made of concrete screed and lined with tiles or similar materials. In this case, the water is drained using standard technology for shower compartments:
- when screeding, pipes are immediately laid in the floor to connect the shower drain(s);
- the screed is made with a slope towards the ladder, but the angle of inclination is taken to be about 1...3 degrees to the horizontal - on smooth, frequently cleaned floors, this is quite enough for reliable and rapid drainage of water;
- the cladding is also created taking into account maintaining the angle of inclination of the floor to the opening of the ladder.
Insulating a concrete floor with polystyrene slabs or other material is very desirable, since such finishing itself creates a feeling of discomfort, and it should not be aggravated by the cold penetrating from below from the frozen ground.
When installing a drain, it is necessary to provide for a slope of the pipe leading from it (to a septic tank or central sewer) of at least three degrees, and also to calculate the required pipe diameter to ensure the required throughput.
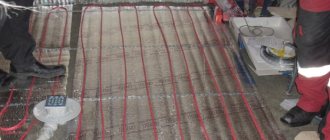
Independent installation of a warm concrete floor in a bathhouse with a drain
How to make a drain in a bathhouse with your own hands: a step-by-step guide
A bathhouse is the very place where you can’t do without water. Even if it is used there to a lesser extent than in the hammam, several tens of liters of water are guaranteed to be drained every time the building is used. Thus, organizing a drain in a bathhouse is a mandatory and inevitable event, and it is better to pay due attention to this at the design stage. In this case, the cost of organizing drainage will be lower, and the building will retain its basic operational characteristics.
Filtration well: we clean the wastewater better
Such wells will provide good water purification, and they are located further from the bathhouse - the distance can be from 3 to 5 m. The stages of work are as follows:
- the hole is dug in the same way as in the previous case, and the diameter depends on the reinforced concrete rings that will serve as its walls;
- rings are installed, if desired, you can make formwork and pour concrete mortar;
- the bottom is covered with a mixture of sand and crushed stone, or expanded clay, the layer of material is at least 30 cm.
- a trench is dug in the same way, pipes should be laid, the depth should be 60-70 cm below the soil freezing level. An alternative would be to insulate the pipes.
This method has its own requirements:
- Pipes must have a diameter of at least 50 mm and cannot bend too much.
- Only sewer pipes can be used.
- The finished well should be covered with a lid in which a ventilation hole must be made.
Such systems require periodic cleaning, as soapy water can clog the soil.
How to drain water in a bathhouse: design features and important nuances
As has already become clear, its durability, as well as its functionality, will depend on how correctly, competently and efficiently the drainage system in your bathhouse is made. Many rely on the natural outflow of water, making special gaps in the floorboards and allowing the water to flow freely, gradually being absorbed into the soil. Our ancestors built in a similar way, but there are also some nuances here.
- You should never expect that the soil surface will absorb all runoff without exception. No matter how much you fight, the moisture will still slowly “sharpen” the foundation, walls and even the very surface of the soil, which over time can simply sink under the building.
- The smell inside the bathhouse, even with proper ventilation, when choosing a free flow of water, can leave much to be desired, but no one wants to steam among the miasma of decaying skin particles left over from the last time.
The only time when this option is suitable is when the bathhouse will be used only a couple of times during the summer, and even then, for a family of no more than two, or at most three, people. In all other cases, you will have to seriously think about how to properly drain the bathhouse so that everything is in the best possible way. You will need to take into account many points, and there are several options for sewer and drainage systems, so you should be prepared for something new if you decide to do everything yourself. But in this case, you can be completely confident in the results of your work, because everything is done with your own hands, therefore, reliably and for centuries.
Related Posts
- How to make a heated floor from a stove in a bathhouse
- How to make water filters with your own hands?
- Manufacturing and connecting a sauna stove with a water heat exchanger
- Disadvantages of polypropylene pipes in home heating
- Features of analyzing water from a well: when is it necessary and what is the cost?
- DIY bailer drawings and photographs: general principle of bailer operation
- What sizes of sandwich pipes are best to use for a chimney?
- Rules for laying sewer pipes
- How to weld a metal sauna stove
- How to tap into a water supply system under pressure with your own hands: all the methods in one place
- Types of ventilation in the bath
- Electric heated floor in a private country house: installation features in a wooden and frame house
- Hand pump for water from a well
- Do-it-yourself organization of an autonomous water supply system for a private home and cottage
- Step-by-step technology for pouring self-leveling floors
- Dimensions and installation of pipes for a bath
- Construction of a frame bath with your own hands
- How to update old tiles in the bathroom
- How to connect a washing machine yourself: step-by-step installation instructions
- How to install light in a steam room?
- When health is in your hands: a bathhouse that will be the envy of your neighbors
- Connecting the toilet to the sewer without corrugation
- Thin-walled metal pipe for electrical wiring
- Benefits of using a duct extension for radiators
- Instructions for inserting into a sewer pipe with your own hands
Read with this
- How to make a heated floor from a stove in a bathhouse
- How to make water filters with your own hands?
- Manufacturing and connecting a sauna stove with a water heat exchanger
- Disadvantages of polypropylene pipes in home heating
- Features of analyzing water from a well: when is it necessary and what is the cost?
- DIY bailer drawings and photographs: general principle of bailer operation
- What sizes of sandwich pipes are best to use for a chimney?
- Rules for laying sewer pipes
- How to weld a metal sauna stove
- How to tap into a water supply system under pressure with your own hands: all the methods in one place
Bath sewer theory
So, you decided to build a bathhouse. Where to begin? Of course, with planning. Because without planning, the end result is not at all what you wanted at the very beginning.
In order for your bathhouse to please you with its characteristics, you need to write down all the important points before you start building it:
- How many people should the steam room and washing area be designed for?
- How quickly should the steam room warm up and how long should the temperature be maintained?
- In what seasons should the bathhouse be used or should it be ready for year-round use?
These are just a few questions from a large list that you must answer before starting bath construction.
So, what should a bath sewer be like, how should it be equipped - here is a small list of questions that you should answer before you start installation:
- Will you make a bathroom in a bathhouse or will you only have a washing area?
- Will the bathhouse be heated year-round, will there be above-zero temperatures in the bathhouse rooms?
- What materials will be used in the construction of the bathhouse, what will the walls, rough and finished floors be made of, what waterproofing materials will be used?
- How far is the house from the future building site, how far is the septic tank, at what distance from the future bathhouse is the drainage ditch?
- How far is a well, borehole, or any other source of drinking water located from the future bath complex?
- Is there an open body of water near the construction site - a river, lake or pond?
- Will there be a plunge pool installed next to the bathhouse or a swimming pool?
We invite you to familiarize yourself with the casing and socket in a wooden house
Having answered the above questions, you can fill the floor with a drain yourself or make a pouring structure, as well as install a water drain in the bathhouse with your own hands.
How is a bath sewer installed, and what theoretical aspects are important here?
Firstly, at the time of the start of the implementation of the bath water drainage system, you must have completed all foundation work. In strip and slab foundations, holes for future sewer pipes are prepared in advance. Columnar foundations do not require such preparation.
Secondly, a place must be selected for a pit with a crushed stone filter for bath water. Many owners build a pit right under the bathhouse, but this is the wrong decision. In this case, the lower crowns of the bath house and the subfloor will constantly be affected by wastewater, even if the base is made high and the waterproofing preparation is not forgotten.
Thirdly, before starting the project, it is necessary to choose what type of floor will be used - solid or poured. This determines how the power structure of the lower floor of the bathhouse will be implemented, how the subfloor will be implemented and, most importantly, how wastewater will be collected from the washing compartment.
In order for your bath furniture to last for many years, you need to study some recommendations for caring for it. The basic rule to remember: after each session in the steam room, the room must be ventilated. This procedure will allow you to quickly remove excess moisture from the room. Sometimes a sauna stove is used for drying, which is turned on for some time after the sauna procedures.
A bathhouse is a room in which sanitary and hygienic procedures are carried out. Therefore, cleanliness in the steam room should be monitored as carefully as in the bathroom. Regular cleaning helps prevent the accumulation of dirt and the development of bacteria on the shelves in the steam room.
The most important rule is the mandatory drying and ventilation of the room after each session in the steam room
https://www.youtube.com/watch?v=LpF7xkrmHSU
After each procedure, it is recommended to wipe all surfaces using a dry towel. This measure will significantly speed up the drying process of wooden boards. It is worth remembering that natural materials cannot be treated with cleaning products containing active chemical compounds. The best option in this case is to use laundry soap.
Self-assembly of bath furniture requires careful preparation. Before starting work, you will need to complete a drawing that includes all the necessary dimensions and data about the room and the structure of the shelf itself. If you are not confident in your own abilities, you can always use the services of specialists.