As a rule, most drivers do not pay attention to the interior lamp as long as its operation completely suits them.
Therefore, the procedure for dismantling the lampshade may be due to the following reasons:
- The interior lighting has stopped lighting - this occurs both due to a burnt-out light bulb and due to a lack of contact at the input of the lamp itself.
- Insufficient lighting - in most cases is due to the fact that low-power or outdated devices are installed in the ceiling, producing a weak luminous flux. It can also occur due to the burnout of any part of the lighting devices in the ceiling.
- Flickering of the lamp - occurs due to poor contact or malfunction of the LED lamp driver. To diagnose the cause, it is necessary to remove the ceiling light.
- A broken lens glass or a cracked lamp housing is caused by careless actions of both the driver and passengers. It also occurs during the natural aging of plastic and the loss of its mechanical properties.
Regardless of what reason led to the need to dismantle the lampshade, you should take this procedure as carefully as possible, since careless actions can easily cause damage to both the lamp itself and the ceiling lining. Which will entail additional costs for their repair and restoration.
Features of interior lighting on VAZ cars
In the simplest configuration of the Lada Priora, there is only one interior lighting fixture. It is located on the ceiling at the front. They are equipped with C10W bulbs, which emit a soft but faint yellow light. Priora owners are not satisfied with such light, so they install an improved unit from the “Lux” version model.
Two lighting fixtures are fully equipped in Priora and Kalina. One is located near the driver. The second is located in the ceiling above the rear seats. Although an LED lamp is used, it shines no worse than light sources installed near the driver.
Additional cabin lighting
Pros and cons of replacement
Converting a lamp to use an LED lamp instead of a fluorescent lamp has features that are best taken into account at the preparation stage.
The benefits include:
The remodeling process takes minimal time. LED lamps do not require maintenance. It is enough to clean the lampshade from dust from time to time and occasionally replace the tubes. Compared to fluorescent lamps, LEDs consume 60% less electricity. Impressive savings that will quickly pay for the cost of the device. LEDs have an increased resource, which can reach 40,000 hours. When using LED tubes, there is no unpleasant flickering or pulsation that has a negative impact on the eyesight
This is especially important when organizing lighting in schools. There are no harmful substances inside the LED lamp and it does not require disposal after breakdown. The device is absolutely safe for humans and the environment. Even with significant voltage drops in the network (up to 110 V), the lamp will continue to function as if it were 220 V. A wide range of color temperatures is available, which makes it easy to create suitable lighting.
The most obvious advantage is energy savings
At the same time, it is worth considering the disadvantages of LEDs:
- Compared to other lamps, they are the most expensive.
- Over time, the luminous flux characteristics of LEDs decrease due to crystal degradation.
- LED lamps operate in a narrow direction, which is not always convenient. Instead of one fluorescent one, several LED devices may be required.
- Color temperature is not always at the desired level. Often the light is not enough for comfort.
- LEDs get quite hot during operation. The lamp design must have a heat sink, which not only complicates the design, but also affects the price.
Recommended reading: Which is better - LED or energy-saving lamp
Almost all of these disadvantages can be mitigated by using a high-quality scheme. It is still recommended to convert the lamp to LED lamps, since the benefits from such a solution will be greater.
Instructions for installing new lampshades
To replace lighting fixtures in both the Priora and Kalina interiors, no special knowledge is required, since the procedure is simple.
Photo gallery “Step-by-step installation of lighting shades”
To replace the light bulb, follow these steps:
- First you need to remove the protective cover. This can be done by prying it with a screwdriver from the mounting side and lightly pressing the clip. Now the cover can be easily removed from the ceiling.
- Next you need to disconnect the power wires.
- Having disconnected the old lamp, a new element is installed in its place.
- Assembly is carried out in reverse order.
Installing an additional “Lux” lighting fixture will require care and time. First of all, you need to purchase a new block, which will be placed above the rear sofa.
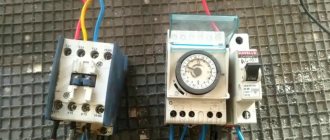
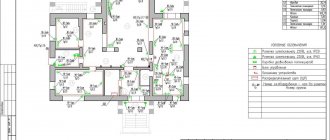
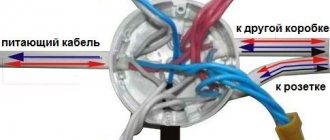
Lighting connection diagram
The installation procedure consists of the following steps:
- First, you need to apply markings to the ceiling, deciding on the place where the rear lamp will be located.
- Then, according to the markings, a hole is cut in the ceiling covering.
- Next, you need to stretch the power wire from the front light between the roof and the ceiling covering.
- At the next stage, the unit to be installed is connected.
- To ensure that the lid fits tightly to the ceiling, you can cut a frame from some kind of rubber seal.
In the Priora “Norma” configuration, it is recommended to change the front unit installed from the factory. Replacing it is easy, since the characteristics of the devices are the same.
The replacement scheme is similar to replacing a light bulb: a new element will be installed instead of the old light source. When installing LEDs, keep in mind that they differ in brightness color. For the rear light, it is better to make the LED backlight brighter, and put medium-brightness LEDs in front (the author of the video is Repair and Tuning).
After replacing the lighting unit of the Priora Norma configuration with a higher-quality luxury one, the driver becomes more comfortable in the cabin.
Simplicity of installation and low time costs make it possible to replace the standard lighting unit with a more powerful one, or equip the cabin with an additional light source. At the same time, you do not need to have in-depth knowledge of electrical engineering; even a novice driver can perform the replacement.
Price issue
The block (diode) costs 460 rubles. The front Lux package costs 535 rubles.
There are two options to improve lighting by replacing it with LED:
- Replacing a conventional lamp with an LED one. Price 50 rub.
- Replacing a lighting lamp with an LED module - 350 rubles.
To replace the unit you do not need to remove it, just remove the glass.
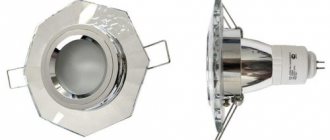
Base G9 and G4
These miniature light bulbs are similar in design, they differ in size, but their installation principle is the same. Due to their low weight, they are attached only to the socket with the base. Additional fastenings are usually not provided. Let's look at how to replace such a light bulb in a spotlight.
- De-energize the lamp by turning off the mains power;
- if there is a decorative light diffuser, remove it;
- We take the body of the light bulb and pull it out with a slight force;
- install a new one by inserting the pins into the socket. If you have a halogen, when installing, handle it only with gloves or a cloth.
Replacing light in furniture lighting
Any spotlights on furniture and kitchen equipment are replaced in 99% of cases using one of the above methods. The whole difficulty of replacement lies in dismantling the decorative lamp diffuser.
Strict requirements for the appearance of the lamp force designers to hide the fastenings as much as possible and you need to use your imagination to understand how to remove this or that lamp.
Video “Installing the tail light”
This video demonstrates how to install a rear light in the interior of a Lada Kalina with your own hands (the author of the video is NBI12345).
The reasons why you sometimes have to remove the interior lamp on a Lada Priora car may be the following:
- Failure of its backlight lamp
- Failure of the interior air temperature sensor
- Mechanical damage to the lamp housing (for further replacement)
In order to remove the lampshade with your own hands, you will need a minimum of tools, namely:
- Torx bit t 20
- Holder
- Flat blade screwdriver
How to remove the interior lamp yourself? We act step by step
The question of how to remove the interior lighting lamp becomes quite relevant for the driver when the bulbs in the lighting have burned out - or you are planning to change them to more fashionable diodes.
There is nothing complicated in this process - you don’t call an electrician when a light bulb burns out, for example, in the bathroom at home. Changing it in a car is easy even for a beginner. You just need to know a few nuances and learn how to correctly and without interference remove the parts that interfere with this procedure (in this case, the lampshade).
Features of interior lighting on VAZ cars
In the simplest configuration of the Lada Priora, there is only one interior lighting fixture. It is located on the ceiling at the front. They are equipped with C10W bulbs, which emit a soft but faint yellow light. Priora owners are not satisfied with such light, so they install an improved unit from the “Lux” version model.
Two lighting fixtures are fully equipped in Priora and Kalina. One is located near the driver. The second is located in the ceiling above the rear seats. Although an LED lamp is used, it shines no worse than light sources installed near the driver.
Additional cabin lighting
Which lamps are best to choose as replacements?
It is recommended to use a standard principle that has been repeatedly tested by the personal experience of many users. The first recommendation is to choose devices from the range of well-known manufacturers that guarantee high quality products. Such devices are usually expensive, but quickly pay for themselves due to economical energy consumption.
The second selection principle is the number of LED elements per unit area of the working surface of the lamp. The more LED elements placed on the surface, the higher the dissipative ability of the lamp. Therefore, if you need to illuminate a large area of the room, you should choose products with the maximum possible number of LEDs.
This LED lamp, where the placement of working elements is marked in a three-row design, is close to fluorescent devices in terms of light dispersion
Out of habit, a potential buyer chooses light fixtures with an eye to the power parameter. In this case, the power is determined slightly differently - taking into account the ratio of 1 to 10, when compared with a conventional direct incandescent lamp. For example, if the power of a conventional device is 100 W, then the LED analogue will correspond to 10 watts.
It is also important to focus on the color temperature of the lighting fixture. We wrote more about this parameter in the next article.
Based on the operating conditions, lamps are selected according to the protection class. For domestic use, IP40 is usually a satisfactory option. For rooms with higher requirements - protection class 50 and higher. We talked in more detail about the protection class and decoding of values here.
High protection parameters are necessary for luminaires installed in special rooms with an explosive environment.
Correct dismantling
Depending on the make and class of the car, removing the interior lamp can be done in different ways. The reason for this is the different design of the diffuser mounts. Today, products secured with special flags and spring clips are popular. In the first case, you just need to pull the transparent cover towards you. In the second, using a thin minus screwdriver, you need to pry off the cover in specially designated areas (we have highlighted them in the photo).
Please note that dismantling must be carried out with extreme caution. It doesn't take much force to remove the diffuser, so if there is resistance, it means you're doing something wrong. It is better to re-examine all the joints; perhaps the hole for the screwdriver is hidden somewhere else.
It should also be noted that sometimes the lid is removed by itself, and sometimes along with the “internals”. This depends on the design features of the device. As soon as you remove the first obstacle, a new one will appear - a light bulb. Depending on the type of base, the lamps can turn off in different ways: if you press on the spring or simply disconnect the contacts.
Next, you need to remove the car interior lamp with your own hands. It is usually secured to the casing with several screws (2 to 4) or a mechanical latch. Here you need to be extremely careful, because the electrical wiring from the battery is connected to the housing. All you need to do is disconnect the contacts.
Another important tip is to mark the wires for yourself, because you will have to install the interior lamp in the old place after the repair work. To do this, you can use electrical tape of different colors or a marker.
Is it possible to change the chandelier on a suspended ceiling?
A distinctive feature of suspended structures is the fact that, if necessary, you can install the lamp anywhere. To do this, it will be enough to secure a special ring, then make a hole of the appropriate size and hang the chandelier. During operation, electrical appliances tend to break down, resulting in the need to replace the lamp or the entire appliance. Removing a chandelier is not difficult if you have an idea of exactly how to do it.
How to remove a chandelier from a suspended ceiling
Before removing the chandelier from the PVC sheet, it is worth considering that it can be installed on a hook or on a special strip. If the chandelier is fixed on a hook, the work algorithm will look like this:
- First of all, it is recommended to turn off the power to the lamp, then take a tester or a screwdriver with a special indicator and check that there is no voltage.
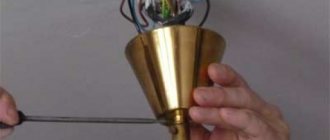
- If there is a decorative cap, it should be lowered, which will provide unobstructed access to the hook.
- Through the hole that appears, it is recommended to remove the chandelier from the hook and remove it along with the terminals.
After the chandelier is removed, you will need to disconnect the terminals.
Advice! All work should be performed strictly according to the attached step-by-step algorithm and only with the voltage turned off.
How to change a chandelier on a suspended ceiling
Replacing a chandelier on a suspended ceiling is not as difficult as it might seem at first glance. As a result, you can perform such work yourself, without resorting to the help of specialists. As practice shows, when replacing an old chandelier, choose a device of a similar design. All that is required is to assemble the chandelier according to the attached instructions, and then hang it on a special hook left in the surface from the old lighting fixture.
Removing and installing the lampshade
First of all, we open the upper compartment, the so-called eyeglass case, and under it you need to unscrew the two fastening screws:
After that, using a flat-head screwdriver, pry off the cover - a decorative trim, under which there is a rear-view mirror mount.
And also unscrew the two fastening screws, as shown in the photo below:
Next, carefully move the lampshade to the side, but without sudden movements, since there are several more wires going to it.
And now you can disconnect the power wires by squeezing or pressing the clamps, depending on the type of their fastening:
Replacing the lampshade or temperature sensor, as well as backlight bulbs, occurs without any problems. After all the manipulations, you can install the lampshade in its place. The entire repair will not take more than 10 minutes. The price of a new lamp is about 1,500 rubles for the whole assembly with sensors, etc. For one element no more than 500 rubles.
Removing the interior lamp of a Lada Priora car is carried out to replace a burnt-out lamp or switch, as well as when carrying out other work in which its presence will interfere with the progress of their work. Prepare a standard set of tools, de-energize the car by disconnecting the minus terminal from the battery and perform the following sequence of actions:
- First of all, you need to remove the lamp diffuser. To do this, pry it up with a small flat screwdriver and, overcoming the force of the spring clips, remove it.
- We release the lock of the interior lighting lamp and disconnect the block with the power wires.
- Replace the lampshade or make any other repairs, then perform the installation in the reverse order.
At this point, the repair work to remove the interior lamp on the Lada Priora car has been completed.
Dismantling old tiles: options and sequence of actions
Before starting work, it is important to take care of safety precautions, protect furniture and plumbing fixtures and prepare the necessary tools for removal. Dismantling is carried out wearing safety glasses and construction gloves. Wear closed, tight shoes so that if a tile falls from the wall, it will not hurt your toes. Remember that ceramic shards are very sharp. Standard protective equipment will prevent injury and small particles from getting into your eyes and skin.
If the renovation takes place in a room where there is furniture or plumbing, they also need to be protected from dirt and scratches from splinters, this will make subsequent cleaning easier. Wrap or cover all items tightly with rags and top with plastic. To prevent the spread of dust, hang a well-moistened cloth in the doorway, carefully securing it around the perimeter. You cannot work with the door closed: air must circulate in the room to make it easier for you to breathe.
The tools you will need are a flat chisel (chisel) and a hammer. If you want the tiles to remain intact, you will additionally need a construction knife or a tile jointer. Don't forget heavy trash bags.
How to remove tiles from walls and floors: step-by-step instructions
When the preparatory work is completed, we proceed to dismantling. We will describe how to remove tiles from walls yourself, because this process is more labor-intensive than removing floor masonry and requires precautions.
The technique is the same for both dismantling the entire surface and for removing individual tiles if they need to be replaced.
- Remove tile joints over the entire surface. To do this, use a knife or jointer. If the grout does not budge, soak it with water by spraying it with a spray bottle. This is the most monotonous stage of work.
Knock the wall. By the dull sound you will identify voids - places where the tiles do not fit tightly. These are areas where several fragments can fall off at once. Memorize or mark them with masking tape to prevent the elements from suddenly falling and injuring you.
Start working from the top left corner and move horizontally along the rows from top to bottom.
Insert the chisel at a 45-degree angle between the tile and the wall and begin gently tapping it with a hammer. If ordinary glue was applied, the fragment will come off easily; if cement mortar is applied, you will have to make an effort.
Use the same method to remove all tiles and remaining adhesive from the wall.
The same technology is used to remove cladding from the floor, including porcelain stoneware. To clean dry adhesive from tiles, soak them in warm, soapy water for several hours.
If the integrity of the tile is not important, you can not remove the grout and proceed directly to removing the cladding. The fragments can be used for mosaic decoration. In this way, they update furniture and add zest to the interiors of a bathhouse, sauna or country house.
Removing ceramic tiles using a hammer drill
If the room being renovated is small, hand tools are sufficient. But they are not practical for use in spacious bathrooms, dining rooms and hallways. To remove tiles from a large area, use a hammer drill with a flat nozzle. This speeds up the process of removing the cladding by 2-3 times, but there are several nuances that must be taken into account:
A hammer drill is not suitable for dismantling cladding in areas where electrical wiring runs, behind batteries and in hard-to-reach places. To avoid electric shock or damage to cables and pipes, use hand tools.
Tiles removed with a hammer drill rarely remain intact. Theoretically, it is possible to remove it carefully: to do this, first point the tool not under the tile, but into the base, to make indentations in 2-3 equidistant places. Only then pry up the tile. The grooves compensate for the force of vibration, and there is a chance to remove the fragment without damaging it.
If there is little dust when dismantling with a hammer and chisel, then when working with a hammer drill the room becomes very dusty. Be sure to buy a respirator to protect your airways from dirt.
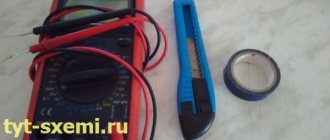
What you need to fix an LED light bulb
You don't have to purchase anything fancy from tools. Every family usually has a soldering iron, preferably one with a thin tip. Along with it there is usually solder and rosin (or flux containing solder) or soldering acid. You will also need tweezers - you can’t go anywhere without them.
In addition, for comfortable work, it is advisable to have a holder (third hand) or an assistant who will hold the board with LEDs. To quickly heat up the board with LEDs, we recommend using a compact gas torch . It will allow you to quickly unsolder a burnt-out LED and instantly solder the old one in its place. You can buy a gas burner at any tobacco store and the cost is about 350 rubles. But, if you do not intend to spend a lot, a turbo lighter .
Product delivery options
Note! Below are the shipping methods available specifically for this product. Payment options may vary depending on the shipping method. Detailed information can be found on the “Delivery and Payment” page.
Parcel by Russian Post
Available payment methods:
- Cash on delivery (payment upon receipt)
- Using cards Sberbank, VTB, Post Bank, Tinkoff
- Yandex money
- QIWI
- ROBOKASSA
Shipping throughout Russia. Delivery time is from 5 to 12 days.
Parcel by Russian Post 1st class
Available payment methods:
- Cash on delivery (payment upon receipt)
- Using cards Sberbank, VTB, Post Bank, Tinkoff
- Yandex money
- QIWI
- ROBOKASSA
Shipping throughout Russia. Delivery time is from 2 to 5 days. More expensive than regular delivery by Russian Post, approximately 50%. Parcel weight up to 2.5 kg
Express Parcel EMS
Available payment methods:
- Cash on delivery (payment upon receipt)
- Using cards Sberbank, VTB, Post Bank, Tinkoff
- Yandex money
- QIWI
- ROBOKASSA
Shipping throughout Russia. Delivery time is from 3 to 7 days. More expensive than regular delivery by Russian Post, approximately 100%.
Transport companies
Available payment methods:
- Using cards Sberbank, VTB, Post Bank, Tinkoff
- Yandex money
- QIWI
- ROBOKASSA
Delivery is possible to any locality where there is a representative office of the transport company. Delivery time is from 2 to 10 days. Sending large parcels is approximately 50% more profitable than by Russian Post.
Read also: New Toyota Camry 2021 big test drive
Courier delivery in Togliatti
Available payment methods:
- Cash upon receipt
- Using cards Sberbank, VTB, Post Bank, Tinkoff
- Yandex money
- QIWI
- ROBOKASSA
Delivery time from 1 to 12 hours.