Infrared film heated floor - what is it?
IR underfloor heating is popular due to its unique operating principle. Despite the fact that it is a type of electric underfloor heating (since it requires electricity to function), an infrared floor is much more economical and safer than its predecessor.
The operating principle of IR underfloor heating is based on the release of thermal energy in the infrared range. Long waves of radiation heat a person and the surfaces of surrounding objects: furniture, walls. And they, in turn, being a secondary heat source (reflectors) heat the air in the room. This approach to heating a house allows you to subjectively feel the heat before the air warms up.
Advantages and disadvantages of infrared heated floors
Pros:
- there is no electromagnetic radiation;
- simultaneous damage to the entire system is reduced to zero, thanks to the parallel connection of the units;
- installation on any surface (horizontal, vertical, inclined) does not cause difficulties;
- uniform heating of the floor surface. What is very important when installing infrared heated floors under laminate;
- DIY installation will not be difficult;
- it is possible to dismantle the film, for example, when moving;
- installation of the floor is possible in rooms of any purpose (including wet ones) and under any type of covering;
- Let's install the film in an open space (veranda, terrace) and closed (rooms in an apartment or house, office, warehouse, etc.);
- high heat transfer (97%) and efficiency (30% higher compared to other electric underfloor heating systems).
Minuses:
- the need to comply with the rules for connecting and operating the system;
- not recommended as the main source of heating due to the high inertia of the system (heats up quickly, cools down quickly);
- Unlike water heated floors, film floors are not resistant to mechanical stress and damage.
Advantages and disadvantages of infrared floors
Sometimes you can come across posts stating that infrared floors are harmful to human health, although not a single supporting fact has been proven. On the contrary, IR radiation is installed in saunas, hospitals, maternity hospitals and other institutions. Let's first consider the advantages of infrared heated floors .
- IR heated floors do not burn oxygen in the room. It is much easier to breathe in the room because the humidity and oxygen content remain high.
- It operates absolutely silently, without vibrations, and does not circulate air in the room, which is very useful if there are people in the family who are allergic to dust and wool.
- Infrared radiation heats with health benefits, this is the same sunlight that kills pathogens in the room.
- Installed under any floor covering : you can lay tiles, parquet, linoleum or laminate on an infrared floor, and it will work 100%.
- The thinnest system, it does not change the height of the room, which is very useful when renovating an apartment (there are no thresholds).
- The room warms up evenly, there are no temperature differences at the top and bottom of the room.
- Significant cost savings. The floor turns on much less often, works only when necessary and quickly raises the temperature to the desired value.
- Easy installation - there is no need to cover it with a screed; you can lay the floor after renovation in an apartment or house.
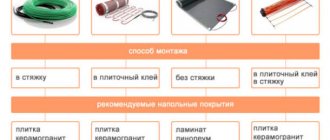
Infrared floor under laminate, parquet, tiles and screed
IR floor under laminate
IR floor under parquet
IR floor under tiles
Wet screed on IR floor
Today in Europe, more than 64% of premises use infrared floors as an auxiliary heating system and more than 20% of buildings use it as the main source of heat. However, there is a small fly in the ointment in this barrel of honey. Now we will look at the disadvantages of infrared heated floors :
- High current consumption when starting the system. The system is very economical, since 100% of the film area is switched on for a short time, but not every wiring can withstand such a short-term load. On average, 10 sq.m. films consume about 2.2 kW, that is, 25 sq.m. will consume about 5.5 kW. For a modern room this will not be a problem, but old “Khrushchev” and “Stalin” buildings can only withstand up to 5 kW according to the passport. It is necessary to study the technical documentation of the house before installing such a floor.
- Difficulties arise when changing heating zones. 30-40% of the room area remains free when installing the film; initially you can place furniture there, but to make a rearrangement, you need to take into account the location of the IR floor. Otherwise, the furniture may become very hot.
- The starting price of materials is high. It is necessary to invest a lot of money, which only pays off over time.
- Another disadvantage of infrared heated floors is their dependence on electricity. No light - no heat. If you do not have a generator, it is better not to use infrared floor heating as the main source of heat in the room.
Most owners of modern houses and apartments in new buildings will not experience such shortcomings, since the large area and the abundance of kilowatts of electricity in the technical documentation decide a lot. But no matter how you choose infrared floors, the pros and cons of this technology are relative and you need to choose everything individually.
Types of infrared film heated floors
Despite the relative novelty of infrared heating systems, manufacturers offer several varieties:
- film infrared heated floor. The essence of this system is that the heating element is a fiber laid between two layers of polymer film. The heating film is flexible, durable, wear-resistant, and is also a good dielectric.
In turn, film flooring has its own varieties. The division is based on the composition of the heating element:
- carbon – carbon-graphite;
- bimetallic - copper and aluminum.
The first system became more widespread among users.
- rod infrared heated floor. The peculiarity of the system is that the function of the heating element is performed by carbon rods connected by wire. This is the most innovative of the systems, allowing to reduce heating costs by 60% (compared to other systems). The widespread use of carbon rod floors is hampered only by their high price.
Related article: The color of the walls in the bedroom, pleasant for relaxation
Comparing these systems for specific operating conditions will make it possible to find out which infrared heated floor is better.
How does infrared floor work?
Let's start with a brief overview of this technology to understand how relevant it is. Its operation is based on the principle of secondary convection - first the objects in the room are heated, and then only the air, and not vice versa, as when using conventional water or electric radiators and floors.
Uniform heating of the room
Difference between electric and IR floors
The infrared system consists of copper bars (often silver-plated) and strips of carbon material that are resistant to high temperatures. The heating element (tires) is laminated with a special polymer that transmits infrared radiation and protects the device from moisture and electrical short circuits. The network output is connected to a socket, electricity passes through the copper busbars, forming infrared radiation.
We have partially disassembled how the infrared floor works, now let’s move on to more precise data and characteristics of the installed system:
- The power of an infrared floor can range from 150 to 400 W/sq.m; it directly depends on the type of film and is selected individually.
- The radiation length is from 7 to 20 micrometers.
- The melting point of the film is 264 degrees, the average heating temperature is up to 55 degrees.
- The service life is about 15 years.
- The width of the rolls is 50 and 100 cm.
- The electromagnetic field can be ignored.
- Used as an auxiliary heating system and the main one. If the installation of an infrared floor is carried out for the purpose of heating the entire room, then the equipment should cover 70-90% of the room's area.
There are 2 types of infrared floors: film and rod (we focus on film, because they are more practical and cheaper). In turn, film infrared floors can be carbon or carbon. There are also bimetallic ones, coated with a highly conductive material. They are more expensive, but 12-15% more economical.
The cost of an infrared heated floor ranges from 900 rubles to 2500 rubles, depending on the thickness of the film and the frequency of the copper bars, as well as on the quantity of goods purchased - small footage is sold much more expensive. The cost of a carbon infrared floor ranges from 1500-3200 rubles. The high price is due to the parallel connection of the rods (one burns out - all the others work).
Operation of infrared film heated floor
Recommendations:
- if a significant amount of water gets on the film floor, it must be turned off immediately and dried (naturally);
- you cannot turn on the system in order, for example, to dry the carpet after wet cleaning);
- It is not allowed to fasten anything (for example, a door stop or baseboard) using hardware. They will damage sections of the film;
- It is prohibited to spread carpets, blankets, metallized films (foil) on the floor, or to rearrange furniture. This may cause the system to overheat.
Installation of infrared film heated floor
The process of laying infrared film heated floors:
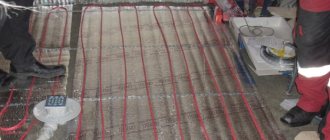
- Cleaning and leveling the base. After cleaning, check the horizontal surface. If the deviation is more than 3 mm, you need to level the base with a self-leveling floor. We wrote earlier how to do this.
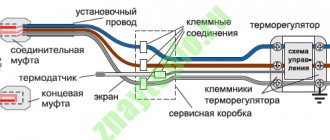
- Hole for thermostat. You need to drill a vertical groove from the floor to the installation location of the thermostat, and also make a hole for the thermostat itself. This must be done first in order to then clean the surface of dust and pieces of the wall. Do not forget to supply power from the nearest outlet, having previously de-energized the system.
- Thermal insulation. You can use reflective thermal insulation, or non-reflective insulation (for example, cork). The main thing is that the thickness of the thermal insulation layer is 3-5 mm. Holes will be cut in it for laying wires and fastenings with film. When laying thermal insulation, secure it with mounting tape. For reflective thermal insulation, do not use materials with a reflective foil coating - it is of poor quality.
- Laying. The film is laid towards the wall on which the thermostat will be installed (to reduce the length of the wire). The distance from the walls is 10-20 cm. Near strong heaters (for example, such as a fireplace), the distance is about 1 meter. You can cut the film only in those light areas that go between the dark sections. The film is laid end-to-end, which is then glued with tape (do not glue the edges where the fastening with wires will be). The extreme sides of the strips are also glued with tape to the thermal insulation. The film should be laid with copper heaters down.
- Insulation of film ends. Sections of film flooring have open areas where the copper is cut, which must be insulated to avoid damage due to any leakage. The easiest way to do this is with bitumen insulation in the form of a film. We cut off the required dimensions (a little larger to ensure the reliability of the insulation), and glue the copper sections on both sides. Under the insulated copper sections, holes are cut in the thermal insulation to recess the sections. After gluing the bitumen insulation, tape it to the insulation by pressing it into the holes. This will insulate the copper area forever. Remember that the areas to which the wires will be connected do not need to be insulated yet.
- Installation of clamps. Metal clamps are connected to the uninsulated sections of copper in the film. Please note: one side of the clamp must fit between the film and the copper strip. You cannot simply clamp the contact from above and below: you can damage the film, and the floor will soon stop working normally. One side of the clamp was inserted onto the copper under the film, clamped with pliers or pliers, and that was it.
- Connecting wires. The wires are connected to the terminals in parallel. That is, the left sides connect only to each other, and the right sides connect only to each other. To do this, it is better to buy 2 colors of wires so as not to get confused. First, you need to remove the insulation at the ends of the wires with a special tool. After removing the insulation, the tip is twisted and inserted into the hole of the clamp, then firmly fastened with pliers or pliers. The connections also need to be insulated with bitumen insulation and secured with tape on top.
- Laying wires in thermal insulation. The wires should go along the floor to the wall so that they are in the baseboard area. This will protect them from the pressure of the floor covering. To route the wire to the wall, you need to cut a hole under its path in the thermal insulation for recessing. Then you need to insert the wire into the hole and fasten it with tape so that the wire also sticks to the tape. Near the wall, the wires should not protrude beyond the thermal insulation, so slightly wider cutouts are made there, and the wires are taped again. So you lead the wires from film to film, then to the place under the thermostat.
- Installing the thermostat sensor. The sensor is installed under the film approximately in the center of the second section. For the sensor, you also need to cut a hole in the thermal insulation material, and, if necessary, in the base. For the wire from the sensor to the thermostat, you also need to cut a hole in the thermal insulation. If the wire will turn sideways, cut a smooth turn to prevent the cable in the wire from breaking in the future.
- Connection and performance check. We’ll talk about the connection below, but you can check the operation of the film heated floor with your hands or with a portable infrared sensor, which, by pointing at the film, you can find out the temperature.
- Laying sound insulation. It is advisable to use rolled material that provides both moisture and sound insulation.
Then the floor covering is laid. A huge advantage of infrared film heated floors is the possibility of installation without a wet screed. Even if you move, the floor can be disassembled and transported to a new home. But infrared flooring is also well suited for self-leveling coating.