What is a socket box?
A socket box is a device for installing sockets and switches. When installing a socket or switch, you don’t have to install a socket box, but this is unreliable and unsafe, since the wiring may catch fire.
According to the standards, the socket box must be made of fire-resistant material (mostly polypropylene), although when using Soviet wiring, metal socket boxes are encountered. Nowadays, in addition to polypropylene, metal and wooden ones are produced. They are more often used when installing outdoor sockets for decoration.
Where do the electrical accessories in the house begin?
Sergei, a consultant at the large electrical goods store Axiom Plus, notes that clients usually start their choice with external characteristics, visualizing which ones will suit the interior. The budget has a tangible influence on the choice - the brand, series, and frame material depend on it (plastic is the most affordable and popular; glass, metal, wood are more exclusive and more expensive).
This is logical because it assumes the end result as a base, but beauty still needs to be achieved. You will have to start with the basics, and decorative aspects will follow.
The vast majority of electrical installation products on sale are manufactured according to the German Schuko standard.
The Italian standard for installing narrow keys is very rare.
By the time the selection begins, you should have a wiring plan. Based on it, it is clear how many sockets and switches need to be purchased and where to install them. So, in a standard apartment with a modern renovation “after the builders”, at least 50 of them will need to be installed.
Don’t skimp on the number of connection points, because modern residents of private houses and high-rise buildings use a lot of household electrical appliances. Get it wrong and you will have to connect them through unsightly (and sometimes dangerous) “tees”.
Important: do not forget to plan in advance not only the location of classic sockets, but also multimedia, Internet, TV, and also for the thermostat. Then ultimately you will get a complete picture, ideal visually and functionally.
Did you plan it, did you calculate it? Now let's choose.
Types of socket boxes and characteristics
Typically, socket boxes are used with dimensions of 60 and 68 mm in diameter and a depth of 25 mm. When choosing a socket box, you need to take into account that it is selected for a specific product. Socket boxes come in different shapes:
- round,
- oval,
- rectangular,
- square.
Round socket boxes are very popular these days. Typically, these are mounted in plasterboard, since they are usually equipped with special fasteners, which will allow the socket box to be properly secured.
Types of socket boxes for open mounting
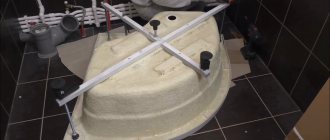
Preparing a square socket box for installation
An external product or an overhead socket box is used when arranging open electrical wiring, which determines its design features.
The main differences between open-type products are manifested in the shape given to them during production.
According to this feature, all known samples of external socket boxes are divided into the following types:
- rectangular blanks for fastening sockets;
- square socket boxes;
- oval (round) products, usually used for mounting single samples.
Rectangular metal double socket box
A standard rectangular socket box can have one, two, three or more single “seats”. Professionals call such products multi-seat.
To install several sockets, it is allowed to use so-called “modular” socket boxes, on the basis of which, if desired, an arbitrary number of places can be selected. With the help of a set of several modules, socket boxes for 4 points, for example, can be easily obtained.
Typical (standard) characteristics of such products traditionally include:
- dimensions;
- specified thickness;
- diameter (for round workpieces).
Preparing the wall for installing a socket box
When preparing a wall for installing a socket box, the best option would be a hammer drill and a diamond bit, but not everyone has such a device, so we take a hammer drill and a drill. We drill holes along the contour of the box, the more often the better. We take a chisel and gouge out the required amount of space to install the box.
It is better to make the grooves a little larger than the box itself in order to be able to adjust and adjust the vertical installation of products, this is especially important when several pieces are installed in one place. If there is reinforcement in the wall, then use a grinder to cut the reinforcement. You can also use a grinder to make a hole for the socket box. To do this, you will need a stone disc and a grinder; in this case, we cut out a rectangular or square hole (depending on the required number of sockets), and hollow out the plaster in the middle of the resulting rectangle. The consumption of gypsum or alabaster is greater, but solving the problem is many times faster than making a hole with a drill. After this, you need to clean the groove from dust. It is better to moisten it with a primer or at least water for better adhesion of the alabaster to the wall.
There is also a socket box with a design feature that allows you to connect several socket boxes together to make it possible to install 2-3 or more sockets on one level.
Selection order
When considering the criteria that guide the selection of rectangular socket boxes, special attention is paid to solving the following issues:
- For what specific purposes are they used?
- How to decide on the type of sockets needed to suit the interior of a given room.
- Which is better: modular or multi-place open products.
When choosing, the method of fixing the purchased devices is also taken into account.
Stated Goals
Taitong socket
To install smart sockets and other elements of smart equipment, it is most convenient to use square socket boxes from Taitong. They are presented for open sale in models with the following performance characteristics:
- landing dimensions: 86x86x34 mm;
- body material – PVC plastic.
The design has two built-in nuts that are necessary for attaching smart sockets.
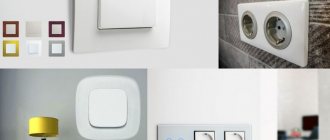
Appearance (design)
When assessing the appearance of products suitable for the interior of the room, we proceed from the possibility of selecting them by color, shape or design features.
The domestic industry produces special socket boxes designed in “retro” style. They are made as antique-style elements of electrical wiring, consisting of a pair of colored twisted conductors. When designing it, individual cores are fixed on special rollers, also made in “retro” style. In the usual version, when choosing a form, they proceed from the requirements of compliance with the design of the room.
Modular or multi-seat
Mounting box with socket boxes
When choosing the number of places on socket boxes and their design, they are usually based on the following considerations:
- If you plan to install several electrical devices at once on a mounting location, it is wiser to choose a multi-place socket box specifically designed for these purposes.
- In a situation where in the future it is possible to expand the total number of electrical installation products, preference is given to modular designs.
Choosing the right socket box suitable for interiors is a responsible matter. Only taking into account all the factors mentioned will allow you to make the only right decision and select the right copy.
Installation of a socket box
Next, take the socket and insert it into the hole. Do not forget that the edges of the product must be flush with the wall or recessed into the wall, and the holes for the wires must be prepared for laying, or the wire must already be installed. It is best to use alabaster for fastening. For those who do not have experience, it is better to dilute the alabaster mortar with plaster or cement to increase the hardening time, which will allow you to more evenly install the product in the wall and correct the position in case of a slight error.
Next, you need to seal the space behind the product and on the sides with a solution. We install the product, then add mortar and use a wide spatula to level it with the wall and remove excess mortar. During the hardening of the solution, you can use various supports and slats, but since alabaster hardens quickly, it is better to simply hold it with your hand until it is more or less engaged, after which we release it and wait for the end of hardening.
You can purchase socket boxes at any construction market or store.
Preparing the socket box for installation
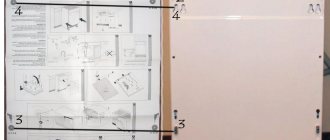
A characteristic feature of socket boxes for plasterboard is the presence of 4 screws on the front part, while in elements for concrete there are only 2 of them . The only difference, perhaps, is their location, this is explained by the company that produced them, but their purpose does not change.
If you look at the box, you can see the outer screws; they are used to secure the plastic and iron frame of the switch or socket.
The next pair of screws are recessed into the box. They can be located side by side or perpendicular to each other and drive the screw mechanism, and the box is secured with the claws. The fittings for the feet can be plastic or metal.
On the back of the box there are special holes for a cable or jumper. You can cut them from the side or back. It all depends on your preference, but holes in the back will be more convenient for installation.
Installing an outlet
After the solution has completely hardened, you can begin installing the electrical point. To do this, you will need to peel the wires from the first layer of insulation and insert them into the holes intended for the wires. Next, we clean the small end of the wire down to the metal, insert it into the corresponding holes in the socket, and secure it with a bolt or clamp.
After this, we carefully insert the socket into the socket box, tighten the spacer bolts and secure the sockets themselves with screws along the edges, which allows it to better adhere to the wall, after which we install the cover on top.
At this point the installation is complete, you can check the functionality. We carry out the full range of repair work in St. Petersburg. Details and prices here Leave a request for How to choose and install a socket box yourself: