During renovations, special attention is paid to lighting, which, as you know, sets the basic atmosphere for each room. Along with the rapid development of energy-saving technologies, the use of diode lamps is increasing, which can significantly reduce energy consumption. LED strips are distinguished by a combination of practicality and attractive design. They are attached directly to the ceiling and create even, soft lighting.
LED strips for ceiling lighting
What are the devices
LED strips are flexible boards made in the form of strips and equipped with LEDs. The latter are located at an equal distance from each other.
LED ceiling lighting
LED strip SMD 3528
In addition to the luminous elements, the tape contains resistors that protect the entire system from high voltage and limit the flow of current.
LED strip structure diagram
Table. Types of LED strips.
| Characteristic | Varieties |
| Diode type | 1. SMD 3028. 2. SMD 5050. Diameter affects coverage area. |
| Fixation method | 1. Self-adhesive with a reliable adhesive layer. 2. Attached with plastic brackets. |
| Tightness | 1. Without sealant, used in ordinary rooms. 2. Medium protection from water, can be used next to the sink or in the bathroom. 3. Sealed, able to function under water. |
| LED color | 1. White tape. 2. RGB. |
Types of LEDs on LED strips
Types of LED strips
RGB tape
Connecting LED lighting
After the installation of the flexible tape with diodes is completed, they begin to connect it, and the owners can do this work on their own.
LED backlighting involves the use of the following elements:
- power unit;
- controller and sensor;
- Remote Control;
- semiconductor lighting system of a certain length.
The process of connecting an LED strip consists of several stages:
- First of all, connect a network cable with a plug to the power supply.
- Next, 2 contacts of the controller are connected to the block - this action is performed if the RGB system is used for lighting.
- Then contact cables are connected to the controller.
It happens that a controller is already installed in the room, designed for an LED strip of a certain length, but it needs to be reconfigured for a larger number of LEDs. In this case, you will need to install an additional amplifier.
How then to make the wiring? In this case, the power supply is connected to the amplifier and the other end of the LED device, and on the opposite side, in order to reduce the load, another section of the light strip is attached.
When creating colored ceiling lighting, polarity must be observed when making connections. You also need to monitor the compliance of the voltage on the controller and power supply with the lighting device.
The tapes are not allowed to be connected in series, as this often leads to overheating of the bus and melting of the plastic base.
Typically, LED strips are sold in 5-meter-long reels. If a shorter strip is needed, then the excess section is cut off using scissors. An incision is made in the designated location. When you need to solder the tape, then you should use a low-power soldering iron.
To increase the length of decorative lighting, you can use special small devices - connectors, which are designed to close an electrical circuit by snapping into place.
Product benefits
The main advantages of LED strips include:
- saving electricity;
- uniform and directional lighting;
- service life reaching 10 years;
- the ability to choose different colors;
- in multi-color ribbons - stable color throughout the entire service life;
- flexibility, allowing you to give the tape any shape;
- environmental friendliness and fire safety due to the absence of mercury and low heating;
- possibility of adjusting the length of the tape;
- no influence on TV signals due to the absence of interference.
LED strip power
Due to these qualities, diode strip is often used not only for additional lighting, but also as the main light source. At the same time, the energy consumption of 10 meters of such a strip will be even less than that of an incandescent lamp that is familiar to many.
What does an LED strip look like in the interior?
Power supply power for LED ceiling lighting
Lighting in the kitchen or living room can be powered by a power supply with different power ratings. The most widely used options are 12 V and 24 V. The calculation is carried out as follows:
- The current consumed by one meter of the product is determined.
- The indicator is multiplied by the number of meters.
The result obtained is taken with a margin of 30%. This eliminates the possibility of damage to the power supply from severe overloads.
Selection of tape by diode type
The most common diodes for such tapes are SMD 3028 and SMD 5050. They are mounted directly on the surface of the tape and vary in size, as indicated by the numbers in the name. In terms of brightness, small SMD 3028 diodes are not inferior to large ones, but due to their small sizes they can illuminate a smaller ceiling area. Therefore, to create a brighter backlight, you should choose SMD 5050.
As for the color parameter, it is worth paying attention to the crystals used in LEDs.
Prices for LED strip
LED Strip Light
Color samples
There are currently 4 options available:
- yellow;
- red;
- blue;
- green.
White crystals are not currently produced. Instead, the design uses a blue element that emits ultraviolet light. Since the diode is coated with a phosphor that glows when exposed to such rays, the output is white light.
LED Strip Light
But such a solution to the issue negatively affects the quality of the tape. It is the most short-lived due to the rapid burnout of the phosphor. The result is not only a decrease in the brightness of the tape, but also the appearance of a blue glow.
The classic RGB combination, in turn, allows you to get more than just one of the three colors offered. As is known from optics, white color is obtained by mixing all three colors. In combination with the stable operation of crystals that do not require additional coatings, this significantly increases the service life of the product. Typically, such tapes come complete with a remote control, which is used to adjust the lighting. This provides additional opportunities for experimentation.
What's happened
In addition to the usual lighting, which is used every day in production, as well as in administrative premises, GOST standards are prescribed with instructions for emergency lighting. These rules apply to all public places and industries, even if only a few people work there.
Ceiling with LEDs
When emergencies occur due to fires, leaks and other serious situations, there is a possibility that conventional lighting will burn out, making it very difficult for people to move towards the emergency exit. To quickly and easily pass through narrow corridors and openings, emergency lighting must be installed.
Tips for choosing LED strip for different rooms
Depending on where the ceiling lighting is planned to be installed, the type of product and its placement are selected. The brightness changes due to variations in the number of diodes within one meter of tape. The more lighting elements, the brighter and more expensive it is.
One meter of tape may have a different number of diodes
Number of LEDs on strip
In the corridor
Since this area does not require stable bright lighting, purchasing a strip with SDM 5050 or higher diodes will be impractical. Mostly corridors and walk-through areas need additional light at night. Using incandescent lamps will lead to high energy costs, and darkness is not a good solution. The best option would be to install low power LED strips. Their light will not irritate the eyes at night, and using a dimmer you can change the brightness, which will also have a positive effect on the family budget.
LED lighting in the corridor
Dimmer for LED strip
In the bathroom
Since this is a room with high humidity, it is necessary to use a sealed structure. This will prevent electrical problems if water gets in. The brightness of the lighting is selected according to the wishes of the home owners, because for a small space the tape is suitable both as additional lighting and as the main light source.
LED ceiling lighting in the bathroom
In the bedroom
Most people who want to purchase LED strips install them in the bedroom to add comfort and a more relaxing environment. In this case, options with RGB crystals are suitable, giving more room for imagination, working in certain parts of the spectrum and providing finer tuning when using a dimmer.
Prices for LED strip
LED strip
Amazing bedroom design using LED strip
In the nursery
It will be a great joy for your child to select interesting color combinations with their parents and adjust the lighting to suit their mood. For this reason, it is worth paying attention to diode strips with advanced capabilities. These are models with RGB + W diodes.
The advanced functionality mode allows you to configure both pure white light for main time and different shades of the spectrum for games. In this option, it would also be appropriate to use dimmers. Then a low voltage will allow you to minimize the glow of the diodes and use the backlight as a night light.
An example of using LEDs to illuminate a plasterboard ceiling in a children's room
In the living room
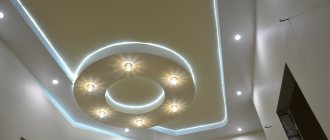
This place performs key functions in almost any home. All relatives gather here, holidays are held and guests are received. Therefore, it is important to choose not only the optimal interior design, but also to take a responsible approach to the installation of lighting. Massive chandeliers with incandescent lamps have long given way to diode systems. The latter allow you to implement a larger number of design ideas. For example, creating a multi-level ceiling with internal lighting.
Drywall prices
drywall
LED strip to illuminate the ceiling in the living room
This idea will appeal not only to guests, but also to members of the household. For supporters of natural white lighting, monochrome strips are suitable, and for creating a festive atmosphere, the best solution would be RGB strips, the variety of colors and customization options of which will be an excellent addition to the fun.
In the kitchen
Here, in most cases, tapes are used not only for decorative, but also for practical purposes. In addition to the ceiling, they can be glued to the top edges of wall cabinets, which will add something unusual to the kitchen interior. You can increase functionality using sensors - they are convenient to use when you need to turn on the light, but your hands are full. When using the tape over the work surface, this solution is especially convenient if your hands get dirty while cooking.
LED strip in the kitchen
Video - RGB LED strip
Selecting lighting depending on the ceiling
Not all options are suitable for certain conditions. Therefore, before making a ceiling with lighting, you need to take into account the design features and choose what suits you best:
- Concrete and wooden surfaces differ in that they cannot accommodate built-in lamps. Overhead equipment is used for illumination. Also perfect is the option with lighting from under the baseboard, fixed around the perimeter just below the ceiling level. At the same time, wood and concrete are durable, which simplifies installation if you need to install an element with a large weight.
- Tensioners ceilings are used very often, this option can be called the most convenient for installing lighting. Here you can put almost everything that is on sale. The cavity under the canvas allows you to mount built-in lamps; diffused and directional contour lighting also looks great on such ceilings. It is possible to make a starry sky or stretch a translucent material that will provide bright light due to the lamps mounted above it.
Light penetrates well through the translucent stretch fabric. - Multi-level and standard plasterboard structures also allow you to implement any lighting option. In this case, you can initially provide a niche or protrusion where the LED strip is subsequently placed. It is possible to make curves, ovals and protrusions of irregular shape and give them a floating effect. You can also install light profiles or boxes in the ceiling to create clear lines of any color.
An aluminum profile with a diffuser is designed for suspended ceilings, but is also suitable for plasterboard structures, since it weighs little and can simply be glued.
DIY installation
Since adhesive-based tapes are in greatest demand, let’s consider this method of creating LED lighting.
To work you will need:
- LED strip purchased with a small margin for safety;
- scissors for cutting the required length of the product;
- heat shrink tube or electrical tape;
- soldering iron with solder and rosin or LED connectors;
- wires for connecting tapes.
DIY LED strip installation tool
Additionally, you may need ceiling skirting boards and a level for marking the ceiling. The best option is a ceiling plinth glued to the wall. Using a level, you will need to mark the walls to obtain horizontal lines along which the part will be glued.
Installation of tape, completely ready for installation
Step 1 . Measure the heights in different corners of the room and find the smaller value from which the markings will go. Step 2 . Using a level, mark horizontal lines for installing the baseboard. At its lowest point it should be 5 cm from the ceiling. This way the light will freely penetrate into the upper area of the room.
Laser level line for fixing baguette
Step 3 . If you have the necessary wiring, install the baseboard using adhesive known as “liquid nails.”
Step-by-step process for installing LED strip on the ceiling
Step 4 . Degrease the surface on which the LED strip will be installed. It is also necessary to get rid of crumbling coatings. To increase the reliability of fastening, glue the installation site with strong double-sided tape. Step 5 . Separate the adhesive layer from the diode tape and glue it parallel to the ceiling or at an angle to it to create the desired lighting.
The tape adheres freely to surfaces. First, you need to clean the surface from dust, then remove the protective film from the base of the tape and glue it along the design line.
Connecting to the power supply using wires
The easiest way is to use an LED connector. In this case, the contact end of the tape is applied to the connector contacts, after which the cover is closed. But this option is more expensive and less reliable, like soldering.
LED lighting scheme in the apartment
Diagram of parallel connection of two RGB strips
Steps to connect power using soldering.
Step 1 . Tin the contact pads on the tape and cover them with solder.
Soldering the connection between the tape and the cable
Step 2 . Strip approximately 8 mm of wires from insulation, tin them, provide them with solder and cut them to a length of 3 mm. Step 3 . Place the wires on the pads and use a soldering iron tip and solder to perform soldering.
Soldering LED strip
Solder on different pads should not be connected to avoid short circuit on the wires.
Wires are soldered to the tape
Step 4 . Despite the low voltage, it is better to insulate the soldering area using heat-shrink tubing or regular electrical tape.
Heat-shrink tubing
LED strip contact insulation
In order to heat the heat shrink tube, you can use a regular lighter, but professionals use an industrial hair dryer (heat gun) for this.
Heating the heat shrink tube with a hairdryer
Cutting and fastening the tape
To cut the tape, you should use special markings applied to the surface of the product. The standard pitch through which pads are repeated is 3 diodes. Typically, the location for the cut is indicated by a line or a pictogram in the form of scissors.
LED strip cutting
The tape is connected in one of three ways:
- LED connector;
- soldering with wires;
- soldering without wires.
Regardless of the chosen method, you must follow the rule - do not connect the tape in length exceeding 5 meters. This value allows all diodes to burn evenly without losing brightness, which will suffer when going beyond 5 m.
Pieces of tape connected by a connector
Stages of connecting pieces of tape with a connector (part 1)
Stages of connecting pieces of tape with a connector (part 2)
The first method, as mentioned, is simple but expensive, so let's turn our attention to soldering.
Soldering with wires.
Step 1 . Tin the stripped ends of the wire. Cover with solder. Step 2 . Coat the contact pads at the end of the tape with solder.
Soldering process
Step 3 . Solder the ends of the wire and the end of the tape so that the solder from different pads does not connect.
Soldering connection photo
Step 4 . Repeat with the end of the other ribbon.
This method is convenient when you need to install the tape at an angle. It is prohibited to bend the tape itself at a right angle for fastening. The use of soldering the ends using copper wire of a suitable diameter solves this problem.
Another option is to use a corner connector
Prices for suspended ceilings
suspended ceiling
Corner connectors
What is LED strip
The strip with LEDs located on it looks like a flexible strip 5 - 50 millimeters wide. On one of its sides there are LED resistors connected to each other by electrical conductors, resulting in a single circuit. On the other side of the diode tape for the ceiling, as a rule, you can see double-sided tape designed for fixing it on different surfaces.
These flexible strips may contain different numbers of LEDs, and of different sizes. In order to obtain more saturated and bright lighting, one or two rows of diodes are additionally soldered.
Backlight power supply from mains
After installing the tape in place, a switching power supply is connected to it, reducing the voltage from 220 volts to the optimal value for the functioning of the structure. The operation of the tape itself is supported by a voltage of 12 or 24 volts. When installing the product, it should be taken into account that the power consumption of the LEDs should not exceed the power of the power supply. Otherwise, automatic shutdown will occur in accordance with the protection system. This characteristic is selected based on the length of the installed tape. The size of the power supply also plays an important role. The smaller it is, the easier it will be to hide it. Therefore, it is better to think over the connection diagram in advance.
A special controller is used to operate the multicolor ribbon. Upon completion of installation, it is advisable to hide it along with the power supply. The result of the work will be functional lighting and an aesthetic appearance of the furnished room.
Controller for RGB LED strip
Prices for slatted ceilings
slatted ceiling
As practice shows, the popularity of LED strips is only increasing over time. This is explained by the ease of use of the structures in everyday life and when working with room design. Well-chosen lighting will not only provide visibility in your home. Using a custom setting, you can achieve the desired emotional effect by changing several lighting parameters, which cannot be noted with classic chandeliers with incandescent lamps. Economic benefits are also a plus. Purchasing a diode strip will save you from high energy bills and the need to replace lighting for the next 10-20 years (depending on the type of product).
How to install spotlights?
You will find the answer to this question in this article! We also recommend reading about how to install a suspended ceiling with your own hands.
Power and density
The most important parameter of LED strips is power. An important indicator is the placement density. Popular devices have 60 to 120 diodes per meter. But strips of 30, 72, 90 and in some cases 240 bulbs are available for sale. They can be arranged either linearly or in several even rows.
The power of a strip meter depends on the type of LEDs, for example:
- SMD 3528 (60, 120 or 240 lamps) – 4.8 W, 9.6 W and 19.2 W, respectively;
- SMD 5050 (30, 60 or 120 elements) – 7.2 W, 15 W and 25 W, respectively.
Today there are flexible strips with a power of 220 V. In this case, when installing the diode strip on the ceiling, conventional 12V power supplies will not be required. You will only need a small rectifier to connect to the outlet.
To begin with, let’s clearly examine the methods of installing diodes:
- The first option for lighting design is when the diode strip is attached around the perimeter.
To do this, a small groove is installed at the points of contact between the wall and the base of the ceiling, with a distance of 3-5 cm. This small niche acts as a kind of pocket. The tape can be additionally covered with special frosted glass, this is done to ensure that the light is scattered throughout the room. In order to save money, you can do without it; - The second design method involves installing a multi-level plasterboard structure.
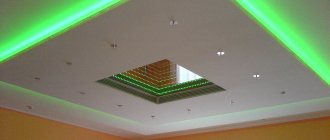
In this case, LED ceiling lighting is installed on the ledges and small slopes that are created in the design composition. This decor always compares favorably with other types of decoration, since it creates a very impressive renovation. An extensive range of colors, in cases where LEDs emit different colors, allows you to simulate any atmosphere in the rooms. Pink shades evoke romance, while the red composition is ideal for parties. In this case, you can fantasize endlessly; - Another option for successfully upgrading the ceiling is modeling the starry sky.
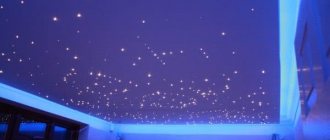
This design is well suited not only for children's rooms, it is often used in living rooms. Children will always be indescribably delighted with such a design solution. One has only to imagine that there is a real galaxy in the apartment, with countless stars. LED strip is not suitable for original modeling; it is necessary to use spot LEDs; - It is also worth dividing the ceiling lighting according to the method of direct mounting, when the rays from small light bulbs are directed into the room or turned in the other direction and reflected from the frame.
Both options are good in their own way. It all depends on the tasks assigned to the lighting. - Ceilings with “light lines” are gaining the most popularity - this is a decorative element more than suspended ceilings
On a note! At the very beginning of the review, it was noted that installing LEDs yourself will not be difficult. This is true, but it is better to entrust the preparatory work to specialists. They will carry out the installation of frames and niches flawlessly, and further installation can be continued on their own.
Varieties
Recently, ceiling lighting has become very popular among many interior designers. It helps to significantly add coziness and an intimate atmosphere to the room.
Attention! Back in the 1970s, LED light bulbs began to be sold. But at that time they were of rather poor quality and had flickering, so they could not be used in homes.
The types of ceiling lighting are described below.
Contour diffuse
This type of lighting provides diffused lighting. It highlights the contours of the ceiling. In this option, the LED strip is attached to a special shelf (on the bottom line in the finished recess), and its glow falls on the surface of the ceiling. The result is a wide luminous stripe.
Neon LEDs
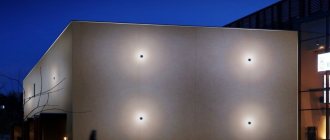
Directed
The light bulbs in this option will be located on the slope of the ceiling. This type of lighting is one of the most comfortable and pleasing to the eye.
Spot
This is the installation of lamps like a starry sky. These light bulbs are connected to the finishing material. Such lighting is difficult to install, and it will be much more expensive than contour or directional lighting.
Curly
LEDs are inserted into small lampshades that will be installed in the suspended ceiling. The products are connected in several pieces, one will shine on the floor, and the others will create “rays of the sun” on the ceiling plane.
You might be interested in: Connecting a chandelier
Specifications
What to look for when choosing: service life, lamp brightness, power, color temperature, type of base, level of dispersion, dimensions.
You may be interested in: Selecting a circuit breaker
Manufacturer
When purchasing lamps, it is better to choose a well-known manufacturer. These could be Osram and Philips; the products of these companies are expensive, but at the same time quite high quality.
A scattering of stars in the children's room
Note! If price is important, then you can purchase a product from an unknown manufacturer, but it is advisable to have a return guarantee.
Bulb brightness
For many LED products, the brightness is in the range of 80-100 lm/W. There are light bulbs using COB technology, the brightness of which can be more than 150 lm/W, but they are not used in houses and apartments. In Chinese products, the optimal brightness is 60-70 lm/W.
When choosing, you also need to pay attention to the color temperature:
- warm light color (2600-3100K). This kind of light is more characteristic of LN;
- neutral glow of a warm shade (3100-4400K). Products with neutral warm light, close to daylight. Mainly used for workspace;
- cold shades (over 4400K). These bulbs have a light blue glow. Great for makeup artists, cosmetologists and so on to concentrate on work.
The process of installing tape in the cornice
Briefly about the main thing
Additional lighting creates a play of light that affects the spatial perception of the room and the objects filling it. Wall lighting is one of the most common lighting decor techniques. To implement it, built-in sources and LED strips are used.
LED strips have the advantage of being lightweight, very flexible, and can be laid over any surface. They differ in the type of color rendering, direction of luminescence and level of tightness. You should pay attention to the tightness of the device if you plan to decorate your kitchen, bathroom or sauna with lighting.
Using LED strips, they illuminate walls, baseboards, ceilings and niches. It will be the most acceptable option if you need to illuminate a photo frame, an open bookcase or a shelf in the bathroom. It is difficult to do without it if you need contour lighting of a work area in the kitchen or an arched opening. The backlight can be made dynamic by changing its color (spectrum) and brightness using different effects.
Ratings 0