LED lamps instead of halogen lamps are a justified solution, since they are much more economical, safer and more efficient. They will work longer, and if necessary, burnt out LEDs can be replaced with new ones. The only drawback is the price.
But LED light bulbs will quickly pay for themselves, since their owner will not need to replace them for the coming years. After installing LED lamps, it is important to monitor correct operation. Sometimes they may flicker. If the problem is left unattended, it will affect the service life.
Pros and cons of exchanging lamps
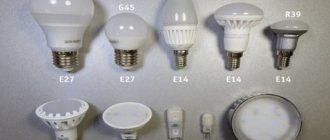
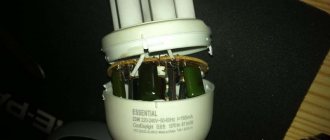
Many people try to replace halogen bulbs with LED bulbs in a chandelier, since they work on the same principle as incandescent bulbs. Inside the flask there is a tungsten spiral and a chemical mixture that prevents failure and wear of the product. Power comes from a 12-, 24-volt current source.
Halogen lamp.
The advantage of an LED lamp is that it quickly reaches full power. The brightness of an incandescent, fluorescent or halogen lamp increases gradually. Diodes tolerate voltage surges more easily, especially if it is an expensive and high-quality device.
In addition, safety is important to buyers. The chips are powered by minimal voltage, so the elements do not pose a danger during the replacement process. If an incandescent or halogen light bulb stops working, it cannot be repaired. Speaking of LED devices, it is often enough to simply replace a burnt-out LED with a new one. If you have experience, you can do this yourself.
Disadvantages of LED lamps:
- Over time, the crystal degrades, which reduces the brightness of the glow;
- high price;
- Neutral or cold light suppresses the release of melatonin, which can cause sleep deprivation.
Chinese low-quality products may have poor color performance and high pulsation. Also, buyers often encounter defective devices.
Video: How to choose the right LED lamps.
Features of the fluorescent lamp device
In order to more clearly understand society’s desire to replace fluorescent lamps with LED devices, it is logical to become more familiar with the gas design.
Indeed, a light device with a luminescent coating is a sealed glass tube, usually filled with mercury vapor.
Fluorescent lamps with lamps filled with a gaseous medium are “powered” by electricity through a choke element. More advanced designs are equipped with an electronic circuit without chokes and are considered somewhat improved in terms of operation
Two modifications of such devices are available:
- For outdoor installation (with high pressure flasks).
- For domestic installation (with low pressure flasks).
In fact, inside the cylinder of a fluorescent lamp there is a mixture of gases consisting of mercury vapor and argon. The inside walls of the glass flask are coated with a special composition - phosphor. When an electric discharge is formed in a gaseous medium, a gas glow is formed, and due to the phosphor, this glow is transformed into light in the visible range.
Advantages of fluorescent lamps
The development and production of lamps of this type, first of all, were the result of a constant request to save energy resources. We should pay tribute - fluorescent lamps allow significant savings.
An energy-saving light device and a traditional source with a direct filament. If we compare the energy parameters, the difference is significant in favor of the first device, where current consumption is reduced significantly
At the same time, you can save due to the higher light output of devices, placing a smaller number of devices per unit area compared to direct incandescent lamps.
The feasibility of using gas-discharge lamps is noted not so much for the domestic sphere, but for industrial and economic structures, that is, where it is necessary to illuminate large areas with minimal costs in terms of energy consumption.
Among the advantages of fluorescent lamps, a decent operating time stands out. The average operating time for gas structures is 10,000 hours.
Comparative cartography, which notes the electrical advantages of light devices of different periods of use. As can be seen from the comparative parameters, the traditional direct-heat lamp is the most “wasteful” light device
If fluorescent lamps are compared to direct filament analogues, where the maximum operating time is 1000 hours, the significant difference becomes more than obvious.
Disadvantages of light devices with phosphor coating
However, the existing advantages of fluorescent lamps, unfortunately, do not hide the obvious disadvantages of these same devices. And the main negative here is the increased chemical hazard.
Structure of the luminescent light source: 1 – sealed glass tube; 2 – phosphor layer; 3 – filament; 4 – luminous flux visible to people; 5 – mercury atom
The cylinder of each lamp contains at least 2 mg of mercury, and this chemical element is classified as extremely dangerous for a living organism. Of course, as long as the flask is sealed, the chemical hazard is reduced to zero.
However, cases of broken glass cylinders of fluorescent lamps are quite common practice
Therefore, it is important to immediately think about the correct disposal of fluorescent lamps
Also among the disadvantages are the light and the “strobe” effect. Both effects have an adverse effect on vision. That is why fluorescent lamps have not found widespread use in the domestic sphere. In a word, there were every reason to raise the issue of replacing fluorescent lamps. A suitable alternative was quickly found.
Features of lamp reinstallation
Before replacing lamps, you need to consider a number of features. For example, if this is an ordinary chandelier with halogen bulbs, there is no provision for reinstalling the light source due to the installed transformer, which converts the standard voltage specifically for “halogen” ones.
Transformer for halogen chandelier.
In this case, you will have to change the chandelier completely. If the LED chip is designed for a lower voltage, it simply will not turn on. Also, some chandeliers have a remote control. If you install other bulbs, it will stop working .
In a spotlight
First, the fixing ring is removed, then you need to remove the device from the cartridge (before doing this, you should put gloves on your hands). The new bulb is then installed, after which the lamp housing is secured in place.
Changing a halogen lamp in a spotlight.
An LED light bulb for a spotlight is considered the best analogue, as it is economical and safe. The displacement of halogens is due to high energy consumption. If the socket in the lamp matches the purchased LED lamp, you can replace one type of product with another.
It is much easier to install an LED analogue instead of a 220-volt halogen lamp, since the design includes a current stabilizer. But if it is necessary to rework the halogens of a 12-volt model with an equivalent supply voltage, difficulties may arise that only a specialist can handle.
In a suspended ceiling
Replacing light bulbs in a suspended ceiling occurs in the following order:
- De-energizing the room.
- Dismantling of internal mechanisms, that is, installing a driver instead of a transformer. This is necessary to convert the 220 V current to the required rating for the LEDs.
- Removing the cartridge.
- Installation of LED lamp.
- If necessary, insulate the wiring.
- Assembly.
Installation of a lamp in a suspended ceiling.
Before turning on the light bulbs, you should double check that everything is installed correctly. It is important that the transformer works correctly, otherwise it may cause the diodes to burn out.
Instructions for replacing fluorescent tubes with LED tube lamps
How to remove a lamp from a ceiling or wall
Before you begin upgrading the lamp, you must disconnect it from the electrical wiring. To avoid being exposed to dangerous phase voltage, you need to turn off the voltage supply with the switch and check using an indicator that there is no phase on the terminal block, with which such lamps are usually connected to the electrical network. Although the switch should be set to open the phase wire, in practice electricians do not always comply with this. If there is a phase on the terminal block, then you need to find the circuit breaker through which voltage is supplied to the lamps and temporarily turn it off.
The next step is to disconnect the power supply wires from the terminal block and insulate the bare ends with insulating tape.
yellow-green ground wire PL is also connected to the luminaire body
colors. As a rule, it is pressed with a screw to the part of the lamp body that is bare of paint using a screw, as in the photo. This wire also needs to be released by releasing the screw. The PL ground wire does not need to be insulated.
If there is more than one lamp installed in a room or office, you can now turn on the light to continue working in good light and unscrew the screws holding the lamp to the ceiling. If a fluorescent lamp is removed from an Armstrong-type suspended ceiling, then it is enough to press it up and, turning it around, remove it diagonally from the resulting empty square in the ceiling.
Electrical diagram for connecting a linear LED tube lamp
The supply voltage to each of the two sockets when a linear fluorescent lamp is connected to it is carried out by two wires according to the following electrical diagram.
This is due to the fact that in order to ignite mercury vapor at a low voltage in a fluorescent lamp, it is necessary to create clouds of electrons at its two ends using hot filaments.
An LED linear lamp works on a different principle and for it to start glowing, it is enough to apply a 220 V AC supply voltage directly to the opposite pins of the base, as in the electrical diagram above. Therefore, only one wire needs to be connected to each cartridge. Which of the cartridges will be connected to the phase wire and which to the zero wire does not matter.
Removing unnecessary elements from the lamp
The lamp has been removed and you can begin to remodel it. First of all, it is necessary to remove the fluorescent lamps from the lamp. To do this, you need to grab the fluorescent lamp with both hands near the bases and turn it 90° in any direction. After this, the lamp can be easily removed from the sockets. Before removing the lamp from the ceiling, it is useful to mark the working lamps with a marker; it is quite possible that they will serve in other lamps for some time. Removal of lamps must be done carefully so as not to break them, since their bulbs contain mercury vapors hazardous to human health.
Next, the electrical wires are disconnected from the starters (which looks like a cylinder in a block) and the throttle (which looks like a transformer). The throttle and starters with pads are removed; they will no longer be needed.
Old style starter sockets are attached to the fixture fixture using screws or narrow metal strips. Modern starter cartridges are secured using latches. In order to remove such a cartridge without damaging the mount, you need to squeeze the cylinders of the latches with tweezers and they will easily come out of the holes in the lamp body. Otherwise, the cartridge can be removed by prying it with a screwdriver.
In old cartridges, the current-carrying conductors are secured with screws. Modern cartridges use a screwless method of fastening wires. In order to disconnect the wire without damaging the cartridge, you need to rotate the wire clockwise and back 90° while simultaneously pulling it out with a little force. If the cartridge is not needed, then the wires can be cut off with wire cutters. By the way, wires are also disconnected in this way from other installation products with a screwless fastening method, such as switches, sockets and electrical sockets for chandeliers and lamps.
Electric holder for linear lamps G13 fastening and connection
There are three types of sockets for G13 sockets in fluorescent tube lamps. They differ from each other in the way they are attached to the lamp body and in the way the current-carrying wires are connected to the socket.
The marking of the lamp socket or base indicates: G – pin connection system for the lamp, 13 – distance between the pins, expressed in millimeters.
Since for the LED tube to work, it is enough to connect only one wire to each socket, you can do without dismantling the socket by only connecting one wire coming from the socket to the terminal block. One of the wires coming out of the cartridge is usually short, as it was connected to a previously installed starter. This wire can be shortened and insulated. If the lamp is designed to install several lamps, then the wires from all sockets installed side by side are connected to one terminal using a terminal block. The wires coming from the opposite row of cartridges are connected to the remaining free terminal of the terminal block.
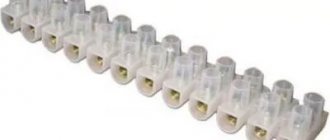
When replacing fluorescent lamps in a luminaire with LED lamps, you can use a Vago-type terminal block to make the installation look neat. You won’t have to deal with insulating the wires and the reliability of connecting the cartridges will increase, since both of its contacts will be connected.
In the photo, the cartridges are mounted using two Vago blocks with four positions each. These were at hand. In this case, it was more expedient to use only one Vago block for five installation locations for wires.
If you don’t have Vago terminal blocks at hand, but you want to do the installation when remaking the lamp at a high professional level, then you will need to dismantle the sockets.
The Soviet-style socket shown in the photograph is attached to the lamp body using screws or a narrow strip of thin metal. The wires in them are inserted into holes on the back side and secured with screws, like in a terminal block. Spring-loaded bushings are inserted into the mounting holes of the cartridges installed on one side. This ensures that the lamp is pressed between the sockets and eliminates the influence of deviations in the geometric dimensions of the lamp fittings.
How to connect Soviet-era cartridges together can be seen in the photograph. If there are more than two cartridges in the lamp, then another jumper is thrown from the free terminal of the cartridge. This installation scheme has a drawback: if you remove the lamp from the socket to which the supply voltage is supplied, then all other lamps will go out. This is due to the fact that voltage is transmitted to adjacent sockets through a jumper between the pins made inside the lamp itself.
After clamping the wire with a screw, you must tug on it; the wire may get past the terminal and therefore remain unclamped.
Modern G13 sockets for linear lamps are mounted on luminaire fittings using latches. To dismantle the cartridge, simply squeeze the latches towards each other using tweezers and the cartridge will easily come out of the mounting holes. Metal springs are also installed on one side of the lamp, but they are flat.
When dismantling and installing cartridges, you need to be very careful and not apply more force than necessary, since the plastic fastening latches can easily break off.
The connection of wires to modern G13 sockets for linear lamps is made with a screwless quick-release system. It is enough to remove the insulation from the conductor to a length of about 10 mm and forcefully insert it into one of the required holes, which are located on the lower plane of the cartridge. Clamping contacts in adjacent holes inside are connected to each other and to a contact that transmits the supply voltage to one of the lamp pins.
Therefore, in order to connect all the cartridges to the power wire, you need to connect them together with jumpers, like the wiring diagram shown in the photo. The length of the jumper between the sockets is selected based on the distance at which the sockets are installed from each other in the luminaire body.
After installing the wires, all that remains is to install the sockets in their original places in the lamp and connect the wire coming from them to the power supply terminal block. The same operation is performed with sockets located on the opposite side of the lamp.
The modification of the lamp is completed and all that remains is to fix it in place, connect the supply voltage to the terminal block and insert the LED tube lamps. With leisurely work, upgrading the lamp to allow the replacement of fluorescent linear lamps with LED lamps took no more than an hour.
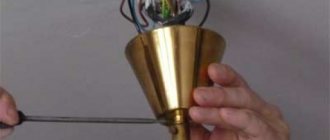
Is it possible to convert a halogen lamp to LED?
Some halogen lamps can be converted, for example if it is a small table lamp. To work, you will need a radiator, an aluminum board for soldering chips, LEDs and a power supply. First you need to do some work on the radiator. If it is large, part can be sawed off.
Heatsink for LED lamp.
LEDs are soldered onto the board, after which they need to be connected to the power supply. If everything works, a bulb or lenses are installed on top, after which the device should be checked again. Next, you can begin installing the board into the lamp housing.
The power supply must be in a plastic tube with holes through which cooling will flow. The power cable passes through the lamp leg and is installed in the housing itself as an additional radiator. Thus, a 100-watt lamp can be converted into a 4-watt LED lamp. If the work is done correctly, the radiator will not heat up to temperatures exceeding 30°.
Types of lamps
As soon as LED lamps appeared on the market, people became interested in them. They are economical and durable, and their appearance, dimensions and brightness are practically no different from conventional lamps. They do not need to be disposed of, and their service life exceeds the service life of luminescent models by tens of times. You can save money if you do not completely replace the entire system, but install new lamps in the old fixtures instead of old lamps. You can do this yourself without any special qualifications or experience.
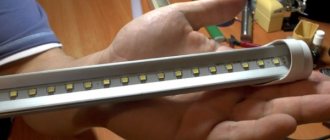
The LED tube contains a getinax strip with a power supply and soldered LEDs. Therefore, there is no need to install an external source for it. It is connected directly to the electrical network. The tubes contain a base; on the inside, pins are connected with copper wire, to which the supply voltage is supplied. The lamp is fully adapted to replace fluorescent lamps without any modification to the design. Simply cut off the excess cables and connect the device.
LEDs are divided according to several criteria:
- dimensions - their length varies from 600 to 1500 mm;
- power - from 9 to 25 W;
- the type of light emitted - it can be warm or cold.
How to avoid mistakes
Before converting a halogen chandelier to an LED one, you need to learn about common mistakes and problems that may arise. Craftsmen often encounter difficulties at the stage of changing the design of a chandelier. Also, not every master can choose the right LEDs. You should take into account their characteristics, the type of holder in the chandelier, the color temperature and the size of the lampshade.
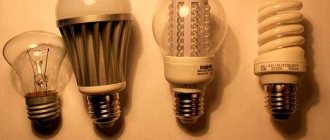
Comparison of different types of lamps.
Halogen lights have a warm glow, so you should purchase diodes with a temperature of 2700 to 3000 K. You also need to remember that 220 V LED sources shine brighter than 12 W.
The 220 V LED lamp has an AC voltage stabilizer. 12 V devices do not have a stabilizer and are not bright when operating on alternating current, so they operate on constant current, which is regulated by the driver. Therefore, for correct operation, you will have to redo the circuit.
Some features of fluorescent lamps
Let's start with the “death” of such a lamp, which will require a special approach to the “funeral”. Type in the search “ demercurization, disposal of mercury my city
" Find the nearest location that provides this service. There are many such points, one or two will definitely be nearby. This is where you need to hand over the burnt-out LL, and not throw it in the trash container. Energy-saving lamps, mercury lamps, burnt-out LEDs and batteries should also be taken there. Unless, of course, you are a person who is not indifferent to the pleasure of walking around your home.
This is one of the disadvantages that replacing fluorescent lamps causes, but it is not the most difficult. The situation is much more complicated when, after many years of use, the heel of the lamp has become “stuck” to the base. Yes, LLs last for many years, and it often happens that the base is simply overgrown with deposits (condensation, dust, etc.), which makes it impossible to remove the lamp without destroying the bulb. Our recommendation is to invite specialists. You must understand that inside the flask there are vapors of mercury and other gases that are heavier than air and which cannot be removed by ventilation.
A voltage drop will damage approximately 30% of the LL. This must be kept in mind when arranging lighting in a country house, where voltage drops are not the exception, but rather the rule. The remaining 70% of the lamps will not fail. They will simply work with less efficiency.
If you connect the LL to the network without observing the “phase - neutral wire” principle, then every second lamp will flicker. Even with a serial connection. This is because the fluorescent lamp circuit contains a capacitor that will dump excess charge if the balances are connected incorrectly.
Even if you follow any connection diagrams for fluorescent lamps, they will still flicker and “blink”. It's not because we haven't figured out how to do it right. This is the physics of electrical breakdown, which cannot be permanent. It “sparks”, so the lamp sparks. The less the ballast (capacitor) works, the better it maintains the “breakdown” level, and the less flickering the lamp is.
Has the lamp begun to flicker noticeably? First, replace it with another lamp that does not blink. Check the voltage in the network, if everything is in order, replace the starter. If the blinking does not disappear, replace the entire electronic ballast.
And do not forget to remove the lamp from time to time and clean the contacts with sandpaper; this is the Achilles heel of these lamps - oxidation of the contacts, which significantly affects its performance.
In conclusion, I would like to note that, despite all their shortcomings, LLs have many advantages, from long service life and the correct spectrum, to safety and minimal load on the apartment’s electrical wiring. Therefore, despite the conquest of the lighting market, it is too early to write off fluorescent lamps as scrap. It is more useful to learn to use them competently and appropriately.
Today there is a tendency to independently manufacture various devices for the home, including lighting fixtures. This allows you to give a second life to old household items, and also save a lot on the purchase of new lamps. Today we will talk about making a fluorescent lamp with your own hands.
Anyone with even a minimal understanding of the basics of electrical engineering can make such a lighting device or repair a faulty lamp. Our article will help you with this.