Even an experienced driver sometimes cannot start the car. Most often, the cause of this is a breakdown of the generator or a low battery. Sometimes the failure of one device leads to the failure of another, since they are interconnected. Therefore, it is necessary to know how to check them and what tools or devices are needed for this.
Why does the generator fail?
The generator box contains a stator, which is the stationary part, and a rotor, which rotates. There is also a relay-regulator, winding, brushes and bearings. All these components can cause generator failure:
- The most common reason is when the bearings jam. This happens because over time dust and dirt get into the generator housing. But the bearing does not always “catch the wedge”; sometimes it can only wedge. This is not difficult to determine; if the rod stops rotating completely, then this indicates the first case. And if it still scrolls and then can stop, this means that the bearing is jammed.
- The electric winding of the rotor or stator may burn out if moisture penetrates there. Copper wires can short out or corrode, stopping the production of electrical current.
- Wear of brushes running along the magnetic paths of the stator. They are presented in the form of graphite rods that simply need to be changed.
- The regulator can also cause damage to this device. In this case, the generator is not able to recharge, or charging does not reach the battery at all. These are the main reasons why a generator breaks down, so when buying one you should always pay attention to these details.
Types and types of relay regulators
Depending on the type of relay, the method for determining performance also depends. Regulators are classified into 2 types:
- combined;
- separate.
Combined relays - this means that the relay itself with the brush assembly is located in the generator housing.
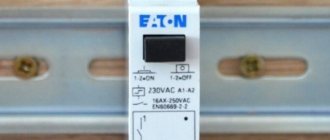
Separate relays - this means that the relay is located outside the generator housing and is mounted on the car body. You've probably seen a small black device attached to the fender of the car, wires go to it from the generator, and from it to the battery.
A distinctive feature of regulators from other devices is that the relays consist of a non-separable housing. During assembly, the body is glued with sealant or special resin. There is no point in disassembling and repairing it, since such electrical appliances are inexpensive.
Safety rules when checking a generator
When disassembling the generator, you must follow some rules that will ensure the safety of the process. First of all, it is necessary to use tools that comply with safety regulations when working with electrical appliances. It is also necessary to wear protective clothing that will prevent various chemicals from coming into contact with the skin, eyes and other parts of the body. The inspector must wear safety glasses, rubberized gloves, and use an insulating mat.
The parts are washed in special tanks directly with kerosene, after which they must dry for 40 minutes. When rewinding reels, appropriate equipment must be used to check their condition. When welding, you need to take care of the generator power supply, which must be turned off.
Checking the generator rotor/stator
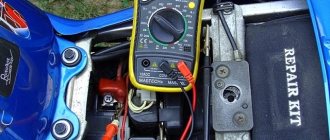
How to test a generator with a multimeter? To carry out the test, you will need to connect the ends of the device to the slip rings of the rotor. The optimal winding resistance is 2.3-5.1 ohms, so its absence means that the winding is broken somewhere. Low readings indicate that a short has occurred between the turns. If the device shows an excess of the norm, then you need to inspect the contacts.
In addition, it is necessary to measure the current used by the winding. To do this, you need to connect slip rings to 12 V using an ammeter in the circuit. The permissible amperage should not exceed 3-4.5 A. If this value is exceeded, it means that an interturn short circuit has occurred in the rotor winding, which indicates the need to rewind or change the coil. This also applies to the relay regulator, whose maximum current strength is 5 A.
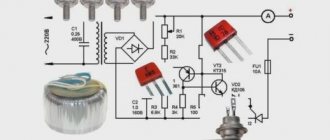
The resistance of the insulating layer is checked by connecting an ordinary light bulb (220 V, 40 W), applying a voltage of 220 V. Here you need to connect one end to the rotor housing and the other to the slip ring. If the lamp is not heated, then there is no short circuit, otherwise the lamp filament begins to heat up. This indicates that the winding needs to be changed or rewinded.
To check the stator, you will need to tilt the rectifier, and the resistance between the ends of the winding should fluctuate in an amplitude of 0.2 Ohms. And between the ends and zero - 0.3 Ohm. If the generator makes too much noise when turned on, then a short circuit has occurred in the stator winding or rectifier. The lamp test is carried out in a similar way. Glowing filaments warns of a malfunction.
Checking the VAZ 2107 generator
The “seven” generator produces electric current when the engine is running. If problems arise with it, searching for the causes and eliminating the breakdowns must be done immediately. There can be many problems with a generator. Therefore, possible malfunctions need to be dealt with in more detail.
Checking the diode bridge
The diode bridge of the generator consists of several rectifier diodes, which receive an alternating voltage and output a constant voltage. The performance of the generator itself directly depends on the serviceability of these elements. Sometimes diodes fail and need to be checked and replaced. Diagnostics is carried out using a multimeter or a 12 V car light bulb.
Multimeter
The procedure consists of the following steps:
- We check each diode separately, connecting the probes of the device in one position, and then changing the polarity. In one direction the multimeter should show infinite resistance, and in the other - 500-700 ohms.
A light bulb
If you don’t have a multimeter at hand, you can use a regular 12 V light bulb:
- We connect the negative terminal of the battery to the body of the diode bridge. We connect the lamp into the gap between the positive terminal of the battery and the terminal of the generator marked “30”. If the lamp lights up, the diode bridge is faulty.
- To check the negative diodes of the rectifier, we connect the minus of the power supply in the same way as in the previous paragraph, and the plus - through a light bulb with a bolt securing the diode bridge. A burning or flickering lamp indicates problems with the diodes.
- To check the positive elements, plus the batteries, we connect through a lamp to contact “30” of the generator. We connect the negative terminal to the bolt. If the lamp does not light up, the rectifier is considered working.
- To diagnose additional diodes, the minus of the battery remains in the same place as in the previous paragraph, and the plus is connected through a lamp to contact “61” of the generator . A glowing lamp indicates problems with the diodes.
Video: diagnosing the rectifier unit with a light bulb
My father, like many other owners of domestic automobile industry products, used to repair the generator rectifier unit with his own hands. Then the necessary diodes could be obtained without problems. Nowadays, parts for repairing a rectifier are not so easy to find. Therefore, if the diode bridge breaks down, it is replaced with a new one, especially since this is much easier to do than to repair it.
Checking the relay regulator
Since different voltage regulators were installed on VAZ Sevens, it is worth checking each of them in more detail.
Combined relay
The combined relay is integral with the brushes and is mounted on the generator. You can remove it without dismantling the latter, although this will not be easy. You need to get to the back of the generator, unscrew the two screws securing the relay and remove it from the special hole.
To check the voltage regulator you will need:
- power supply with variable voltage 12–22 V;
- connecting wire;
- 12 V light bulb.
The process itself consists of the following steps:
- We connect the negative of the battery to the ground of the relay, and the positive to its contact “B”. We connect a light bulb to the brushes. We do not include the power source in the circuit yet. The light should light up, and the voltage should be about 12.7 V.
- We connect the power supply to the battery terminals, observing the polarity, and increase the voltage to 14.5 V. The light should go out. When the voltage drops, it should light up again. If this is not the case, the relay must be replaced.
- We continue to increase the tension. If it reaches 15–16 V, and the light continues to light, this will indicate that the relay regulator does not limit the voltage supplied to the battery. The part is considered non-working; it recharges the battery.
Separate relay
A separate relay is mounted on the car body, and the voltage from the generator first goes to it, and then to the battery. As an example, let's look at checking the Ya112B relay, which was also installed on classic Zhiguli cars . Depending on the version, such a regulator can be mounted both on the body and on the generator itself. We dismantle the part and perform the following steps:
- We assemble a circuit similar to the previous one; instead of brushes, we connect a light bulb to contacts “W” and “B” of the relay.
- We perform the check in the same way as in the method described above. The relay is also considered faulty if the lamp continues to light when the voltage increases.
Old type relay
Such a regulator was installed on the old “classic”. The device was mounted on the body; testing it has some differences from the described options. The regulator has two outputs - “67” and “15”. The first is connected to the negative terminal of the battery, and the second to the positive terminal. The light bulb is connected between ground and pin “67”. The sequence of voltage changes and the lamp's reaction to it are the same.
Once, when replacing a voltage regulator, I encountered a situation where, after purchasing and installing a new device, the device showed more than 15 V at the battery terminals instead of the required 14.2–14.5 V. The new relay regulator turned out to be simply faulty. This suggests that it is not always possible to be completely confident in the performance of a new part. When working with electricians, I always control the necessary parameters using the device. If problems arise with charging the battery (overcharging or undercharging), then I start troubleshooting with the voltage regulator. This is the most inexpensive part of the generator, which directly determines how the battery will be charged. That’s why I always carry a spare relay-regulator with me, since a malfunction can occur at the most inopportune moment, and you can’t travel very far without a battery charge.
Read also: How to repair a 220V diode lamp
Video: checking the generator relay regulator on a “classic”
Capacitor check
The capacitor is used in the voltage regulator circuit as a suppressor of high-frequency interference. The part is attached directly to the generator housing. Sometimes it can fail.
The serviceability of this element is checked using a special device. However, you can get by with a digital multimeter by selecting a measurement limit of 1 MOhm:
- We connect the probes of the device to the terminals of the capacitor. If the element is in good working order, the resistance will be small at first, after which it will begin to increase to infinity.
- We change the polarity. The device readings should be similar. If the capacitance is broken, then the resistance will be small.
If a part fails, it is easy to replace it. To do this, simply unscrew the fastening element holding the container and fixing the wire.
Video: how to check a car alternator capacitor
Checking brushes and slip rings
To check the slip rings on the rotor, the generator will need to be partially disassembled by removing the rear section. Diagnostics consists of visually inspecting the contacts for flaws and wear. The minimum diameter of the rings must be 12.8 mm. Otherwise, the anchor must be replaced. In addition, it is recommended to clean the contacts with fine-grained sandpaper.
The brushes are also inspected, and if they are severely worn out or damaged, they are replaced. The height of the brushes must be at least 4.5 mm. They should move freely and without jamming in their seats.
Video: checking the generator brush assembly
Checking the windings
The "seven" generator has two windings - rotor and stator. The first is fixed to the anchor and constantly rotates when the engine is running, the second is fixedly fixed on the body of the generator itself. Windings sometimes fail. To identify a malfunction, you need to know the testing procedure.
Rotor winding
To diagnose the rotor winding, you will need a multimeter, and the process itself consists of the following steps:
- We measure the resistance between the slip rings. Readings should be between 2.3 and 5.1 ohms. Higher values will indicate poor contact between the winding terminals and the rings. Low resistance indicates a short circuit between the turns. In both cases, the anchor requires repair or replacement.
Stator winding
A break or short circuit may occur with the stator winding. Diagnostics can also be carried out using a multimeter or a 12 V light bulb:
- On the device, select the resistance measurement mode and one by one connect the probes to the terminals of the windings. If there is no break, the resistance should be within 10 ohms. Otherwise it will be infinitely large.
Checking the belt
The generator is driven by a belt from the engine crankshaft pulley. It is necessary to periodically check the belt tension, since if it is loosened, problems with charging the battery may occur. It is also worth paying attention to the integrity of the belt material. If there are visible peels, tears or other damage, the element needs to be replaced. To check its tension, follow these steps:
- We press on one of the belt branches, for example, with a screwdriver, while simultaneously measuring the deflection with a ruler.
Before a long trip, I always inspect the alternator belt. Even if the product is not damaged externally, I keep a belt in stock along with the voltage regulator, because anything can happen on the road. Once I was faced with a situation where the belt broke and two problems arose at the same time: the battery was not charged and the pump was not working because the pump did not rotate. A spare belt helped.
Bearing check
To ensure that a generator malfunction caused by jammed bearings does not take you by surprise, you need to check them when a characteristic noise appears. To do this, the generator will need to be removed from the car and disassembled. We carry out diagnostics in this order:
- We visually inspect the bearings, trying to identify damage to the race, balls, cage, and traces of corrosion.
When checking, you should also pay attention to the front cover of the generator. There should be no cracks or other damage on it. If damage is detected, the part is replaced with a new one.
Testing the relay regulator
This element is a voltage stabilizer, since when driving the speed of the generator shaft is not constant. The voltage changes periodically in an amplitude of 12-20 V.
To check the functionality of the relay, it is necessary to measure the voltage while the car is running. Measurements are made by connecting to the outputs of the generator device or battery terminals with an amplitude of 20-50 V. With a working module, the voltage should range from 14 to 14.2 V. After several presses on the accelerator, it is necessary to check the reading of the device.
How to test a combined relay
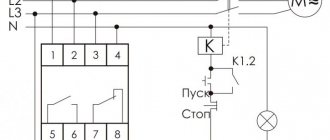
For example, consider the regulator of a VAZ 2110 car. To check whether the relay is working, you need to assemble a circuit such as in the figure.
Relay regulator VAZ 2110 - 37.3701:
- 1 - battery;
- 2 — ground terminal of the voltage regulator;
- 3 - voltage regulator;
- 4 – terminal “Ш” of the regulator;
- 5 — output “B” of the regulator;
- 6 — control lamp;
- 7 — terminal “B” of the voltage regulator.
When assembling such a circuit with a standard voltage of 12.7 Volts, the light bulb should simply glow.
If the regulator voltage is raised to 14-14.5 Volts, the light bulb should go out. If the light does not go out at such a high voltage, then the regulator is faulty.
How to check battery charge
There are several ways to test the battery, but the easiest way is to use a multimeter. To do this you need to do the following:
- Connect the device to the battery terminals.
- Place it in the voltage measuring position at 20 V.
- The red tip touches the plus, the black tip touches the minus.
- Then look at the instrument readings.
It is worth noting that when checking the battery, you must turn on the ignition.
Checking the combined relay-regulator of the car
First we will check the combined relay-regulator circuit together with the brush assembly. These are now installed on many foreign cars, and by the way, on many domestic cars (often labeled Y212A).
As you understand, it is necessary to remove the generator and disassemble it, since this combined unit is attached at the back next to the generator shaft, along which these brushes run. For this:
- We look for a special “window” on the back of the generator where the brushes are immersed.
- Unscrew the fastening bolt.
- Remove the brush assembly.
- We clean it - as a rule, it will be covered in graphite dust; the brushes are made of graphite, using special carbon.
Then we need to check it, but for this we assemble a certain circuit, it is advisable to use a power supply with an adjustable load or a charger. We also need to take a regular 12V light bulb from a car, for example from a “dimensions”, we will need wires to assemble the entire system.
We may need a battery, because many chargers do not work without it. But from the wire from the battery we connect the relay-regulator, to the brushes of which we connect a 12V light bulb, this can be done with small alligator clips, the main thing is not to break the graphite elements. A small diagram for understanding.
If you connect everything in a calm state, the light will simply light up and stay lit, this is normal, since the brush assembly is a conductor of electricity from the shaft. Let me remind you that in a calm state, the voltage on the brushes will be approximately 12.7V.
Now we need to raise the voltage on the charger to 14.5 V, the lamp will light, but when this threshold is reached it should go out! That is, 14.5 V is a kind of “cutoff” for a further increase in voltage! If you lower the value, the lamp should light up again. Then your relay-regulator is working, it passed the test.
Checking the output current strength of the generator
Before starting the test, you need to check the tension of the drive belt. The ignition must be turned off. Then you need to disconnect the negative wire from the battery and the standard wire from terminal B.
After this, you need to connect the measuring instruments:
- ammeter (0-100A) to the folded negative wire of the generator;
- negative wire of the voltmeter (0-20V) to the car body;
- tachometer to the negative terminal of the battery.
Next you need to look at the voltmeter readings. If it is at zero, it means there is a break in the circuit somewhere, a burnt-out safety insert or poor contact. To verify this, you need to start the car and turn on the high beams. The fan should be running at maximum. Then you need to increase the shaft rotation speed to 2500 min. The ammeter will show how much current is leaving the generator.
How to check the diode bridge of a generator without removing it from the car
Before examining the diode bridge of the generating unit without removing it, you will need to remove all the wiring that goes to it and the relay, and also remove the ground from the battery. First you need to check if it is shorting. To do this, use a multimeter to measure the resistance: the plus of the device to the rectifier phase, and the minus is placed on the generator housing. If it works, then the multimeter data will show the maximum value, and if there are only a few ohms on the sensor, then the bridge has become unusable.
How to check the generator voltage regulator
A modern regulator, combined with a brush assembly, is used on most foreign and domestic cars. First, let's evaluate access to the generator. If it is difficult to access and inconvenient, then it would be better to remove it from the car. If access is free, then remove the relay from it without removing the generator. But before this, you must remove the negative terminal from the battery.
The regulator is attached to the generator from the rear cover side, usually with two bolts. We unscrew them and carefully, so as not to damage the brushes, remove it, having first disconnected the wires from it.
For further testing, we will need either a power supply or a charger, a 12-volt calvania lamp. The main thing is that you can increase and decrease the voltage from 10 to 16 volts. If you use a charger for testing, you will also need a battery. The fact is that many chargers do not work without it.
We connect the charger to the battery in normal mode. Additionally, we connect a multimeter and two wires to the battery terminals. One is positive, the other is negative. And we connect them to the relay regulator. The positive terminal of the regulator is a plug. The downside is a metal plate under one of the mounting holes. We connect the light bulb to the brushes with wires. The stand is ready, you can start testing. The power supply is connected in the same way, only without the battery.
We connect the charger to an external network and turn it on. The load regulator knob should be at the minimum level. We begin to slowly increase the tension. At the same time, the intensity of the light bulb should gradually increase. With a load of 12 volts or more, it should burn at full heat. We continue to gradually increase the voltage until the light goes out or the load reaches 15 volts. If the regulator is working properly, the light should go out at a voltage value of 14.2 -14.5. When the load decreases, the light will light up again.
If the light bulb goes out to 14 volts, or a voltage of more than 14.8 volts is reached, and the light bulb is still on, then such a regulator must be changed.
Checking a separate generator voltage regulator
A free-standing stabilizer is checked in the same way. Basically it is mounted on the body in the engine compartment. But sometimes on the generator cover. In any case, unscrew it and connect it to the stand. Let, for example, it be a Y112 V type stabilizer.
the positive wire to terminals “B” and “C”, and feed the negative wire to the housing. We connect the control lamp to terminals “B” and “W”. Next, we do everything exactly the same as with the combined stabilizer. We gradually raise the load; when it reaches 14.5 volts, a cutoff should occur. If there is no cutoff, then change the regulator.
Checking the outdated 591.3702−01
This obsolete type of relay was installed on almost all rear wheel drive vehicles. It is classified as free-standing. Always attached to the body of the engine compartment. The connection diagram for testing is slightly different from that described above. The actions and essence of the check remain the same.
There are only two contacts here. The markings are made with the numbers “67” and “15”. Contact numbered “67” is the negative terminal. Accordingly, “15” is a plus. We fix the negative wire from the charger to the device body. We attach the positive one to terminal 15. We connect the wires of the control light: one on the body, the second to terminal “67”. Our stand is ready for testing.
How to check the k1216en1 regulator with a multimeter
And finally, a few words about the k1216en1 relay. This regulator was installed on rear-wheel drive and front-wheel drive VAZs with injection engines. If we take into account the fact that there are many such cars in use throughout the post-Soviet space, we cannot ignore it.
This regulator belongs to a combined relay with a brush assembly . Its preliminary and main verification is carried out according to the method described above. There are no special differences.
Replacing or rewinding the generator rotor/stator
If a rotor or stator breaks down, there are three ways to fix this problem:
- contact a specialist;
- replace the old element with a new one yourself;
- update the winding yourself.
Rewinding the winding with your own hands is not easy. In addition, the whole process requires special care and precision, so it is better to buy a new one and leave the old one, perhaps it will still be useful. After assembly, it is necessary to measure all indicators and check the operation of the device.
Every driver must remember the relationship between the battery and the generator and be able to determine the reason for their failure. It is advisable to always have a multimeter on hand, which can come in handy, especially on long trips. Each of these devices can work independently for some time, but if measures are not taken in a timely manner, you can end up in an unpleasant situation. Therefore, you should not ignore little things that can later become a problem.
How to check the relay - regulator without removing it from the car?
Indirect signs
If your “regulator” is out of order, you will notice it very quickly, especially if it is winter and frost outside. The fact is that there will be either an “undercharge” or an overcharge of the battery . If the charge is under-charged , you simply won’t start your car - you come to the parking lot, insert the key, and the car barely turns the engine, or doesn’t start at all, sometimes even the lights go out.
When recharging , almost the same thing will happen, only the reason will be boiling away of the electrolyte from the battery cans. It can be indirectly determined by the rapid decrease in electrolyte in the banks, and a white coating on the top of the battery, as well as on parts of the body underneath it. It’s worth thinking about it and checking the regulator relay.