Types of Tesla Coils
- Actually, the coil of Tesla himself (a spark gap was used in the composition);
- Transformer on a radio tube;
- Transistor coil;
- Resonance coils (two pieces).
All coils have a similar principle of operation, the only difference is the complexity of their assembly and the electronics used.
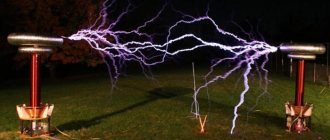
Looking at photos of homemade Tesla coils, you inevitably want exactly the same one for your home. After all, their work is such a beautiful sight that it is impossible to take your eyes off.
However, many are afraid to undertake the manufacture of such a device, justifying it by the fact that the work will take a lot of time and effort, and all this is also life-threatening.
But we assure you, the circuit of a regular Tesla coil is quite simple. Therefore, we invite you to assemble this unusual device yourself.
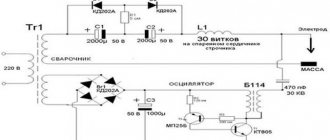
Tesla transformer circuits
The device is assembled according to one of the supplied diagrams; the ratings may vary, since the efficiency of the device depends on them. First, about a thousand turns of thin enameled wire are wound onto a plastic core, creating a secondary winding. The coils are varnished or covered with tape. The number of turns of the primary winding is selected experimentally, but on average it is 5-7 turns. Next, the device is connected according to the diagram.
To obtain spectacular discharges, it is enough to experiment with the shape of the terminal, the spark glow emitter, and the fact that the device is already working when turned on can be judged by the glowing neon lamps located within a radius of half a meter from the device, by independently switching on radio lamps and, of course, by plasma flashes and lightning at the end of the emitter.
Step-by-step assembly of a Tesla coil yourself
So, we don’t need to demonstrate aerobatics, so we will make the simplest coil that uses a transistor in its assembly. It is the most economical in terms of time and money, and therefore is ideal for us.
What is a Tesla transformer used for?
Toy? Nothing like this. Using this principle, Tesla intended to build a global system of wireless energy transmission using ether energy. To implement such a scheme, two powerful transformers are needed, installed at different ends of the Earth, operating at the same resonant frequency.
In this case, there is completely no need for copper wires, power plants, or bills for paying for the services of monopoly electricity suppliers, since anyone anywhere in the world could use electricity completely unhindered and free of charge. Naturally, such a system will never pay for itself, since there is no need to pay for electricity. And if so, then investors are in no hurry to get in line to sell Nikola Tesla’s patent No. 645,576.
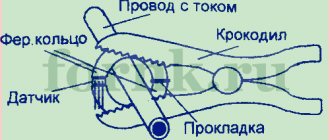
Tesla coil structure
- Primary coil (primary circuit);
- Secondary coil (secondary circuit);
- Power supply;
- Grounding;
- Ring of protection.
These are the main elements of transformers. It should be noted that other components may be found in different types of coils.
How the device works
The power supply supplies the primary circuit with the required voltage. After which the circuit produces high-frequency oscillations, which, in turn, force the secondary circuit to create its own oscillations, which go with the first ones in resonance. Thanks to this, a current with high voltage and frequency appears in the second coil, which forms the much-anticipated effect - a streamer. Now you need to collect all the elements in one pile.
Necessary materials
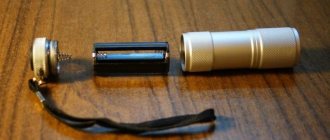
- Let's take a car battery (or any other source of constant voltage 12-19 V) as a source;
- Copper wire (preferably enamel) with a diameter of 0.1 to 0.3 mm. and about 200 meters long;
- Another copper wire with a diameter of 1 mm;
- Two frames (dielectrics). One (for the secondary circuit) with a diameter of 4 to 7 cm and a length of 15-30 cm. The other (for the primary circuit) should be several centimeters larger in diameter and shorter in length;
- Transistor D13007 (you can use others identical to it);
- Pay;
- A few resistors of 5 - 75 kOhm, 0.25 W power.
Assembling a Tesla coil yourself at home
Now we have gradually approached the assembly of the installation itself. First, let's create a secondary outline. We wind a thin wire with a diameter of 0.15 mm onto a long frame tightly without overlaps. You need to make at least 1000 turns (but you don’t need too many). After this, we coat the coil with varnish in several layers (other materials can be used) so that the wire is not damaged in the future.
Now about the terminal. It allows you to control the streamers, but at low powers it is not necessary; instead, you can simply move the end of the coil up a few centimeters.
For another coil, we wind thick wire around the remaining frame. In total you need to make 10 turns. The secondary circuit must be inside the primary.
Now we install everything so that the structure does not fall down and the primary and secondary contours do not collide together (this is exactly what the frame is for). Ideally, the distance between them should be around 1 cm.
Then we put everything together. To the plus of the power supply we connect the primary circuit and one resistor, to which we connect another resistor in series. To the end of the second resistor we connect the secondary circuit and the transistor. We connect the other end of the primary circuit to the second contact of the transistor. And we connect the third contact of the transistor to the minus of the power source.
When connecting, it is important not to mix up the transistor contacts. You also need to attach a radiator or other cooling to it. Everything is ready, you can try the device in practice. However, do not forget about safety. Do not touch anything, only in the dielectric!
You can check the operation of the installation by the presence of a streamer, or, if there is none, you can bring a light bulb to the coil, and if it lights up, then everything is in order.
Immersion blender - which company is better to choose for your home? Photo+video reviewsDIY tester: instructions, diagrams and solutions on how to make a simple homemade device. Step-by-step instructions on how to make a tester from a smartphone
DIY voltage regulator: master class on how to make a simple voltage regulation device
Simple generator, DIY Tesla coil
Today I'm going to show you how I make a simple DIY Tesla Coil at home ! You may have seen such a reel in some magic show or television movie.
If we ignore the mystical component around the Tesla coil, it is simply a high voltage resonant transformer that operates without a core. So, in order not to get bored from the leap of theory, let's move on to practice.
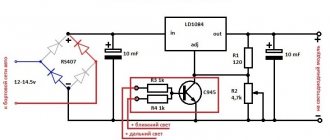
The circuit diagram of this device is very simple
To create we need the following components:
- power supply, 9-21V, this can be any power supply
- small radiator
- transistor 13009 or 13007, or almost any NPN transistors with similar parameters
- variable resistor 50kohm
- 180Ohm resistor
- coil with wire 0.1-0.3, I used 0.19mm, about 200 meters.
For winding you need a frame, it can be any dielectric material - a cylinder about 5 cm and 20 cm long. In my case, this is a piece of 1-1/2 inch PVC pipe from a hardware store.
Let's start with the most difficult part - the secondary winding. It has 500-1500 spools of reel, mine is about 1000 rpm. Secure the beginning of the wire with the terminal and start winding the main layer - to speed up the process, you can do this with a screwdriver.
It is also advisable to spray the already wound coil with varnish.
The primary coil is much simpler, I put paper tape with the sticky side out, in order to maintain the ability to move the position and wind it around 10 turns of wire.
winding a Tesla transformer
The entire circuit is assembled on a breadboard.
Be careful when soldering the variable resistor! 9/10 of the coil does not work due to an incorrectly soldered resistor.
Connecting the primary and secondary windings is also not an easy process, since the insulation of the latter has a special coating that must be cleaned before soldering.
Before turning on the power for the first time, place the variable resistor in the middle position and place a light bulb near the coil, and then you can see the effect of wireless power transfer. So we made the Tesla Coil.
Turn on the power and slowly turn the variable resistor.
This is a fairly weak coil, but be careful not to place any electronic devices near it , such as cell phones, computers, etc. with coil working area.