Floor screed on a loggia - why do it?
If you decide to turn a balcony (loggia) into a full-fledged cozy room, before starting renovation work the question will definitely arise - is it worth doing a screed on the balcony?
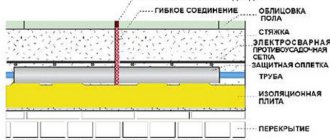
Option for making floor layers on a loggia
First, assess the condition of the slab - unless you live in a new building, the concrete slab has most likely seen better days and needs reconstruction. Also decide on the goals of the renovation: what should the future balcony room be like, how much time will you spend on it, what furniture will you bring to the loggia?
It is necessary to screed the floor on the loggia if:
- there are cracks, swellings and red spots on the balcony slab;
- you are planning to lay laminate, linoleum or parquet;
- a “warm floor” system will be installed on the loggia;
- the balcony room needs additional insulation;
- it is important to provide hydro- and sound insulation;
- communications need to be hidden;
- you just want to level the balcony slab.
Varieties
The modern construction market offers several options for how to make a screed on a balcony, and each type has its own pros and cons.
Wet cement (cement-sand). This method of leveling a balcony slab is the simplest and most cost-effective, and the work is easy to do yourself. But wet pouring also has disadvantages: it can be laid in a day, but it will take at least 10-14 days to dry. To prevent the surface from cracking, it must be moistened: sprayed with a spray bottle and covered with polyethylene.
Dry (consists of a layer of expanded clay or sand, with gypsum fiber boards on top). A dry screed on a loggia will cost about 2 times more than a wet one, but with this technology you don’t have to worry about diluting the solution and waiting for the mixture to dry. Expanded clay is an excellent insulation material, and after finishing the work, the surface can be laid with any material - from parquet to ceramic tiles.
Semi-dry. In essence, this is a regular cement-sand coating, only less water is needed during the preparation of the solution. The consistency of this building mixture resembles sand in a children's sandbox.
Laying takes one day, and after three days the final work can be carried out. If you follow the technology correctly, the semi-dry coating eventually turns into a durable monolithic slab, which serves as an excellent insulation material and allows you to lay any floor covering on top.
Screed with insulation. If the balcony is very old or thorough protection from the winter cold is needed, repair specialists advise using insulation (expanded polystyrene, penoplex, expanded clay) and pouring cement mortar on top. This method significantly raises the level of the balcony floor, but you are guaranteed good sound insulation and warmth in the room.
Preparatory work
Whatever type of subfloor you choose, making a screed on the balcony with your own hands will be quite simple. The technology for pouring the building mixture is simple, and even a novice builder can handle it - just follow the instructions carefully.
Necessary tools and materials for construction work:
- dry construction mixture (or just cement and sand);
- capacity;
- hammer and chisel:
- hacksaw for metal:
- screwdriver:
- waterproofing (roofing felt or polyethylene);
- boards for formwork;
- trowel and rule;
- beacons (metal profiles) and level.
Laying concrete on the floor for a wet screed
Defining the terminology
For a closer look at the topic, we will consider 3 categories of balconies:
- Unglazed balcony.
- Loggia.
- Loggia with heating (continuation of the apartment).
For each of them, you can use a separate material that will be used to level the surface. If you choose the wrong method, the coating may collapse under the negative influence of various factors.
Open balcony
In summer it rains and in winter it snows. For this type of premises, a cement floor screed is simply necessary. In addition to leveling, the surface of the slab will be strengthened with a fresh layer. If the house has recently been put into operation and the condition of the concrete floor is in perfect condition, you can use an OESB or DSP sheet. As a decorative coating, the ideal option would be to use materials such as:
- Decking.
- Ceramics.
- Porcelain tiles.
- Paving slabs.
It must be taken into account that the base of the structure is largely in a suspended state. Therefore, when choosing a method for leveling the floor on a balcony with your own hands, you should not use heavy materials.
If there is a large difference in the plane, it is recommended to abandon the screed in favor of wooden beams.
Loggia
In this case, the floor slab is protected from the effects of snow, rain and wind. However, it is subject to sudden temperature changes, due to which drops of condensation periodically form. That's why
Related article: High-quality corner connection of profiled timber
The ideal option would be to use moisture-resistant materials:
- DSP.
- Plywood.
- OeSBi.
- Cement strainer.
Only moisture-resistant floor coverings can be used: linoleum, tiles, laminate class 33 or 34.
Loggia with heating
A screed for a loggia, which is well-glazed and constantly heated during the cold season, is needed directly to level the surface. Absolutely all types of floor coverings used in the living room are used as the finishing layer.
The first stage is surface preparation
It is necessary to remove all unnecessary objects from the loggia, beat off the old screed, if necessary, down to the concrete slab. All cracks and holes must be very carefully sealed with cement to avoid the risk of leakage (especially if you plan to make a liquid screed on the balcony).
Then clean the surface again from construction dust and dirt, prime it so that the construction mixture will better adhere to the concrete.
The floor solution must be prepared immediately before work - the mixture dries out quite quickly. The dosage of water and instructions for using ready-made compositions are on the packaging; if you use ordinary cement and sand, then you need to mix them in a ratio of 1:3 (if you are sure of the excellent quality of the cement - 1:4). Water - enough to obtain the consistency of thick sour cream or dough.
Preparation of the grounds
The base for the screed must be strong, clean, free from oil and dust.
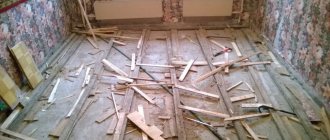
If there are old coatings, we remove all layers to the base, remove construction debris and inspect the surface of the reinforced concrete slab.
Figure 2. Dismantling balcony coverings
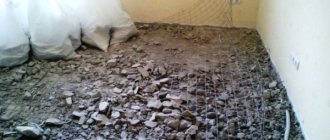
If there are cracks, we carefully repair them and clean them of destroyed concrete.
We clean the damaged areas of the concrete slab to form durable layers. If there is exposed fittings, we clean it of rust and dust. Rust can be removed with phosphoric or hydrochloric acid, or with a stiff wire brush.
We clean the cleaned areas from dust, treat them with a primer and seal them with ready-made repair compounds for concrete or cement mortar.
Figure 3. Repair of a concrete slab.
We coat the repaired concrete slab twice with a deep penetration primer. After the first layer has dried, apply a second layer of impregnation. It is better to choose primer compositions with antiseptic additives to prevent the formation and development of mold, mildew and other microorganisms.
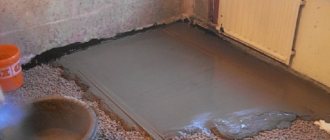
Liquid floor screed on the loggia
Liquid cement-sand floor screed on a balcony is used when it is necessary to raise the floor level no higher than 8 cm - a thicker layer will be too much of a challenge for the balcony slab.
The technology of work consists of several stages.
We measure the height of the future floor on the walls using a level. If the cement fill is liquid, you need to make formwork from wooden beams around the perimeter of the room (so that the solution does not leak out). Seal the gaps between the sides and the slab with sealant or foam.
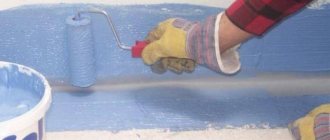
Leveling liquid screed using the rule
We lay a layer of waterproofing (usually a large piece of polyethylene). The film should extend beyond the future floor covering by 10 centimeters - the excess is cut off after drying.
Then you need to cut the required number of beacons (the distance between them is 40-60 cm) and install them, starting from the edge of the slab. You can attach it with screws or cover it with cement on top. If a solution is used, you will have to wait until the mixture dries - this will slightly increase the repair time.
When the beacons are firmly fixed, you can gradually pour out the mixture itself - carefully, away from the wall, so that the solution is evenly distributed between the profiles.
Important! First, the floor screed on the loggia is distributed over the surface with a trowel. Then use a rule (a light piece of metal profile) to ensure a perfectly even coating. To prevent bubbles, you can pierce the filling several times with a regular knitting needle.
After 2-3 days, when the solution has set, you can remove the beacons from it (if you do not decide to drown them), wipe the marks and bumps with the solution. You also need to sand down any uneven areas. It takes 1-2 weeks for such a floor to dry; at first it needs to be regularly sprayed and covered with film to prevent cracks from appearing.
After another couple of days, the screed on the balcony will finally gain strength - and you can begin work on laying the flooring.
Work order
Below I will tell you how to make a screed on a balcony using cement mortar over insulating material. The whole process consists of several stages, presented in the diagram below:
Stages of arranging a screed on a balcony.
Now about each of them in more detail. I’ll warn you right away that in my case the work was carried out on a glazed balcony, so the floor surface needed insulation. This is what was done using penoplex.
Preparation
It all starts with preparing the surface and the entire room for screed installation. I proceed as follows:
- I empty the balcony of unnecessary things and clean the floor surface. I take out all the tools and materials that will interfere with the construction of the screed, and then clean the surface of debris and dust. It is better to use a vacuum cleaner that will clean the floor slab from the slightest particles of debris and dust.
The floor on the balcony must be cleaned of dust and debris.
- I am repairing a concrete slab. This must be done for the reason that before pouring the concrete solution I will be laying expanded polystyrene (extruded). Therefore, it is advisable to protect the insulating layer from moisture. The liquid will not cause much harm to the insulation itself, but fungus and mold may appear on the surface of the concrete. This is done as follows:
- The discovered cracks are cleared of crumbling pieces of concrete along the edges and slightly widened using a grinder or hammer drill.
- A little polyurethane foam is blown inside from a gun. It will increase in size and will not allow water from the outside to penetrate under the layer of insulating material.
- After the foam has hardened, you need to cut off the excess that has protruded to the surface using a bench knife.
- If protrusions or sagging mortar are found on the surface of the slab, it is better to knock them off with a chisel on a hammer drill so that the base on which the insulation will be laid is as even as possible.
- It is also necessary to get rid of sharp stones and protruding pieces of wire that can tear the waterproofing membrane (we will install it in step 4).
Cracks in foams are sealed with polyurethane foam.
- Soil reinforced concrete floor slab. A deep penetration primer containing antiseptic additives is most suitable for the job. This substance will provide reliable protection against various microorganisms that can develop under the insulating layer and screed. The work is done like this:
- First, using a roller (you can use a wide and thick brush - a brush), I treat the floor surface with a primer.
- After the first layer has dried (this usually takes up to 4 hours), I repeat the procedure.
The concrete floor is primed with a roller.
- I am waterproofing the balcony floor. To do this, you can use pasting and coating material. I like to work with bitumen mastic, which is ready to use after purchase and applied to all surfaces with a regular brush. It is necessary to treat not only the floor, but also the walls to a height of up to 20 cm. In the simplest case, you can simply lay a thick plastic film on the floor.
The balcony floor can be waterproofed with plastic film.
- I glue the damper tape. You can use material from any manufacturer. As an example, I can offer a product from the Turkish company FiratPlastic. This tape is glued at the point of contact between the screed and the walls of the balcony to compensate for possible changes in the size of the mortar and protect the surface from cracking.
Gluing damper tape.
After all the films have been laid and glued, you can proceed to insulating the floor using penoplex.
Insulation
At this stage I proceed according to the following scheme:
- I lay foam boards on a waterproofed floor. Penoplex is extruded polystyrene foam. Insulation that has a low enough thermal conductivity coefficient to prevent cold from entering the balcony, but at the same time sufficient strength to withstand the load when pouring cement mortar and subsequent use of the floor. Laying is done as follows:
- The first layer of insulating boards is laid out. The ends of the penoplex have a stepped protrusion, which facilitates the connection of individual parts of the insulating layer with each other.
- There is no need to secure the slabs to the floor surface in any way. They will be firmly held in place with a cement screed poured on top.
- The second layer is laid on top. Individual sheets of penoplex should be positioned so that the seams of the second layer do not intersect with the seams of the first. In this way, it is possible to avoid the appearance of cold bridges, which reduce the efficiency of the thermal insulation.
Penoplex is placed on the floor without additional fastening.
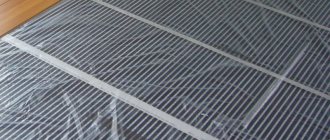
- I install reinforcing mesh. It is necessary to strengthen the surface layer of the screed. Made from steel wire, sold in the form of individual sheets ranging in size from 0.5 by 2 to 2 by 6 meters. I recommend taking a product with a cell size of 10 by 10 cm. There are several important points here:
- The mesh itself should not be located on the surface of the penoplex. To achieve maximum effect, it is necessary to place it on an elevation a few centimeters from the insulating layer. For this purpose, special plastic legs with a cross-shaped cutout at the top are used, into which a reinforcing mesh is inserted.
- I recommend placing the individual parts of the reinforcing layer overlapping each other at a distance of one cell (10 cm) and tying them together using steel wire.
- If there are no special legs, you can install the mesh on slides of quick-hardening mortar.
Reinforcing mesh laid on the insulation (before installing the legs).
- I install beacons. They are aluminum perforated slats that will serve as a guide for leveling the balcony screed. Their installation diagram is as follows:
- For fastening, special legs are used, screwed directly into extruded polystyrene foam. Its strength is sufficient to hold the slats while leveling the cement-sand mixture.
Fasteners for beacons.
- First, the beacon is installed on one side (at a distance of 5 cm from the wall). To do this, you need to determine the highest point of the floor surface (there is insulation on it), then place the beacon and level it by unscrewing or screwing the legs.
- Then, using a water level, the beacon is installed and leveled on the other side. You need to act according to a similar scheme.
- Intermediate beacons are installed at a distance of 60 cm from each other. To do this, you need to stretch strings between the extreme landmarks, along which you can perform orientation. At least this method seems to me the least labor-intensive.
- Instead of special brackets, beacons can be mounted on mortar slides. But in this case you need to have some skills, so I still recommend going to the store to buy the necessary accessories.
Installed beacons and reinforcing mesh on polystyrene foam (heating cables are visible in the photo, since it was made at another facility).
Now the floor is completely ready for pouring concrete. This is what we will do in the next section.
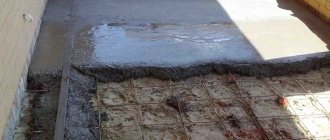
Pouring the solution
To ensure normal conditions for dehydration of the cement mortar, I recommend pouring the floor on the balcony in dry but cloudy weather. The air temperature in the room should be no less than + 10 and no more than + 25 degrees Celsius.
If you do not follow these recommendations, the evaporation of moisture from the screed will occur too slowly (or quickly), which will negatively affect the quality of work.
Well, now about the process itself:
- I am preparing a solution for the screed. This should be done only before starting work, since the finished mixture retains its performance characteristics for no more than an hour and a half, after which it begins to harden and loses its plasticity. You can obtain the solution in two ways:
- Mix one part cement and three parts sand, then add enough water so that the finished mixture has the consistency of very rich sour cream.
- Use ready-made dry construction mixture for work, which is pre-mixed with water to the same consistency. I prefer this option, since the mixture sold in the store contains plasticizers and additives that improve the technical characteristics of the material itself and the finished screed.
Preparation of mortar for screed.
- I pour the solution onto the floor into the space between the beacons, starting from the wall farthest from the entrance. It is necessary to pour out enough construction mixture so that it rises above the beacons to a height of about 1 cm. This is necessary for further leveling the surface of the subfloor.
- I level the solution. Everything needs to be done quickly enough so that the mixture does not start to “set”, but at the same time carefully, so that later you do not have problems with laying the finishing floor covering. The system is like this:
- First, using a rule (aluminum strip 1 meter or more long), the mixture is distributed between the beacons so that the surface of the screed is flush with the edge of the landmark.
Leveling the screed.
- In hard-to-reach places (at the corners of the balcony and near the walls), you can level the mortar using a trowel or grater.
- To avoid the formation of voids, you can use a needle roller or a regular knitting needle. The last thing you need to do is pierce the surface of the screed so that air bubbles come out.
- I leave the screed to dry. Here it is necessary to ensure that the solution does not dry out too quickly. If the weather is hot and sunny outside, after the screed has set, for the first two or three days you need to cover the floor surface with plastic film or periodically moisten it with water.
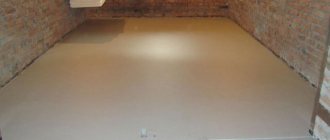
- I am installing decorative flooring. Usually we are talking about linoleum or laminate. It is for these materials that the base in the form of a concrete screed is best suited.
Linoleum as a decorative covering on the balcony.