Why is a heating cable needed?
The situation with icicles and pieces of cloth that fall down, demolishing everything they come across in their path, is not uncommon. There are two ways to avoid tragedy:
- constantly clean the roofs of buildings and structures from snow mass;
- install a heating cable for the roof.
The second option is simpler in all respects, but it has one requirement - the presence of electricity as a power source. That is, it turns out that the electric current passing inside the cable turns into heat. The cable heats up and melts the snow. Water slowly flows down the drainage system without forming icicles or ice.
Heating of the slope and drain. How it happens
What element is the main element in a roof heating and drainage system? If we talk about heating a living space, then heating radiators and pipes connected to them act as heating elements. How does the gutter heat up? For this purpose, a self-regulating heating cable is used, which is specially used for heating roofs and gutters of any diameter. It is laid along the entire perimeter of overhangs, pipes and gutters and helps maintain the temperature at a certain level. Similar cable heating is also used for fan pipes, fire safety devices, water pipes and roofing.
What causes insulation? The cable is installed in each of the drainage elements. Heating occurs due to electricity supplied from the general network. Many additional and auxiliary elements are responsible for the serviceability of the entire device. They measure the temperature both inside and outside the device, while starting or pausing the heating process. A number of fuses are used for this. The cable passes electrical energy through itself and generates it into heat. Several types of cable are used to insulate gutters and roofs.
Types of cables
If this is your first time encountering heating cables, then there are only two main types. They have minor differences, but at the same time they perfectly perform the tasks assigned to them.
- Self-regulating cable.
- Resistive.
There is a very noticeable difference between them and quite a big one. The latter looks like an ordinary wire, inside of which there is a metal core covered with an insulating layer. The main features include the presence of constant resistance, uniform heating temperature and stable power. This can be both an advantage and a disadvantage. Heating of the resistive cable occurs in a closed electrical network. Wires can be either single-core or double-core.
The action of a self-regulating cable is somewhat different from that of a resistive cable. First of all, we are talking about a high-tech product, which includes an insulating layer, protective braiding, elastomer and conductors. Features include the presence of a matrix that is not only self-regulating, but also semiconducting. The resistance of the main wire depends on the outside temperature with which it interacts. Thanks to this, the degree of heating in a particular area is regulated.
So which one to choose
To begin with, you should consider in more detail each of the types of cables that are used to heat roofs and gutters. Which one is better and how do they differ from each other? Resistive cable is not that economical, largely due to the fact that the temperature in all areas is always the same. Its cost is lower than that of a self-regulating heating cable.
Advantages:
- starting current may be low;
- low cost;
- has a constant power value;
- the level of heat transfer is quite high;
- heating occurs quickly.
Main disadvantages:
- possible overheating of the wire in places of overlap;
- low service life;
- huge energy consumption.
These factors have a more than negative impact on work. The resistive one is several times cheaper than its prototype, however, it will not last long, is prone to overheating and electricity bills will increase significantly. Self-regulating cable for heating gutters is used more often. The main features include the ability to continuously monitor the temperature from the outside of the house, after which the device is adjusted. At the same time, the heating system will not waste heat by heating stable areas of the roof or gutter. It is safe to say that thermal energy is used economically and purposefully by the device.
Flaws:
- the starting current indicator must be high;
- heating occurs slowly;
- high cost of material.
Peculiarities:
- complete versatility. Possibility of use with any types of roofing and storm drains;
- high service life;
- excellent insulating properties;
- resistance to possible overheating of individual elements;
- installation is quite simple and does not take much time;
- economical energy consumption with self-regulating elements.
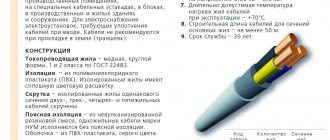
Types of heating cables
Today, manufacturers offer two types of roof heating cables: resistive and self-regulating.
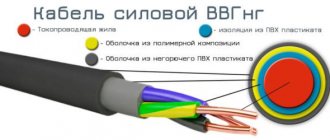
Resistive
This cable was the first invention in anti-icing systems. Essentially, this is a copper core in a plastic braid, on top of which a shielding wire in the form of a mesh is laid (it also acts as a grounding wire). There is another protective plastic layer on top.
Resistive heating cable Source kak-sdelat-kryshu.ru
This variety works like an ordinary conductor, in which the greater the resistance, the more thermal energy is released. From a school physics course we show the formula for electrical resistance:
R = S,
where p is the density of the metal, L is the length of the conductor, S is the cross-sectional area of the cable.
It turns out that the longer the cable, the higher the density of the metal used in its manufacture, but the smaller the cross-section of the cores, the more heat the cable will generate. If the above parameters are accurate, the resistance will be the same for the entire length of the laid section. This means that the resistive conductor releases thermal energy along its entire length in the same amount.
This is not the best indicator for a roof anti-icing system. The thing is that the laid conductor is exposed to snow and ice along its length not equally. In some areas there is a large layer of snow, in some areas there is no snow cover at all. And the heat is lost equally along the entire length of the conductor. That is, the cable cannot itself react to loads by changing the amount of heat generated. Therefore, in some areas heat is wasted. This is the main disadvantage of heating cables for gutters and roofs.
A resistive cable may not cope with the task assigned to it Source stemedcaucus2.org
Resistive cables today are produced in two types: serial and zonal. They differ from each other in design features.
Consecutive
This is one core in a plastic braid, as described above, or a two-core product in which current flows through two wires in different directions. In this way, electromagnetic radiation is neutralized. That is, the safety of operation under voltage increases.
To increase the length of the heated section, pieces of the heating cable are connected in series. At the same time, pay attention to the formula, the resistance of the conductor decreases, which means its heat transfer decreases.
Zonal
These are two-core wires, the cores of which are connected to each other with a nichrome thread. It is wound in a spiral around the wires, connecting alternately to one core and then to the other. The connection is made through special so-called contact windows. Thus, the heating cable for the roof is divided into heat transfer zones.
The advantage of this variety is the ability to cut the conductor into sections that will work independently. In addition, in conjunction with other zones, if one of them is damaged, the others will work.
Twin-core cable for roof heating Source hi.decorexpro.com
Self-regulating cable
If you look at the design of a self-regulating heating cable for heating a roof, it is practically no different from a resistive two-core one. The only addition is the matrix to which the two cores are connected. The matrix is a semiconductor layer that responds to changing ambient temperatures. In this case, first of all, its resistance changes: the higher the temperature, the lower the resistance. Accordingly, less heat is generated.
It turns out that the conductor itself regulates the supply of electric current to one or another area depending on the temperature of the air or snow. This makes it possible to further save on current consumption.
The only negative is the high price. It is 2-4 times higher than that of resistive.
Self-regulating heating conductor Source farfors.ru
See also: Catalog of companies that specialize in carrying out calculations and performing electrical work of any complexity on a turnkey basis.
Calculation of the required amount of cable.
The total length for anti-icing systems is determined by the total number of roof components that need to be heated. Table 1 below will help determine the required cable length for roof heating. Table 1
| Design element | Required quantity of cable m per m structure | Note |
| Overhanging roof edge | See Table. 2 | In table 2 Based on weight and length, calculate the required number of cables. |
| Gutter | 1 | One strand of cable for every 10 cm of width |
| Drainpipe up to 100 mm. | 2 | |
| Drainpipe more than 100 mm. | 4 | |
| Endova | 2 | * Laying on the bottom is allowed 2/3 length. For large quantities precipitation may increase to 6 cable threads. |
| Dormer window | 1 | 1 meter of cable per meter of window perimeter. |
We advise you to study How to make lighting in a garage and its varieties
* For complex roof structures or large areas, it is possible to use a more powerful cable.
Attention! These recommendations are not absolute. The amount of cable may vary depending on the roof structure. Table
2
| Visor (see) | Heating cable loop height | Meters of cable per meter of soft roof * | Meters of cable per meter of metal roofing** |
| 30 | 45 | 1,9 | 2,5 |
| 60 | 75 | 2,7 | 3,5 |
| 90 | 105 | 3,6 | 4,5 |
| 120 | 135 | 4,6 | 5,5 |
* Standard soft roof design. ** Metal roof with laying pitch of 60 cm.
Installation procedure
- The cable should be warmed to room temperature before installation.
- Clear all gutters and gutters of debris.
- Remove sharp edges that could damage the heating cable.
- Mount a moisture-resistant junction box in a protected area.
- Start cable installation from the junction box. Leave a small loop where the cable exits the junction box.
- After installation, test the cable with a megger for a resistance of 10 MΩ.
- A thermostat can be used to turn the cable on/off. An automatic ice and snow detector can be additionally used to switch cable modes.
ATTENTION!
- To minimize the risk of fire if the cable is damaged or improperly installed, use a safety circuit breaker (fuse) to ground the circuit. On circuits longer than 30 meters, it is recommended to use a 30mA switch to prevent abnormal shutdown. The braid must be connected to ground, providing protection through the circuit switches. All electrical connections must be made by a qualified electrician.
- Do not twist the wires relative to each other. This may cause a short circuit and damage the cable.
- Live electrical elements must be protected from moisture, otherwise an accident may occur.
- A damaged cable must be replaced.
- Avoid installing ladders on top of heating cables.
Flat roof
Anti-icing system
Heating gutters and roofs is not just about heating cables. The system additionally includes:
- wire supplying power to the heating element;
- power unit;
- thermostat and RCD;
- fasteners;
- couplings.
The efficiency of the system depends on the thermostat. This device regulates the supply of electric current depending on the ambient temperature. Therefore, temperature sensors are additionally installed in the design. The simplest thermostat is a dual-range one. It only works to turn the anti-icing system on and off.
Wire with thermostat for heating the roof and gutters Source fishing-caravan.ru
A more advanced option is the so-called weather station. It monitors not only temperature, but also other parameters, for example, air humidity, which directly affects the formation of ice on roofs. Weather stations operate based on programmed parameters, hence the good savings in voltage consumption - up to 80%.
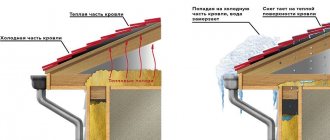
Heat the roof or gutter?
How to select materials and install everything correctly, without overpaying for unnecessary things? Here everything will depend on the thermal insulation of your roof.
If everything is fine with it, warm air from inside the house simply will not be able to get out, the roof will not heat up, which means there will simply be nothing for icicles to form from.
In this case, ice will only appear at outside temperatures not lower than -5C.
Mistake #1
In this situation, there is no need to heat the roof itself, but it is enough to get by with heating only the drainage system.
Thermal insulation and energy efficiency, as they say, rule.
But if the roof’s thermal insulation is of poor quality, the snow begins to melt even at relatively low air temperatures (-10C).
In this situation, water will flow towards the bottom edge and gutters.
It will freeze there, turning into pieces of ice. Here you will already need to lay a cable for complex heating:
- the roof itself
- gutters
- gutters
Installation of an anti-icing system
So, we can conclude that a self-regulating heating cable for roofing is the best option, but expensive. As for installation methods, all the varieties presented here do not differ from each other.
- At the edge of the overhang, installation is carried out using a snake, the width of which varies between 60-120 cm. If the roof is covered with metal tiles or corrugated sheets, then installation is carried out along each lower wave.
Installation of wire on the edge of the overhang with a snake Source liderbudowlany.pl
- On valleys, the cable is laid in two parallel sections along the roof element. The distance between them is 30-50 cm.
- The same applies to horizontal gutters of the drainage system and vertical pipe risers.
Installation inside the gutter of a drainage system Source proroofer.ru
It is necessary to pay attention to how the cable should be laid in the receiving funnel - this is the element between the gutter and the pipe, as well as in the drain pipe located at the very bottom of the pipe riser. These two elements are more exposed to loads from melt water than others. Therefore, inside them the heating cable is laid in rings or in the form of a falling drop.
Installation of a heating cable inside the receiving funnel in the form of falling drops Source kareliyanews.ru
Heating cable installation
To install an anti-icing system, heating cables are laid:
- at the edge of the roof;
- in the valleys;
- along the line of intersection of the roof and adjacent walls;
- in horizontal gutters;
- in vertical drainpipes.
Features of cable laying in these areas have their own differences and features.
On the edge of the roof
In this area, the cable is laid in a snake so that it is 30 cm above the edge of the outer wall. The height of the snake in this situation is 0.6, 0.9 or 1.2 m.
When installing a cable on a metal tile, a turn of wire is laid at each lower point of the wave. Installation on a metal seam roof requires a different approach. The cable rises along the first seam to the desired height, then descends to the gutter on the other side of the same seam. It passes along the gutter, reaches the next seam and repeats the cycle again.
If there are no gutters on a pitched roof, then significant ice build-ups and icicles can form on its edges. To prevent this from happening, the cable is laid according to one of two possible patterns: a “dripping” loop or a “dripping” edge.
The "drip" loop design assumes that melting water will flow and drip directly from the cable. To do this, the cable is mounted with a snake so that it hangs 5-8 cm from the edge of the roof.
The “dripping” edge scheme is organized according to a similar principle. Only the cable is fixed to the edge of the roof (dripline), laying it traditionally with a snake.
In valleys and at the intersection of roof and wall
Ice easily forms in valleys and other places at the junction of roof slopes. The cable here is laid in 2 threads, along the joint, 2/3 of its length. Due to this, a frost-free passage is formed through which melt water can flow.
A similar method of constructing a frost-free passage is used at the intersection of the roof and wall. Here the cable is also laid in 2 threads at 2/3 of the height of the slope. The distance from the cable to the wall is 5-8 cm, and the distance between its threads is 10-15 cm.
In gutters
In a horizontal trench, the cable is laid along its entire length in one or more parallel threads. The number of threads depends on the width of the gutter. If in a tray up to 10 cm wide it is enough to put one thread of cable, then in a tray with a width of 10-20 cm there are already two threads. For a wider gutter (more than 20 cm), their number is increased by adding one thread for every next 10 cm of width. Lay the cable so that there is a space of 10-15 cm between the threads.
To secure the cable in the gutters, use mounting tape or special plastic clips. It is also possible to make fasteners in the required quantities yourself - from steel tape, which can easily be shaped into a clamp. Clamps and elements of the mounting tape are secured to the walls of the gutters with self-tapping screws. The resulting holes are sealed with silicone sealant. A distance of 0.3-0.5 m is maintained between fastening elements.
In drainpipes
Ice often forms in drain funnels, blocking the path for melt water to drain from the roof. Therefore, cable laying is mandatory here. One thread of cable is placed in a pipe with a diameter of up to 10 cm, and two threads with a diameter of 10-30 cm. At the entrance to the pipe, the cable is secured to the walls using steel brackets.
In the upper and lower parts of the pipe, enhanced heating is required, which is carried out by laying additional cable strands - in the form of a “dripping” loop or several spiral turns.
If the length of the pipe exceeds 3 meters, a chain or cable with fasteners is used to lower the cable and secure it. The chain (cable) is suspended on a hook screwed into the wooden elements of the roof or a metal rod fixed to the gutter.
Video description
Video on installing a heating wire on the roof and in the gutter:
Connecting the heating cable
This operation must be carried out carefully.
- Remove the plastic insulation.
- The shielding braid is cut lengthwise, rolling it into a bundle.
- Cut off the bottom insulating layer.
- The matrix is cut to a length of 3 cm.
- The conductors of the supply cable are also cleared of insulation.
- The wires are connected in pairs using a thermal tube. This is a plastic tube into which a heating conductor core is inserted on one side. It is pulled out from the opposite side of the tube and connected to the core of the supply wire. The connection is made by soldering. Then the heat tube is pulled over the joint and heated with a hairdryer. It expands, becomes soft, and after cooling decreases in size, compressing the veins together. The thermal tube performs insulation functions.
Using a heat tube and a hair dryer to connect two wires Source sosyalforum.org
- In this way, two wires are connected. And then two of them are immediately clamped with a sleeve, which will protect the connection from mechanical loads.
The supply wire is connected to an alternating current network with a voltage of 220 volts. An RCD is installed between the connection point and the wire. This device will protect the entire system from stray currents that appear if the insulation of one of the elements of the anti-icing system has been broken. That is, even when a person touches the wires, the current will not strike.
Please note that the anti-icing is a grounded system. Therefore, the shielding braid rolled into a bundle is connected to the grounding conductor of the supply wire in the same way as the wiring. In this case, two conductors (zero and phase) are connected by one sleeve, the grounding circuit by another.
When it comes to network connectivity, the anti-icing system is straightforward. It consumes little electricity, so a regular outlet will be enough. Although other options are not prohibited. For example, to the switchboard via a machine.
What is a roof heating system
A roof heating system, anti-ice or snow melting system is a complex of heating elements, sensors and actuators that prevent the formation of ice and icicles on the roof. As a rule, the roof is not heated completely, but only in the most vulnerable places: along the edges of the slopes, along the valley, along the entire length of drainage systems. It is not advisable to install heating above the snow retainers, as this will require too much energy and will also reduce the effectiveness of the roof’s thermal insulation due to the snow cap. The cables are placed on top of the roof covering, so you can add an anti-icing system at any convenient time after the final finishing of the roof; dismantling its elements is not required.
We advise you to study How to check the battery charge
The roof heating cable is usually laid along the edges of the slope, and it can be attached to the snow guards with plastic ties
A good heating system can:
- prevent snow and ice from falling on people, cars, flower beds, etc.;
- reduce the load on the rafter system and floors, which usually increases due to ice;
- protect the drain from destruction, which often cracks after the accumulated water freezes;
- extend the service life of the roofing material, saving it from unfavorable operating conditions;
- relieve home owners from the need to manually clear the roof of snow and ice.
Roof heating system design
A standard roof heating system has three main components.
- Heating block. It is one or several lines of heating wire or film, which are mounted on the roof and in the drainage system for the entire period of operation. Requirements for heating block elements:
- resistance to high and low temperatures, sudden changes;
- resistance to high humidity;
- the ability to withstand mechanical loads, including impacts and the weight of a person stepping on them;
- UV resistance;
- fire safety (especially if the roofing material or roof structure is capable of supporting combustion).
- Information and distribution block. Designed to transfer energy from the network to the heating unit, distribute power between system elements, and ensure the operation of monitoring sensors. It is mounted next to the heating unit: on a parapet, fence, under a canopy or roof overhang, in the attic.
- Control block. It consists of thermostats, weather sensors, a control panel, starting and protective devices and regulators, with the help of which the user sets the required operating mode. In a system of self-regulating wires, the control unit has a simpler device. In particular, it can eliminate weather sensors.
Cabling
Although the system itself is simple, it needs to be laid where a lot of snow accumulates and then ice forms. For each square when installing the cable on the roof surface there should be 250-300 W of power. Laying on the edge of the roof will be effective; this should be done in the form of a twisting strip. The estimated length of the fastening is from 30 to 45 cm; on hard roofs you can make longer snakes.
The cable is also mounted inside gutters; two strands can be laid here; the power will be sufficient, but the diameter must also be taken into account. If it is large, then you can add a third for effective heating
Also, attention should be paid to the outlets of pipes and funnels, since additional heating may be required here
How much cable is needed: footage and power
At the preparatory stage, it is important to choose the right cable in terms of power and determine the need for it by footage. Its total length consists of all sections of the anti-icing system.
- For gutters and drainpipes, the footage is equal to the length of the gutters and pipes, and if two branches are stretched, then the length is multiplied by 2. The need for junction points and valleys is calculated in the same way.
- For the cornice, it is necessary to determine the width of the slope and the number of cable branches, taking into account that the laying step is 15–20 cm. Loops for drainage funnels are also added to the total amount. You can take a small margin (up to 5%), but we must remember that not only a lack of cable is bad, but also its excess.
The main parameter for choosing a cable is specific (linear) power.
- Its standard value for the resistive version is 18–22 W/m, and for the self-regulating one – 15–28 W/m.
- If the cable heats polymer elements, then the power should not exceed 17–18 W/m.
- To heat gutters and pipes, it must be taken into account that when using a cable with a power above 35 W/m, one thread is sufficient for a width (diameter) of up to 15 cm. For values less than 25 W/m, two threads will have to be pulled.