Exclusively for our readers, we post top-secret information on self-repair of remote controls. Just don’t laugh, yes, I know that there are plenty of such articles on the Internet, but why then do only a few clean the remote control correctly? Maybe because those who (not all, most) wrote or copied them are themselves a little unaware?
This article will help you find answers to the following questions:
- What to do if your favorite remote control stops working or becomes very difficult to press
- Is it necessary to buy a new one right away or can it be restored?
- How to properly disassemble the remote control
- Do I need to stick new covers on the rubber bands of the remote control?
- How to clean the remote control without damaging anything
The next step, I would still recommend... taking the remote control to a specialist, the cost of repairing the remote control is low, and a specialist will do better in any case, because he already has considerable experience. However, if you want to try to clean the remote control yourself, we carefully read and remember.
Take the remote control out of the bag or case (if it is in one) and do not put it on again, the remote control must breathe. Open the battery compartment and remove them. Look carefully to see if there is any additional fastening of parts of the remote control body in the form of screws; if there is, a screwdriver will help.
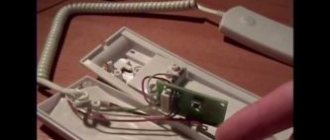
Almost all remote controls, with rare exceptions, have the upper and lower parts of the housing secured with latches. To avoid dents, cracks and broken latches, we need one or two thin screwdrivers and a straight blade. With our fingers we press on one and the other part of the body to try to determine which one goes into which. Carefully pry the tip of the screwdriver from the side and move it along the body, unclicking the fasteners. Sometimes you need two screwdrivers, because the case is latched very tightly, then we inserted one screwdriver, and a little further - the second one, they clicked there - again we move the first one further.
Have you opened it? And I know what you will say: “God, where does all this dirt come from and what is this wet thing???” Well, with dirt - here, I think it’s clear, it has been slowly penetrating into the remote control body for years and consists mainly of dust and pet hair, but that’s not all. Do you see the elastic band with buttons? No, it is not glued to the board, although it may not be possible to tear it off right away, so we start from the corner, carefully...
It's creepy, isn't it? There are various rumors and disputes about what it is: some say that it is fat from our fingers, note that most of it is on those buttons that were most often used, and others say that it is a plasticizer that leaked from the rubber due to partial destruction of its structure as a result of repeated pressing. Be that as it may, the fact remains: because of this sticky poop, our remote control refuses to work normally or has become very, very tight.
Now that all parts of the remote control are in front of us, we can begin the cleaning process. How to wash the plastic parts of the case and contact rubber? We go to the bathroom, take an old toothbrush and laundry soap (ideally). We soap the brush, clean it, and then rinse it off with water. Is it that simple? Yes, that’s right, simple, what were you waiting for? When cleaning the rubber band, be careful not to overdo it and tear the buttons, do not forget to thoroughly lather with a brush between the buttons and on the side of the contact graphite pads. A properly washed rubber band should be absolutely non-greasy and non-sticky to the touch. You can dry it with a hair dryer or wipe thoroughly with a towel. A hairdryer is preferable, as it will definitely dry the water in all hard-to-reach places.
There is an opinion that the board itself can be washed in the same way, with soap and a brush under running water, in principle it is possible, but it will take a very long time to dry, since moisture can penetrate under the microcircuit and cause its immediate failure. There is a much more reliable method: no, not alcohol, it does not wash and not solvents, after all, it is important for us to wash without damaging the graphite tracks on the board and the varnish! The ideal product is acetone, it dries very quickly, cleans well and leaves no residue. We wet the cotton wool, wiped it, waited (you can’t wash it off in one go) until the board became dry, and repeated the operation again.
Due to the fact that acetone is now prohibited (why hasn’t gasoline been banned yet, do drug addicts snort it too?), use nail polish remover (from nails), just take one that does not contain additional “fats and oils”, it will clean better . That's all, all parts of the remote control have been washed and dried, all that remains is to assemble everything as it was and enjoy the result. If you did everything correctly, the remote control will be like new, and all the buttons will be pressable perfectly.
A few words about the principle of operation of the remote control buttons:
There are contact pads on the remote control board; they consist of two parts; as long as the button on the remote control is not pressed, the circuit is interrupted and no current flows through the pad. The elastic band of the remote control has buttons with a graphite coating at the bottom. Graphite, as we know, conducts electricity when we press a button - the coating located on it forms contact with both parts of the corresponding contact pad on the board and current begins to flow through this circuit. This signal coming from each button comes to the control chip, and it, “seeing” which command is pressed, issues the corresponding code for its execution to the IR transmitter (LED). Dirt and sticky liquid are insulators, which is why the buttons stop working.
If the process of cleaning the remote control is not successful, and this may be due to the fact that the graphite coatings on the rubber band have worn off (this is true for Chinese remote controls), there are two ways: still buy a new remote control (preferable), or buy a set of graphite coatings with a tube of glue. You can purchase such a set on the radio market, in radio stores, or order it through online stores, the price is from 1 to 2 dollars (depending on the manufacturer and the number of coatings in the set)
The gum has already been washed, all you have to do is stick new covers from the bag over the old ones. However, there is one important nuance here: due to the fact that the button has now become longer (by the thickness of the new coating), its stroke will be reduced (until contact with the board), to the point that the buttons seem to not be pressed at all or begin to be pressed yourself. You may need to use a sharp knife to cut off part of the button, but you need to do this so that the cut is even, because glue, even gel glue, does not adhere very well to the rubber material of the remote control.
The process itself is simple: we drop glue, use a needle to prick a circle with a new coating and place it on the glue, press it, make sure that the glue does not get on the contact graphite surface, wait until it dries. Please note that many remote controls have “pressure limiters” on the sides of the buttons with a coating, they serve to prevent you from pressing the remote control too hard and “squashing” the buttons (this is not uncommon). Take this into account when gluing new coatings, as well as if you cut off old ones, so that it does not turn out that the coating is lower than the limiters, because in this case the button will not physically be able to contact the board (it will rest against the limiters)
Here is a travel option for restoring the remote control when you really need it, but you don’t have anything at hand. We take foil from a cigarette pack, cut it into rectangles, diamonds, circles, or as we need it, and glue it in exactly the same way as described above. Why cigarette foil? On its reverse side there is paper; paper and rubber stick together much better than foil and rubber, but the reliability of this method is not very good.
As practice has shown (more than one thousand remote controls have already passed through my hands), if regular cleaning does not help... it’s better to buy a new one. So, as they say: think for yourself, decide for yourself. I’ll bow out for this, otherwise it’s already getting dark, it’s time to regain strength after work with a bottle of cold beer
Sometimes when switching channels you may notice that the buttons do not work well. This is a signal that the device needs to be cleaned. As a rule, the cause of incorrect operation of the remote control is food residues, and sometimes liquid spilled on it: tea, juice or coffee. Of course, you need to eat in specially designated places, but the temptation is still great. So, let's look at how to disassemble the LG TV remote control in order to calmly, without nerves, switch channels and change TV settings when you want, quickly and easily.
Cleaning the remote control
In order to clean the device from dirt, prepare the following devices:
- Alcohol or alcohol-containing liquid.
- A small brush with soft bristles.
- Clean pieces of soft cloth.
Using this kit, you can carry out external cleaning every week without disassembling the device.
Important! To ensure that the assembly of the PU does not cause difficulties, lay out the parts in the order in which they were removed.
In the future, try to keep the device away from food and drinks. To prevent the remote control from getting too dirty, purchase a special case for it. It will protect the device from contamination. In this case, the question of how to disassemble the remote control for a Philips, LG or Sony TV will not worry you too often.
Over time, any remote control becomes clogged, and in order, for example, to change the channel or turn off the TV, you have to press the corresponding buttons for a long time and with force. Such clogging of the remote control is a completely natural phenomenon. Dirt, gradually accumulating on the main chip, blocks the action of the pressed buttons. In such a situation, you can either buy a new remote control, or, by disassembling a device that has been tested for years, return it to functionality.
You will need
- small screwdriver
Instructions
- To disassemble the TV remote control, remove the batteries from it. Sometimes there are retaining screws in the battery compartment that hold the top and bottom of the remote housing together. If your remote control model has such screws, use a suitable screwdriver and unscrew them. If there are no screws, then the remote control body is held on by latches located on the top or bottom of it.
- Insert a screwdriver into the junction of the housing parts. Pry the upper or lower part of it and, applying force, disassemble the remote control. You will see that it consists of three main parts: the Body;
- Look at the microcircuit. One of the main reasons why TV remotes malfunction is that frequent use wears off the conductive coating on the buttons or microcircuit. If the coating remains intact under the layer of dirt, the remote control can be restored to functionality.
- Wipe the chip with a cleaning solution. Remove dirt from the TV remote control housing and the gasket with the buttons. If the contamination is too strong, such as happens from many years of using the remote control in a plastic bag, thoroughly rinse all its parts with water, except, of course, the microcircuit. The main thing is to let them dry thoroughly before assembling the remote control, so as not to provoke accelerated oxidation processes in the already assembled device.
- A screwdriver made of plastic or hard rubber, a blank sheet of paper.
Remote control chip;
Rubberized pad with control buttons
Tip added July 19, 2011 Tip 2: How to disassemble the remote control Every home has household appliances that are usually equipped with a remote control. This remote control is very convenient, as it can be used to control equipment from a distance. However, remote controls very often break down and require repair. How to disassemble the remote control to repair it?
You will need
Instructions
Useful advice Carry out all work with extreme caution so as not to accidentally damage parts and latches.
How to disassemble the remote control - printable version Rate the article! The remote control is an important thing in the house.
However, people usually begin to appreciate the ability to change channels and adjust the volume of the TV without leaving the couch when the battery runs out or the remote control starts to work poorly. Replacing the battery is a simple task, but it’s a completely different matter when the remote control simply starts to work poorly. Usually the reason is simple - the mechanism is clogged, the buttons become difficult to press, and it becomes clear that the device should be urgently disassembled and cleaned. How to do this correctly?
Step-by-step guide to disassembling the Philips TV remote control
Important: Before you start disassembling the device, we remind you that if you are not confident in your abilities, contact a professional Philips TV repairman. For competent specialists, this procedure takes a minimum of time.
- Any repair begins with opening the case. Many beginning craftsmen have difficulty with this. To avoid breaking the plastic, carefully pry the edges of the remote control with a thin object and unfasten the latches along the entire perimeter of the device.
- After the case is opened, the microcircuits should be inspected for soldering defects and contact oxidation. If necessary, we repair damage. We clean the board with alcohol or another special solution.
- Next, remove the rubber keyboard and wash it thoroughly.
- If you want to improve and prolong the operation of your remote control for a long time, purchase a repair kit for the remote control with special conductive pads. Using the glue included in this kit, glue the spacers to the inside of the buttons.
Next, assemble the remote control in the same sequence. If you have any questions, call the Philips service center specialists or contact a technician online.
You can contact the masters from our service center by calling or writing your question on the feedback form.
How to clean the remote control: care instructions
First of all, it is worth noting that any equipment in the house should be properly cared for. Only in this case will it work efficiently and serve you for a long time. The remote control is small, but still an element of technology. Moreover, the lion's share of the load falls on it, because you constantly pick it up and press buttons. To ensure that the remote control works longer without having to clean it, you should only use it with clean hands. Very often the remote control gets clogged because it is handled with dirty hands.
Eating in front of the TV is not only harmful to health, but also to the equipment that comes to hand. Small particles of food get inside and render the devices unusable.
If you eat in front of the TV, try to finish your meal completely, wash your hands, and only then continue working with the remote control.
But what should you do if the remote control for your recently purchased Sony TV has already started to work poorly? First, try simply changing the battery; in most cases, the remote control begins to respond more actively and stops creating problems. If this does not help and you have every reason to believe that there may be a lot of debris inside the remote device, then cleaning is clearly required, which should be done carefully and carefully at home.
Why does the TV receiver not respond to the remote control module?
To find the reason why your Philips TV does not respond to the remote control, it is recommended to follow these steps:
- The first step is to check whether the TV itself responds to the button command. You can do a reset by unplugging all wires and accessories such as antenna cable, HDMI cable, CI+ module.
- Next, unplug the power cable from the socket and leave the TV turned off for a few minutes; the LED indicator should go off.
- After connecting the power plug, you should try to start the receiver using the remote control module.
- Change batteries. Batteries have their own service life; discharged cells will need to be replaced with new ones.
If the TV does not start, the cause of the problem lies in the remote control itself. If the receiver turns on, you need to reconnect all cables and accessories. It is better to check each external device, it may cause the plasma panel not to respond to signals from the remote control module.
The functionality of the remote control can be checked using one simple test. You will need a smartphone equipped with a digital camera. The human eye is not able to recognize infrared radiation, but a mobile phone with its camera turned on will notice it. This recommendation is not suitable for owners of an iPhone or iPad, since these gadgets are equipped with a special infrared filter. You need to do the following:
- Having activated the camera of the mobile device, point the indicator light of the remote control module at its lens;
- Press any button on the remote control, for example, the channel switching key.
Disassembling the device: how to clean the TV remote control
In order to clean the remote control, it must first be disassembled. Depending on the TV manufacturer, the remote control may be closed differently. Some companies make simple latches that can be opened without a screwdriver, while others use screws and it will be impossible to wash the inside of the remote control without a tool.
The main TV manufacturers today are:
- Sony;
- Samsung;
- Phillips.
The advice is that almost any remote control can be opened with a knife by unscrewing the screws with its tip. However, you should be guided by the situation. If it is difficult to unscrew the screws with a knife, you can break the threads, and in the future the screws will sit tightly. The ideal option, of course, would be a small Phillips screwdriver.
When you open the remote control, be careful and attentive. It is important not to move connections or parts, otherwise you may get confused and not know how to put everything back in its place. There is no need to wipe the chip and board; the most important thing is to simply get rid of dust. Alternatively, you can vacuum the remote control inside, setting the lowest traction power.
Instructions: how to disassemble the Sony TV remote control
Cleaning the inside of the remote is always a good idea, but you need to open it first. Most remote controls today can be easily opened with a screwdriver, but there is a completely different category of TV remotes that are held together without screws at all. These are remote controls for new Sony TVs. However, opening them is actually not that difficult; to do this, you should take a knife or a screwdriver, the latter will be even better, and carefully use the tip to pry the junction of the remote control cover. You will find that the device opens up slightly.
You should not try to completely open the remote control in one place at once, otherwise you will simply rip off all the fastenings. Carefully, step by step, open the lid, moving around its perimeter and gradually opening it.
You may not be able to do this operation the first time, but the main thing is to pry the lid off well from the beginning and then simply take your time. Even if you hear that one of the fasteners is cracked, it doesn’t matter, the cover will hold on to the others. But be careful, because completely stripped fasteners mean you'll have to reattach the cover.
Proper cleaning of the TV remote control at home
In most cases, to fully clean the remote control, it will be enough to open the main box of the device and thoroughly blow it out. Sometimes you will need to wipe individual elements with a cloth. However, it happens when the remote control is very dirty and can only be saved by complete cleaning. In this case, get ready to disassemble the device as expected - separate the top and bottom covers, separate the rubber gasket under the buttons and the board with microcircuits. You shouldn't clean the board, it can damage it, but you can even wash the rubber gasket under the tap. In this case, you should first dry it completely and only after drying use it again.
As a last resort, if even the board is dirty and you definitely want to clean it, then arm yourself with a cotton swab, moisten it with alcohol and wipe with careful, gentle movements so as not to damage the microcircuit.
If you don’t want the remote control to quickly become dirty and require detailed cleaning when disassembled, we recommend cleaning it regularly from the outside, which is much simpler and easier. To do this, you can use ordinary wet wipes or cotton wool soaked in alcohol. Although alcohol is a liquid, it evaporates instantly, so it will not cause any harm to the remote control, nor to the microcircuits inside.
There are other preventive measures that will prolong the stable operation of the remote control without cleaning, these are:
- Buying a cover.
A simple but extremely effective solution that allows you to keep your remote control clean and tidy. Yes, each time you use the remote control you will have to remove it from the case, but this will protect the device from debris and dust. - Polyethylene.
If you don’t want to spend money on a full-fledged case, we offer you a simple, but also effective solution - wrap the remote control in film. It could even be cling film, the ends of which can either be hidden behind or carefully sealed with tape. No dirt will get inside the remote control, and the film can be replaced at any time. - Hygiene.
Of course, the most basic precaution is first of all your personal hygiene; you should not use the device with dirty hands or while eating.
All you have to do is resist the temptation and your TV remote control will serve much longer and more reliably.
Causes of failure
The technician can identify the problem in a few minutes, but he will use special tools and equipment. Ordinary users may not have such knowledge and skills, so they are forced to turn to specialists for help. But you shouldn’t make hasty conclusions and immediately run to the nearest workshop in panic. The reason for the failure may be so trivial that to restore the device you will need to perform a few simple steps.
The most common causes of remote control failure include the following:
- Low batteries. It is recommended to replace the batteries or check the functionality of the old ones. Using a voltmeter or tester, you need to measure the power source. The minimum indicator should be at 1.3 V.
- Different signal frequency. You need to pair it with your TV receiver. If the device is used simultaneously for several electronic devices, you need to make a separate connection for each.
- Some buttons may not work. The cause is usually dirt or moisture, but sometimes it is due to mechanical damage resulting from a fall or impact.
- When you press one of the keys, the command of the other is executed.
- The malfunction lies in the operation of the TV itself.
If the user spills liquid on the device, it is recommended to disassemble it and clean it. Water becomes a short circuit catalyst, and when it settles under the rubber components, it forms a sticky consistency. The sticky layer on the contacts must be removed with a soft cloth soaked in alcohol, or use a cotton swab for this purpose.
Expert answer: how to clean the TV remote control (video)
Let's summarize, the remote control is a very important thing in the house, which is difficult to do without. However, without proper protection and care, the TV remote control quickly becomes dirty, both externally and internally. To avoid this, you should use a case or wipe the device from time to time, both externally and internally. In order to open the remote control, you should use a screwdriver or, in extreme cases, a knife, which should be used to unscrew the screws and open the cover. Sometimes modern remote controls are closed with latches; in this case, you need to carefully open the lid along the edge until it comes off completely.
Attention, TODAY only!
Features of disassembling the touch panel
The touch control panel is disassembled according to a similar scheme. Many companies equip their devices with modern remote controls with touch sensors. Despite the significant difference in the control principle between conventional remote controls and sensors, the touch sensor in a Samsung TV does not interfere with disassembly.
IMPORTANT! Try not to damage the cables that connect the touch sensor to the board. Remove these parts from the plastic shell, handling the sensor as carefully as possible.
Samsung TV and its competitors are equipped with approximately the same additional devices. Parsing the remote control from Samsung or any other brand will not be difficult if you understand the general design principle of these devices.
Video tutorial: how to open the PHILIPS
Any household appliance is subject to wear and tear, especially small devices such as the remote control. As a rule, many people have it lying around anywhere. More often than others, this household item is at risk of being crushed or drenched in sweet tea drunk while watching your favorite show. We will tell you how to fix the remote control without being a master in this article.