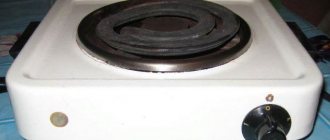
On the hottest summer days, the only salvation from the sweltering heat is a regular floor fan.
Not everyone can afford a full-fledged split system or even a mobile air conditioner.
But unfortunately, even this inexpensive and accessible wind blower breaks down from time to time. Chinese models especially fly like seeds.
And there is an overwhelming majority of them in our market. What to do if the fan stops rotating and working? What are its main problems and why does it break down?
Let's take a closer look.
Why doesn't the fan work?
In total, there are 5 main reasons for the failure of floor fans:
- old dried grease or lack of it
- dried out capacitor
- blown thermal relay or fuse
- turn short circuit of windings or wire breakage
- mechanical displacement of the motor shaft
The main problem of cheap models, which for some reason few people pay attention to, is incorrect casting of the blades. Because of this, an imbalance occurs, bearings break, and gaps increase.
You cannot influence this in any way, since you already bought a fan with such an initial defect. Sometimes it seems to work, the impeller rotates normally, but it does not blow.
That is, there is no cooling air flow from it. Why is this happening?
Due to the incorrect angle of attack of the blades. Its petals are deformed and drive the air flow in a circle, rather than throwing it out.
This effect can appear over time, after the fan has been standing in direct sunlight for a long time and its impeller, having heated up, begins to gradually change its shape.
This can only be treated by replacing the impeller with a new one.
The cooler makes a humming noise and does not spin
Cases when the fan does not spin and the motor hums are quite common. There may be several reasons causing this failure:
- lack of lubrication on the bearings (what to do was discussed above);
- capacitor failure;
- electric motor malfunction.
Capacitor failure
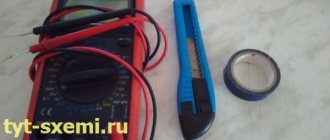
Repairing a floor fan in this case comes down to checking the capacitor capacity
using a tester. To get to the radio component, you will need to disassemble the motor housing. A detailed description of how to disassemble the case was given above. After removing the casing, you will see the capacitor attached to the motor.
The presented device has a capacitor capacity of 0.85 microfarads. For this reason, the device must be set to a value ranging from 2 microfarads to 200 nanofarads, as shown in the figure below.
In this case, after connecting the capacitor to the device, it is clear that its capacity is 0.841 microfarads. If we take into account the error of ± 5%, then the capacity of the radio component is within normal limits, and it is not the reason why the cooler stopped working.
Engine malfunction
When repairing a fan with your own hands, you also need to “ring” the electric motor in search of a breakdown. If it is faulty, the device will not turn on and will make a humming noise. It is necessary to measure the resistance on two stator windings
, having first disconnected the wires going to them, as shown in the following figure.
As you can see, the resistance is also within normal limits, since its value is 1215 Ohms (1.2 kOhms). Otherwise, the device will buzz but will not turn on. In such a situation, the motor will need to be rewinded in a special workshop.
Floor fan does not spin
The most common problem is dried out lubricant or lack of it. The fan begins to jam, lose speed and, as a result, the load on the engine increases. The wind blower no longer operates at full capacity.
The motor, wound with a thin wire of 0.2 mm, begins to heat up and the windings gradually burn out.
How is such a defect detected? In this case, the fan stops rotating. It hums, but the impeller does not spin.
It also happens that it starts only at 3rd speed, and does not respond at all to the first two. It just doesn't have enough power to turn the shaft.
In order to start it, you have to brazenly spin the blades like on old airplanes.
By the way, the same symptom can occur if the starting capacitor is damaged. Without instruments, how can you find out which reason is to blame for the breakdown?
To do this, you need to at least get to the engine shaft by removing the protective casing and blades. If the shaft rotates by hand with great difficulty, then blame dirt and dried grease.
And if it spins easily and has inertia, then most likely the air conditioner is covered. Symptom - you plugged in the fan, but it doesn’t spin. At the same time, you crank the engine up and it starts.
If you hold the fan blades with your hand while working, it may stop again. The capacitor is checked with a multimeter if it has an appropriate capacitance measurement scale.
To replace, select a new condenser according to the same parameters as indicated on the body of the old one.
By the way, a capacitor that is not yet completely dry also affects the speed. If you notice that they have fallen and the fan has begun to spin more slowly, this is a sign to check it.
The problem of tight rotation is solved by new lubrication of the bearings. So-called plain bearings are used here. Some people call them bushings.
It’s a bit expensive to use balls in such designs, and they rattle over time. For repairs, it is not at all necessary to disassemble the entire engine. Just unscrew a few screws and spray the required areas with WD40 universal aerosol.
Possible breakdowns of Timberk fans
Timberk fans have proven themselves to be inexpensive and easy-to-use devices for creating comfortable climatic conditions and maintaining air exchange in an apartment or office. Despite their good quality, they are prone to breakdowns.
During operation, customers noticed the following malfunctions:
- drop in blowing force due to soft plastic blades;
- There are times when a capacitor fails;
- the appearance of extraneous noise during operation;
- electric motor failure;
- the rotor breaks;
- strong backlash appears;
- When working for a long time, the smell of burnt oil appears;
- the legs bend and change geometry under the weight of the motor;
- overheating of the power supply;
- mechanical failures at fastening points.
In terms of price-quality ratio, Timberk products are leaders in their segment. All devices have a manufacturer's warranty and can be replaced when contacting service.
How to disassemble a fan - instructions with photos
How to get to the bushings without removing the engine? To begin, unscrew the central screw on the back wall of the protective casing.
Another self-tapping screw is hidden in the adjustment button-lever for turning or stopping the fan head.
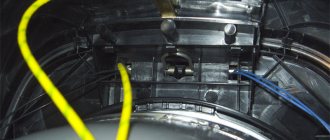
After this, the back cover can be easily removed from its place. What's underneath? Here you can see the rotation gearbox that gives rotation to the entire head.
A special rod connects to it from below.
The starting capacitor of the engine is fixed on top.
By the way, keep in mind that it may not be there in different models. In this case, look for it near the speed shift buttons.
To access the motor bearing, you will need to remove the gearbox. It is secured with three screws and supported from below by a rod.
Tighten the screws and disconnect the rod. After this, the gearbox is removed from the shaft and you have access to the rear bushing.
There is no need to unscrew or disassemble anything else. Vedashka will do the rest for you.
Place a narrow guide tube on the WD40 can and poke it several times into the gap between the shaft and the bearing.
After spraying WD40, turn the shaft in different directions by hand and move it back and forth a little.
Excess thickened grease, foreign debris and dust will gradually come out. This excess dirt can be easily removed with cotton swabs.
If you have a thick lubricant like cyatim or litol, it is advisable to apply it to the gear worm. After these cleaning procedures, drop a few drops of sewing machine oil onto the bearing from the outside.
Just don't apply it too much. Otherwise, it will eventually spread all over and dust will stick to it, turning back into dirt. As a result, you will again get a wedge and a problem with fan rotation.
In some models, felt washers are placed near the bushings. They are saturated with oil and when heated, the oil flows onto the shaft, lubricating it.
Everything is assembled in reverse order. Rod - three gearbox screws - outer cover.
By the way, if you overtighten the central screw on the back cover, and this is a self-tapping screw, not a screw, it can pass through the plastic of the rotary gearbox and rest against the shaft.
You will again have problems with revs and jamming. Sometimes the cause of a breakdown is trivial and unpredictable.
We've sorted out the rear bearing, then move on to the front part of the fan. There is a protective cap in the center here.
It unscrews, attention - clockwise, since the thread here is left-handed.
You throw it off and remove the propeller from the shaft. You now have access to the front journal bearing.
The principle is the same here. First, squeeze out and soften the old grease and dirt with a Vedashka, and then apply new one.
After that, put the propeller back on and close the lid. Having completed the repair, turn on the fan at high speeds, let it run for a few minutes, and switch to the speed required.
Short circuit of windings or broken wires
If the damage is more complex and simple lubrication does not help, you will have to disassemble the fan in more detail.
First, you do all the disassembly machinations as indicated above. After removing the propeller, unscrew the plastic front lock nut, which is located immediately behind it, and remove the entire protective frame.
In your hands you still have the motor itself and the leg in which the power wires pass and the push-button mechanism is located.
You disassemble this leg by unscrewing 6 screws.
First of all, check the soldering of the wires. It is quite possible that one of them, or even several, has fallen off or burned off.
If everything is intact, how can you figure out which wire goes where and is responsible for what? Start testing with two wires from the power plug.
One of them, let it be black (as in the photo below), goes directly through the backlight to the fan motor.
The second wire goes to the lower terminal of the dial switch (button 0).
Next, by pressing the corresponding buttons - 1st speed, 2nd, 3rd, certain switch contacts are closed, and thereby the engine speed changes.
Each wire from these buttons goes to its own terminal on the winding, with a greater or lesser number of turns. By applying voltage to them, you make the propeller spin faster or slower.
Floor fan connection diagram
A simplified diagram of a wind blower looks like this.
Typical circuits for most inexpensive 3-speed floor fans are something like this:
Pressing each button is accompanied by the closure of its contact group.
In this case, the other contact group opens at this moment.
Sometimes these contacts burn out or do not reach their plate. Then you lose any of the speeds.
All this is checked simply with a Chinese multimeter, in circuit continuity mode.
If your very first wire breaks or there is no contact on it, the fan motor simply will not start. Therefore, if the fan is completely inoperative, check it first.
Unless, of course, before you make sure that the plug itself and the power cord from it are working properly. This is also caused by the tester.
Place one end of the probes on the pin of the plug, and touch the other end to the contact pad on the “0” button. If working properly, there should be zero resistance.
Then you can check the wires in the same way at all speeds. Contact probe for the plug - another probe for the outgoing wire from the corresponding speed button to the engine.
If there are zeros everywhere, then the switch and wires are working.
Next, check the second contact on the plug and the wiring that goes directly past the switch to the engine. Make sure your cord is intact here too.
Only after this can you proceed to checking the windings of the motor itself.
DIY floor and table fan repair
After identifying a problem with the fan, you can proceed directly to repairs. First, prepare the necessary tools and materials depending on the type of fault. The first thing that is checked after diagnosing the cord, plug and socket is the serviceability of the electric motor. Often the problem is with the chip, so first determine the level of current entering the board and leaving the chip. If there is no voltage, the problem lies in a broken microcircuit, which can be replaced.
If current flows to the microcircuit, but the floor or table fan does not turn on, you will have to disassemble the case and check whether current is flowing inside. If not, the problem is with the electric motor, so you will have to have the motor repaired.
How to replace the chip:
- disconnect the two wires connecting the electrical plug and the microcircuit board;
- do the same with the 2 wires going from the board to the motor;
- attach a new chip.
To understand how to repair a fan yourself, you need to know the operating principle of the device. Scheme:
- asynchronous motor, installed on standard floor and table fans, has 8 starting and operating windings;
- to start, the phase is shifted by 90 degrees using a capacitor;
- starting is carried out after pressing the power button (first the red indicator turns on, then the electric motor begins to rotate);
- The speed of the torque is influenced by a 3-speed switch, which has mechanical locks for simultaneous switching of speeds.
How to check fan windings
Set the resistance on the multimeter to 2000 ohms. Next, in order not to bite the wires anywhere, at the place where the capacitor is connected, strip off the insulation a little.
Look for the common point of the circuit, as in the diagram below.
Having found it, you call up the resistance of the winding. To do this, touch the contacts on the switch with the second probe one by one.
Approximate fan winding resistance values can be as follows:
Of course, they may differ slightly for different models, but the most important thing is that there is no breakage or short circuit. Measurements can show either several hundred Ohms or a little more than 1 kOhm.
It all depends on the power of the fan and the cross-section of the wire.
The resistance between the terminals of the windings will be lower - 100-200 Ohms.
The capacitor winding and the total resistance of all windings combined are also checked.
Here is the most competent and complete video on checking the performance of fan windings with a multimeter.
If checking the integrity of the windings also does not reveal any deviations or defects, move on. To do this, you completely disassemble the fan, as they say, piece by piece.
Engine disassembly and malfunction
First, the engine must be freed of all plastic parts. Unscrew the 4 screws from the front side and remove the cover.
On new models, in addition to screws, there are also latches. They need to be bent with a screwdriver.
To disconnect the leg, you need to find another screw, which is usually hidden under the plug.
Loosen it and pull out the mounting shaft. To dismantle the wires that pass through the leg, you will need to bite them out or unsolder them from the terminal blocks on the speed buttons.
At the same time, write down or sketch where each one is initially connected.
As a result, you should have a bare fan motor in your hands without anything unnecessary.
Let's take it apart. Unscrew the screws holding the back cover together.
At the same time, before disassembling, be sure to put marks on all covers and hardware indicating how everything was originally assembled.
Otherwise, after incorrect docking, you will lose alignment. There will be problems with the shaft wedging and the rotation of the blades.
Thermal safety relay malfunction
After removing the bearing, you get to the windings themselves. Among the bundle of power wires coming from the switch, look for a special thermal relay.
Very often the engine stops working after it burns out. This relay should operate and open the circuit at a winding temperature of 135-145 degrees.
After cooling, the relay closes again and the fan starts. So, sometimes it burns out completely and actually plays the role of a fuse.
If your fan often turns off and starts again on its own, this protection is to blame. Know that it doesn't just work. This means that your shaft is either jammed, or the windings are exhausted and they are overheating.
Overheating of the windings may be associated with the destruction of the small impeller, which is located on the shaft inside the engine itself. It is designed to blow air and reduce the temperature of the coils.
The cheapest models do not have a temperature sensor-relay; everything is connected directly. Based on this, if your “thermal fuse” has burned out, you can, of course, bypass it and start the wind blower. But at the same time you will be left without fire protection.
This relay is also checked by the tester.
There should be a chain between its legs in continuity mode.
Fan malfunctions in car cooling systems
The fan is turned on by a sensor located in the cooling system. Reacting to the signal, the cooler turns on and directs additional air flow to reduce the temperature of the fluid and engine. A number of failures are not associated with breakdowns of the fan itself, but with the operation of electronic sensors that are sensitive to changes in the system.
Fan relay clicks frequently
The fan relay often clicks in automotive cooling systems. The reason may be either oxidation of the relay contacts or temperature surges that cause it to operate. The following are subject to diagnosis:
- sensor;
- wiring;
- the controller has a circuit to control the fan.
A breakdown can cause engine damage, since incorrect operation of the sensors causes incorrect ignition timing.
Ventilation problems in apartments
Built-in exhaust fans are much simpler in design. But their cost is low and it is often easier to purchase a new one than to look for parts that have disappeared from circulation. Poor ventilation of rooms may not be due to the operation of the device itself, but to errors in the organization of the exhaust system.
Ventilation in the bathroom
If ventilation in the bathroom does not work, the air becomes humid and is not ventilated, laundry does not dry well, and mold may appear.
Floor fan motor
Inside the fan there is an asynchronous motor with regulation of the shaft rotation speed by switching the windings. A capacitor is attached to the gearbox. The radio element is not a trigger element. We believe that it is not for nothing that the windings are fastened four in two rows, shifted relative to each other by an eighth of a turn. Field rotation uses voltage phase and 90 degree shift. The equipment is useless at this point, one winding of the asynchronous motor of the floor fan will burn out, and the motor will have to be replaced. It is not possible for a beginner to wind a complex product on his own.