The issue of the strength of the roofing system is always given the closest attention, because much will depend on this stage of construction. For example: protection of the home from the environment and adverse weather conditions. And mistakes made in the organization of such an important factor as attaching rafters to floor beams threaten various troubles, from unplanned repairs to dismantling the roof with the construction of an alternative frame. Rafters and floor beams are irreplaceable segments of the roof system structure. Wood is usually used in their manufacture. And they are also attached in various ways, which we will talk about in today’s article.
Roof rafter system: one of the possible options
Features of rafter systems
But first, just a few words about the features of rafter systems - they are also different, and this directly determines how to attach the rafters to the beams. When designing a structure, they usually choose the most suitable option for a particular case. Rafters available:
- hanging,
- layered.
The first type of segments is taken for the construction of light roofs with a fairly large area. They will be supported by the walls of the building. The system with the second type of rafters is more complicated, in which the rafter legs rest on additional points.
- When constructing rafters, the entire structure can be based on a Mauerlat. This method is most popular and effective when constructing the roof of brick and block dwellings.
- If at the top of the walls there is, for example, a monolith - a concrete beam, or the walls of the building are made of beams (logs), the roof usually rests not on the Mauerlat, but on horizontal floor beams that overlap the box of the building across.
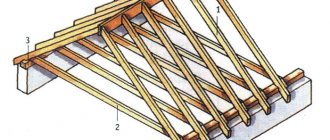
- Roof structures supported by beams are the simplest variation of the construction of an attic, lighter roof. The main thing in the project is to correctly calculate the thickness of both the floor beams and the rafter legs, taking into account the possible loads on the entire roof structure. And during installation, you need to correctly support the rafters into the floor beams. Roofs with rafter system supports on overlapping beams (without the participation of a Mauerlat) can be mounted on the condition that the walls of the building will be able to withstand fairly large loads at the points of application.
It is worth additionally noting that the correct choice of rafter installation option, as well as maximum adherence to architectural technologies, will optimally guarantee that there is no risk of damage to all attachment points of rafters to beams in particular, and to the roof in general.
Basic terms
1. Rafters are beams made of logs or beams that serve as a support for the roofing “pie”, which includes both the finishing roofing covering and hydro- and vapor barrier layers. The lower part of the rafters - the rafter legs - can rest either on the wall of the building itself or on the mauerlat. The upper parts of the rafters are connected to each other end-to-end or overlapped at an angle, and then attached to the ridge beam or purlin. The main types of rafters are:
- Layered, which are suitable for roofs with intermediate columnar supports. The lower part of such rafters (leg) rests on the mauerlat, the middle part on an intermediate wall or support, the upper part on the ridge. Thus, the rafters experience less stress.
- Hanging ones, which do not have additional support, which means they work both in bending and compression, and also create a significant bursting force. To strengthen the structure, a tie is used - a horizontal beam that is attached to the rafter legs and at the same time can serve as a floor beam.
2. Mauerlat is a massive beam, usually a beam with a cross-section of at least 15x15 cm, which is laid on the axial walls parallel to the ridge. The Mauerlat is fastened to the wall using studs recessed into a reinforced concrete belt. The Mauerlat is placed on the protruding parts of the studs, and then the fastening is reinforced with nuts. The Mauerlat is necessary so that the load from the roof structure is evenly distributed along the entire length of the axial walls, and does not represent separate points. In light structures, for example, houses made of timber or log cabins, it is allowed to fasten the rafters directly to the upper crown or beam of the wall, without erecting a mauerlat. Capital buildings made of brick and concrete blocks must have a Mauerlat.
The most comprehensive information about rafters can be found on Wikipedia.
Fastening parts
Wooden and metal parts are used for the installation of rafter systems. The first include: block, triangle and dowel, etc. Metal in fastener parts is quite widely represented: nails, angles, bolts and screws, clamps and brackets. As well as special devices for installing rafters, which are called “sleds”.
W.B.
Fastenings of this kind are used during installation work on load-bearing floor beams during the construction of wooden buildings. Their main advantages: no cutting into the beams themselves is required, and fastening is carried out using bolts with screws of large nails.
Overview of fastening fittings for mounting rafters
There are several types of fasteners for arranging a rafter system. All of them are united by the material of manufacture – metal. The most popular types of fasteners are:
- Corners that are used to strengthen nodes during installation of rafters. Corners not only make the fastening more durable, but also increase the load-bearing capacity of the structure. Another advantage is that there is no need to make recesses in the wood, that is, the integrity of the elements of the rafter system is not compromised. The corners are secured with nails with ruff-type protrusions on the leg or with screws.
- Perforated tape, which also serves to give the rafter structure strength and additional rigidity.
- Brackets, which are made of 2 mm galvanized metal and are attached to the wood with anchor bolts, screws or nails.
- LK fasteners, similar in design to brackets and fixed with nails or screws.
- “Sled” fasteners used for installing the truss system of wooden houses in order to protect the roof structure from deformation during the shrinkage of the building.
- Perforated metal plates.
Other types of fastenings that are used when arranging the rafter system are bolts with nuts, self-tapping screws, and wire ties.
Mauerlat
A popular method of securing rafter systems at the bottom is considered to be connection to the Mauerlat. But, despite the spread, in order to do this work efficiently, you need to know some nuances. After all, if something goes wrong, it can affect the reliability and service life of the entire roof.
- Before fastening the rafters to the mauerlat, special inserts must be made at the bottom of the rafter legs. It is not recommended to install the structure without them, since under load the edge of the block will slide off the smooth coating of the beam.
- As for the recesses in the Mauerlat itself (whether it’s worth making them or not), it may depend on the materials from which it is made.
- In the case of using hardwood, experienced craftsmen advise making a cut in the Mauerlat beam - this, together with the cut made in the rafter leg, will reliably create a “point-blank” lock. And when you use a softwood Mauerlat, it is not advisable to make a cut - it will lead to a possible weakening of the entire arrangement.
- The reliability of the roof under different weather conditions may depend on the method of fastening the rafters to the Mauerlat.
How to fasten with a Mauerlat
Attaching rafters to floor beams
Floor beams sometimes act as a kind of alternative to tightening. Most often this happens during the construction of light attics - it’s more convenient. But you can only attach the rafters directly to the floor beams if you are confident in the reliability of the walls of the house. Because in this case there is no Mauerlat, and, as a result, the load on the walls is not distributed evenly - now it is point-loaded. And this is worse, of course.
By the way, it is not necessary to take thick beams for floors; a section of 5x15 cm is enough. Your main task is to make such a fastening so that the rafters do not begin to slide along the beam.
By the way, there is a big difference in how to attach the same rafters to the floor beams of single-pitched and gable roofs. So, the greater the load the roof experiences, the fastening should be done with a double tooth, while for single-pitched roofs one is enough. By the way, a double tooth usually has two spikes.
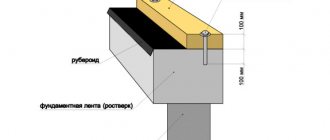
The most durable fastening is obtained if you make a notch, and with an additional tenon, which will also prevent lateral shifts of the rafters due to loads. On the other hand, it is important not to weaken the beam itself at the same time. Therefore, the cutout for the rafters should be made no closer than 25 cm from the edge (this will also help to avoid falcons), and only 1/3-1/4 deep from the thickness of the beam itself:
To ensure that the rafter leg does not slide off the mauerlat, a special recess is made in it. And in the Mauerlat itself, sometimes they make another one, a counter one - this is only more reliable, and the stubborn lock turns out to be strong.
True, the Mauerlat itself will be significantly weakened by this - take this into account. You can do something like this with it only when the Mauerlat is made of hard hardwood and has good strength.
The grooves alone will not hold the rafters in place, so be sure to additionally use metal fasteners. If your connection is stationary, it will be enough to drive nails at an angle, and for more unreliable structures, use clamp connections and metal plates. Forged wire, which is mounted into the wall for these purposes, will also help.
Another type of fastening of rafter legs to beams is bolted:
- Step 1. At the end of the beam that protrudes, make a triangular cutout. The hypotenuse of the cutout should be at the same angle as the angle of the rafters.
- Step 2. We also saw the lower part of the rafter leg at the same angle.
- Step 3. We place the rafter on the beam with a cut and fix it with nails.
- Step 4. Perpendicular to the rafter leg, we drill a hole for the bolt - through, so that the bolt can be entered from below through the cutout in the beam.
- Step 5. We put a washer on the bolt and tightly fix the entire assembly with a nut.
Upon completion of fastening, be sure to check the strength of all connections.
Connection: rafter leg + beam
Any roof, under the influence of various types of loads, tends to “float” to the sides and downwards. To prevent this from happening, various methods can be used to prevent displacement of rafter system segments.
Support diagram
One of the time-tested and experience-tested methods of masters is cutting out connectors in the rafter legs, which can be done by connecting using a tooth with a stop, with a tenon, or supporting the rafters on a beam floor.
The notch in the first option is used if the roof has a large sloping angle. This means that the rafters are attached at an angle of more than 35o. A tooth with a stop and a tenon is made in the rafter leg, and a corresponding socket is made in the body of the beam for the tenon (the insert is deepened to one third of the thickness of the beam itself, otherwise the structure will be weakened). The cut is made at a distance of no more than 40 cm from the edge; in this case, it is usually possible to avoid chipping. And in order to prevent the joints from sliding sideways, a single tooth is created together with a tenon.
Notches with 2 “teeth” can be used for flat roofs, in cases where the angle between the connected elements is not more than 35o. The process itself is implemented using one of the following methods:
- in 2 spikes;
- at stops - without the participation of spikes;
- into stops complemented by spikes;
- fastening the lock plan with 2 tenons (other variations are possible).
For 2 teeth, the entrance is usually the same in depth. However, in some variants, the first of the teeth supplemented with spikes is buried by a third of the thickness of the entire beam, and the second by half.
When arranging roof structures, a technique can also be used when they are connected to each other: a rafter leg plus a ceiling beam from the ceiling (used quite infrequently). In this case, a thrust tooth is constructed in the leg in such a way that the first of the planes fits onto a flat beam cut, and the second is fixed into a cutout, which is buried in a third of the thickness of the beam. For greater strength, in addition to notches, additional connections are often made using bolts and clamps.
Types with a puff
How to attach rafters to the wall - options and methods from practice
Fastening the roof rafters of a house can be done in various ways, it all depends on the design features of the rafter frame. The most important thing is that the connection is strong and can withstand various loads associated with the climatic conditions of the area.
Methods of fastening rafters
Before you start building a roof, it is important to understand all the intricacies of the process, in particular how to attach the rafters to each other. The frame elements can only be firmly connected using special rafter fasteners. Parts made of wood and metal can act in this capacity.
The wooden elements that are used to connect the nodes of the rafter frame include the following:
- Bars.
- Triangular scarves.
- Nagel.
- Spikes.
Metal elements used for this purpose include the following:
- Nails or screws.
- Bolts complete with nuts and washers.
- Staples and clamps.
- Overlays.
- Loops.
- Anchor bolts.
- Nail and serrated plates.
- Corners.
- Perforated tape.
The use of one or another type of fastening element is determined by the required strength of the structure, its geometry, as well as the magnitude of the load.
Rules for connecting the lower heels of rafter legs
Most often, the rafters rest against the wall with their lower part, and the elements can be connected in this way:
- Directly to the Mauerlat.
- Through the ceiling beams.
- With the help of puffs and rafters.
- Using frame structure strapping.
- Attaching to the upper crown of a house made of logs or timber.
The installation of a hanging rafter system is carried out taking into account the fact that the rigid fastening of the upper part of the elements provides expansion pressure on the walls of the building. To reduce the degree of load, tie ties are used to connect the rafter legs of one truss. In this case, the connection of the building wall occurs with a non-thrust triangle.
If you lay the ceiling beams perpendicular to the walls, you can avoid the use of tie rods. A rafter system without a Mauerlat is used in the construction of light mansard roofs, but taking into account the fact that a point load may be exerted on the walls. For example, walls made of brick or other piece materials cannot be subjected to point loads; in this case, a Mauerlat is required. To create a roof overhang, the beams must extend beyond the external walls by approximately 0.5 meters. The rafters are also extended to a similar distance, since they are fastened to the edge of the beam.
The rafters should not be allowed to slide along the beams, so it is important to make the connection very strong. Only in this case can deformation of the roof under certain loads be prevented.
Methods for attaching rafters to beams, walls, beams
For most private developers, the pressing question is how to attach the rafters to the timber. Attaching rafter legs can be done in the following ways:
- The emphasis is on the beam.
- Tooth with emphasis.
- Tooth with a spike.
The slope of the slopes determines the number of teeth. Using the methods listed above, the load from one element of the rafter frame can be transferred to another:
- The use of a single tooth cut is permitted if the slopes have a slope of more than 35 degrees. In this situation, a tooth with a tenon is placed in the heel of the rafter leg, and a stop and a socket for the tenon are cut out in the beam. The main thing is that the nest does not go deeper than a third of the thickness of the beam. The notch should be located at a distance of 0.25-0.35 m from the edge of the beam, which is located behind the plane of the wall. The presence of a tenon does not allow the rafter leg to move laterally.
- For a roof with slopes of a slight slope, up to 35 degrees, the installation of rafters involves increasing the contact area of the rafter leg and the beam to increase the supporting area of the structure. To do this, a cut is made into two tenons, into a lock, with a stop and a tenon or without a tenon.
The connection between rafters and beams can also be done using bolts or bolts and clamps.
Options for attaching rafters to the Mauerlat
The rafters are fastened to the wall in most cases using a Mauerlat. This element is designed to evenly distribute the load from the roof structure onto the load-bearing walls of the building and its foundation. There are two ways to attach rafter legs to the mauerlat: rigid and sliding fastening.
Rigid mount
This method of connection does not allow the connected structural elements to move, bend or rotate. You can achieve this result in the following case:
- If you use metal corners for the rafters, which will connect the rafters to the hemmed support beam. In this case, the rafter leg rests rigidly on the support beam and is secured using steel corners, which are located on the sides of the elements being connected. It is the corners that prevent the element from moving in the transverse direction.
- If you make a gash on the rafter leg and secure it with staples, nails or wire. In this case, the rafters are fastened with nails on both sides of the connection unit, and the third - in the lower part of the element in the vertical direction.
On a skate
When constructing roofs, modern craftsmen use several types of fastenings for the rafter system on the ridge:
- joint to joint;
- for a run;
- overlap onto the upper ridge run.
Butt-to-butt connection . At the top, the rafter segment is cut at an angle (which is equal to the planned roof slope). And then they rest on the opposite leg, where circumcision is performed in the same way, but only in an asymmetrical direction. It is better to do this using preliminary templates. In some cases, the cut is performed during installation, and the cut is made through 2 beams.
On the run
The installation for the run is similar to the above variation. The differences will be in the installation of the ridge beam itself. This design is highly reliable, but it cannot always be abused, since it will require additional installation of support beams. As a result: the attic is not very convenient for further use. This method will allow you to complete the installation of pairs of rafter legs on site, without any preliminary “curtsies” or templates. In this case, the upper segments of the legs rest against the ridge beam, and the lower segments rest against the mauerlat.
Overlap on the ridge run. Here, the installation is carried out in the same way as in the previous version, only the upper joints of the rafters are overlapped, touching from above not with their ends, but with their sides. In this case, the fasteners will be bolts (or studs as an option).
Installation of rafters on the ceiling
There are several ways to fasten the rafters:
Rafter mounting options
Below I will tell you in more detail about all the installation methods, and you can choose the option that suits you.
Beginners often call the timber on which the rafters rest a rafter beam. In reality, a rafter beam is a type of roof truss that is made of metal or reinforced concrete. These structures are used to cover large buildings without load-bearing walls, for example, workshops or warehouses.
Rafter beams allow you to span large buildings that do not have internal walls
Using fasteners
This method of fastening is the simplest and fastest. Its principle is based on the fact that the leg is cut from the end at an angle equal to the angle of inclination of the slope, which makes it possible to maximize the support area of the rafter leg.
In this case, special fastening elements are used to fix the leg, such as:
- Toothed plates that are clogged at the junction of parts. The plates are laid on both sides of the joint. It must be said that they can be used to connect any parts of the rafter system;
You can ensure a reliable fastening point using serrated plates
- Perforated plates. They are placed at the junction of the parts and tightened with screws or fixed with nails.
The use of fasteners can significantly simplify and speed up the process of constructing a rafter system. However, fasteners do not tolerate thrust loads well.
Therefore, the legs must be tightened with crossbars. In addition, it is additionally advisable to use racks, as in the photo below.
The fastening unit using toothed plates must be reinforced with racks
Inset
The insert allows for rigid fastening of the leg to the base. Moreover, this method can be used to install rafters both on the floors and on the mauerlat.
The notch provides rigid fastening of the legs to the base
The principle of cutting is based on making grooves at the base into which the legs rest. In this case, the ends of the legs themselves are cut at a sharper angle than the angle of inclination of the slope, which ensures even more reliable fixation of the parts.
The insertion can be carried out with a single or double tooth. The latter allows you to get an even more reliable connection.
Double double tooth mortise is more reliable
This connection method has one drawback - the complexity of its implementation. But the fastening unit is capable of withstanding large thrust loads. Therefore, it is excellent for hanging rafters.
When using a mortise, additional fixation is carried out using the fasteners that I described above, or with a pin, as in the diagram above.
The tooth-and-tenon type insertion method is the most complex
Tooth and thorn
The method of installing rafters with a tooth and a tenon is practically no different from a conventional mortise. The only thing is that there is an additional spike in the leg, which provides additional fixation.
The spike not only increases the load-bearing capacity of the attachment bridle, but also prevents lateral displacement of the leg. This installation method does not require the use of additional pads. Fixation can be done with nails or screws.
Since this installation method is the most complex, it has recently been rarely used.
The bar overlay can be applied in two ways
Overlay
The use of an overlay is, in fact, also one of the variations of the insert. Installing the pad allows you not to cut the leg at an acute angle, but to join it in the same way as when using fasteners. Instead, a block is cut, the end of which is located below the leg.
In this case, the pad itself is attached to the leg using studs, bolts or clamps. Sometimes a flashing is used to strengthen a mortise joint. This increases the resistance of the unit to thrust loads.
If the roof is small, for example, mounted on a garage or gazebo, you can even connect the rafters to the base with bolts.
If the roof is small, connections can be made with bolts
Calculation principle
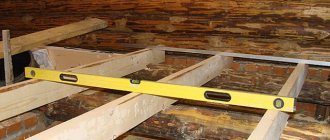
At the preparatory stage for construction, it is necessary to calculate the rafters with floor beams in advance. When designing a roof frame, the climatic and other features of a particular region, as well as its characteristic snow and wind loads, are taken into account. Based on these data and SNiP, which determine the relative and permissible deflections, the section will be calculated for all elements of the system: roof beams, rafters, and other parts of the truss. It is also necessary to perform structural calculations that determine the laying step for the beams. And the distance between the beams, in turn, determines the step for placing the rafter legs.
As you can see, it is quite possible to build a roof rafter system with your own hands if you study the entire process step by step: from purchasing the material to determining the load the building structure can withstand and how to attach the rafters to the floor beams.
We recommend watching a video about installing rafters:
The main types of connections found when arranging a rafter system
The approach to how to fasten the rafters is determined depending on the location of the fastening point:
- rafters and mauerlat;
- two bars when increasing the length of the rafters;
- rafters and additional structural elements that strengthen the roofing system.
Scheme of rigid fastening of rafters to the Mauerlat
Rigid fastening of rafters is used when it is necessary to create a strong connection between the rafter base and the Mauerlat. An important requirement: the fastening should not be affected by factors such as torque, sliding, turning, etc. an effort.
The strength of the structure is ensured by:
- equipping the rafter leg with a gash - the so-called “saddle”;
- equipping the fastening unit with a stripe in the form of a support bar.
How to properly attach the rafters to the Mauerlat using this method? First, using a template, a recess (“saddle”) is created on the rafter leg in order to further place the rafter on the mauerlat. It is prohibited to make any cuts on the Mauerlat, because violating the integrity of this element can significantly reduce the load-bearing capacity of the entire rafter system!
After the rafter leg and the mauerlat are joined, the elements are fastened using three nails: two are driven into the sides of the rafters at an angle to the rafters and to each other, and the third is strictly vertical in the middle. A more reliable method of fastening is metal corners, which are fixed with nails with special protrusions on the leg.
The knot will be made even stronger by the supporting block, which is mounted under the rafter leg and rests against the mauerlat.
Photo of fastening the rafters to the Mauerlat
Attaching the rafters to the mauerlat
photo of attaching the rafters to the Mauerlat
photo of attaching the rafters to the Mauerlat
photo of attaching the rafters to the Mauerlat
photo of attaching the rafters to the Mauerlat
photo of attaching the rafters to the Mauerlat
photo of attaching the rafters to the Mauerlat
photo of attaching the rafters to the Mauerlat
photo of attaching the rafters to the Mauerlat
Sliding rafter technology
Those who are interested in how to fasten rafters when arranging the roof of a house made of timber or rounded logs will want to know about sliding fastening. A rigid connection between the mauerlat and rafters is not suitable in this case, because wooden houses necessarily shrink in the first few years after construction. If the roof is not given some room to move in the direction of expansion/contraction, it may become deformed or even collapse.
With this method of fastening, the mauerlat and rafters are connected using special “sled” fittings or corners with elongated holes for nails.
Photo of the sliding fastening of rafters to the Mauerlat
Video about the sliding method of fastening and its installation:
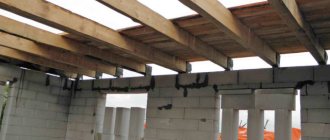
Installation of rafters on beams (when arranging a roof without a Mauerlat)
If you are planning to install a simple roof for a wooden house, the rafters can be attached to the floor beams. However, keep in mind that the distribution of the load from the roof will be point-wise and not distributed, as with a Mauerlat. With this constructive solution, the floor beams should protrude beyond the contour of the walls by about 40 cm. To ensure that all rafters are fixed at the same angle to the beams, a string is pulled across the latter, which will serve as a guide for cutting out grooves for installing rafter legs.
To make the fastening unit more durable, cuts are made both at the base of the rafter leg and in the floor beam. In the first case it is a “tooth with a spike”, in the second it is a socket for a spike. To avoid reducing the load-bearing capacity of the beam, the nest should have a depth of no more than 1/3-1/4 of its width.
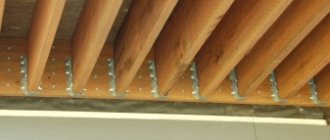
Next, the rafter legs inserted into the grooves are fixed to the beams using metal fittings: angles or bolts with nuts.
Fastening the rafters in the upper (ridge) part
At this stage, you can act according to one of three schemes:
- fasten the upper parts of the rafters, cut at the required angle (ideally according to a template), end-to-end using long nails, or even better, metal plates;
- fasten the rafters with an overlap using a bolt and nut, studs or nails. This method is considered more reliable than the first because the rafters have a larger contact area;
- fasten the rafters end-to-end and secure them to the ridge purlin. This scheme differs from the first method in that there is also a ridge beam. In this case, the “saddle” is made not only on the rafter leg, but also on the upper part, which will rest on the ridge girder. If the ridge is large, it may require additional supports, which is completely unsuitable for attics that will be used as living quarters.
Extension of rafters
As a rule, standard lumber has a length of up to 6 m. If the slope of your roof is longer, it is necessary to build up, or lengthen the rafters. Here, too, you can act differently:
- using the method of oblique cutting (at an angle of 45°) and connecting parts of the rafters with a bolt with a diameter of at least 12 mm;
- end-to-end, strengthening the connection with overlay beams fixed with nails in a checkerboard pattern;
- overlapping, observing the intersection of rafter sections of at least 1 meter in length and the arrangement of fastening fittings in a checkerboard pattern.