What is a double socket?
A double socket is a device in the form of a plastic case of different designs with a working part. Inside the case there are all the terminals, springs for the plug, contacts, and grounding elements that allow you to remove voltage from the devices and ensure their safe use. Modern sockets are available in the following types:
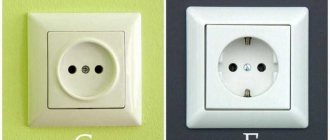
- French with a third additional pin,
- American, with side slits,
- double socket with cover for installation outdoors or indoors with high humidity levels,
- German with grounding contacts (common in Russia).
The case on the front side in the center has two recesses with holes for the plug pins. A single socket has one recess, a triple socket has 3. On the sides of the recess there are protrusions in the form of metal plates, and on the reverse side there are working elements. The double socket can be installed independently. It is better to plan the installation of electrical accessories during repairs, so that the socket can be slightly recessed into the wall using a socket box, i.e., make it “hidden”. If replacement is required after repair, then you can choose special compact models that are easy to use.
Connecting a double socket is not very complicated; a plastic cup is used for installation, and the structure itself is secured with bolts. First, the socket must be disassembled; first, the frame with the working mechanism is attached, using the previously installed socket box. The top of the structure will be covered with a decorative overlay cover. Before starting work, you must turn off the power to the apartment and take care of your own safety.
Preparing to install double sockets with your own hands
It is important to first select and prepare the surface for the device to be installed and purchase the necessary tools that will be needed during the work process. For the simplest option - installing internal double sockets with one socket box, we will need:
- Screwdrivers with different blade configurations (flat and Phillips);
- Sharp knife;
- Indicator for checking the presence of current (a probe or a special screwdriver with a diode that reacts to the presence of voltage);
- Pliers with wire cutters;
- A hammer drill for preparing a niche and laying grooves for wires to the connection point;
- Double socket;
- Wire of a suitable cross-section (two or three wires);
- Dowels, screws, self-tapping screws.
Before direct connection, we carry out preparatory measures:
- Select the location where the device will be placed;
- We fill the wall for grooves (grooves) and a niche;
- We fix the box in which the socket box will be placed on plaster or cement mortar;
- We lay the wires to the connection point;
- We install the socket box;
- We decide on the configuration and type of network device.
When installing an external double socket, there is no need to dig out a niche. It is attached directly to the wall on top of a sheet of fire-resistant dielectric material cut to the size of the box.
Versatility
Nowadays, sockets with two or three seats appear almost everywhere. This is noticeably better than single samples, where tees then need to be inserted. They are reliable, high quality and simply comfortable. At the same time, you do not need to significantly change the electrical wiring, which reduces your costs in the end. Manufacturers have now released closed and open versions onto the market. All you need to do is choose the right overhead double socket.
Most often the situation is as follows. Friends have come to visit you. They all urgently need to charge their tablets, cell phones and laptops. The number of connectors needed is significant. You can't please everyone with single sockets. This is why experts recommend installing a double internal socket everywhere.
Why double socket?
It is very difficult to find any disadvantages to the decision to install a double socket.
Almost the only argument that is given against it is most likely expressed simply “out of harm” and says that connecting it to the network increases the risk of overload - except for families that have electricians, no one will even think about whether it will “pull” or one point two powerful electrical appliances. In practice, to connect such devices that consistently consume high amperage current, separate sockets are made, so under normal conditions, several factors must come together to cause a long-term dangerous overload, the combination of which seems very, very unlikely.
What is the average outlet designed for?
power socket
The first point is the current strength that the socket can withstand - usually this parameter is indicated on its cover, less often - on the inside. Old Soviet devices, which are now increasingly rare to find (they are replaced almost primarily because of the need to connect modern Europlugs), are mostly designed for a current of 6 Amps. Modern ones, even of mediocre quality, are already marked with 10 (if it is without grounding) or 16 Amperes.
What these numbers mean, the school formula for calculating the power of electric current will help you find out - even humanists should understand it. P (power) = I (current) * U (voltage), and given that the voltage in the household network is always constant and equal to 220 Volts, it is quite simple to calculate what the current marking indicates.
- 220 Volts * 6 Amps = 1320 Watts = 1.3 kW
- 220 Volts * 10 Amps = 2200 Watts = 2.2 kW
- 220 Volts * 16 Amps = 3520 Watts = 3.5 kW
Power of household electrical appliances
You can clearly imagine where you can safely connect a double socket by comparing the most commonly used electrical appliances:
Taking into account the recommendations of the PUE: how to properly connect powerful kitchen electrical appliances, boilers and air conditioners - a separate line is always connected to them, it is very difficult to imagine in what situation the installation of a double socket will entail the simultaneous inclusion of two devices with a total power of more than 2.2 kW. Using an iron at the same time as a vacuum cleaner or hairdryer is quite problematic - only a microwave and an electric kettle remain, but together they work for a maximum of 5-8 minutes, and the safety margin in electrical engineering is not an empty phrase. Plus, for such electrical appliances they usually install good 16 Ampere sockets.
Double socket: comfort and beauty in the home
In a room where several electronic devices will be connected at once, there is a catastrophic lack of sockets.
To solve the problem, install a double socket. Firstly, it is practical, and secondly, it is a more attractive option than connecting a filter and other devices. Every year the product is improved and new options are developed using innovations. Therefore, the modern market offers a wide variety of models, which determines the option for connecting devices.
How to properly connect a double socket
When doing a major renovation, people often start with the wiring. With a large number of electrical appliances, the question often arises - how to connect a double outlet to create more comfortable conditions. Their installation helps to avoid unnecessary communications, as well as additional sources, connections: tees, extension cords and carriers.
It often happens that connecting a double socket can cause some difficulties. This happens when there are no minimum skills or mistakes made in a hurry. To prevent this from happening, you need to prepare everything in advance and make sure that all the parts are available and that the outlet itself is in working order. In addition, there are many nuances that can affect a malfunction or short service life.
Main types of double sockets
Typically, any socket consists of a protective housing, as well as a ceramic base with contacts. They are connected by screw terminals to which the electrical cable must be connected.
The classification of sockets is very diverse. To choose the right one, it is necessary to take into account the type of plugs of the electrical equipment being connected. They are divided according to several factors:
- By type - external and internal;
- By type - built-in, wall-mounted and overhead;
- Depending on the modification - with grounding, closed sockets, grounding and a protective frame, with a frame without grounding.
Also, dual power supplies are divided into classes depending on the country, manufacturer and material manufactured. Each country uses its own connectors. They come in a wide variety of shapes, but in the CIS countries, they usually use devices with ordinary round connectors of different diameters.
The main types of sockets used:
- Ordinary, without grounding;
- Spring, plug sockets;
- With protective curtains used in children's rooms;
- With rubber gaskets for damp areas;
- Sockets with protective shutdown;
- For different types of plugs with multiple holes;
- With timer;
- Functional, with the fork ejected when you press the side button built into the device;
- With screw clamp;
- With lid.
Main types
There are several main varieties. In the photo of the double socket you can see the design features of each model.
All types of double sockets can be divided according to the following criteria:
Mechanical protection. There are open and closed models. The closed type of sockets is a design in which the openings for connecting an electrical device are securely closed. This feature increases the safety of the outlet, especially in a home where small children live.
There are models with an overhead cover. An open socket is not additionally protected by anything. To close the holes, special devices are required if there is a child in the house. The cost of such models is usually lower than with protection.
Availability of grounding. Most models contain grounding contacts, but there are varieties without them. This design feature does not affect the functionality of the product, but the double socket with grounding is safer than its analogues. It is important not only to purchase, but also to connect these contacts correctly.
Design features. Sockets may vary in design. There are overhead and built-in modifications. The main differences are in the installation and dimensions of the product. Hidden sockets look neater, but the external type is easier to install and connect.
Housing tightness. There are sockets that are marked IP-45 and IP-55. Such products are highly durable, and the body is reliably protected from dust and moisture. The higher the level of protection, the better. This product can be installed outdoors and in production.
Additional functions. A double socket can contain special devices. For example, a timer is programmed to turn the power supply on and off. Backlit keys will allow you to find the socket in the dark. An RCD can also be built into the device.
Necessary tools and additional materials
Installing a double socket requires tools and materials prepared in advance:
- Screwdriver suitable for screws;
- Indicator screwdriver;
- Nippers or pliers;
- Sharp knife for stripping cables;
- If installation takes place in a new location, a hammer drill will be useful;
- Voltmeter;
- Socket;
- Socket box;
- Cable;
- Self-tapping screws and dowels.
Installation of double and triple sockets
There is no difference between how to connect a triple, double or single socket - all the steps are completely the same. Of course, all work must be performed with the electricity turned off:
- A hole is drilled in the wall where a socket box will be installed and a groove through which the wire will be fed (if installation is being done from scratch).
- Gypsum or cement mortar is prepared - just a little so that it is enough to secure the socket box in the wall.
- The socket box is installed flush with the wall (the wires are inserted inside it, and before that their ends must be wrapped with electrical tape so that the gypsum solution does not get on the wires). Then you need to wait the allotted time for the solution to completely harden - depending on the composition, this can take from 15 minutes to a day.
- Next, the insulating tape is removed from the ends of the wires, the required amount of insulation, if necessary, the wires are inserted into the contact mounts and tightened. Contrary to some opinions, there is no difference in how to connect a triple socket (the same applies to double and single) - the phase wire can be clamped both on the right and on the left contact. The main thing is that there is good contact between the core and the terminal; to increase its area, the core can be flattened a little with pliers.
- Then the inner part is installed in the socket box - there is no need to expose anything here, since it has a limiter with which it is pressed against the wall. When the socket is completely leveled, the spacer tabs are tightened and the limiter is screwed to the socket.
- The last step is to secure the cover - it is screwed to the inside with bolts.
At what step you need to turn on the electricity depends solely on the degree of curiosity - whether the connection was made correctly or not. You can check the voltage immediately after connecting the wires, after installing the internal part in the socket box, or after the installation is completely completed.
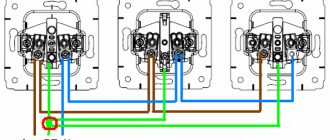
Diagram of step-by-step connection of a double socket
Before connecting a double socket into a ready-made socket box, you need to make preparations. Using an indicator screwdriver, the identity of the wires is checked: phase, neutral and ground. This is done very simply. Apply the tip of a screwdriver to the exposed wires, and cover the area with the light bulb with your finger. If at the moment of touching the core a light signal appears, then this is a phase.
An indicator screwdriver is needed to determine the identity of the wires: phase, neutral and ground
Not everyone and not always have an indicator screwdriver at hand. In this case, color coding of cables will help:
- Red or brown color indicates phase;
- Blue or cyan - zero;
- Yellow-green will always be ground.
If you install the socket in a new location, you should prepare a niche for it. Using a hammer drill or drill, a hole is drilled, wires are brought out, and a socket box is installed. The wires can be taken out of each socket box separately or routed through a cable from one to another. Thus, in one glass there should be two phases, two zeros and one ground. In the second - one from each wire. It must be taken into account that the grounding wire cannot be pulled in a loop; it can only branch off.
The next step will be to turn off the electricity completely in the apartment or only in the room in which installation work is being carried out. The lack of power in the network is checked again.
The socket body is disassembled. By unscrewing the mounting screws, the plastic cover is removed. The screws on the terminals are loosened, and the prepared wires are connected to them one by one.
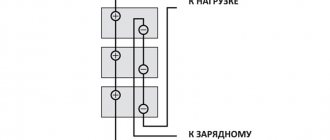
The step-by-step diagram for connecting a double socket to two sockets is as follows:
- A PE (grounding) wire is connected to the central terminal in both designs;
- Two phase wires are connected to the left terminal of the first socket, and two neutral wires are connected to the right terminal;
- The second electrical outlet is connected in the same way, only one wire is connected to the outer terminals and one (ground) to the central one.
- At the final stage, the sockets are screwed with self-tapping screws to the socket box, and the top panel is attached to them on top.
In addition to the double socket, you can connect a socket with a double switch.
The distribution box must have a five-core cable and a separate ground wire. For a double switch with a socket, the connection diagram looks like this:
- Using a jumper, a phase is supplied to the switch;
- Ground and zero from the panel go only to the socket;
- Two free conductors are connected to two switch nodes, through which the phase goes to both lighting groups;
- In the distribution box, zero and ground are twisted with the conductors from the lighting.
When using such a prefabricated structure, it should be remembered that the socket can withstand only periodic use; it is not designed for constant use.
Marking the wall
Place the future outlet on the wall, not far from the running cable. Before installation, markings are made on the wall. To do this, mark the centers of the first and second socket boxes. The distance from one point to another must be at least 7 cm. Deviation from this pointer may result in uneven installation of the decorative socket cover. Both socket boxes must be located strictly in a horizontal or vertical plane. The building level will help with this.
Routing sockets and twisting wires
The wiring stage is one of the most important in the process of connecting a double socket. You need to connect the power wire to the contacts by pulling it from the junction box to the outlet. A drill is placed on a hammer drill or drill, the diameter of which is equal to or slightly larger than the cross-section of the wire being laid.
The cable is cut with a knife or a special tool and the cores are released. The twisting is done directly in the glass. First, the first 1-1.5 cm of wires are exposed, then they are twisted together. To ensure reliability of the connection point, it is recommended to solder it.
The main cable is pulled into the hole of the first socket cup, and the auxiliary cable into the hole of the other. Next, the wires are connected to the socket mechanism.
Subtleties of fastening socket boxes
There are two types of socket boxes: with clamping claws and those that are attached with screws. The latter are considered more reliable, because During operation, the clamps may become loose and the structure may fall out. They can also be single round or elongated for two rosette mechanisms at once. To install double sockets and connect wires in a wooden house, metal products are used.
The glass for the double socket is installed in a pre-prepared niche
A niche is made for the socket box using a hammer drill and a crown attachment. For reliable fixation, an alabaster or cement mixture is used. The inner walls of the hole are moistened with water, then the solution is applied to them. You need to wait 20-30 minutes so that the alabaster has time to set and only then install the glass.
After deepening into the niche, the position of the socket box is leveled using a level. The voids between the walls and the wall are filled with the remaining solution. Using a knife, uneven surfaces are cleaned and excess mixture is removed.
Fastening a glass to a plasterboard wall is a little easier. Holes are made in the wall for the future socket, a socket box with already wired wires is installed and secured using presser feet. Then, using mounting screws, it is pressed tightly against the wall.
How to make grounding?
What to do if there is no grounding in the house? This issue can be resolved in the following ways:
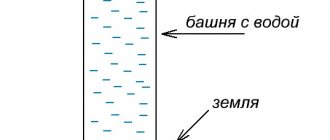
- The ground loop frame, consisting of 3-4 metal corners, should be buried in the ground near the house. For wiring, a copper wire with a cross-section of 1.5 m² is used; in apartment buildings, the cable should be pulled separately to the grounding panels. The twisted copper pair from this shield will extend into the apartment. For a country house building, the wire will have to be pulled directly from the circuit frame.
- The second method is safer; it involves grounding the wiring. Through the distribution panel you need to connect the conductor via the neutral cable and the bolt, after which the wire should be brought into the house.
Classification of double sockets
There are different types of double sockets, primarily differing in design. You should choose a suitable outlet based on your specific needs and tasks.
Double sockets are usually classified into:
Overhead 2-seater with grounding
The body of this model contains contacts that are necessary to protect electrical appliances.
Such an outlet also protects a person from possible penetration of current, which may accidentally end up on the plastic case. To install such an outlet, no additional renovations are required in the apartment; it can be installed instead of any conventional model.
Double pass-through with lid
The operating conditions of the device also determine its choice. The device case has a lockable lid, which protects the contacts from moisture. This product is marked IP-44. If the socket will be used outdoors, you should pay attention to the product marked P-55. The durable housing protects against moisture and dust.
Indoor installation
Indoor installation requires planning the placement of the device even during renovation work. In such options, the holes are hidden behind curtains, which are moved to the side when connected. Such sockets are grounded, because there may be children in the room. Only when pressed simultaneously, the curtains are activated. Even if you insert a foreign object into the socket, it will not work, so it does not pose any danger at all. This is why closed plan models are so popular among the varieties of double sockets.
With and without grounding
Products with grounding, in addition to the main two contacts (phase and neutral), have an additional one for connecting the ground wire. The grounding contact has two components - internal and external. The grounding cable is connected to the internal one, and the electrical appliance is connected to the external one through the corresponding contact in the plug.
If your electrical wiring does not have a grounding wire (common in older homes), there is little point in purchasing a grounded outlet since the grounding terminal will not be able to be connected. If there is a grounding wire, it is better to choose a grounded outlet.
Open and closed
Closed sockets are equipped with a special curtain that covers the holes for connecting the plug. Such models do not allow an inappropriate object (nail, needle, etc.) to be inserted into the socket, and are usually used to ensure the safety of children.
The curtain moves only when both holes are simultaneously impacted, that is, when the plug of an electrical appliance is connected. There are also double sockets with a cover covering the openings.
In this case, to connect the plug, you need to lift the cover. The latter protects not only from electric shock, but also from water, dust and other contaminants entering the outlet.
Protected from moisture or dust
Dust and waterproof double sockets are marked with the designation “IP” and two numbers indicating the degree of protection. Pay attention to the photos of double sockets; if you choose them in an online store, such markings should be visible on them. This parameter is also always indicated in the technical specifications of the product.
For rooms with high humidity levels, it is recommended to choose double sockets with protection class IP44, equipped with a cover.
For installation in open areas, you should choose sockets protected according to the IP55 standard; they are more resistant to moisture and dust.
Programmable
They are equipped with a timer that allows you to set the automatic shutdown and on times. Modern programmable sockets can be equipped with remote control modules (via Wi-Fi or Bluetooth), allowing you to turn them on, off and set the timer from a smartphone.
Spring loaded
Equipped with an internal spring and a housing button, they allow you to almost automatically remove the plug without force. When you press the button, a spring pushes the plug out of the socket.
Built-in (internal) and overhead (external)
The internal double socket is mounted almost flush with the wall. In this case, the structure itself and the contacts of the socket are located in the wall. The surface-mounted socket protrudes above the wall and is mounted directly on it.
Types of double sockets
The main elements of an electrical outlet are the outer protective casing and the working part, which includes the base and contacts.
They are connected to each other by screw terminals - clamps necessary for connecting the cable of electrical equipment.
The only drawback of double sockets is that it is problematic to connect two high-power electricity consumers through them simultaneously
There is a misconception that double sockets are identical to assembled or dual models and represent several independent devices located close to each other, interconnected by cables.
If a double socket is connected to one power circuit, then electrical installation work is carried out according to a scheme similar to connecting a single socket. The only difference is the serial connection of two contact pairs within the electrical installation product
Technological progress does not stand still. Modern models are more advanced designs. In terms of rated voltage and current, they are strikingly different from the sockets that were ubiquitous during the Soviet era.
For example, if in old-style models the permissible current did not exceed 10A, then for modern electrical installation equipment this figure is 16A.
Each part of a double socket can be connected to a separate power circuit if you first remove the brass jumper connecting them at the terminal
In reality, a double socket has one clamp and several distribution strips. Due to this, the electric current is supplied to both sockets equally, but its level will be divided depending on the power of the devices powered from the network.
Therefore, when replacing a failed old device with a new one, it is worth knowing its design features, which require certain nuances during installation.
The distance between the output contacts, as well as the diameter of the plug pins, in modern models is larger than in traditional analogues, and is 4.8 mm instead of 4 mm
According to modification, double sockets are classified into the following main types:
- Open and closed version . In closed models, the holes are hidden behind curtains, which move to the side when the device is turned on. Devices of this type are indispensable for homes where there are small children. The curtains only work when pressed at the same time. Thanks to this, even if a foreign object is deliberately inserted, nothing dangerous happens.
- Without grounding and with grounding contacts . In models of the second type, grounding contacts are installed on the socket body, which protect electrical appliances and the user from breaking currents that accidentally “exit” the plastic body.
- For installation in rooms with high humidity and outdoor installation . Models of the first option are marked IP-44. They are equipped with a housing that protects the device from moisture penetration. Devices for outdoor installation are marked IP-55. Their highly durable housings are protected from dust contamination and moisture penetration.
Each type has a corresponding letter marking. For example: “A” indicates that this is an American double socket, “B” indicates the presence of a grounding contact.
Depending on the type of design and material of manufacture, devices are also divided into standard and polar, overhead and custom-made
Among the latest developments, programmed sockets are especially popular. Devices equipped with a timer turn on and off independently from the power supply after a set time interval has elapsed.
The protective housing of modern sockets is made of heat-resistant, unbreakable plastic. To enhance its decorative qualities, it is decorated with various inserts.
Thanks to the variety of design options, you can choose devices that will be invisible in the interior or, on the contrary, act as a worthy decoration.
When planning to install a double socket yourself, experts recommend choosing simple models without any modifications. Or give preference to double sockets with a spring-loaded plug ejector. Such models are convenient because they are equipped with springs that are activated when the plug is removed from the device.
To protect yourself by minimizing the risk of accidents, you should choose products from proven companies, ABB, and Legrand.
Installation of a double socket
Socket design
To figure out how to install a double socket in a wall with your own hands, you need to study the design of this design.
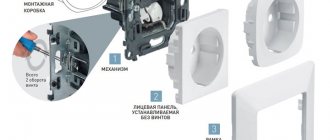
Conventionally, it can be divided into 3 parts:
- Cable. Depending on the building design, it may consist of 2 or 3 cores. In older buildings, wiring with white insulation is installed. Zero and phase have to be found experimentally using measuring instruments. In new houses, a three-color cable is laid, where the insulation near the ground is green-yellow, the phases are brown, and the neutral is blue.
- Mounting box, in conversation - socket box. It is a plastic cup with holes for wires. The depth of the cylinders is 40 and 60 mm. The second option is more convenient, as it makes it possible to conceal the installation of additional equipment (dimmers, sensors, relays). The mounting box is held in the wall due to the astringent properties of the plaster.
- Housing with lid. The housing is made of heat-resistant plastic. A caliper is attached to it, a tire made of two brass plates forming contacts, nuts, screws and terminals. On the sides there are spring-loaded tabs with position adjustment screws.
To properly assemble the socket, you must have an indicator, a straight screwdriver and a Phillips screwdriver.
Removing the old socket
After a power outage, you need to make sure that the cable you will be working with is de-energized. You can check it with an indicator screwdriver. After that, proceed to dismantling the old device. First of all, you need to unscrew the mounting screws and remove the protective cover. Next, you need to disconnect the wires and unscrew the mounting spacers. Then the core is removed.
Installing a new socket box
The most labor-intensive process is installing the socket box. How further things will progress, as well as the final result, depends on this. Installation begins with preparing the niche. To do this, you will need a hammer drill, which you need to hollow out a small recess in the wall, in the place where the power source will be. The niche should be larger than the body of the socket box.
When the recess is ready, the socket itself is attached, but before that you need to pass the power cable through it. It is fixed using holders located on both sides. Then you need to tighten the installation tabs, which expand into the walls and hold the body. Sometimes they may not be available and must be purchased separately. That’s why it is recommended to check and prepare everything before starting work.
Over time, the structure may become loose, and subsequently the socket falls out. To prevent this from happening, some owners fill the free space between the body and the walls of the niche with some kind of solution. You can use gypsum, alabaster or ordinary cement mortar.
In two sockets
If there are two holes in the wall, in each of which wires are laid, the following solutions are available for this case:
- Insert two devices into them with one socket each. You need to choose them so that the lids do not overlap one another or there is an opportunity to grind them off along the edges.
- Purchase an internal socket with a long cover. Connect two holes into one. After this, you can plug the extra line and insert the mechanism in the middle of the created opening.
The choice depends on the residents' needs for electrical outlets. One option would be to install an outer horizontal block with 4-5 slots on top of the holes.
In one socket
Double socket in one socket box
This process is not particularly difficult even for a novice master. If the product is manufactured according to international standards for the width and depth of the case, there should be no problems during installation. You need to determine where the phase is and clean the glass of debris. To prevent the penetration of domestic insects from neighboring apartments, it is recommended to seal the channel in which the cable is laid with silicone. If space allows, the bottom of the glass can be covered with felt for better sound insulation.
After the preparatory work, the mechanism is connected to the network, inserted into the installation box, positioned and secured.
With grounding
Viko Yasemin with grounding
To obtain a grounding point, you need to purchase an appropriate product that provides a contact for the third wire. In three-core cables it is located in the middle. Connect the ground by tightening the bolt firmly. This line is designed for extreme conditions; poor contact is unacceptable here.
If there is a two-core cable running through the wall, it is not necessary to change it. As an alternative to this expensive process, you can run a single copper wire directly from the panel. For laying, you can use the spaces under the baseboards or colored plastic boxes.
Installing a double socket instead of a single one
When deciding whether to replace an outlet, you need to take into account that a double product has a total power that is distributed to both inputs. If the 16A marking is applied, the total power of consumers connected to the sockets or to an extension cord from one of them should not exceed 4 watts.
It should also be taken into account that due to the spacing of the inlet holes on the sides, the thickness of the double structure will be greater. Because of this, the risk of damage to it by any hard and heavy object increases.
Installing an outlet
How to properly connect a double socket so that you don’t have to redo it later? You need to start by stripping the cable. To do this, you need to remove its main shell so that the wires are visible, with a margin of about 10 cm. Very long wires may not fit in the box. If the wiring is old and the ends are very short, they can be extended. For good contact, it is better to use special terminals, or twist them with pliers and then insulate them.
Next, you need to strip the ends by 1.5 cm. Then you need to connect them to the contacts on the ceramic core. It is common to count wire markings by their color. Typically, the phase is marked with a brown wire, zero is blue, and ground is yellow.
After this, it is necessary to loosen the contact terminals on the core of the socket, insert the stripped ends in this order: phase and neutral must be connected to the side contacts, and the ground wire is connected to the central contact, which is usually marked with a ground symbol. The main thing is not to confuse anything in order to avoid short circuits.
When the contacts are connected and tightened, you can proceed directly to the installation of the double socket. To do this, carefully lay the wires in the socket box so that they do not get under the fasteners. Some electricians advise folding them like an accordion and tying them together. Then the socket core is placed inside the fixed socket box and secured with fastening tabs or self-tapping screws. To avoid distortion, you can use a level. The process ends with the attachment of a protective plate, after which it is closed with a decorative frame, which usually simply snaps into special grooves.
If everything is done correctly, there should be no gaps left. Don’t think that if there is a double socket, then its power doubles. It and the electrical wiring supplying it are designed for 16 amperes, which must be taken into account when operating it.
Sometimes people ask how to connect an outlet without grounding. This is not difficult at all. The process is similar to the previous one, only it is better to use a two-core cable. If this is not possible, then the grounding conductor is cut to the main shell, insulating it. In this case, the most common socket with two sockets is used.
Double socket installation technology
Installing a double socket in one socket box requires certain preparatory steps. The first step is to determine the identity of the wires by finding out where the phase and zero are.
The easiest way is to study the insulation code marking:
- the phase wire is painted red or brown (less often white or black);
- neutral has white-blue or light blue insulation;
- grounding is always green-yellow.
The following article will introduce you in detail to the features of marking electrical cable cores, which we recommend that you read. But for greater reliability, it is better to play it safe by taking measurements.
An indispensable assistant in this matter will be a regular or electronic screwdriver equipped with an indicator at the end - a light bulb or an LED indicator.
To determine the identity of the wires, remove the cover from the failed device and touch each exposed wire in turn with a screwdriver with a sensitive indicator: on the neutral wire there will be no light signal, and on the phase wire it will light up.
If there is no ground wire in the house, the installation work is a little easier.
Before you begin arranging an electrical outlet, you must de-energize the room. To do this, the levers of the circuit breakers on the panel are lowered down, moving to the “off” position. It is recommended to re-check the voltage at the location where the double socket is installed.
If there is still current in the phase, this indicates that not all supply lines have yet been de-energized. That’s why it’s so important to turn off all circuit breakers before starting work, and not limit yourself to just those that control the wires going to the outlet.
A double socket with a protective contact is installed if a grounding system for a private home is installed. In multi-storey buildings there is no point in using devices with grounding, because... zeroing has been done there
Marking the wall
The socket is placed near the wire running in the wall or from the electrical distribution box. The location of the future device is marked with a pencil.
Before installing a double socket with two “glasses”, it is necessary to determine the distance between the drilled holes. To do this, mark the center of the first socket box. This is the point of intersection of the diagonals. Using the same principle, the center of the second device is determined.
At the marked place in the wall, a recess is made of such dimensions that a glass - the inner body of the device - can easily fit into it.
To drill a hole in the wall itself, use a crown, the diameter of which is a couple of millimeters larger than the size of the purchased socket box. If there should be no problems with a brick or plasterboard wall, then to drill a hole to install a socket in a concrete wall, you will have to set the hammer drill to the shock mode.
The rules and technology for installing socket boxes in walls made of concrete and plasterboard will be familiarized with the material collected and systematized in our article.
The depth of the hole should be such that the “glass” does not protrude beyond the surface of the wall. Having drilled a niche, you need to clean its middle. To do this, use a chisel and a hammer. Plaster can be knocked off with a chisel or screwdriver without much difficulty.
Routing sockets and twisting wires
This stage is very important and must be approached with the utmost care and caution. The master’s task is to connect the power wire to the contacts. To do this, a wire is pulled from the junction box to a double socket.
The socket itself is disassembled into two components by unscrewing the mounting screws using a screwdriver, separating the front panel from the mechanism
The previously installed crown must be replaced with a drill. The diameter of the drill should be slightly larger than the cross-section of the wire supplied to the socket or the diameter of the corrugated pipe in the cavity of which the supplied wire will lie. The ideal option is when the diameters of the drill and wire match.
The main wire is inserted through one of the mounting holes of the socket box. And the auxiliary one is launched through the second hole.
Twisting of wires is performed directly in the “glass”. Before performing work, the outermost one and a half centimeters of the ends are stripped of the braid with a stripper - a tool that does not cut through the wire.
In the absence of one, you can use a sharp knife, first cutting the winding in a circle with it, and then carefully removing it from the wire. For ease of assembly, the edges of the cores are raised up.
To extend the service life of the socket, the exposed ends of the wires must be soldered, or a brass contact must be used. The second option is more successful, since it not only simplifies the subsequent use of the outlet, but also ensures high safety of the device.
When connecting wires, do not firmly clamp their ends into the terminals, since under the influence of great forces they can be damaged.
When connecting a grounded socket, always follow the wiring rule: on the right - phase, on the left - neutral. The grounding cable is connected to the top and central terminal of the device, which is equipped with protruding “antennae”, which often protrude beyond the body of the device. The grounding contact is fixed in the same way as phase and zero.
You cannot attach a phase and a neutral to the same plate, as this will cause a short circuit and damage to the entire wiring.
Having fixed the wires in the contact holes, unclench the “antennae” by unscrewing them clockwise using special bolts
Having completed the installation of electrical connections, proceed to the installation of socket boxes.
Subtleties of fastening socket boxes
The socket boxes with the power cables attached to them are secured using holders located on the sides. They may be included with the device, or they will have to be purchased separately. There are also models that are not equipped with fixing tabs, which are secured by screwing them onto screws.
As you tighten the screws clockwise, the fixing “legs” will diverge to the sides, firmly digging into the socket box
But since the socket box with the lever in the center experiences a double load, during operation the fastenings of the mechanism can become loose and weaken. When the socket boxes fall out, the wires are often exposed, which can lead to emergency situations.
To increase the reliability of fastening, craftsmen often use alabaster or cement mortar. To obtain a homogeneous thick mass, the structure of which resembles sour cream, dry alabaster is mixed with water. But keep in mind that the material should be diluted in small portions and you need to work with it quickly and carefully.
The alabaster mixture is placed in the place where it is planned to install the socket box. To ensure that the mixture adheres well to the surface, the inner edges of the hole should first be moistened with water.
Work on installing the inside of the device should be carried out 20-30 minutes after laying the mixture so that it has time to “set” a little. Having placed the “glass” on the prepared place and buried it in the mixture, level the position using a level and a hammer.
When installing a socket box, it is important to maintain the vertical and horizontal position of its position, applying a level in both planes for this purpose
The resulting gaps between the wall and the socket box are filled with the remains of alabaster. Without waiting for the plaster to acquire the desired strength, the sagging is removed with a knife.
Having placed the double socket horizontally or vertically and given the device the desired position, secure it with screws. If it is necessary to adjust the level, the work is performed using pliers.
When tightening the mounting screws, the main thing is not to overtighten them, otherwise, with strong pressure, the front panel may simply crack or collapse
At the final stage, the front panel is placed on top and clamped with screws. The decorating element will cover the unsightly part of the outlet and protect it from accidental damage.
After completing the connection of the outlet, all that remains is to turn on the circuit breakers and the residual current device in the panel and test the operation of the electrical installation equipment. It is better to check the operation of the outlet when turning on inexpensive household appliances, for example, a table lamp. After all, the slightest mistake during the installation process can cause a short circuit and “burnout” of household appliances.
Dismantling
Replacing single types is considered a minor repair. Now you can easily connect a double type using an outdated socket box. If you change it, there is enough space left for new samples. This will save you from the hassle of installing new wiring, and the interior will not be damaged in any way. It may have to resort to some cosmetic repairs, but this has never been a critical condition for anyone.
Always keep safety in mind first. Turn off the power to the panel. Check that there is no voltage at the outlet. Only use a screwdriver with an indicator.
You can quickly uninstall the old version yourself. Unscrew all fasteners, remove the cover, disconnect the wires and unscrew the fastener tabs. Do the same with the outlet you are going to install.
New socket
First, a standard socket box is installed. It is always the key to a securely fixed socket. It is often also covered with alabaster or putty to increase the adhesion strength to the wall. Then all the cables are connected. The outer insulation is removed with a knife and a heel.
There is no need to leave too much wire. They have no purpose here. It will only interfere with the installation of the entire mechanism. The margin should not exceed 10 centimeters. If the wires were short, then they can be extended. Then strip the insulation from the conductive wires.
Double sockets with cover are no different from other versions. Only outwardly they look more aesthetically pleasing. Here the wires are connected in exactly the same way. The phase wire is always brown, the neutral wire is blue, the ground wire is green-yellow.
We unscrew the screws and install all the wiring in place, then tighten everything well. It makes no difference which terminal to install phase or zero on.
The most important thing is that they do not connect to the same contact. In this case, a short circuit may occur. The grounding connection is attached to the center contact, which is located on the bracket. Nearby you can see a grounding sign.
Double socket in one socket box - instructions
The disadvantage of this installation is the reduction in power to power two “strong” devices at once. When installing a double socket with grounding in one socket box, you need to make sure that all the wires lie correctly and do not fall on adjacent contacts or mounting tabs.
The process of installing a double socket with a grounding wire in one glass is as follows:
- The power in the apartment is turned off;
- The old single socket is dismantled or a new seat is prepared;
- The electricity is turned on for a while and it is determined where the phase is and where the zero is. Afterwards the power turns off again;
- The design of the new socket is being disassembled. To do this, the panel is unscrewed and the mechanism is released;
- We cut off the long end from the cable sticking out in the wall, so that the protruding end is no more than 10 cm;
- The veins are stripped to 1.5-2 cm;
- The wires are connected according to the location of the terminals: the zero is connected to the screw on the right, the phase is connected to the left, the ground is connected in the middle or on top. After this, the guilt lingers;
- Using fastening screws, the mechanism is fixed in the socket box;
- The front panel is installed. Attached and secured with screws.
Afterwards, the electricity in the house is turned on and the functionality of the double socket is checked. Each stage of installation must be carried out very carefully, because... The slightest discrepancy can lead to a short circuit in the future.
Final stage
The photo of the double outlets does not show any protruding wires. They are all neatly placed inside. There should be nothing unnecessary under the fastening tabs. Otherwise, the entire insulation system may be damaged. Bend the wires with a regular accordion. The installation is simply perfect in this case.
Then you slowly bury it inside. Everything is fixed using self-tapping screws or fastener tabs. Using a level you can always choose the optimal place. Its auxiliary part is then attached to the installation box.
At the end, all decorative elements must be installed. The socket should lie flush against the wall so that there are no gaps on all sides.
Never forget that although this is a double outlet, the load on it does not exceed the standard 16 Amps. The load cannot be increased 2 twice after connecting. When turning on a variety of electrical appliances, it is worth remembering these data.
Two single sockets are placed side by side if there is no extra space when working according to the European standard. Study the question carefully so that you can do everything yourself later.