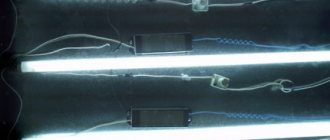
How to check the heating element correctly and quickly
To check the heating element, you will need a digital device - a multimeter.
The multimeter is a small plastic case with a digital display and sockets for connecting test leads. The device is used to measure parameters such as direct and alternating voltage, current, resistance and capacitance (in more expensive models). Using it you can ring any heating element. Checking the heating element with a multimeter
Sequence for checking the heating element:
- The heating element is removed from the household appliance and lies on any surface. You need to connect the test leads, turn on the multimeter and set a parameter such as resistance measurement.
- Place one probe on the first terminal of the heating element, the other on the second terminal. The marking of the probes does not play a certain role in this case.
- If the device shows a certain value, for example, 24 Ohm, this means that the heating element is working properly and can be installed on the water heater.
- If the multimeter shows 0, then this allows you to determine a short circuit inside the heating element housing.
- If 1 is displayed on the display, this is a signal for a wire break inside the heating element.
Even with a small resistance value, the heating element will work properly, but it will take more time to heat the liquid.
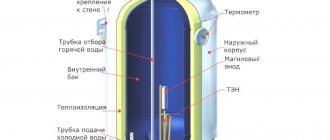
Design and principle of operation of the Ariston water heater
The modern Ariston boiler for 30, 50, 80 and 100 liters is a sealed structure consisting of the following parts and assemblies:
- Storage tank:
- Electric heating element (TEH);
- Magnesium or zinc sacrificial electrode;
- Setting and control unit;
- Casing.
The inner surface of the tank must undergo anti-corrosion treatment. Depending on the cost of the product, various modifications may have the following as anti-corrosion protection:
- Titanium coating;
- Glass porcelain coating;
- A layer of heat-resistant enamel that is resistant to aggressive compounds.
In addition, expensive premium water heater models may have all-metal welded storage tanks made of alloy stainless steel.
The air gap between the casing and the inner container is filled with a polymer heat-insulating composition (most often, polyurethane foam). Thermal insulation allows you to significantly slow down the cooling process, thereby reducing energy consumption.
Heating elements are divided into two main types: “wet” and “dry”. Heating elements that come into direct contact with the heated liquid are called wet. In the process of interaction with the working environment, a persistent coating of insoluble scale forms on the outer surface of the heating element, preventing normal heat transfer. To protect against corrosive destruction of the heating elements and the inner surface of the tank, a zinc or magnesium anode is used.
The functionality, information content and ergonomics of a water heater largely depend on the design and design of the control unit and settings. There are two types of control mechanisms: electronic and mechanical. Digital systems have an attractive appearance and are distinguished by precise settings, but are extremely sensitive to voltage fluctuations.
The mechanical unit looks “simpler”, and the adjustment accuracy is not the same, but the reliability of such devices fully compensates for these shortcomings. In addition, the price of models with electronic adjustment is noticeably higher.
The casing of the unit can be made of both metal and polymer materials. The most common is the cylindrical shape, but models of other configurations are in demand.
Principle of operation
Structurally, the boiler is two barrels isolated from each other.
One of them (internal) is made of either stainless steel or high-quality steel with an anti-corrosion coating.
Modern heat-insulating materials are used as insulators.
This can be basalt fiber, polyurethane foam and similar insulators. Such a “thermos” can retain the heat of heated water for up to 3 days.
Expert Recommendation: Schedule your water heater for later hours using a nightly rate.
When it cools below the programmed value, the thermostat supplies voltage to the heating elements (heating elements) and water heating resumes.
To avoid mixing cold and already heated water, the latter is taken from the very top of the device. Cold water, displacing hot water, is always at the bottom.
When using equipment wisely, you should not force it to constantly work at maximum load. Every technology has its own resource.
Expert advice: by adjusting the thermostat to t=600, you can avoid scale deposits, thereby extending the life of the heating elements and the inner barrel. But periodically, once a month, it is useful to turn on the boiler at the highest possible temperature for disinfection purposes.
How to fix a breakdown
Termex and Ariston boilers are repaired using the same methods.
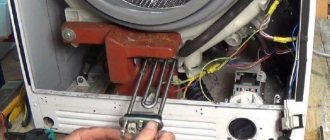
In most cases, the boiler does not turn on due to problems with the heating element. It is secured with 6 bolts, they need to be unscrewed and the heating element removed. It is possible that he has become slightly stuck and will not give in immediately. Once it is disconnected, you need to thoroughly clean the device. Now you can check its operation with a tester. Instructions for verification are given in the next section. All repairs consist of replacing the old heating element with a new one.
Next you need to clean and wash the boiler tank. As soon as it dries, you can begin installing a new heating element and magnesium anode. To make the element last longer, it is recommended to add a water filter to the water heating system. Also, you should not heat the water more than 45 degrees.
There is no power supply to the water heater. A connecting cable runs from the shield to the mechanism. You can find out whether the cable is damaged or not using a tester. If it is normal, then the device will not show phase and zero. The faulty wiring must be replaced with a new one and routed from the switchboard.
Pressure and/or temperature sensors are broken. Can be checked using a tester. In case of malfunction, replace with a new one.
Pressure sensor and temperature sensor
Water pressure too low. Each Thermex device has its own operating pressure specified in the instructions. The owner needs to buy a pump and install it in the boiler. It can also be lower than it is currently located on the wall. It is possible that some contacts have come loose, burned or oxidized. They either need to be tightened or cleaned. If they still don't work, they will have to be replaced completely.
Faulty socket. You can connect another device to it to check its operation. A broken socket must be replaced with a new one. It must be selected in accordance with the power of the boiler. It is also worth making sure that the ground is properly connected to the power outlet. If the connection is incorrect, the RCD may not work, causing the boiler to break. A residual current device is necessary in case of increased voltage in the network and burnout: it is on time.
A broken RCD can also cause a malfunction.
Detailed instructions for and RCD can be found in the following sections.
How to change
Whether a malfunction of the heating element has been identified or a decrease in the efficiency of the device is due to the formation of scale, it will have to be dismantled. It is possible that the heating element will be replaced simultaneously with preventive cleaning of the internal tank.
First of all, you need to:
- disconnect the device from the power supply;
- remove the outer protective cover from the assembly;
- check the absence of voltage at the thermostat terminals with a phase meter probe (indicating screwdriver) and free them from the wires, having previously photographed the connection order;
- remove the thermostat with thermostat;
- close the ball valve at the water inlet, remove the check valve;
- remove water from the water heater through a hose from the valve or directly through its own drain system;
- Unscrew the nut securing the heating element to the mounting plate;
- squeeze the heating element with the rubber sealing flange and anode into the tank;
- unfold it inside the tank and pull it out;
- descale the tank and rinse it;
- If the heating element is in good working order, replace the anode and clean the heating element from scale;
- if the heating element is faulty, replace it with a new one recommended by the manufacturer;
- replace the anode with a new one;
- assemble everything in reverse order, using previously taken photographs of connecting the wires to the thermostat.
You may also be interested in an article about Termex storage water heaters.
Read the article on how to change the heating element in a Termex water heater here.
Features of replacing heating elements in Ariston boilers
You are familiar with the recommendations for replacing tubular electric heaters in Thermex boilers. Most models from other manufacturers have a similar design, but there are also water heaters with a slightly different layout.
A special feature of mounting the heating element of the Ariston water heater is a flange installed on the inside
A special feature of Ariston boilers is an oval flange, made in the shape of a funnel and installed from the inside. The flange is pressed against the tank body using a strip located outside the tank. The strap is secured with just one nut. To remove the heating element, unscrew it and remove the bar. Next, push the flange with the heating element inside the container, insert your hand into the neck and unfold the heating element with the flange up. Then dismantle the heating element by tilting it and inserting the flange into the neck. Otherwise, the process of replacing a tubular electric heater is no different from the method described for Thermex boilers.
Operating instructions for the Ariston water heater
The beginning of operation can be considered the installation and connection of the boiler to the centralized cold water supply system and the electrical network. The quality of installation determines the safety, efficiency and service life of the product.
If for one reason or another the boiler is put into operation independently, you should pay special attention to the points below
Recommendations for installation and connection
It is necessary to begin work on mounting and connecting an Ariston water heater by carefully studying the instructions supplied with it.
- Since the power consumed by the device is quite large, it is necessary to make sure that the characteristics of the electrical wiring used for connection fully correspond to the expected loads and have a grounding loop. The best option for connecting to the electrical network is a separate cable from the distribution cabinet or panel.
- Do not use components that have visual defects, damaged threaded areas, etc. The safety valve included in the delivery package deserves special attention.
- Since the mass of the product is quite large, and the temperature of the water contained in it can reach up to +75C, the boiler must be fastened to the load-bearing surface using metal anchor bolts with a diameter of at least 10 mm. It is permissible to use plastic dowels of similar load-carrying capacity.
- Installation of supply and discharge pipelines must be carried out in strict accordance with the diagram supplied to the heater by the manufacturer.
- The connection point to the electrical network must be reliably protected from condensation, dampness and direct contact with water.
- You can connect the Ariston to the power supply only after filling the storage tank with cold water, otherwise the heating element of the water heater may fail.
- If all the work is done correctly and the product is in good working order, after switching on the corresponding indicator should light up, indicating that the boiler is working.
Ariston boiler replacement heating element
Storage water heaters, regardless of the manufacturer, require periodic maintenance and often repair. Why is there a need to repair Ariston heaters? – in 80 percent of cases due to lack of maintenance, another 20% are due to local unfavorable operating conditions with power surges and unacceptable water quality, in the absence of even a coarse filter. This is an approximate estimate given by experts.
But to repair and maintain an Ariston water heater, specialists are not always needed, since this can be done with your own hands. In case of typical breakdowns, repairing Ariston is not difficult. The Italian manufacturer, one of the five largest creators of household appliances, has taken care of the ergonomics and maintainability of its devices under the Ariston brand. What kind of breakdowns usually occur?
Typical breakdowns of Ariston water heaters and their causes
- Routine maintenance - the debris accumulated at the bottom, which contains most of the products of shedding of the magnesium anode, must be removed periodically.
- Another technical feature of water heaters is the mandatory periodic replacement of the magnesium anode. Depends on the conditions and is done according to the manufacturer’s regulations. The usual terms are for large anodes 400 mm long - up to 5 years of operation, for small ones - up to 2 years.
- Tena burnout is a direct consequence of improper operating conditions due to lack of maintenance, or, rarely, operation in the absence of water.
- Leaking tank, red spots on the tank - failure to replace or incorrect installation of the rubber O-ring during maintenance. It is extremely rare for the tank to be destroyed by corrosion due to violations of operating rules.
- Safety valve leaking - installation of a cheap, defective gray market part, or due to frequent operation by manually opening to release water.
- Failure of electronics, display, temperature sensor, thermal relay are quite rare breakdowns, often caused by unstabilized electricity or operation at almost 100% humidity, but the hardware itself can fail to function due to a low-quality transistor crystal, For example…
Next, we’ll look at how to prevent this and the like...
Typical Ariston tank design
There are different designs of storage type water heaters, including 2 heaters, with a dry heater, flat and round, 20 liters and 120 liters, vertical and horizontal, but the principle is the same for all.
Let's pay attention to a typical diagram: - inside a stainless steel (or enameled) tank there are two key elements:
- A magnesium anode is an elongated cylinder of metal, which is most active in electrochemical reactions, therefore it comes into close contact with aggressive water, and at the same time gradually corrodes, its material transforms and crumbles.
- Ten, often an open type, is a copper tube with a heating coil inside, which, under the protection of the anode, slowly, according to its power, usually from 1.0 to 2.4 kW, heats the water, remaining safe and sound.
- The hot water intake is located at the top so that the currently warmest water in the tank is drained into it.
- A safety valve is installed on the cold water supply, which should operate at 3.0 atm, and it also does not release water from the tank back into the cold pipeline when there is no pressure there...
Thus, the water heater delivers heated water when there is cold water pressure, while the water is heated by an automatically controlled heater, according to the set temperature on the thermostat.
So that it doesn't break
Maintenance boils down to periodic cleaning and replacement of the anode. As soon as the anode is depleted, the heater will immediately be destroyed by corrosion and burn out. Therefore, according to the manufacturer’s instructions, at least once a year it is recommended:
- remove the bottom protective cover;
- remove the tank lid, clean the tank of deposits, check the suitability of the anode based on its size and replace it if necessary. For large anodes the procedure is carried out much less frequently. At the same time, descale the heater, for example, overnight in citric acid...
By the way, specialists usually service such tanks without removing them from the wall, being under them, which reduces the labor intensity of the process.
How to change ten in Ariston
A typical replacement for an Ariston tena is the same branded one. But the brand is so popular that the ubiquitous cunning gray manufacturers offer their own shadows, with the same mount, but at a fraction of the price. As a rule, a branded one will, under normal conditions, work without breakdown until the service life of the tank itself expires. There is a high probability that a cheap one will have to be replaced soon...
Replacement is done in the same order as maintenance, only the heater is not cleaned, but thrown away...
A respected specialist will tell you how to change the heater, no matter what manufacturer’s boiler (Ariston, for example), but in every detail...
What to do if the Ariston electronic board burns out
As a temporary measure - “short-circuit everything and re-energize”, watch the video from an experienced Ariston water heater user. The electronics don’t work, the scoreboard doesn’t work, the Ariston electronic device burned out...
Sooner or later, any owner of this device will have to replace a burnt-out heating element in a storage electric boiler. Don’t think that it will serve you for decades, no matter how high-quality and expensive the model is.
Heating elements fail for two reasons:
- scale formation and burnout of the working element (heating coil)
- corrosion and mechanical failure
Scale forms primarily in the presence of hard water. Just 1mm of scale gives 75% additional thermal insulation. Thus, the heating element under such a large layer of salts simply begins to overheat.
Disassemble the boiler, as shown below, and begin cleaning. This can be done in two ways:
- a regular knife or wire brush
- if the scale is very hard, then use citric acid or special products
Recommendations on how to use your boiler economically
A boiler is quite an expensive device. Every owner learns about this when it comes time to pay for electricity. That is why there are a number of recommendations for saving electricity.
Rules for budget use of a boiler:
- There is no need to turn off the water heater if hot water is constantly needed. When the boiler maintains a constant temperature, it takes less energy than heating it every time from the beginning.
- If hot water is needed less often than a couple of times a day, then it is better to turn off the boiler.
- Some models have an economy mode.
But the main thing is to save water itself. You don't want it to flow unnecessarily. Heating is quite fast, and closing the tap for a few minutes during procedures will save money.
Operating instructions: Ariston water heater 50 liters
Before the water heater is installed, you need to make sure that the wiring can accurately handle the added power. It is also important that the outlet is grounded and does not have contact with water. But there are cases when you simply cannot install the device.
The reasons for this ban are hard water. The water heater will simply break down very quickly, so you need to install a filter. Also, you cannot install the boiler where theoretically there could be sub-zero temperatures. For a boiler, factors of frost, dampness, dust, sunlight, and insects are considered dangerous.
It is necessary to prevent drops of water and also steam from getting on the boiler body. This means that the boiler is not installed above the bathroom. And if the water pressure is weak, it is necessary to set the temperature to maximum, otherwise the boiler will not turn on at all.
Installation and connection of the boiler
Installing a water heater is not particularly difficult. If you wish, you can do this yourself, but it is better to entrust this operation to a professional. If you decide to do it yourself, let's immediately discuss the issue of electricity.
Step by step:
- We decide on a location, drill holes for fastenings and hang the heater. It is better to do all this with the help of a level to avoid unnecessary distortions.
- Next, you need to cut the tees into the distribution pipes. If they are metal-plastic or polypropylene, then there will be no problems with this. What to do when the pipes are metal? There are two options: either use a grinder and a screwdriver (thread cutting machine), or connect to a mixer.
- We drilled holes, hung the apparatus, and cut tees with taps into the pipes. It is necessary to install a valve on the cold water supply in order to be able to shut off the water to the boiler.
- We screw the valve to the cold water outlet (it should be included in the kit). Don’t forget to wrap flax or fum tape around the thread. The valve has a dual function. On the one hand, it discharges water at high pressure, on the other hand, in the event of a shutdown, it does not allow water to leak out of the device and thus leave the heating element dry (which is unacceptable).
- It is advisable to install a tee with a tap above the valve to drain the water. This will make your life much easier if you decide to remove the unit one day. We screw American ones onto the valve and hot water outlet. Why them? The reason is the same. If you decide to remove the device for repair or replacement, you won’t have to worry about connections; American ones can be easily disassembled and assembled. We connect the connections from the pipes to the boiler.
- The launch proceeds as follows. Without turning on the water heater, open the cold water supply. Don't forget to turn off the valve on the hot water pipe leading to the riser, otherwise you will supply heat to all your neighbors. We open hot water in the bathroom in order to release the air from the boiler. As soon as water flows confidently from the tap, you can turn on the water heater.
The external threads in the middle should face up. We screw the valves onto them. We screw eccentrics into the internal thread and put on the mixer. We attach the water heater to the valves. The convenience of this option is that there is no need to make an insert. This method is used for metal wiring.
Don't forget to turn off the valve on the hot water pipe leading to the riser, otherwise you will supply heat to all your neighbors
Installation and connection of the boiler to the network
Under no circumstances should the ground wire be connected to the neutral wire.
The device comes with a standard cord and plug for connecting to the mains. In normal condition, when the Termex is hanging correctly, the intake tube hole inside the tank enters in the upper quarter, and the inlet pipe in the lower quarter.
To correct this drawback, you need to remove them and give them the desired shape, and also slightly bore the holes for the bolts.
Installing a boiler The first step is to fix the heater on a load-bearing wall, taking into account the fairly large weight of the equipment. Such devices do not require special installation, as they operate from a regular outlet. The device cannot withstand thermal conditions.
What affects the heating temperature of water? This design feature allows you to change the lateral tilt of the case by simply moving the bottom point of the drive. But this is only provided that the water in the system meets the necessary standards and does not contain a large amount of impurities and heavy elements, and that the installation, operation and timely maintenance rules are followed when using the device. Electrical diagram for connecting a water heater through a socket connected to a cable laid from the switchboard: The difavtomat can perfectly replace a combination of an RCD and a circuit breaker.
Unscrew the drain valve5. Also, the operating instructions for the equipment must include an electrical diagram of the water heater and a network connection diagram. Installing a boiler The first step is to fix the heater on a load-bearing wall, taking into account the fairly large weight of the equipment. Most often, the design of a water heater has two thermostats: the first controls the heating of water, and the second monitors the condition of the first.
If necessary, replace it with a fresh one. Failure to carry out cleaning work will lead to a decrease in operating efficiency and a decrease in the level of efficiency. Note that the manufacturer has established a minimum service life of a Termex water heater of seven years.
It is capable of being shaped and is not afraid of temperature changes. If the brackets are held for some time, the characteristic will change quickly. The valve is often included with the water heater, but it can also be purchased separately. Experts say that using a regular check valve is highly undesirable. When installing these elements with your own hands, turn the thread no more than once, otherwise you will damage the pipe. Connection diagram of the boiler to the water supply
How to remove and check the heater
Most often, heating elements in storage boilers break because they are constantly in the water. Regardless of the volume (50, 80 liters or more), the service life of the part can be influenced by various factors:
- Frequency of boiler use.
- Maximum heating temperature.
- Water quality.
Why do parts burn out? This happens when you turn on the equipment without water. Although most manufacturers prevent this point with the design features of the tank. Therefore, the main reasons for the heater to burn out will be water with a large amount of impurities and scale. The sediment covers the element in several layers, interfering with normal heat dissipation. As a result, the heating element overheats.
How to remove the heater with your own hands? First of all, unplug the boiler.
Regardless of the brand (Polaris, Elenberg or Termex), turn off the machine in the control panel. Now start draining the water.
Draining the boiler
There are several ways to delete content. Via check valve:
- Place a deep container under the valve or connect a hose and lower it into the chamber.
- Open the valve and let the water drain out.
- With a tank volume of 30 liters, the procedure will last at least 1 hour.
With a volume of more than 80 liters, there is no point in waiting that long. Drain through the boiler inlet.
Close the water inlet valve.
- Unscrew the cold water supply hose.
- Remove the valve.
- Unscrew the hose from the tank outlet.
- Open the boiler tap.
Place the container and the contents will drain in a few minutes.
How to get heating element
Now it’s time to start dismantling the part; for this it is better to remove the equipment from the wall. The exception is models where the elements are located below. Proceed sequentially:
- First, disconnect all hoses that are connected to the housing. Be careful: water may spill out of them.
- Remove the body from the hooks and lower it to the floor.
- Remove the lid. Depending on the model, it may be positioned differently. It's better to look at the instructions.
- Remove the decorative washers from the pipes. They are found in Thermex heaters.
- Using a Phillips or slotted screwdriver, unscrew the screws or unfasten the latches.
- First, disconnect the thermostat wiring. Take a photo of it first to make the correct connection.
So, the heater is in your hands. Proceed with diagnostics.
Checking an element
The first stage is a visual inspection. Assess the general condition, the amount of scale and the integrity of the body. If the insulation is broken, only replacement will help.
To diagnose using a multimeter, you need to determine the resistance of the element of your model. To do this, look in the instructions for the power of the device. Then make calculations using this formula:
Apply the multimeter probes to the heater contacts and see the result. If it matches the calculations, everything is fine. If 1-0 Ohm is displayed on the screen, a short circuit or break has occurred.
Next, the breakdown to the housing is calculated. The primary sign of such a breakdown is water that beats with electricity. A small discharge can be obtained by touching the tank.
Set the tester to buzzer mode. Place one probe on the contact of the part, the other on the body. Is the tester beeping? There was a breakdown.
For the next test you will need a megger. Set the range to 500 V. Connect the probes to the contact and body. Indicators of more than 0.5 Ohm are considered normal.
How to change the heating element? The new part must be selected in accordance with the model. The serial number can be found in the instruction manual. Installation is carried out in reverse order.
How to remove the heating element from an Ariston water heater?
Let's consider the process of how to remove the heating element from an Ariston water heater and its nuances for various models. First of all, we disconnect the boiler from the electricity, for which we remove the plug from the socket or turn off the machine to which the device is connected.
First, let's look at mounted vertical devices. If you have a dry heating element installed that does not come into contact with liquid, as in the PRO ECO 100 V DRY HE device, then to remove it, remove the protective plastic panel, unscrew the screws and disconnect all the wires. After that, we simply take out two heating elements. There is no need to drain the water.
If the heating element comes into contact with water, you need to drain it. To do this, disconnect the pipes from the nozzles on the device and unscrew the check valve, first placing a container under the boiler or connecting a hose. If you have a small 30-liter or 50-liter model, it will be more convenient to remove it from the wall.
To do this, lift the body and pull it towards you to remove it from the hooks. One person can handle this. If the boiler is larger, 80 liters or 100 liters, then it will be easier to change the heating element on a device hanging on the wall. Next, remove the protective plastic cover from below and disconnect the interfering cables, remembering their location.
There are two types of mounting the heating element in Ariston water heaters:
- In the first case, the tubular electric heater is secured with one nut and a strip. These are models with an autoclave flange, such as Ariston ABS PRO ECO, Ariston ABS SLV 100V, Ariston TI TRONIC 50V and others. Unscrew the nut with a 13mm wrench and remove the retaining corner.
We insert the flange inside the tank, placing a container underneath to collect water. This can be prevented by accumulated scale, so first tap the lid a little. Inside, the flange unfolds, since the spiral in such water heaters is bent at a right angle, and is pulled out.
- In the second case, the heating element is supported by a washer and five to six nuts.
These are devices such as Ariston SB R, SG, PRO R and others. The nuts are unscrewed, the washer is removed, the spiral along with the magnesium anode simply slides down. This should be done carefully with progressive movements, as hard scale can interfere and damage the spiral. It is recommended to replace the magnesium anode with a new one if it is damaged.
In horizontal models such as the SL 20, the plastic cover is on the right. The water is drained in the same way and the screws are unscrewed. The heating element here is located horizontally and is secured with a washer and five nuts. In the SL 30 QH boiler, the front cover is removed and the two heating elements are removed in the same way. In floor-standing boilers ARI 200 STAB 560 THER MO VS EU, SI 300 T 3KW the heating elements are also located horizontally.
How to disassemble an Ariston boiler in order to change the heating element - read the article at the link
In conclusion, a video on how to remove a heating element from an Ariston water heater:
The sequence of replacing heating elements in Ariston water heaters
has been producing water heaters for a long time, producing durable and high-quality models that will serve users for many years. The external and internal structure of Ariston water heaters is almost the same as Termex. But many people have difficulty removing the flange due to its oval shape.
The sequence for replacing the heating element on an Ariston water heater:
- Turn off the power to the water heater and drain all water from the tank. There is a simple way to do this: open all hot water taps and open the safety valve. Make sure in advance that the outlet of the safety valve is directed to the sewer. If not, then the water will have to be drained into a separate container.
- A protective casing is not provided in Ariston models, but before removing the flange, it is necessary to undo the fixing bar, which is secured with one bolt. The flange is not pulled out, but pushed inside the boiler.
- It will not be possible to completely remove the heating element together with the flange, so it must be deployed inside the household appliance. When the flange is deployed, the heating element will be outside and can be simply dismantled.
Apart from the non-standard flange, there are no problems with replacing heating elements in Ariston boilers.
How to replace the heating element in an Ariston boiler yourself?
The heater in the Ariston boiler suddenly broke; the family cannot live without warm water. How to replace the heating element in a boiler yourself?
Failure of the heating element is a fairly common problem with water heaters, therefore, in order to extend the life of the water heater, it is recommended to clean it once every six months to a year. If this is done with such frequency, then the service life of the water heater and heating element can be significantly extended and you can be confident in its performance, because a heating element covered with a thick layer of scale not only fails faster, but also heats water worse, which makes life not so comfortable.
Replacing heating elements in different models of water heaters may differ. Often people buy water heaters without an electronic display, so I will talk about replacing the heating element in such a model (the process will be approximately the same for this type of water heaters). I should immediately note that the view inside the water heater will not be the most pleasant; there is a lot of scale, especially if the water heater has not been cleaned for more than a year. I advise you to completely disconnect the water heater, remove it and lay it horizontally on a flat surface. So, we pry up and remove the cover under which the temperature regulator and the heating element itself are located. Most likely, there are two wires connected to the cover; you can immediately disconnect these two terminals, just first remember what is attached where. In general, I advise that when you disconnect something, make notes with a marker or take photographs, so that you don’t have to guess later how to connect it back. Now unscrew the wires from the thermostat. I also advise you to remember what level the temperature regulator is set to.
Now our task is to pull out the heating element itself. To do this, you need to unscrew the nuts or other fasteners. Once this is done, the element can be retrieved. Actually, as you can see, there is nothing particularly complicated about this. Now the heating element must either be replaced or cleaned if you carry out maintenance work. It is advisable to clean the heating element with a wooden stick. The water heater tank itself also needs cleaning. I recommend buying one or two bottles of Coca-Cola and letting the scale settle. You can also soak the heating element. This drink is still disgusting, it removes scale well, then, accordingly, it is necessary to thoroughly rinse this drink from the walls of the tank and from the heating element itself.
After all the work is completed, we put the water heater in place and check it for leaks; you need to be extremely careful, since there are wires running nearby.
To replace an electric heating element in a boiler, naturally, you need to completely de-energize it and remove the wires from the current-carrying blocks by unscrewing the clamps.
Next, pull out the control system assembly by simply pulling it down by the ceramic cup, it will remove the contacts of the electric heating element, and the thermocouple will come out of the tube soldered into the tank - put it aside so as not to damage it.
Next, open the taps and drain as much water as possible, place a container (something like a wide basin) and begin to unscrew the bolts securing the hatch of the tank in which the electric heating element is installed.
Then pull out the hatch along with the heating element and unscrew the heating element, replacing it with a new one.
If you didn’t know what kind of heating element is in the boiler, then take the burnt one as a sample to buy a similar one. It would also not hurt to clean and rinse the tank from dirt and sediment before assembly, possibly even scale, depending on how long the boiler has been in operation.
Everything is assembled in the reverse order, first the heating element is screwed to the hatch, then the hatch is screwed to the tank and then the control system is inserted into it, the tightness is checked for leaks and then the wires are connected to the terminals of the control system.
Yes, indeed, the process of replacing heating elements on storage-type water heaters has some features that are unique only to models of this company.
Before starting work on changing the heating element, first of all, you need to turn off the power to the equipment. Turn off the circuit breaker and unplug the power plug from the outlet. Turn off the cold water supply valve to the water heater. Unscrew the hot water outlet hose from the water heater (marked in red on the water heater), but preferably not at the point of attachment to the boiler (the same as the “water heater”), but for a longer time so that you can lower it directly into the sink or toilet to flush. Now unscrew the cold water supply hose on the boiler itself (it is marked in blue). Drain the water in the water heater into the sink or toilet)
Disabling triggered self-defense
The RCD may trip when the water heater is turned on. This device even sometimes cuts off the power to the entire house. Here's why it runs:
- There is a short circuit in the boiler itself or in the wires if the simple/differential circuit breaker is triggered. A short circuit also occurs as a result of a network overload if many devices are connected to the electrical network.
- The RCD must be suitable for rated current and leakage current. If this condition is not met, the RCD often trips for no reason.
- Incorrect connection of the RCD in the electrical panel.
- Poor quality of the RCD device. Signs: sticking TEST button, switch with physical defects. As a result, minimal vibrations cause the RCD to operate idle. Water heaters from Termex often have low-grade RCDs.
- In rare cases, an involuntary shutdown occurs after heating the water. This is caused by a deformed body.
First you need to do some checking. At least once a month you must press the TEST button: this causes current leakage. This way you can find out whether the RCD is triggered or not. If the protective differential circuit breaker does not respond to the test, it needs to be replaced.
For a more thorough diagnosis, it is necessary to examine it in a disassembled state. If, when shaken, you can hear the contacts disconnecting, the indicator does not light up, and the device itself looks blackened, then it was operated under excessive load. This is also indicated by melted internal parts.
Burnt elements inside the RCD
If there are no visual defects, then the owner needs to examine the connections in the electrical panel. There should be no moisture either inside or outside, and the degree of heating during operation should not be critical.
When buying a new differential machine, you must follow certain recommendations:
Voltage 220 V (if the owner has a single-phase network), 380 V (if a three-phase network). They can be distinguished by the number of device connectors: 2 and 4, respectively. It is necessary to calculate the rated current either for all electrical appliances that are in the apartment, or for the maximum load. Most often they buy a device with a slightly exaggerated load current (from 16 to 100 amperes)
During installation in the house, you need to focus on a current of no more than 30 amperes. It is important to know the leakage current at which the device is triggered. They produce RCDs from 6 to 500 mA
Manufacturers of high-quality water heaters sometimes indicate the current leakage rate. Due to old wiring, a large leak may occur, which also needs to be taken into account. Different RCDs protect against different types of electricity. For an apartment or small private house, choose the device type AC (protection against AC leakage) or A (protection against AC and DC leakage).
After replacing the old machine with a new one, you need to check its serviceability.
How to clean a boiler?
To clean the water heater you will need the following equipment: a knife, a flashlight and a metal brush for washing dishes. Initially, you need to disconnect the heater from the power supply. You also need to turn off the water supply throughout the house or apartment.
To thoroughly clean the boiler, the electrical part is removed from it. You need to remove it very carefully so as not to snag the rubber gasket. The removed electrical part must be cleaned with a special iron mesh or a certain chemical.
The next cleaning step is to remove scale and debris from the tank. To do this, you need to completely inspect the tank cavity (using a flashlight) and clean out all the debris by hand.
The cleaned tank must be thoroughly dried, after which it can be assembled to its original state. Also, before starting work, you should check the tightness of the tank.
If the rubber gasket does not allow water to pass through, then the boiler can be put into operation.
How to check electrical elements and heating elements
Heating element of the Termex boiler
One of the most common reasons why the boiler does not turn on is a broken electric heater. It fails in the following cases:
- the filament inside the heating element has burned out;
- there was a short circuit in the incandescent wire, so the electric boiler received an electric shock;
- a thick layer of scale has appeared on the heating element, so heat exchange is impossible, and the water heats up less and less with each use.
To check the heating element, you must remove it from the water heater. Then the device needs to be descaled. Now you can carry out a full inspection for cracks, holes, swelling and other defects. If there is such damage, then repairs will cost more than buying a new heating element. If there are no visual defects, you need to ring it using a tester.
Checking the heating element using a multimeter
Checking for serviceability is carried out in two ways:
- It is necessary to check the nichrome thread, which creates the glowing process. The tester is set to circuit test mode. It is necessary to check whether the nichrome thread, which ensures the incandescence process, has failed. To do this at home, the tester must be set to circuit test mode. The terminals of the device must be connected to the contacts at the base of the heating element. If the arrow is at zero, the thread is fine. If the arrow is not at zero, then the thread has broken and the heating element will have to be completely replaced.
- It is necessary to check the closure of the spiral. You only need to connect one terminal of the tester to the heating element. The other contact must be attached to the water heater tank. If the device shows a target, it means that the coil is resisting the boiler insulation. Therefore, the spiral touches the body. The heating element needs to be changed.
Replacing a tubular electric heater in Termex boilers
Replacing a burnt-out water heater heating element is not at all difficult if you follow our recommendations. We will tell you about the features of such work using the example of common water heaters from the Termex company.
To carry out repairs, you will need a set of screwdrivers, wrenches and pliers. If access to the flange on which the boiler's electrical components are installed is limited, then it is better to remove the device from the wall. To do this, follow these short instructions:
- Shut off the cold water supply from the riser;
- Drain the water heater tank. To do this, open the hot water taps in the kitchen and bathroom and turn the safety valve lever (if its pipe does not have a drain outlet, then place a bowl or bucket under it);
- Close the taps and disconnect the water supply from the boiler pipes;
- Remove the boiler.
Often the removed heating element is a pitiful sight
As a rule, horizontal models, as well as water heaters installed according to all the rules, do not need to be removed
It is important that there is enough space underneath for repair work. At the same time, remember that some of the water remains in the tank, so be sure to place a container under it to collect water
The boiler should be disassembled in the following order:
- Remove the protective cover by unscrewing the screws that secure it, which manufacturers often hide under stickers. Vertical Thermex models, as a rule, have a lower position of the protective cover, and horizontal ones have a left one;
- Remove all contact terminals from the heating element and thermostat;
- Unscrew the screws securing the clamping flange;
- Remove the flange;
- Dismantle the heating element.
In some models of water heaters, in order to remove the heating element, you need to remove the thermostat. To do this, unscrew the nuts securing it and remove the sensor from the housing installed next to the heating element. Be very careful when doing this - the thermostat sensor is a thin-walled copper flask connected through a thin, fragile copper tube. This structure cannot be bent or deformed - if damaged, the device will depressurize and fail.
The markings on the body of the burnt heater will help you select the right heating element.
When going for a new heating element, do not forget to take with you a heater that has expired. There is no need to rely on consultants from specialized stores. Most often, their help will end with the words: “Choose,” while simultaneously pouring out several dozen electric heaters of all types onto the counter. The part you take with you will help you choose the right heating element from this pile. Just in case, compare its markings with the mark on the body of the original electric heater. Don't forget to purchase a new magnesium anode if it is not included in the kit.
Reassemble the water heater in reverse order. When installing the pressure flange, make sure that the sealing gasket is not distorted, otherwise leakage cannot be avoided. Poor sealing of the threaded connections of the boiler pipes can also lead to leaks, so use tow or fum tape correctly.
What to do
Ariston water heater design. (Click to enlarge)
To begin self-repair, you should pay attention to the features of its design and operating principle. Typically the tank includes the following functional units:
Typically the tank includes the following functional units:
- heating element for heating water;
- thermostat for controlling and monitoring the heating temperature;
- relay that controls on/off the heating element;
- magnesium anode that protects the tank from corrosion;
- a safety valve that reduces the pressure inside the tank when water is heated;
- electronic control unit (simpler models are equipped only with warning lights).
Good to know: to heat a cube of water by one degree, 1.167 kW/h of electricity is required; if the supply water temperature is 17 degrees, then to heat it to 65 degrees you will need to spend about 56 kW/h without taking into account the heat loss of the boiler and pipes.
You can do this yourself at home, following a certain sequence:
- Disconnect the boiler from the power supply if the heating element does not heat.
- Turn off the cold water supply and drain the water heater.
- Remove the protective cover and disconnect the wires (you must first draw a connection diagram or photograph it, which will facilitate the reassembly process).
- Unscrew the flange nuts using a wrench.
- Place a container under the tank and carefully remove the flange with the heating element and the magnesium anode (its remains).
- Clean and wash the internal walls from scale and dirt.
- Install a new heating element and magnesium anode.
- Reassemble all parts in reverse order.
- Before connecting to the power supply, draw water and check the tightness of the assembly for several hours; the tank should not leak (otherwise, do not turn on the tank; you will need to install a new gasket on the flange).
You may also be interested in the article about replacing heating elements in Termex water heaters.
Read an article on how to disassemble and clean a Thermex water heater here.
And then the usual physics - when you open one tap, water will not flow from the tank until air takes its place. Therefore, a second tap is necessary to supply air to the system.
Expert advice: in order for the Ariston boiler to serve without repair for many years, it is necessary to carry out preventive cleaning once a year and limit water heating to 60 degrees, which will significantly limit the formation of scale.
Watch the video in which an experienced user explains in detail how to repair an Ariston water heater with your own hands:
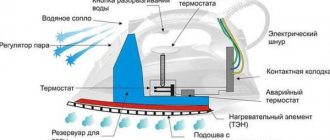
The design and principle of operation of the heating element
A heating element is a tubular heating element that operates on the principle of high resistance. This means that it is made of a material that prevents the passage of electric current. Accordingly, electrical energy is converted into thermal energy.
A heating element
The general structure of the heating element: a curved metal tube with a wire made of a certain material. A metal with high resistance is used for the wire, this ensures fast and high-quality heating. This metal is most often nichrome. The tube itself is made of carbon steel (as a cheaper option) or stainless steel.
The ends of the nichrome spiral are soldered to the output pins, which will then be supplied with operating voltage. To prevent the wire from touching the walls of the tube and a short circuit occurring, the internal cavity of the heating element is filled with electrical insulating filler. Next, all that remains is to solder the tube and give it the required shape.
Design
A heating element is a thermal heating element that is necessary to heat water in a boiler or boiler. Types of heating elements for water heaters:
- Wet (ATT - ATT, Electrolux EWH Centurio, ASF);
- Dry (AEG, Isea, Tesy, Ariston Ti Tronic Best).
They are mainly distinguished by the principle of location. Wet heating elements directly touch the water. This significantly speeds up the heating process, but at the same time they have a shorter shelf life. The chemical composition of the water affects it, causing scale and rust to form on the metal heating element.
More popular are the so-called dry heaters . They are located in a protective casing, which protects them from direct contact with water. They have a longer lifespan, unlike wet models, but the heating time is slightly longer. A water heater with a dry heating element costs a little more than one with a wet heating element, but if you buy such a device, you can save on part repairs.
Also now on sale there are models with a classic tubular heater and stearite . Their difference lies in their design. Tubular heating elements were previously used in almost all water heaters: Electrolux Centurio, Electrolux, Garanterm, Polaris and many others. They are a tube with L-shaped fastenings. A special metal spiral is used for heating. It is placed in a copper or stainless steel protective shell. To protect the element from combustion and short circuits, another heating element is located in the tube. It is made of dielectric material, which prevents the formation of short circuits and increases the thermal conductivity of the element.
Photo - tubular heating element
Often, instead of a second tube, the housing is filled from the inside with magnesium oxide or quartz. For additional protection of contacts, stainless steel or ceramics are used to cover the contact rods. This is most often used for instantaneous water heaters, where the heating element is constantly exposed to water. Due to the fact that the heating element has enormous resistance, most (almost 90%) of the electrical energy is converted into heat. The resulting heat is transferred to the shell of the heating element of a storage or instantaneous electric water heater, which helps to increase the water temperature.
The steatite type electric heating element (Wester WHE, Oasis) has a slightly different design. It is presented in open form, where soapstone wires play an important role; this is an ideal option for country water supply. They are located along the ceramic cylinder. This cylinder is covered with vertical depressions into which the wire is wound. It has very high strength indicators, but due to the great danger in use, it is used only in heaters with a thermostat. Heating of the wire can reach up to 800 degrees with a minimum kW rating. It should be noted that such a ceramic heater can heat an area of water unevenly, which makes it possible to use an electric element to provide heating of water in an asymmetrical tank.
Photo - steatite heating element
At the same time, a steatite heating element for an electric water heater must be protected from the effects of fats and other aggressive substances, since it is very difficult to clean.
Video instructions: how to clean the heating element
Features of repairing a heating element in a boiler
For reliable diagnostics, you will have to remove the cover that covers the heater. Then you can proceed like this:
- Test the heating element with a multimeter to measure resistance. The value “zero” on the monitor means a short circuit, and “infinity” means a break in the nichrome spiral, which heats the water.
- Check the heater with a tester with a test lamp. If it lights up, the heater is intact, but the reason for the incorrect operation of the boiler is something else.
You can remove the heating element from the box to visually diagnose it for ruptures. Clean the surface from scale. This procedure requires care. It is best to soak the heating element in a solution of citric acid (50 g per 1 liter of water). The scale will completely dissolve in about two days, but you can save time by bringing it to a flaky state and cleaning it with a soft brush.
Next, carefully inspect the heating element for mechanical damage to the shell. A heating element made from low-quality material will not even need to be cleaned: it may look torn, beaten, bent, or simply crumble in your hands. The cracks may be insignificant, but they will still mean a break, which cannot be restored - only replaced with another part. If the heating element appears to be intact and a tester test only confirmed this, try checking the thermostat if it is installed in your water heater model:
Replacing the heating element
- insert the thermostat into the heating element;
- Find the terminals on the thermostat that supply current and connect them to the terminals of the tester device.
The ringing will mean the device is working properly; its absence indicates a breakdown of the thermostat.
Blitz tips
A few tips that will allow you to extend the life of the device without overpaying for electricity:
- Do not unplug the device. Maintaining a set temperature takes much less energy than heating it up. This is especially true in winter, when the water temperature is especially low.
- If hot water is needed less often than once a day, then it is better to turn off the device. In this case, heating will take less energy than maintaining the temperature.
- Significant savings are achieved through controllers. The unit can be programmed to heat water at the desired time.
- If possible, use the controller mode marked “E” (Eco).
- Do not allow water to flow aimlessly. Once again, turning off the tap for a couple of minutes will save you a lot of energy and money.
Ariston is the largest manufacturer of household appliances, which began its work back in 1975. The president of this organization is Italian Vittorio Merloni, who is also its founder. In 1980, Ariston became a European leader among manufacturers of household appliances and electronics.
Advantages of water heaters:
- Safety. Water heaters are adapted to almost any operating conditions. They are also equipped with a new security system that prevents emergencies.
- Durability. The long service life of the heaters is ensured thanks to the high-quality materials from which they are made. It is primarily stainless steel with security welds, as well as a titanium coated steel tank.
- Ease of use. On the front panel of the boiler there is a simple control system with which the desired heating temperature is set. There is also a malfunction indicator in the water heater panel, which gives a certain signal if the unit is used incorrectly (overheating, incorrect operation of the thermostat, switching on without water, etc.)
- Economical. Ariston water heaters have the lowest energy consumption. Average electricity savings are 35%.
- Protection against bacteria. Very often, water stagnates in heaters, in which bacteria multiply over time. The ECO protection built into the water heater prevents the appearance of bacteria not only on the walls of the device, but also on its internal elements.
- High intelligence. The presence of an LCD display makes it possible to set the desired operating mode: day, night and economical.
Standard instructions for an Ariston water heater 80 liters
Water heaters of this size are necessary for daily use by the whole family. The presence of sensors and temperature levels guarantees safe operation.
For long-term use of the device, it is necessary to carry out installation in accordance with all the rules or with the help of an experienced technician. To avoid breakdowns and other hassles, follow the operating rules:
- The first switching on and off should be carried out with a full tank.
- If the batteries are damaged, be sure to replace the weak parts.
- In a room with sub-zero temperatures, it is necessary to drain the water from the heater.
- Leaving the device idle for a long time without a heating function should be done with the water supply tap or valve closed. Heaters must also be unplugged from the outlet.
Devices for high-quality water heating from Ariston are presented in user-friendly sizes, equipped with all kinds of engineering improvements and are available in all major retail chains. All you need to do is select the model you need for individual installation.
How to change the device: replacing the heating element
First, as you might guess, the device is disconnected from the power supply. The outer protective cover is then removed from the assembly. Next, you need to check if there is voltage at the thermostat terminals with an indicator screwdriver. Free the terminals from the wires, just don’t forget to take a photo of the connection order. The ohmic resistance on the heating element blocks, if it shows infinity, this means that the problem is a burnt out nichrome wire or a short circuit.
Then the thermostat is removed. The ball valve at the water inlet is closed, dismantling the check valve. Remove water from the heater through the hose from the valve, or through your drain system. Then unscrew the nut securing the heating element to the special mounting plate. Then you need to squeeze the heating element with the sealing flange and anode inside the tank.
Then proceed like this:
- Unfold the heating element inside the tank and pull it out;
- The tank must be descaled; rinse it thoroughly;
- If the heating element is working properly, then the anode should be replaced and the heating element should be cleaned of scale;
- Well, if the heating element “flies”, it needs to be replaced with a new one, and the anode must also be changed;
- Then assemble everything in reverse order, according to the photographs.
As you can see, in order to pull out the heating element, the most important thing is not to forget the matter of photography. Otherwise, then you’ll have to remember 100 times what followed what, and what was where. It's not easy to remove the lid on an electric kettle.