What can you stick LED strip on?
Unfortunately, not all materials are capable of holding the tape for a long time and reliably. The main factor influencing the quality of fastening is the cleanliness of the surface on which it will be fixed. From an unprepared and contaminated surface, sooner or later it will begin to fall off in different places.
Regardless of the type of material, the surface must be degreased a few minutes before gluing the LED strip.
The ideal mount is an aluminum profile, specially designed for mounting LED strips of all types. Its smooth and clean surface serves not only as a reliable base, but also as an excellent radiator. The front part of the profile can be covered with a matte diffuser, thanks to which the lamp acquires a pleasant appearance and does not dazzle the eyes.
Due to the high cost of the metal profile, many craftsmen replace it with a plastic cable channel without a cover. The tape adheres to its smooth surface no worse than to aluminum. But, the main thing is not this. LED strips assembled on SMD 5730 and SMD 5050, as well as strips of all types in a silicone shell (IP67 and higher) require improved heat dissipation during operation. Ordinary plastic is not able to cope with such a task, which leads to a premature loss of brightness of the emitting crystals. As a result, savings on the profile will lead to costs for a new LED strip.
The standard adhesive base is not suitable for long-term fixation either on pure wood or on similar rough surfaces. In such cases, it is best to ensure reliable fastening using a profile. If the profile does not fit into the interior in any way, then you will have to go to extreme measures and resort to the services of superglue. It should not be applied in a continuous stripe, but in separate drops every 10 cm.
A spot application of superglue is quite sufficient and, if necessary, the tape will be easier to dismantle.
If the aesthetic appearance is not of great importance or the backlight is generally hidden from prying eyes, then disposable nylon ties can be used as an additional fixation.
Just don’t follow the advice of would-be experts who recommend securely fixing the LED strip using hot-melt adhesive. Of course, this method guarantees good adhesion to any surface, but it has its pitfalls:
- modern LEDs emit so much heat that they can melt hot-melt adhesive, which will become a source of harmful odor;
- Hot melt adhesive inhibits heat removal and, therefore, provokes overheating of the emitting crystals.
The lack of high-quality clamping can manifest itself not only due to defects on the mating surface. Poor contact may be caused by low-quality glue on the tape itself. By the way, even good glue loses its properties over time. Especially if the product has been lying in an unheated warehouse for several years with non-compliance with storage conditions. So, when purchasing, it will not be superfluous to pay attention to the date of manufacture.
LED strip peels off
It would seem, why come up with something else if there are already such simple methods provided by the manufacturers. However, as practice shows, after not a very long time, the backlight fixed by this method begins to fall off and peel off.
There are most often two reasons:
- poorly prepared surface for installation
- poor quality tape
Before gluing to any surface, it must be properly prepared:
- clear
- wipe dry
- degrease
This must be done a few minutes before actual installation. Only after this can you hope that the backlight will hang for a long time and not fall off.
The second point is the quality of the adhesive tape. Choose copies that have a ZM icon on the reverse side.
This is the most famous world brand that produces not only adhesive tape. Even the Scotch brand itself is just a small part of the company.
At the same time, the presence of such a sign does not guarantee that you will get a quality product. Forging and writing just two letters is not very difficult for Chinese craftsmen.
Also, always pay attention to the date of manufacture. Even high-quality copies from famous brands (Philips), after lying in cold rooms for several years, can easily lose their original properties.
And you will rack your brains, it seems like “ZM”, but for some reason it doesn’t stick well.
What should the average user do and is there a more reliable way to attach LED strips? Of course there is, and most installers and electricians have been using it for a long time.
Simple gluing option
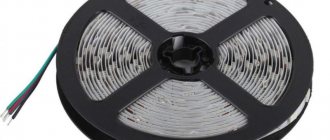
The prevailing proportion of commercially produced LED strips have an adhesive base on the back side, protected by a smooth transport strip. In other words, led tape resembles double-sided tape, in which printed conductors with SMD LEDs are glued on one side, and the other is free for installation.
In the simplest gluing option, you need to perform the following steps:
- indicate the direction for installation with a straight line, in the absence of a profile;
- degrease and dry the installation site;
- remove part of the protective film at the beginning of the tape;
- Gently press the section with the LEDs onto the work surface;
- remove the remaining film and glue the entire strip, adhering to the given direction.
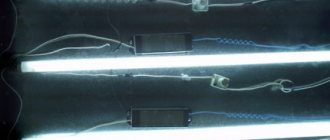
Mounting clips for LED strips.
This is a simple, low-cost solution for installing LED strips that doesn't require double-sided tape. These small clamps use a single screw design to screw into surfaces and secure the LED strip, holding it in place. These staples cost just $2 for a pack of 15, which should be enough to staple spools of flex tape. The brackets work great in areas where the LED strips are pointing downwards, such as in cabinet lighting. This simple LED strip installation step will eliminate the worry of LED strips falling in the future.
Surface preparation
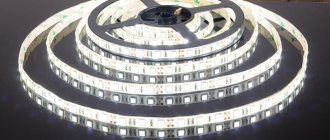
LED strip is used to create lighting in the living room, bedroom, bathroom, hallway, and kitchen. Thanks to its flexibility and adhesive base, it is attached to wood, plasterboard, metal, plastic, and ceramic surfaces. Their shape can be rectilinear, curved, spherical.
During installation, the following rules should be followed:
- Do not allow mechanical impact on the board.
- You can cut the tape at specially marked places.
- When LEDs operate, heat is generated, so the canvas must be cooled.
- Connectors are used to connect sections of the LED strip.
- The tape is connected to the network through a power supply of appropriate power, which provides a voltage of 12 or 24 V.
The adhesive base of the LED strip is 3M acrylic tape. For its strong adhesion to the surface, the following conditions must be met:
- The surface must be smooth, without protrusions, sharp edges, or bumps.
- The base is pre-prepared: cleaned, dusted, degreased with isopropyl alcohol or a cloth with an adhesion activator. To degrease metal and plastic substrates, you can use white spirit or acetone. Painted surfaces are treated with a vinegar solution.
- Markings are applied to the base, allowing the canvas to be secured along the required trajectory.
- The room temperature is above 18 degrees. At room temperature, the tape sets as much as possible within 24 hours. At temperatures above 60 degrees – for an hour.
LED strip can be glued to wood. The wooden base must be smooth, painted or varnished. It does not adhere to an unprepared surface and quickly peels off.
Materials for gluing
The LED strip has a standard self-adhesive backing. But it is not suitable for long-term fixation on rough surfaces, such as wood. The list of materials that can be used to glue the LED strip is as follows: aluminum profile, tape for LED strip, aluminum tape, quick-setting glue. They improve properties and increase fastening efficiency.
Adhesive tape for LED strip
Serially produced tapes are a printed circuit board with LEDs attached to double-sided tape. Its free side, used for installation, is protected by a smooth transport film. For high-quality models, the 3M marking is applied to it.
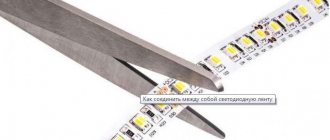
How to glue LED strip:
- Markings are applied to the previously prepared surface.
- Wires and a power supply are connected to the backlight contacts or using a connector; install a switch.
- Using a sharp object, separate the beginning of the tape from the protective film and release a section 15-20 cm long.
- Apply the strip with LEDs to the surface and press firmly.
- Gradually freeing sections of the tape from the film, completely glue the tape along the marked path. When making connections in the corners, do not bend it, but use corner connectors or solder it.
- Install the power supply in a convenient place protected from moisture.
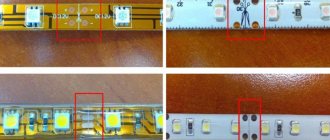
If, when removing the protective film, conductive paths are exposed, it is necessary to apply a backing of electrical tape to this place. Otherwise, a short circuit will occur when connecting.
The tape must be applied accurately to the markings. If it is placed incorrectly after detachment, the tape loses its properties. It will be difficult to reattach it firmly.
Aluminum profile
The optimal mounting for LED lighting is aluminum profiles. They are used for extended, powerful models SMD 2835 and SMD 5630, 5730 and for the popular LED-based SMD 5050. For fastening structures with a power of more than 14 W, their use is mandatory.
Profiles can be overhead, mortise, or corner. LED lighting is glued inside the profile, and it is mounted on the selected surface.
Properties of aluminum profile:
- The self-adhesive surface of the tape fits perfectly onto a flat and smooth base;
- Easily and firmly attached to the mounting plane;
- the heat generated during the operation of LEDs is removed through the aluminum surface;
- The matte diffuser, which covers the front part of the profile, gives a pleasant appearance and makes the lighting softer.
An inexpensive alternative to an aluminum profile is a plastic cable channel without a cover. Its disadvantage, which leads to premature loss of brightness of LEDs, is poor heat dissipation during operation. Therefore, its use is not justified.
The right LED strip adhesive provides a quick-setting bond. Adhesives cope with this task:
- based on cyanoacrylate, called superglue, for example “Moment Super”;
- based on rubber or silicone, for example, liquid nails “Titanium” or “Moment Montazh”.
Recommendations for fixing with glue:
- Superglue is applied pointwise every 50 - 100 mm. This way the tape is securely fixed and, if necessary, it is easier to dismantle it than when applying a continuous layer of glue.
- The strip with LEDs is applied with its base to the surface on which the glue is applied and pressed firmly.
Adhesive joints are used on vertical, inclined porous surfaces. It is resistant to temperature and humidity. The tape adheres to a properly treated surface in 20-60 seconds. They completely glue together in no more than 2 hours. You can use glue to attach the LED strip to metal, wood, plastic, wallpaper, glass.
Hot melt adhesive is not recommended. It attaches well, but due to its low heat-dissipating properties, overheating of the emitting crystals and their premature failure are possible. When exposed to elevated temperatures, it melts and emits an unpleasant odor.
Aluminum tape
If it is impossible to use the profile of LED strips of low and medium power (6-10 W), they are attached to aluminum or foil tape. Its surface has heat-dissipating properties and can serve as a light reflector.
220V tape sticker
Models designed for 220 V voltage are produced without an adhesive backing and are placed in a hermetically sealed shell. They heat up during operation, so they are not recommended for use indoors. Used to organize external lighting of buildings in well-ventilated areas.
You can attach such a model in one of three ways:
- installation on an aluminum profile using clamps;
- fixation using fastening pads, clips, nails;
- gluing with double-sided tape.
To attach it to tape, it is cut into strips 3-5 cm long. One side is glued to the canvas every 5-7 cm. Then the structure, separating the free surface of the tape from the protective film, is fixed in the required place.
When using 220 V LED strip outdoors, the most reliable option is to mount it with clips.
Adhesive tape for LED strip
Manufacturers of tapes, as a rule, have already provided one of the most common methods - installation on the adhesive layer located on the reverse side. It is hidden under a protective shell and to get to it, you just need to pick up the tip with a knife and pull off the protective film.
Roughly speaking, there is already double-sided tape there. On one side it is glued to the tape itself, and on the other, you stick it on the corresponding surface of the ceiling, wall, or kitchen cabinet.
The surface can be either smooth or uneven or rough. Due to its flexibility, the tape should fit normally on any of them, be it a convex arch or other elaborate shapes.
If you doubt the reliability, then simply apply a little varnish or paint to the surface. They will level the entire base as needed.
Just note that gluing in this way can only be done once.
If you didn’t guess correctly with the trajectory or path of the backlight and started to rip it off, then you won’t be able to reliably glue it onto the same layer a second time. Therefore, always apply markings first.
And if the tape has already come off or needs to be removed and moved to another place, what should I do? Then use the second method - additional double-sided tape.
It is better, of course, to first apply it in the right place, and only then glue used or new tape to it.
Where to hide the LED strip
Depending on the type and shape of the base on which the LED strip is attached, it can be hidden in several ways.
- Ceiling. LEDs are mounted in the ceiling plinth or plasterboard cornice. To prevent the tape from being visible, it is laid to a depth of at least 2 cm. If suspended ceilings are installed, first attach the lighting and lay the wires, and then stretch the fabric.
- Walls. To hide the tape in the wall, make a niche in the shape of a plasterboard box. Low-power models are mounted directly on the surface of the niche; for powerful ones, an aluminum profile should be used.
- Furniture. LED lighting can be attached to any cabinet furniture in the living room or bedroom, or kitchen unit. It is glued to the base of hanging cabinets, inside sideboards or cabinets with glass doors, highlighting their contents. To organize decorative lighting, it is glued to the top of the furniture.
- Stairs. You can highlight the staircase in a multi-storey building using LED lighting. It is placed under steps or in recesses in railings.
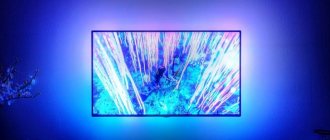
A hidden strip of diffused light complements the main lighting, creates illumination at night, focuses attention on decorative elements, or is used for zoning space.
Adhesive for LED strip
It consists of using ordinary superglue. Thanks to it, your tape will be securely attached and will not fall off, even when the LEDs reach the end of their service life and lose their brightness.
It is best to use gel glue.
It would seem, how can such a small bubble be enough for several meters? The secret is in the installation technology.
For reliable contact, there is no need to apply glue over the entire surface; it is enough to evenly place drops every 5-10 cm and that’s it. Factory tape will do the rest of the work.
The glue is applied to the surface itself.
Just don’t even think about using hot melt glue, generously lubricating everything with a hot melt gun.
Why this cannot be done, read below, where installation errors will be discussed.
These are two of the simplest, most reliable and inexpensive ways to install and secure LED strips available. However, it is primarily suitable for low power models such as SMD 3528 or SMD 5050 up to 14W/m.
They can be attached directly to a wall with wallpaper, a ceiling or the wooden base of cabinets.
Heat dissipation power of 6 to 10 W is easily handled by the surrounding air. But from 14W, more significant heating occurs and here an aluminum profile will be required to act as a cooling radiator.
Common errors and methods for eliminating them
The service life of the LED strip will increase if you avoid the following mistakes:
- Gluing lighting onto the surfaces of ceilings, walls, furniture without a profile. This fastening does not provide cooling for the tape; if it overheats, it will quickly come loose and the LEDs will fail.
- Gluing bare LED tracks. Mounting the strip on a damaged base through which the LED board protrudes will cause a short circuit when connected. To avoid this, apply a layer of insulation to the damaged areas.
- Using a stapler for fastening on wood and drywall surfaces. Attaching the backlight requires shooting the staples many times. If you make just one mistake, the LED board will be damaged and the strip will be unusable.
- Installation on a plastic profile from a cable channel. This type of profile is not intended for mounting LEDs: it does not provide heat removal, which leads to overheating of the structure.
- Using hot melt adhesive. When LEDs operate, it will heat up, preventing heat dissipation, and emit a harmful odor.
The LED strip should only be glued using specially designed materials.