General device
Since irons are produced by many different companies, they differ slightly - in shape, heating speed, quality of spare parts, etc. But the general structure remains the same. Available:
- Sole with a heating element built into it. If there is a steamer function, there are a number of holes in the sole for steam to escape.
- Thermostat with a handle that allows you to set the required heating temperature for the sole.
- Container/reservoir for water used for steaming.
- There is a nozzle for spraying water and forcing steam out. There is also a steam intensity regulator. With its help, the frequency of automatic supply of evaporated water is set.
- The iron is connected to the network using an electrical cord, which is attached to a contact block located in the back under the plastic cover.
General structure of an electric iron
Once you have become familiar with what is where, you can begin repairing the iron yourself.
General structure of an electric iron
Regardless of the type of model purchased, each iron contains:
- Sole with built-in heating element. This part of irons is usually supplemented with holes for steam to escape.
- Thermostat. It is complemented by a handle through which the temperature level is adjusted.
- Water reservoir. Found in models with a steam function.
- Contact block placed on the back of the iron. An electrical cord is connected to this part.
Modern irons are equipped with a nozzle for water outlet and holes for forced steam removal. These components are located above the built-in reservoir.
In addition to the indicated elements, the design of this equipment provides for thermal protection, presented in the form of a fuse (for simple models) or a separate device.
What will you need for work?
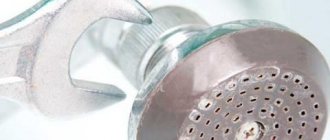
To work, you will need a set of screwdrivers - Phillips and flathead. You will need a wide knife or an unnecessary plastic card to pry off parts of the iron with latches. To check the integrity of the parts you will need a multimeter (read how to use it here). You may also need a soldering iron if you need to change any spare parts.
Tools that may be needed when repairing an iron
That's all from tools, but in the process of work sometimes you need electrical tape or heat-shrinkable tubes, you may need sandpaper and pliers.
How to disassemble correctly
To disassemble the iron you will need:
- sharp knife;
- Screwdriver Set;
- pliers.
Depending on the nature of the problem, you may need a multimeter, sandpaper, insulating material and a soldering iron with solder and flux. It is recommended to start the analysis with visible fasteners. At the first stage, you need to unscrew every screw that comes into view. After this, remove the cover from the back.
Then you need to pull up the main part of the device, which is attached to plastic latches. The latter are pryed with a knife. It is important to be careful at this stage as excessive force will cause the latches to break. If there are screws on the outside of the case, these elements also need to be unscrewed.
See also
How to properly lay tiles on the floor with your own hands, installation methods and technology
How to disassemble an iron
The first difficulty faced by those who want to repair the iron themselves is disassembly. This is far from simple and obvious. The easiest way is to remove the back panel. There are several screws that are visible and are not difficult to unscrew. In addition to screws, there may be latches. So, having unscrewed all the visible fasteners, we pry up the cover with the tip of a screwdriver or an old plastic card, and separate the cover from the body.
Underneath there is a terminal block to which the cord is attached. If there are problems with the cord, you can no longer disassemble the iron. But if everything is fine with the cord, you will have to disassemble it further, and this may cause problems.
Some irons - Philips, Tefal - still have bolts under the cover. We also unscrew them. In general, if we see fasteners, we remove them.
Removing the back cover is the first thing to do when disassembling the iron.
Each manufacturer develops its own design, and it often changes from model to model. That is why difficulties arise. But there are several points that are found in almost any manufacturer.
You immediately need to remove the temperature control dial and the steam button, to do this you need to hold them in your fingers and pull them up. The buttons may have latches, so you may need something thin so that you can press them out a little - you can pry them off with a screwdriver.
To disassemble the iron you need to remove the buttons
Some irons, such as the Rowenta, as in the photo, have bolts on the handle (some Scarlet models have them). If there are any, unscrew them. There is also a screw hidden under the removed buttons; we unscrew that too. Then remove the top plastic parts. They are usually secured with snap locks. To make it easier to remove them, you can insert a knife blade or a piece of plastic (plastic card) into the lock.
There are usually a number of bolts under the covers. Having unscrewed them, we continue disassembling until the body and sole are separated. Unfortunately, it is impossible to give more precise recommendations - there are too many different designs. What can be advised is to act slowly and carefully. And several videos on how to disassemble irons of different brands.
How to disassemble an iron without comments, in the photo
By the way, it was this emergency fuse that caused the breakdown of this iron. The cord, the soleplate of the iron, and the thermostat were in good working order and did not require repair. Only the fuse needed to be replaced, but since it was not possible to buy exactly the same one, an analogue was installed.
How to clean an iron How can you clean the soleplate of the iron from burnt marks and scale inside at home using only simple cleaning products.
Popular articles DIY dream catcher
How to choose an overlocker for your home If you repair, and even more so sew clothes yourself, sooner or later you will be faced with the question - Which overlocker to buy, how to choose it correctly among their abundance in stores?
How to iron correctly If you are going to buy an iron with a steam generator, you also need to think about an ironing board. It is convenient to use a board on which you can place a steam generator. To iron hard-to-reach places, you can use various devices, in the form of a roller or cardboard templates.
How to sharpen scissors at home Sharpening scissors, especially those used by hairdressers and tailors, should be done on a special machine and always by an experienced craftsman. But often there is a need to urgently sharpen scissors at home, without wasting time going to the workshop. Is it possible to sharpen scissors yourself?
How to choose zigzag scissors If the purpose of cutting tailor's scissors is clear, then this is why you need curly zigzag scissors, especially if you have an overlocker and is it necessary to buy them at all? These are the questions the studio technologist will try to answer.
Structure of the Typical sewing machine Description of the device and capabilities of a Chinese-made lockstitch sewing machine of the Typical type.
Cover stitcher Merrylock 009 This article provides only a description of the device and main characteristics of the Merrylock cover stitcher, model 009.
Overlocker Janome ArtStyle 4057 Overlocker Janome ArtStyle 4057 performs 3- and 4-thread overlock stitches. Used for overcasting any fabrics, including knitted fabrics.
All rights reserved / 2011 / Sewing-Master.ru / How to repair sewing machine at home by yourself / MY-Project
Do you have a sewing machine and love to sew? Then this site is for you. Professional craftsmen will tell you how to perform minor repairs on your sewing and knitting machine. Experienced technologists will share the secrets of tailoring. Review articles will tell you which sewing or knitting machine to buy, a dummy iron and many other useful tips you will find on our website. Thank you for viewing the entire page. Copying and reprinting articles from the Sewing Master website without the consent of the author is prohibited. Copyrights are protected by law.
You will be surprised, but the problem of how to disassemble the iron is the most difficult when repairing. The manufacturer is trying to impose official service. In the USSR, disassembling an iron was not an easy task. What can we say about the current diversity? Soviet models were quite rough from an aesthetic point of view, the master is free not to worry about the appearance, modern models are beautiful, revealing such a fragile body. The plastic parts, as luck would have it, are made from a type of polymer that exhibits minimal flexibility and breaks easily.
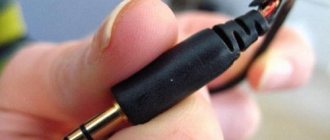
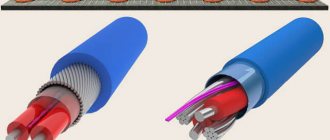
Power cord
Failure of an electrical cord is a fairly common type of breakdown. With such damage, the iron may not turn on at all or work in fits and starts, and the sole may not heat up well. The cord may bend or curl, the insulation may be damaged at the bends, and some wires may fray completely or partially. If there is such damage, it is better to replace the cord, regardless of whether it is the cause or not. In any case, all places with damaged insulation must be insulated.
In case of any damage, any iron repair begins with checking the cord. To accurately determine whether it is in normal condition or not, you need to ring it. To do this, just remove the back cover. The terminal block to which the cord is connected will become accessible. You will need a tester or multimeter. We put it in the dialing mode, press one probe to one contact of the plug, and touch the second one to one of the wires on the block. When you touch the “correct” wire, the multimeter should make a squeaking noise. This means that the wire is intact.
Checking the integrity of the power cord
The color of the conductor insulation can be any, but yellow-green is necessarily grounding (it must be checked by installing a probe on a small metal plate at the bottom of the plug). The other two are connected to the pins of the plug. One of these two wires should be connected to the pin to which you pressed the multimeter probe. We repeat the same operation with another pin.
To be completely sure that the cord is in good working order, you need to wrinkle/twist it during testing. Especially in places where there are problems with insulation. If the squeak from such actions is interrupted, it is better to replace the cord. It must also be replaced if one or both pins “do not ring.” You may be lucky and you won’t need further repairs to your iron.
Checking the performance of the heating element
If the iron does not heat up at all, the heating element may have burned out. If this is the case, then it is worth buying a new iron, since a replacement will cost almost the same amount. But first of all, you need to make sure that the heating element is to blame.
These are the outputs of the iron heating element
In order to check the heating element, we get to the very sole of the iron. On it, closer to the back, there are two outputs of the heating element. We move the multimeter to the resistance measurement position (up to 1000 Ohms), and take measurements. If the numbers on the display are about 25o Ohm, then the heating element is normal, if more, it’s burned out. As has already been said, if the heating element burns out, it is not worth repairing the iron - it is more profitable to buy a new one.
How to repair an iron yourself 6 main causes of breakdown
An iron is a guarantee of neat things and a neat appearance. Responsible and respectable housewives experience not very pleasant emotions when the device breaks down - not everyone can afford its expensive repairs. And why spend extra money if you can fix the device yourself. Let's look at what the main malfunctions of an ironing device are and how you can repair the iron at home yourself.
Before disassembling the ironing machine, check all external structural elements, perhaps the problem lies with them. The main parts of the iron are located in its bottom, and they are the main causes of breakdown. These include:
1) Temperature regulator. 2) Electrical cord 3) Water regulator 4) Steam system 5) Iron soleplate 6) Heating element
Origin of the iron
The first ironing facility was invented back in Ancient Greece - ground heated stones were used to pleat clothes. When the first iron similar to its modern form appeared, it was used exclusively for ironing silk.
Interesting fact: the body of the first irons was filled with hot coals.
It is not known who and when invented the semblance of a modern iron, but the invention of the first electrical device is attributed to Henry Seely. An American registered a mechanism called “Electric flat iron” in 1882.
The weight of the electrical device was six kilograms. Therefore, it is not difficult to imagine what the ironing process was like. After the heating method using a carbon arc was introduced into the mechanism, caring for fabric items became much easier.
In 1892, the General Electric Company began production of irons using an electric spiral. Next, a current regulator and steam supply, anti-scale protection and other important options were introduced into the devices. The design of irons changed in accordance with fashion.
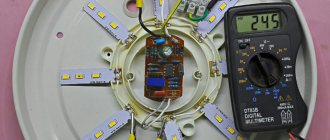
Checking the fuse
A thermal fuse is installed approximately in the same area where the thermostat is located. It is used in case the soleplate of the iron overheats - it burns out if the iron heats up to dangerous temperatures. Usually this fuse has a protective tube attached to it and most often it is white.
Iron repair: fuse and its continuity
Find contacts, call. In normal condition, the fuse “rings”; if it is blown, there is silence. If you wish, you can move the handset and call directly - there may be a break/burnout in the connecting wire. If a fuse is blown, unsolder it, look for a similar one and install it in place.
There is no need to exclude the thermal fuse from the circuit - it will protect you from a fire in case of problems with the thermostat: it will simply burn out and the iron will not work. And although the iron will require repairs, your home will be safe.
Steam spray system
If almost no steam comes out of the iron, but there is water in the container, most likely the holes are clogged with salts. You can restore functionality with a simple technique. Pour water and vinegar (regular, table vinegar without dyes) into a dish with low sides (a frying pan or baking sheet will do). One glass of vinegar per liter of water. The second recipe is to add 2 teaspoons of citric acid to 250 ml of boiling water. Place the switched-off iron into the bowl with the prepared liquid. The liquid should cover the sole.
Cleaning the steam vents on your iron
Place the container with the iron on the fire, bring to a boil, and turn off. Wait until it cools down. Reheat. You can repeat this 3-4 times. Until the salts dissolve.
Sometimes water stops coming out of the sprinkler. This is most likely due to the tube being disconnected. In this case, repairing the iron consists of disassembling the panel on which the injection buttons are attached and installing all the tubes and wires in place.
The second way to descale your iron is to disassemble it completely so that only the soleplate remains. Seal the sole with tape to prevent water from seeping through, but you can also put it in a dish. Pour hot water with vinegar or citric acid into the sole, leave until it cools, drain, and refill. Continue this way until you are satisfied with the result. Then rinse with water and collect.
Although the iron is not the most expensive household appliance, if it breaks, you don’t have to immediately run for a new one. First, let's try to repair it ourselves. Do-it-yourself iron repair - this is where you can start your career as a home electrician. A simple scheme, a minimum of elements.
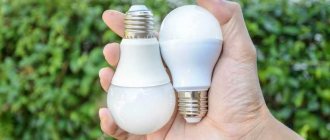
Causes of iron failure
An iron is a fairly simple household device, consisting of a heating element, a light bulb indicating the operation of the modes, a water container used for steaming, a control button and a handle. It is an essential item and cannot be replaced with anything else. That's why its breakdown is so unpleasant. If your iron stops working
, you should not repair it yourself, because it is not entirely safe.
In addition, it is important to correctly determine the causes of iron failure
. If the definition is incorrect, there is a high probability of damage to other components of the device.
Let's look at the most common causes of iron failure.
:
- Damage to the power cord. This breakdown is the most popular. Make sure that the iron is connected to the mains and check the wire for damage or breakage. The integrity of the cord and plug is diagnosed with a special device - a multimeter.
- If there is voltage in the outlet and the iron turns on, but there is no heating, the reason may be that the wire breaks and the contacts with the heating element become loose.
- Thermostat failure. The temperature regulator is a lever that sets the desired temperature of the soleplate of the iron. When the temperature of the iron changes, the contacts in it either close or open, and a high voltage current flows. If the contacts become dirty, dust, dirt, or clothing debris gets in, the performance of the device deteriorates.
- Thermal fuse is faulty. He is responsible for the safety of the iron during operation. If the temperature inside it rises above normal, the fuse disconnects the electrical circuit and is destroyed to prevent a fire. Of course, after this the iron stops working.
So, the iron broke. What to do?
Is it worth fixing it yourself? Self-repairing an iron often involves scratches and cracks on the body, which can lead to the thermostat or handle falling out. The device may be damaged so badly that it is no longer possible to repair it. Not everyone, even a technically advanced person, has all the necessary tools to diagnose and repair a device, much less the necessary spare parts. Often, self-repair of the iron ends with its complete disassembly. In this form they bring it to the service center, which greatly increases the cost of repairs. If the iron stops working
, we advise you to contact the service center. The quality and duration of further operation of the device depends on the level of professionalism and knowledge of the technician who repairs the equipment. We do not recommend turning to friends who supposedly know how repairs are done, or to private craftsmen in order to save money. Large companies that legally offer repair services for household appliances provide high quality repairs. Here you are protected by law and therefore do not have to worry about anything.
Our specialists repair irons of varying complexity, regardless of the reasons for the breakdown of the iron.
, and offer services to repair any damage.
Types of irons and their design
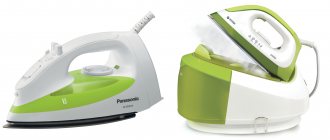
If we talk about electric irons, there are three types:
- Normal, no steaming. Lately they have been unpopular, but they are the most inexpensive and compact and can be purchased as a “hiking” option. For trips, business trips, etc.
Iron without steam and with steam
Steam station or iron with steam generator
The most common are irons with steamers; it is its repair that we will consider further. First, you should familiarize yourself with its device. This will make repairing the iron yourself easier. Knowing the composition of the device and the purpose of its parts, we can name possible causes of problems.
In general terms, each iron consists of a body, a handle, a thermostat and a soleplate with holes through which steam is supplied to the ironing area. To maintain the steaming mode, a water container is built into the iron body, and there are also intensity regulators for the steaming mode.
General structure of an iron with a steamer
Steaming system design
Modern electric irons of this type have several steaming modes. To understand how everything works, you need to consider how it all works. After all, repairing an iron with your own hands is often necessary not because the iron does not heat up, but because there is no steam. And here it is important to understand what exactly is the matter.
Modern models have three steaming modes, which have individual buttons. Each button activates its own pump, which, depending on the settings, supplies the required amount of water. There are such modes and pumps:
- Soft (normal) steaming with steam intensity regulator. You set the regulator to the desired position (usually 4-5 modes) and steam is supplied continuously (until the water runs out) at certain intervals.
- Steam boost. A sharp one-time release of steam that occurs when you press the corresponding button.
- Drip irrigation. From a small nozzle located at the front of the handle, pressing a button sprays a small amount of water.
The device of a modern iron with a steamer
Simpler models (previous generation) usually have a sprayer and a steam mode. Their structure is somewhat different. The first difference is that the sole heating regulator has been moved to the handle (however, not always), there is also a steam regulator on the handle, but it is made in the form of a rotary disk.
Iron with steamer and spray (no steam boost)
How does an iron work?
In order to disassemble and repair an electric iron, you need to know how it works and works. Without this knowledge, it is useless to begin repair work. Almost all steam irons from different manufacturers - Philips, Braun, Tefal, Vitek and others - have the same design and operating principle. Differences can only be in the technical design of individual parts.
Steam iron device
The main part of any electric iron is the soleplate with a built-in tubular electric heater (hereinafter also referred to as the heating element). The power of heating elements in modern models of Vitek irons is usually 2000W, 2200W or 2400W. The devices are available with soles made of different materials - stainless steel, aluminum, Teflon, ceramics and others. The soles have holes through which steam escapes in order to ensure the required ironing quality. The heating temperature of the metal base is regulated by a built-in thermostat.
Vitek irons are not inferior to famous competitors in design and ergonomics
Devices with a steam generation function have a reservoir into which water is poured. The liquid must be cleaned and softened - only in this case can the formation of scale inside the sole be prevented. Water flows from the reservoir onto the heated sole, is converted into steam and exits through the holes. The intensity of steam generation is also adjustable. Most modern models have a function of forced release of a steam cloud with maximum intensity - steam boost.
As a rule, electric irons have nozzles for spraying water. Connection to the electrical network is provided by an electrical cord that can move freely relative to the housing. Inside the housing, the cord is attached to a terminal block. Thus, the design of modern steam irons is not complicated. Even those who are far from technology can understand it.
How to disassemble an iron
If the iron does not work, the first thing to do is disassemble it. This is not as simple as it seems - there are too many models, each of which can have its own “tricks”. Moreover, different models from the same manufacturer can be understood differently. However, there are general principles and rules:
- Remove the back cover of the pen. This allows you to reach the terminal block. In case of some damage (problems with the cord or failure of the heating element), this is enough and there is no need to further disassemble the iron.
Not everything is obvious
The process of disassembling the iron does not require the use of force. If it “doesn’t work,” you need to carefully look at what it’s holding and where. And you shouldn’t take it completely apart right away - this is not always necessary.
Checking the simplest things
Often the iron does not work due to problems with the cord. During operation, it often bends, the insulation is damaged at the bend points, and sparks may even appear. Therefore, the first step when repairing an iron yourself is to inspect and test the cord. To test, you will need a multimeter (read how to use it here).
Disassembling the iron is the very beginning
Checking the power cord
Sometimes, to make sure that the problem is in the cord, you can plug in the iron. If everything is in order, the indicator lamp lights up. This is usually a green LED. Based on whether it is constantly on or goes off periodically, we will monitor the condition of the cord. We twist and bend it, paying attention to the state of the signal light. If it blinks, then the power cord is really at fault. It is better to replace it, but, if desired, you can find the problem area (often it is visually easily identified) and correct the situation.
Typical problems with the iron cord
If these are problems with the insulation, and the conductor itself is intact, using insulating tape the fault is eliminated. If the wires are damaged, they are cut, connected in a new way using soldering, and the junction is insulated. This repair is a temporary measure, as problems will soon appear again - not far from the "restored" place. Therefore, it is still better to replace the cord.
Terminals and contacts
If there is no external damage to the cord and it does not work, you will have to disassemble the iron. At the first stage there are usually no difficulties - there is one bolt at the back. This is perhaps the only fastener that cannot be hidden. Unscrew it and remove the cover.
Removing the back cover is usually not difficult - just one bolt
Under the back cover there is a terminal block to which the wires from the thermostat and the heating element are connected, and our power cord is connected to the other. The terminal block may look different. Some manufacturers, like Bosch, have it hidden under a plastic cover. The cover must be removed. How to get to it depends on the model. Sometimes it’s enough to just pry and pull, sometimes you have to remove some parts. The important thing is to get to the contacts.
Overheating may cause the block or cord to melt.
Often the reason that the iron does not heat up is not hidden in the heating element, but because the contacts are clogged or oxidized. Sometimes water gets on the contacts (the container leaks), sometimes dust gets baked in there, sometimes the contact just weakens. If there is one of these problems, fix it. Perhaps repairing the iron yourself will end there.
If you are going to remove the wires from the contacts, take a photo of how everything happened. There will be fewer problems during assembly. Human memory is an unreliable thing. Photos are much more reliable.
Checking the cord for wire integrity
If the contacts are normal and clean, we test the cord to check the integrity of the wires. We take a tester/multimeter and put it in dialing mode. With one probe we touch the cord pin, with the second we “sort out” the wires on the terminal block. If the wire is intact, one of the pairs should “ring” - you should hear a beep.
Iron cord test
The iron cord is three-wire, two wires go to the pins of the cord, and the third is green or yellow-green - grounding. This is a metal plate on the fork of the iron. When you touch it and the green wire on the block, you should hear a “squeak” from the multimeter. If at least one wire does not ring, we change the cord.
The process of disassembling the Braun FreeStyle iron
The peculiarity of German irons is that the mounting bolts are made with star-shaped caps. To unscrew them, you can make a tool from a regular flat-head screwdriver. You need to select the size of the working blade so that it fits into the hole in the bolt head, and then file it as shown in the figure below.
The tip of the screwdriver must be slightly filed with a file.
Procedure - table
It is best to work in the sequence presented in the table (but there may be slight deviations):
| Illustration | Description |
| Using a screwdriver with a converted tip, unscrew the bolts securing the back cover. Remove the cover | |
| Using a flathead screwdriver, remove the top bezel cap from the housing. To do this, you will have to bend the fastening latches | |
| At the front of the housing, use a screwdriver to pry off the sprayer and filler cap. The parts are easy to remove | |
| Use a screwdriver to unscrew the fastening screw in the sprayer niche | |
| Bend the latches with a screwdriver and remove the ball retainer of the power cord | |
| Use a screwdriver and carefully remove the temperature regulator. After this, turn the iron over, and the cone retainer and ratchet spring will fall out of the hole in the area of the thermostat. Don't lose them | |
| Remove the electronic control unit with the heating element connector. Depending on the modification, it may differ both in appearance and in the number of functions implemented. | |
| After this, separate the upper part of the body from the sole. The base of the iron with the plastic cover on it will remain on the table. | |
| Use pliers to turn the fasteners in the places indicated in the photo. You need to turn clockwise 90 degrees until they coincide with the grooves in the housing | |
| Open the sole by removing the plastic cover. Now you can remove scale from the metal base in which the heating element is located (hereinafter also referred to as the heating element) |
We offer our readers a video that shows the disassembly and assembly of the Braun FreeStyle device:
How to get rid of scale
You can remove limescale yourself using a concentrated solution of vinegar or citric acid. To prepare it, use water heated to a temperature of +50…60 ℃. Proportions: 10 g of acid per 100 ml or 1 tbsp. l vinegar per 1 l water. Immerse the sole so that the solution is inside it. After some time, the scale will become loose and can be easily removed. After removing limescale, rinse the part thoroughly with running water. Reassembling the Braun iron is done in reverse order.
Solving the auto shutdown problem
If the automatic shutdown function stops working, the device can no longer operate correctly. Problems begin with turning on, and the device spontaneously turns off during ironing. Apparently, the horizontal position sensor in the control unit has stopped working.
In the photo, on the left side of the control unit, a white and brown wire is visible
You can solve the problem yourself if the auto-off feature is not necessary. To do this, just connect the white and brown wires going to the control unit. The connection point is insulated with heat shrink tape. After this, the device will continue to operate, but the power-on indication will not work (as well as the auto-off function).
Temperature regulator
Next, repair the iron yourself - inspect the temperature regulator. By detaching the plastic case from the soleplate of the iron, we gain access to it.
How does he work? It consists of three main parts: a rod, contact plates attached to it and a bimetallic plate. The bimetallic plate is heated by the soleplate of the iron. As the temperature rises, it heats up and bends. At a certain temperature, it is bent so much that it opens the contacts, turning off the power. When the iron cools down, it returns to its original state, the contacts close again, and the iron begins to heat up again.
First you need to check if it works at all. Rotate it from one extreme position to the other. In one of the positions, a characteristic click should be heard, which is emitted by the closing contacts. It is through them that power is supplied to the heating element of the iron. Leaving the thermostat in this position, check for electrical contact.
Two contacts come from the temperature controller (the wires that go to the heating element are connected to them). We touch them with the probes of the multimeter (testing mode). If it beeps, everything is fine. But by placing the regulator in the other extreme position, you should get a “break” - the contacts should open. In this case, this node works normally.
Iron temperature regulator
Visual inspection won’t hurt either - maybe they are burnt, oxidized, or weakened. If there is scale, dirt, or rust, they can be carefully cleaned. To do this, you can use a strip of very fine sandpaper or a nail file. Do not be too zealous - do not cut off the contacts completely. When cleaning, try to bend the plates as little as possible so as not to loosen the contact.
Sometimes the regulator is difficult to turn. Grasp it with pliers or pliers and rotate it back and forth until you achieve a smoother motion. After which you need to take a simple pencil and rub the knot with graphite. It does not sinter at high temperatures and has good lubricating properties.
Fuse
Thermal fuses are disposable and reusable. Disposable ones burn out when the critical temperature is exceeded. After this, the iron does not turn on and its functionality can only be restored by replacing the disposable fuse.
Types of fuses in the iron
The reusable one is made on the basis of the same bimetallic plate and works the same. This unit increases the reliability of the iron - it does not allow it to burn out if, suddenly, the thermostat does not work. The most common reason for an iron not working is a blown fuse. This is about 50% of cases of failure of this device. This happens if both the thermostat and the reusable fuse have not turned off the iron.
You can get to the fuse only by completely removing the housing. We find it, touch it with the multimeter probes on both sides. If there are no sounds, it is he who is to blame. We unsolder the faulty one and install a similar one. You can also install a “bug” instead - solder a piece of wire. But during the next failure, the heating element will burn out, not the fuse. Then repairing the iron yourself will end with the purchase of a new one - the price of the soleplate is comparable to the cost of a new iron.
Problems with the soleplate of the iron (heating element + water container)
In many iron models, the heating element along with the water container is sealed in a single housing. Problems with one of these parts lead to one thing - buying a new iron. Replacing the sole is not practical, since this spare part costs slightly less than a new iron. Even if you decide to change the sole, there is no guarantee that you will find the one you need - the market changes quickly, models are discontinued, spare parts are not available for them. In general, if you have reached this stage in repairing your iron yourself, you will most likely go to the store for a new one.
Where are the outputs of the heating element of the iron?
There is only a small percentage of cases when the performance of the sole can be restored - if the contacts have oxidized so much that contact is lost. We find these contacts, clean them thoroughly and crimp them. Next we take measurements.
Set the multimeter to resistance measurement mode. In irons, heating elements usually have a resistance of about 250 Ohms (more precisely, look in the passport), so the measurement limit is 1000 Ohms. If the resistance is somewhere within these limits, everything is fine. If it shows “infinity”, the heating element has burned out. As already said, replacement does not make sense; it is more practical to buy a new iron.
Measuring the resistance of the heating element in the iron
The same solution - going for a new iron - can also be a working heating element. This happens if the water tank is deformed. It may rupture or swell. In any case, the iron turns out to be inoperative, although the electrical part is “normal.” This damage - problems with the water container - occurs when there is a large amount of scale. It is easier to prevent than to eliminate. It is necessary to pour water with a small amount of salts into the iron. Yes, manufacturers write that you can pour water from the tap. It will fulfill its warranty period. And then - buy a new one.