The meaning of the installation is often interpreted not entirely correctly. Connecting fog lights: available methods Having decided how to install the fog lights and securing the fog lights themselves, you can proceed to connecting them. There is no need to talk about how the illumination of the roadway can affect traffic safety, eye fatigue and the comfort of driving a car in difficult weather conditions. Before I tell you about the features of installing these elements, a few words about the importance they are for the car. Most often, yellow filters were installed on fog lights, because only they could give the light beam special characteristics. Naturally, this does not affect the range of light in any way, but fog lights will be useful to get a complete picture of the condition of the road surface.
We will take the fuse with a small margin, i.e. this way you will significantly increase the service life of the headlights and ensure their high safety when driving over rough terrain.
It is necessary to adjust the position of the fog lights during their installation. One way or another, additional lighting is never needed. The greatest importance of headlights lies in the precise supply of light, which determines the illumination of the road. You should begin installing fog lights in your car by disconnecting the negative terminal of the battery. The connection point must be well cleaned of paint, rust and dirt.
Purpose and advantages of PTF
Fog lamps are needed to illuminate the road surface during rain, fog, etc. Other purposes for using PTF:
- to illuminate sections of the right edge of the curb;
- to illuminate the area located directly in front of the car hood;
- allows you to get maximum visual information about the condition of the road;
- like daytime running lights.
Advantages of using PTF:
- wide functionality - their inclusion allows you to solve several problems related to lighting at once;
- the best view of car dimensions even at a great distance.
The rules for installing PTFs depend on their type. There are certain connection diagrams that should be followed during installation.
Advantages of functional lighting equipment
Fog lights allow you to partially relieve the strain on the driver's eyes during a forced trip in difficult weather conditions. With their help, it is possible to achieve better illumination of the road surface. The greatest importance of headlights lies in the precise supply of light, which determines the illumination of the road.
Precisely adjusted devices illuminate up to 10 meters of space in front of the car, which is quite enough for safe driving in difficult weather conditions. Of course, for this you will need to adhere to a certain speed limit. The headlights are adjusted during the installation of the equipment. The quality of road lighting depends entirely on the setting of the angle of incidence of the light flux.
We recommend: Car speedometer: why is it needed and how does it work?
Installation requirements
Most motorists who have diligently studied the theoretical course at a driving school know that they cannot voluntarily install devices on their cars that are not provided by the manufacturer, but the installation of fog lights is prescribed in the traffic regulations.
Even if the car from the manufacturer is not equipped with fog lights, each car owner can install them by removing them separately or by redoing the bumper. It must be remembered that when reworking, serious changes are made to the design of the machine, and this is already considered a partial re-equipment.
- it is allowed to install two fog lights;
- the maximum distance between the headlight and the side surface is 0.4 m;
- The minimum distance from the PTF to the road is 25 cm.
Installation of PTF is carried out in accordance with the established standards.
The PTF may need adjustment, since the angle of incidence of the light flux on the road surface must comply with the rules.
Requirements for installing fog lights
It is permissible to locate fog lamps directly in the headlights.
The rules for installing headlights are regulated by two regulations:
- GOST 8769-75 or SEV standard 4122-83;
- state standard of the Russian Federation GOST R 41.48-2004, corresponding to UNECE Rules No. 48.
Location of fog lights on a car
The general requirements are as follows:
- The installation location is located at a distance of no more than 400 mm from the side surface of the vehicle body. The distance is measured between the side plane and the outside of the headlight.
- It is permissible to install only two fog lights. The standards separately stipulate the mandatory installation of fog lights on tourist buses, as well as on vehicles operated on mountain roads.
- The lower edge of the fog lighting device is located at a distance of at least 250 mm from the road surface.
- Fog lights should have a horizontal viewing angle ranging from +15º to -10º, and a vertical viewing angle from +45º to -10º. It is unacceptable to block the headlights with vehicle parts within the specified angles.
- Fog lights must be connected in parallel with side lights.
- The lenses of the fog lamps must produce a beam of light located below the flow given by the low beam lamps.
- It is acceptable to use transparent filters or selective yellow color. It is unacceptable to use glass of different colors on the same car.
The standards do not have special requirements for installing fog lights on a car, so the owner can install the kit himself.
PTF selection
First, determine the location of their installation on the car. Often, foreign cars have niches on the bumper for installing additional lights. Then the fog lights are selected so that their shape and size correspond to these niches in the bumper.
The quality of performance of PTF functions is practically not affected by their power. Therefore, it is advisable to choose low-power light sources - LED lamps.
On SUVs, PTFs are installed at the level of conventional headlights or on the roof of the car. In this situation, PTFs of any size and shape are suitable. The main thing is that they are equipped with brackets that provide reliable fastening.
The main difference between fog lights is the lamps used in them. There are the following types of PTF:
- Halogen. The most affordable option. The downside is the low lifespan compared to other types of lamps. Before you buy these headlights, make sure that you can easily replace them when they break down.
- LED. Their main advantages are durability and efficiency. The downside is the price. If LED headlights are not installed correctly or are poorly ventilated, their lifespan will be shortened.
- Xenon. Pros: good technical characteristics. Such models are durable and effective. The downside is the high cost.
Connection options and diagrams
If the car does not have wiring for the PTF, you will have to lay the necessary wires yourself. There are two options - through a relay and through a button.
Via relay
To connect fog lights via a relay, you need to stock up on cutting tools and a terminal block. You will also need corrugation, heat shrinkage and electrical tape.
Installation rules via relay:
- Find a place in the car to mount the relay. Attach it so that it can be easily reached in case of replacement or repair.
- Find a place for the button.
- Prepare the power cables. The length should be such that the wires can be laid freely, without tension.
- Install a 10 A fuse. From pin No. 30, lay the finished wire to the “+” terminal of the battery.
- From pin No. 85, take the wire to the power button.
- Connect ground to the relay using pin No. 86.
- Place the PTF on the bumper.
- Connect the “–” wire from the body and the “+” wire from contact No. 87.
- Turn on the headlights and check their operation.
It is not recommended to connect the PTF autonomously. They will drain the battery in a matter of days.
Via button
If the PTF is connected via a button, any wire with voltage is sufficient. As a rule, power is taken from the “+” dimensions or from the ignition system wiring.
The red wire carries “+”, the black wire carries ground connected to the body. Find a place on the panel that your hand can easily reach, and place the button there.
This connection scheme for PTFs is recommended for motorists who tend to forget to turn them off when stopping the car. They turn off when the driver, having finished driving, takes out the ignition key.
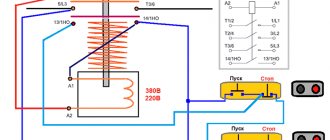
Connection diagram for fog lights via relay
Connecting the contacts How to connect the fog lights through the relay further? When purchasing headlights, you should make sure that they fit the car model, both in terms of plug connection and installation parameters.
Three-position button in the car interior. If the wires are short, take longer ones, strip their contacts at the ends and connect them. In the future, do not forget to regularly clean the fog lights from dirt and promptly change burnt out bulbs.
Installing fog lights in the front bumper Many motorists at this stage are faced with the problem of removing the bumper. If there is no free button on the instrument panel, you will have to mount it in a convenient place. The simplest and most reliable way is to connect to the car’s existing wiring intended for powering the PTF.
The diagram and installation steps for this optics are further in our article. The main thing is to implement the correct connection and protection of the PTF circuit using relays and fuses. Taking into account the fact that according to this scheme, power is supplied to the fog lamps only when the ignition is on, the decision to connect the fog lights according to this scheme allows you to automatically turn off the PTF after removing the key from the lock. In the latter case, it will be necessary to dismantle this unit and install in its place a new unit equipped with a fog lamp switch.
Headlight block. Drill holes for the fog lamp housing, which is secured with suitable bolts.
In the design of modern cars, most manufacturers provide the possibility of installing such additional lighting. Features of installing fog lights Before purchasing fog lights, the car owner should decide on the location of their installation on the car. In principle, it does not present any complexity, and it is very easy to understand. They need to be removed and PTF installed instead. In practice, if the car already has standard wiring for the PTF, this connection will be the simplest.
Proper installation and configuration of these devices will ensure maximum efficiency of their operation. Special modules are allocated for it in the front part of the car. In this case, PTFs of any size and shape are suitable. Once the fog lights have been fully connected via the relay, it will be important to adjust them and lock them in the established positions.
Installing PTF fog lights will help solve this problem. This work is easiest to do using a universal scheme, suitable for almost any make of car, see Installation via an additional light relay on the CFmoto X6.
Mounting options
Before installing the PTF, an electrical wiring diagram is developed - it will eliminate unnecessary wiring and guarantee the functioning of the electrical circuit.
Bumper mounting
There are 3 installation options: in the openings provided by the manufacturer, on a bracket or in a blind bumper where there is no niche for PTF.
To configure, use a homemade template. It is installed at a distance of 5 cm from the PTF. During adjustment, the coincidence line is set at a distance of 10 cm below the center of the lamps. By adjusting the headlights, they provide increased visibility and minimize the likelihood of being dazzled by oncoming cars.
Installation in a blind bumper
This option is labor-intensive; you have to cut out holes for the PTF.
- Remove the bumper and mark where the headlights will be.
- Drill holes around the perimeter, and then cut out a piece of the bumper with a sharp knife.
- Attach the headlights with appropriately sized bolts. Mount the protective cover - attach it to the bumper.
The headlights are adjusted using a special key - it is included in the package.
Other installation methods
PTF can be placed on a bracket made of durable steel. The bracket is fastened in accordance with the PTF installation standards. The part is secured with self-tapping screws. PTFs are installed at the mounting points and the wiring is connected.
Installation in the opening provided by the manufacturer:
- Raise the car by placing a 20 cm thick wooden beam under the front wheels.
- Remove the protective shields that cover the bottom of the bumper.
- Unscrew the fasteners from the plugs provided by the manufacturer.
- After inserting the PTF into the guides, attach them with self-tapping screws.
If non-original headlights are installed, the dimensions and mounting points may not match. Then the elements have to be adjusted.
Requirements for installing PTF
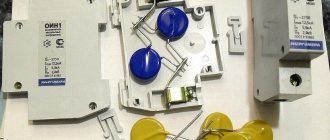
Set of wires, switch and relay for PTF installation
To correctly install fog lights in the bumper with your own hands, you must not only buy a universal set of mounting fasteners in advance, but also take into account all the installation rules. Of course, any PTF must be installed correctly, taking into account all requirements and rules. As stated in the traffic regulations, no more than two fog lights can be installed in the bumper of one vehicle.
Their installation is carried out in accordance with the requirements:
- PTFs must be placed at a distance of no more than 40 cm from the side of the vehicle, which is determined by the outer surface of the lamp.
- To do everything correctly, the devices must be installed at a distance of at least 25 cm from the ground, that is, along the bottom of the lantern.
- PTF light lamps must be installed below the upper part of the light-transmitting opening of the low beam lamps.
- As for visibility angles, they should not be cluttered. The vertical visibility angle should be about 15 degrees, horizontally - around 45 degrees (video author - Romanautoreview).
It would be wrong if the PTFs are included along with the dimensions. Accordingly, when installing in the bumper and connecting the connectors, they must be placed in such a way that they are not connected to the dimensions. It's no secret that all modern vehicles are equipped with a special connector for mounting PTF, so the installation of fog lights is carried out strictly in them. And even if there are no lights themselves, there must be appropriate plugs into which the mounting brackets and the lights themselves are installed.
If your car does not have plugs and seats where fog lights are installed, then you will have to make these places yourself. If this is the case, then when installing a set of headlights in the bumper, you can and even need to be guided by the installation and connection requirements, otherwise you may have problems when undergoing scheduled maintenance. Only taking into account the requirements can you ensure that the devices are effectively used to their full capacity. As for the adjustment, it is carried out after installing the PTF in the bumper instead of the plugs. As you remember, during installation you need to think about how to properly mount the lantern so that its luminous flux angle is correct.
Common Mistakes
If a car enthusiast does not have experience in electrical installation work, it is easy to make a mistake when installing a PTF. In order to properly connect the headlights, it is recommended to learn in advance about the typical mistakes of beginners.
Disadvantages and problems:
- The problem arises when connecting the PTF to the dimensions. This system is not designed to handle the current that it must carry due to the additional load introduced. As a result, overheating and melting of the wires is observed. If the PTF lights up along with the dimensions, the equipment will quickly fail.
- If the PTF installation parameters do not meet traffic regulations, traffic police officers may file claims against the driver. If they find a violation of established standards, the driver will be fined.
- It happens that a car enthusiast chooses the wrong place for a button. If it is located too far away, it is difficult for the driver to reach it. This can cause an accident.
If you often drive in poor visibility conditions, you should install PTF. Thanks to them, you will be able to better control your car in difficult conditions, which will provide you with a higher level of safety when driving.
Connection errors
To avoid problems, you need to take into account the main mistakes and avoid them:
- Poor contact of connections. You should not make twists and wrap them with electrical tape, this is a short-lived option.
The wires should be connected to the relay through the connector to ensure reliable contact. - Installing the relay in an inappropriate location. If it is not secured and is exposed to changes in humidity, it can quickly fail.
- Using thin wires. They will overload and heat up during operation, which will eventually cause the insulation to melt. It is better to buy an option with a margin of safety.
- There is no fuse in the system. In case of voltage surges and short circuits, the headlights will fail or the wiring may catch fire.
Connecting headlights via a relay is not difficult, since everything you need is sold in car dealerships, and the circuit is very simple. The main thing is to ensure reliable contact of connections and lay the wiring carefully so that it is not damaged during operation.
Chevrolet car repair manuals and tips
Knowing how to connect fog lights may be needed when replacing weak PTFs with more powerful ones. Of course, you can also go to a service station, where specialists will do this; you can easily learn how to connect fog lights with your own hands.
What is needed to connect fog lights
1. tools – wire cutters, knife, pliers, terminal block; 2. consumables – electrical tape (blue only), plastic clamps, heat-shrinkable connection and ground terminals, automotive corrugation; 3. materials – 15-amp fuse, PTF block, power button, wires, insulation.
How to connect fog lights
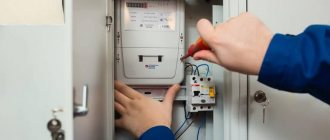
To connect the PTF, you will need to remove the central panel in order to gain access to the on-board electrical network. how to connect PTF
Wiring diagram for fog lights.
First, make and then connect the connectors to the fog lights and screw the ground wire (black in the diagram) using a terminal onto the body. The positive one (also green in the diagram) should be brought to the battery area, since it will be connected to the relay at terminal 30.
Video instructions for installing standard PTF on Lada Kalina
Connecting fog lights via a relay: diagram and instructions First, let's prepare the necessary tools and materials.
These norms are clearly described in the Rules, so we will not dwell on them. If the wires are short, take longer ones, strip their contacts at the ends and connect them. It is small, so you can not even attach it, but hide it behind the dashboard.
About the wires Now you need to deal with the fog lights themselves. The optical structure of the drop is such that it simply reflects ordinary light from ordinary light, like a mirror.
PTF light lamps must be installed below the upper part of the light-transmitting opening of the low beam lamps. Preparing to connect the fog lights relay Tools required to connect the relay: Knife; Pliers; Terminal block. Popularity: 13 views
That is why, whenever possible, it is better to use low-power light sources, and here, more than anywhere else, LED lamps look best. You will need: a set of wires for connecting fog lights; insulating tape;. It should be noted that the electrical circuit must in any case be equipped with a fuse, this is very important.
We independently install and connect fog lights on Kalina
Despite the fact that anti-fog optics illuminate the road for only 10 meters, it still allows for safe movement by car in bad weather. In the absence of this type of headlights, visibility of the road will be limited, which will affect the safety of the driver and passengers of the car. How to install fog lights on Kalina and what headlights can be used for this - read below.
- 1 Which fogs to choose for Kalina?
- 2 Detailed instructions for replacing fog lights 2.1 Tools and materials
- 2.2 Step-by-step instructions
- 2.3 Issue price
Price of fog lights
There are many foglights for this car model, differing in price, manufacturer, quality and configuration. The most common:
- Kirzhach;
- Ray;
- Bosch;
- Prosport.
In appearance, headlights are:
- double;
- round;
- square;
- oval.
The approximate price of fog lights is from 1500 rubles . Can I install them myself in the garage? with the help of instructions, additional tools and free time. If you don’t have anything like this at your disposal, it’s better to contact a service station. Each service has its own price list for services, in particular for the installation of PTF. On average it comes out to 3000 rubles .
Do-it-yourself PTF installation
To work you will need:
- The key is "8".
- Screwdriver.
It is recommended to carry out work on a removed bumper. It will be more convenient this way. You can also mount the headlights directly on the car. After installation, be sure to check the quality of work and adjust the headlights so as not to blind oncoming drivers.
- The steering wheel needs to be turned all the way.
- Remove the dirt protection in the wheel arch.
Unscrew all the bolts and carefully remove the protection
3 self-tapping screws for securing the PTF lamp
Without decorative overlay
Now with overlay
The same actions should be performed on the other side of the car. At this point, the work on installing fog lights on the Lada Kalina can be considered complete.
Connecting PTF to car wiring
Connection diagram of PTF to electrics on Lada Kalina
Initially, the wires must be connected to the headlights themselves. The “mass” is also screwed to the car body. “Plus” is connected to the battery according to the diagram. The wires are pulled through the engine compartment to the passenger compartment.
We pull the wiring into the salon
This must be done along the left wing, where the standard fastenings for the wires are located. Before doing this, you need to remove the fender liner to make work easier.
We will infiltrate here
Connecting fog lights in the cabin
- Remove the ashtray by unscrewing the mounting bolts (4 pcs).
- Next, you need to pull out the panel on which the button covers are located through the resulting opening.
We remove the console for easier routing of wires, you can push them in like that
Separate PTF activation button in the cabin
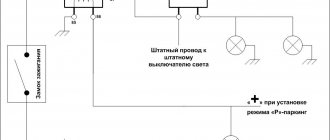
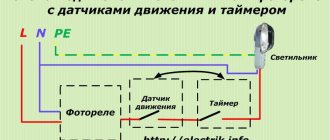
Connection to the LCM (light control module). Now the PTF can be turned on only when the dimensions are on, and when the ignition is turned off, the PTF will go out automatically, everything is according to the “law”
Next, the parts are assembled in the reverse order of their removal. At this point the work can be considered completed.
Painting in car color
- We skin it.
Sand the surface of the lining
Apply primer and wait until it dries
We paint it in color. I got it like this.
Connection diagrams and foglight settings
Any automotive four-pin relay is used for connection. The connection diagram is quite simple and we have given it above. When choosing a relay, you need to look at the current strength - for fog lights they usually use from 30 A, but you can set up to 70, depending on the power of the lamps. As you can see from the diagram, the relay has two groups of contacts - control and connecting.
Along with the relay, you need to buy a connector so that the wires are neatly arranged, as well as an additional 15-20A fuse, which can be placed separately from the general unit.
Power to the relay, as a rule, is taken from the ignition switch, and the button is placed either in its standard place or chosen in a convenient location. After installing the fog lights and checking their performance, it is imperative to adjust them so that the luminous flux operates in a plane that is lower than the plane of operation of the low beam of standard optics. The lighting angle, provided that the height of the luminous flux is observed, you can choose any suitable one.
A simple upgrade to your car's optics will help improve visibility in poor conditions, as well as add a fresh touch to the appearance of your car. Successful installation and smooth and bright roads for everyone!
Preparing for work
Before going to an auto parts store and choosing fog lights (FFL), car owners should know that the procedure for installing them is regulated by the Road Traffic Rules.
In particular, the installation of PTF on a car must be carried out in places specified by the car manufacturer.
In relation to AvtoVAZ wiring products, the connection diagram for fog lights on Kalina implies their installation in the front bumper:
- For this purpose, it has special places covered with plastic plugs;
- The package of purchased headlights must have all the necessary elements for proper connection (wiring, terminal blocks, power button, fuse and relay).
Seat for PTF in the front bumper of Lada Kalina
Note! Purchased headlights are always smaller in size than the standard installation location. Therefore, plastic sidelights should also be included with the PTF.
What can you buy for Kalina?
A wide variety of foglights for cars amazes the imagination with their appearance and shapes:
- Round;
- Oval;
- Square;
- Twin;
- Recessed;
- For outdoor installation, etc.
Not all PTFs are suitable for Lada Kalina, which forces owners to redo the mount themselves
However, only a few PTFs produced by different manufacturers are suitable for Lada Kalina.
In particular, these are:
- Bosch products, characterized by flat glass headlights and sold only in pairs;
- Fog lamps “Kirzhach” with lens-shaped (convex) glass;
- Fog lights “Luch” are an analogue of German products. The price is lower, but so is the quality;
- Products of Chinese companies under the ProSport brand.
Note! This list is not an expert list. Simply, the products of the listed companies are installed in the standard places of the Lada Kalina without any additional modifications. And the complete set of kits is selected exclusively for this AvtoVAZ model.
PTF ProSport in chrome configuration
How can I install
There are 2 ways to install fog lights on a Lada Kalina car:
- Without removing the front bumper;
- With bumper removed.
Advice! If you do not have sufficient skills in working with plastic parts, then it is better to completely remove the bumper. In this way you will protect it from breaking off latches and fasteners due to negligence.
The factory instructions provide detailed information on all mounting points for the front bumper
Connection methods
Installation of the PTF switch off button
So, if the installation of fog lights is carried out at home, then in order to do everything correctly, put the kit in the bumper instead of plugs and connect it to the wiring, you can use one of two connection options. As we remember, PTFs are not turned on by side lights in any case; this must be remembered before installing the kit in the bumper and connecting all connectors. There may be several options for installing devices. One of the easiest in terms of installation and reliability is to connect to vehicle wires that are already wired and designed for fog lights.
In this case, everything can be made simpler. The factory wiring is already equipped with all the necessary components, in particular, the wires and connectors that are needed for connection. The wiring contains all the relays and fuses, as well as a switch that can be used to control the devices. In fact, all you have to do is remove the plugs from the bumper and install the PTF kit, connecting it to all connectors. This option is not relevant for all vehicles, but only for cars equipped with plugs or cars where it is necessary to change faulty fog lights (the author of the video is Andrey Kuvshinov).
When purchasing a PTF kit, you need to make sure that this model can be installed on your car. Not only the connectors must match, but also the installation parameters. If the vehicle is not equipped with wiring for installing fog lights, you will need to do it yourself. In order for the fog lamp connection diagram to be correct, additional wires should be purchased along with the kit; they must be copper and insulated. In addition, you also need to purchase a fog light switch, a fuse and a relay; sometimes these components are included with the PTF.
Remember that under no circumstances should fog lights be turned on along with the dimensions. Standard wiring, as well as the switch, are not designed for the level of current that these optics draw. It should be noted that the electrical circuit must in any case be equipped with a fuse, this is very important. Only a fuse will save your vehicle from fire if a short circuit accidentally occurs in the circuit. The fuse itself must be powerful enough - the power level is calculated in accordance with the power of the optics itself.
We recommend: How to make and install eyelashes on your car’s headlights yourself
For example, if the optics are designed for 60 watts, then when purchasing a fuse, you must calculate its power in advance in accordance with the formula:
60 W * 2 / 12 V = 10 A
That is, the device itself must be selected taking into account a small margin. The best option would be to purchase a 15 amp fuse.
Detailed instructions for replacing fog lights
Installation of fog lights on Kalina can be done either by specialists or in a garage. If you are reading this article, then most likely you are planning to install optics yourself. We are ready to help you with this - below are detailed instructions for installing lanterns, as well as a list of tools that you will need. In addition, you will need a wiring diagram for fog lights, usually it comes with the optics.
Tools and materials
To perform the work, prepare the following tool:
- set with a screwdriver - with Phillips and flat tips;
- a set of wrenches, in particular, you will need wrenches for 8 and 10, but you may need others;
- wire cutters;
- insulating tape.
Connecting contacts to relay terminals in the block
Step-by-step instruction
So, installation of fog lights is carried out as follows:
- First you need to open the hood, disconnect the battery, then unscrew the fasteners and remove the front bumper.
- Then, using a flat-blade screwdriver, you will need to bend the latches and remove the plugs from their seats. Then take the purchased fog lights and secure each of them with three self-tapping screws. Make sure that the optics are securely installed in the installation location - they should not be subject to vibrations while driving, as this will cause them to fail faster.
- Then climb into the car. There is a special seal under the clutch pedal; it must be removed. Once you have access to the access hole, you can push the wiring from the fog lights into the cabin.
- Now you need to connect the optics to the on-board network. If you want it to be activated separately from the main light, then you will need to move the button into the cabin and install it on the console in the car. In this case, you only need to connect the wiring from the fog lights to the main headlights, this will require cutting into their circuit. After connecting the wire, insulate the divided area with electrical tape, this will prevent possible short circuits in the future. After connecting, all wires must be secured with zip ties or the same electrical tape.
- There is another wire coming from the fog lights - ground. The negative leads must be connected to the bolts installed on the body of the car. They also need to be securely fixed, otherwise if they become detached while riding, the optics will not work.
- The next step will be to install a control button with a relay; it would be best to embed it into the center console. After the button is installed, the pink cable from the unit should be connected to the relay.
- When connecting, it is advisable to use a 15 amp safety device. The power relay contacts are also connected to this element, as well as the wiring from the fog lights; they are marked with numbers 30 and 87.
- When the headlights are installed, you need to diagnose the correct installation. Again, check the quality of fixation of the lights on the bumper, as this is very important. Check the functionality of the optics; if you did not make any mistakes during installation and connection, the lights will work.
- Now all you have to do is carefully assemble and reinstall the bumper. When installing, be careful not to damage the wiring. After installing the bumper, we recommend checking the functionality of the optics again.
Features of replacing and installing fog lights according to different connection schemes
Fog lights illuminate the road surface directly in front of the car. The location features allow the light flux to break through dense fog, illuminating the roadsides and markings. You can install fog lights yourself on any vehicle. To do this, you need to follow the placement rules and connect the wiring to the vehicle’s on-board network.
Requirements for installing fog lights
Traffic regulations regulate the installation parameters of fog lights. If they are not followed, problems with technical inspection and traffic police officers may occur.
Rules for installing fog lights:
- The outer side of the lamp housing should be no further than 40 cm from the edge of the bumper.
- The optics are mounted no lower than 25 cm from the ground. The countdown is from the lower limit of the fog lamp.
- Additional lighting is installed below the main headlights with low beam.
GOST 8769-75 states how many fog lights are allowed to be installed on a car, what lamps can be used and how to set the correct angle. In case of deviations from the requirements, the inspector has the right to issue an administrative fine and a requirement to bring the vehicle into proper condition.
To pass a technical inspection, the PTFs must be turned on only in conjunction with the side lights. If the connection diagram is incorrect, the technical inspection staff will refuse to issue the form.
Types of optics
Fog lights are divided into several types:
- regular;
- universal;
- lens;
- laser fog lights.
Factory optics are installed on high-spec vehicles and meet all requirements. Turning on the optics is possible only with active low beam or headlights. To adjust the beam angle, a special thumbwheel is used, which is located on the body.
Universal lights require independent installation, connection and configuration. For fastening, metal holders are used, which are screwed to the bumper or body reinforcement.
When choosing optics, you should trust only well-known manufacturers: these are headlights from Hammali, Hella, Osram, PIAA, Wesem, Morimoto.
Unknown Chinese products melt after prolonged use and are difficult to customize.
Lensed headlights are installed in rare cases and are capable of producing a powerful beam of light that breaks through the fog and illuminates both roadsides. For self-installation, there are kits with fasteners, a button and wires.
Laser options are installed on the rear bumper and are used to mark the vehicle in low visibility conditions.
Before purchasing optics, you need to decide on the installation location, measure the bumper and write down the approximate dimensions of the product.
Installation materials
Installing headlights does not require any special knowledge or tools from the driver. Difficulties can only arise when installing power cables, but this issue can be solved with the help of diagrams.
4 types of tuning for Toyota Corolla
Headlight installation tools:
- clean cloth;
- screwdriver;
- drill or screwdriver;
- thin drill;
- insulating tape;
- stationery knife;
- wires for connecting PTF;
- mounting bracket;
- fuse;
- plastic corrugations;
- screeds.
The junction can be insulated using heat shrink, which is compressed from a regular lighter or an industrial hair dryer.
The headlights are supplied as a connection kit and contain all the necessary parts for self-assembly. The rubber plug, which is placed on the lamp, protects the structure from moisture, dust, and sand.
During the installation process, you must be careful not to damage the components included in the connection kit.
Connection diagrams for fog lights
Cable connections are divided into two types:
- parallel;
- sequential.
The correct and safe option is to connect via a relay and a button. To protect against short circuits, a fuse-link is built into the circuit, which comes complete with fog lights.
The installation kit often contains cables that are not long enough for neat installation in the engine compartment. Connecting fog lights with your own hands will require at least 3-5 hours of time. To install metal fasteners, on some car models you have to remove the bumper.
We recommend: How to check the computer for performance without a car
Parallel connection
With this connection, the positive contact powers each of the headlights. A relay is installed in the wiring, as well as a 15 A fuse. To properly install the fuse link, it should be placed as close to the battery as possible.
The power supply appears only when the ignition is on or the engine is running. The functionality can be supplemented by supplying 12 V from the charging control signal wire. In this case, when you start the car, the headlights will automatically turn on and can be used as daytime running lights.
How to connect fogs:
- The negative contact from the headlights is connected to the car body.
- The positive terminals are connected to each other and go to the relay at terminal 87.
- The positive contact from relay number 30 is connected to the battery.
- The two remaining pins are used for the power button and 12V when the ignition is turned on.
A parallel connection supplies full voltage to each headlight, so the brightness of the lamps does not decrease, but the current consumption increases.
Serial connection
This installation method significantly reduces current consumption and reduces the brightness of the lamps. The circuit is perfect for permanent use of fog lights as running lights.
How to connect fog lights:
- The negative contacts of the headlights are connected to each other with one wire.
- The positive terminal of one headlight is attached to the body, and the second is soldered into the relay.
- The key in the cabin and the positive cable from the ignition are connected to terminals 86 and 85 of the relay.
- Pin 30 goes to the positive terminal of the battery.
Megatuning - installing a projection with a car logo
You can turn on automatic ignition by supplying power from the network charging sensor. In this case, the headlights should shine when the power unit starts and go out when it stops.
Installation of fog lights in the bumper
Installing fog lights will not take much time. For accuracy, you need to take measurements and mark the locations of the headlight mounts.
For installation you need to follow the steps:
- Wash the bumper from dirt.
- Attach the fog lamp to the installation site and make marks for the frames.
- Remove the mounting frame from the headlight.
- Drill holes at the mounting location.
- Install the frame using self-tapping screws or bolts that are included in the kit.
- Screw the headlight to the frame.
- Install a switch in the cabin.
- Carry out wiring using one of the suggested methods.
- Carefully hide the cables in the corrugation and secure them to the main harness using plastic ties.
All electrical work is performed with the battery terminals disconnected. After installing the headlights, you need to adjust the angle of the light so as not to blind oncoming drivers.
To install standard parts in factory locations, you need to remove the plugs and screw the bolts into special ebbs. In some cases, cars have all the necessary wiring for quick connection.