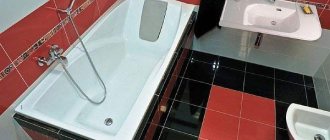
Requirements and standards
There is a large number of tips, but it should be noted that all recommendations must comply with regulatory documents. Otherwise, errors and shortcomings in the shed's power supply system can lead to electrical injury or an emergency.
Depending on the type of building, the lighting of the barn will differ significantly:
- In dry rooms that are heated in winter, any wiring method can be used. If the barn is heated, the line can be installed in both open and hidden ways.
- In unheated sheds, where natural moisture may appear from temperature fluctuations, the electrical cable is additionally placed in a sealed tube that prevents the penetration of dew. Lighting devices are also selected with a sufficient degree of dust and moisture protection.
- For sheds with high humidity (where a greenhouse, greenhouse and similar premises are organized), it is necessary to use cable and wire products with double reinforced insulation in accordance with clause 2.1.43 of the PUE . The lamps must have IP67 or IP68 protection, the switch is placed outside the barn.
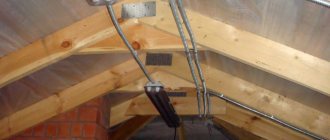
- If the barn is built of boards and there is no finishing inside, then the wiring and installation of lighting devices on a flammable surface is carried out in accordance with clause 2.1.38 of the PUE on a non-combustible surface. The non-combustible layer, when directly located on it, must protrude in each direction in the case of an open laying in accordance with clause 2.1.37 of the PUE. Hidden wiring in wooden structures is carried out in metal tubes that do not spread sparks.
- To ensure safety during the operation of lighting or other electrical equipment in the barn, special measures must be used in accordance with clause 1.7.50 of the PUE . This could be connecting lamps to low voltage 12V, using protective grounding, connecting an RCD or double insulating cables. The above measures can be used both together and separately.
Determination of lighting installation conditions
Depending on the type of barn and its intended purpose, if you want to install lighting, during installation work, various problems and difficulties may arise.
Let's look at the most common options in our country:
- A barn with a heating system. Such conditions for lighting are considered ideal, since you can choose any type of installation: open or hidden. At the same time, the work process itself will be quite simple, without unnecessary problems.
- The second option involves the absence of heating, or periodic activation of the heating element. In this case, the room is characterized by a slightly increased level of humidity. Lighting in such a shed needs to be provided with an additional layer of insulation from moist air. The priority for this case is installation in pipes.
- The most severe case is a completely damp structure. These include greenhouses or greenhouses. In this option, you should not use electrical networks with a single layer of insulation. It should also be turned off outside. When installing lamps, the choice is made on moisture-proof models. The minimum degree of protection is IP 65. A safe voltage is considered to be 12 V.
To carry out lighting, the installation process in an environment with humid air will have several nuances. First of all, the conductors must be placed in a special corrugated pipe. A necessary element is also a 220/12 V transformer.
Before starting work, you should measure the distance from the shed to the living space.
Throwing wiring into a shed for lighting by air is possible in cases where the house is located in close proximity to the building into which the wiring needs to be laid.
Otherwise, when the distance to the barn reaches 5 meters or more, and there are trees or other obstacles in the path where lighting needs to be installed, the cables are placed in the ground.
In this case, the depth of the bookmark should be at least 80-90 centimeters.
Barn Lighting Options
All types of artificial barn lighting can be divided into internal and external. The external one is most often located directly at the entrance or near the door. In order to save energy, you can use solar lamps, which will accumulate charge during the day and illuminate the building at night.
Solar lamp at the entrance
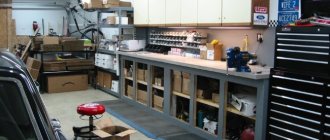
Interior lighting fixtures are installed on the ceiling or wall; additional lighting can be placed near shelves, near a workbench or table, if the barn is intended to be used as a workshop.
Several types of lighting equipment can be used to illuminate commercial buildings:
- LED lamps are the most economical in terms of light emitted per unit of power consumed. They have a long service life and an acceptable temperature range for barn lighting, but their cost is the highest;
- Fluorescent lamps are second on the list of economical lamps for interior lighting of a barn; they have slightly worse parameters than LED lamps. However, they are extremely capricious to low temperatures and at temperatures below –5ºC, an energy-saving lamp may not light up at all.
- Halogen lamps are low efficient for barn lighting, but have the lowest cost. These are relevant if the barn is rarely used and the lighting is turned on only when necessary.
Incandescent lamps are used extremely rarely in lamps, unless the owner wants to change to more advanced models. But, at the same time, Ilyich bulbs for lighting are justified for winter chicken coops, since they are a local heater and provide a good spectrum of light for the bird to gain weight and increase activity. In addition, artificial light in a chicken coop can be provided by specialized LED devices, but their price is quite high compared to a classic lamp.
For some sheds it is important to have autonomous lighting, especially if it is also used as a garage, basement, etc. The simplest version of an autonomous source is a rechargeable flashlight, which can be stored in any convenient place. But in the garage, autonomous lighting can be powered from a car battery.
What you need to know before installation
- High humidity or no heating. In this case, the wiring must be carried out in pipes; they protect from moisture and severe frosts. You can refuse this option if you want to save money, but remember: “The miser pays twice,” it may turn out that everything will have to be changed over time.
- The barn is heated and dry. In this case, you can choose any wiring, both open and closed, there is not much difference.
- A very damp room, this includes: greenhouses and greenhouses. In this case, the wiring must be double insulated, and all lamps must be protected IP 65 or higher. It is better to move the switch outside, also do not forget to set the safe voltage to 12 Volts.
To conduct wiring from the barn, look at this photo.
We recommend running the wire underground, in which case it will be completely protected. If it is believed that there are no obstacles on the way, you can see it through the air.
Preparatory work
The preparation of tools and devices for lighting the barn can begin both before the construction of the barn begins, and already during its direct operation. To connect or build an autonomous building on a site, you need to determine the most suitable power supply method: by air or underground.
Method of feeding a barn by air
The underground method is considered the safest; if there are no underground communications in the planned area where the line is located, it is better to lay the cable in the ground, this way you will prevent the influence of atmospheric factors on it. This will take more time; you will need to dig a trench at a depth of at least 0.8 m and lay a cable channel or pipe in it to protect the lighting line from mechanical damage.
An overhead line is easier and faster to install, but the cable will bend at the attachment point and the insulation will fray over time. The location of the shed lighting cable must be at a height of at least 2.7 m, for which either the roof or a separate support is used. To pull the line you will need a steel cable, clamps and anchorage for tension.
What you need to tension the support cable
The cross-section of the cable for lighting the barn is selected depending on the load used; you need to sum up the power of the lamps and the planned electrical equipment (furnaces, fans, machines, etc.). Then the cross section is selected from the table based on power:
Table: cable cross-section depending on the load
For example, for a load of 5 kW, you will need a wire cross-section of 2.5 mm2 for copper or 4 mm2 for aluminum. Please note that the lighting line can be made with copper wire, both inside the barn and outside, while aluminum wire can be used only outside. The most commonly used cable brands are SIP (for supplying air wiring to the building), VVGng, ShVVP or PVSng-LS.
At the preparation stage, be sure to draw up at least an approximate power supply diagram. This will allow you to determine the number of lighting fixtures, switches, sockets and junction boxes that will be useful to you.
Example of a lighting scheme in a barn
Electric installation work
So, now let's talk about the most interesting thing - how to install light in a barn from a private house. In fact, lighting installation is much easier to complete than preparatory work. Let's look at an example of a simpler and at the same time popular installation method - by air into a dry utility unit.
- Attach the first hook to a suitable location on the house. You can use mounting on insulators, as shown in the photo below.
- Pass the cable through a corrugated pipe, which will additionally protect the lighting line from mechanical damage.
- Turn off the power at the home switchboard.
- Drill a hole in the wall of the house to insert the cable into it and connect it to the house distribution panel at the input.
- Extend the light to the shed and run the cable inside the building.
- Install a circuit breaker at the entrance.
- From the machine, take out the distribution box, from which you need to route the cable in a corrugation to the required places (where the light bulbs will be located).
- You can connect the lamp not only inside the barn, but also at the exit, as shown in the photo. In both cases, it is better to use lamps with moisture-proof shades for lighting.
- Install a light switch in a suitable location. To control street and interior lighting, it is better to use a dual model. We provided a wiring diagram for a two-button light switch in the corresponding article.
- After all the electrical work, turn on the power and check how correctly you managed to install the light in the barn.
That's all you have to do to install lighting in the barn with your own hands! As you can see, there is nothing complicated and besides, such work will not take much time. We draw your attention to the fact that if you install a step-down transformer (for example, nuclear power plant) in an unheated utility room, you will have an additional outlet to which you can connect a power tool during repairs. In this case, the cross-section of the copper cable that you will extend from the dacha must be at least 2.5 mm2.
This completes our simple instructions. We hope that now you know how to install light into a barn from a private house with your own hands! If your summer cottage is often left without electricity, it is recommended to place a flashlight at the entrance to the outbuilding, which can save the situation at any time.
Step-by-step instructions for organizing lighting in a barn
Lighting installation may differ in each specific case, which is due to the individual design features of each barn. As an example, consider the option of powering an overhead line; for this you will need to perform the following steps:
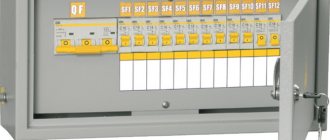
- Install a separate circuit breaker in the house distribution panel to power the shed. Whenever possible, it is advisable to use a separate RCD.
Connect the machine and the RCD for the shed power line.
Then the machine remains in the off position until the installation of the electrical wiring is completed or the lighting line is not connected to it.
- Draw a line from the house to the barn, let's say you are going to conduct wiring through the air.
Draw a line from the house to the shed
Stretch the steel cable, make sure that the tension is stronger than the cable, otherwise their purpose will be reversed. If you use a self-supporting insulated wire with a load-bearing core, you do not need to tension the cable.
- Drill a hole in the wall and run the cable into the shed. It is better to choose the insertion location in the immediate vicinity of the attachment point.
Run the cable into the shed
- If a barn is used as a garage, then it is better to mount a panel with automatic circuit breakers, additional protection or a step-down power supply at the input.
Mount a panel with machine guns
For other uses of the shed, a junction box will suffice. The distribution box is installed using a self-tapping screw or dowel.
- From the box, remove the wiring for lighting; if an additional outlet is planned, then a separate outlet is made for it.
Make cable outlets from the junction box
In addition, you can make an outlet that is turned on along with the lighting in the work area of the barn.
- Secure the wiring to the walls using clamps or any method convenient for you. If you tapped the walls for lighting, then lay the cable in the groove.
Secure the wiring
- Install lamps in the right places. To do this, drill holes for the dowel and secure the lighting device.
Install lamps
- Install sockets and switches for lighting the room, connect all equipment to the wiring.
Install sockets
After the wires are connected, the installation of distribution boxes is completed and access to live parts is closed, you can connect the power line of the outbuilding to the circuit breaker in the switchboard.
How to install light in a barn from a private house
The main nuance when installing lighting in outbuildings is that it is necessary to take into account fire and electrical safety requirements. You yourself understand that the outbuildings or workshop at the dacha are not always heated.
In addition, such buildings may have high humidity, which further aggravates the situation. That is why you need to know how to install light into a barn from a private home, so that in the future the lighting system will be safe and durable.
Next, we will tell readers of the site Electrician Himself all the nuances of electrical installation work and provide some practical advice on this issue!
Determining installation conditions
Before installing the light, you need to find out what the barn in the country is and what it is generally used for. Now we will look at the main options for utility units and briefly talk about what difficulties may arise when installing lighting yourself.
- The room is heated and dry. It is easiest to install light into such an outbuilding, because... You can choose any type of wiring: open or hidden.
- The humidity is high or the barn is simply not heated. Here you already need to draw the lighting line only in pipes, which additionally isolate the wiring from moisture.
- Particularly damp premises (usually greenhouses and hotbeds). The conductor must be double insulated, the light switch must be placed outside the dacha building. The lamps must be waterproof with a degree of protection IP 65, and operate from a safe voltage of 12 Volts.
There is no significant difference between a damp and a particularly damp room in terms of electrical installation work. In any case, you will have to install lighting in a corrugated or metal hose and install a 220/12 V step-down transformer if the barn is used as a cowshed or chicken coop.
Well, the last of the most important installation conditions is the distance from a private house to an outbuilding. If the distance is small and there are no obstacles (we’ll talk about them a little below), we recommend bringing the light into the barn through the air.
If the room is several tens of meters away and there are many trees or other obstacles along the way, it is better to lay the cable in the ground at a depth of at least 80 cm, as shown in the diagram.
Preparing materials
So, based on the above conditions, you must prepare materials in order to independently install light from a private house to the barn.
We recommend that you use VVGng cable (for overhead wiring), moisture-proof distribution boxes with sealed inputs, as well as light switches with a high degree of dust and moisture protection (at least IP44).
Also, with the aerial method of installing the lighting line, we advise you to additionally buy a special insulated cable, along which the corrugated cable will be laid in the future. For the cable, additionally purchase two hooks and special cable clamps, which will be necessary for further fastening.
If you nevertheless decide to run a lighting line to the shed in a trench, we recommend that you watch the instructions with video examples on installing electrical wiring underground. which describes all the intricacies of electrical installation work.
As for the cable, its length must be purchased with a margin of 3-4 meters so that there is no strong tension on the electrical line and at the same time there will certainly be enough material from the house to the barn. Don't forget to calculate the cable cross-section based on power and length.
If you are going to connect several light bulbs and will not remove an additional socket from the distribution box, you can safely choose a cable cross-section of 1.5 mm 2 (again, if there are no restrictions on the distance from the house).