Installing a washing machine in the bathroom is not uncommon, because this room in any apartment is best suited for these purposes. All necessary communications are already available here. In addition, you can put the machine almost anywhere. It is often installed:
- In a free corner of the room
- For built-in furniture
- Under the sink
In other words, you should determine where to connect the washing machine individually, depending on the layout and size of the room.
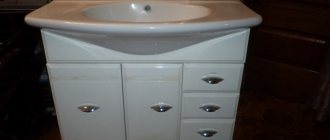
Under the table top
This option is considered the most classic. It occurs most often. This is exactly how buyers most often want to see a washing machine.
Choosing a bathroom countertop for a washing machine is also easy. This really has many advantages:
- Communications have already been established. All that remains is to connect the washing machine to them;
- Together with the tabletop, the machine will look like a single whole;
- The space under the sink will not be empty, but will be functionally used and used.
Some of the disadvantages include:
- Possibility of short circuit due to water entering from the sink;
- The need to bend your back when working with the machine, since the loading hole is located quite low;
- Quite a high vibration level. Moreover, not only the machine itself will vibrate, but also the tabletop with everything on it. Hence, a high level of rattling, possible damage to any items.
Among the features of this installation, it should be noted that it is necessary to purchase a machine slightly smaller in size than the sink; there must be a distance to the wall, otherwise the hoses will not fit.
The sink needs to be slightly larger in size to completely cover the washing machine. This will help minimize the flow of water from the sink onto the machine and thereby reduce the risk of a short circuit to zero.
Methods for connecting to the water supply system
Several different methods are used to connect to the water supply. The choice of the most suitable option depends, first of all, on the experience and skills of the person doing the connection.
Connection to a metal pipe
This method involves inserting directly into the water supply and is carried out using a mortise clamp or crimp coupling. At the top of this device there is a threaded hole through which a hose is attached to draw water from the plumbing system.
Pipeline tapping
Along with the coupling there is a guide sleeve and a rectangular rubber gasket. How the insert itself is performed:
- close the mixers and turn off the valve on the riser;
- the section of pipe under the gasket is cleared of paint in any convenient way and sanded until smooth;
- insert a sleeve into the clamp and fix it in the cutout of the gasket;
- attach the clamp to the pipe with four bolts and begin to tighten them one by one until the gasket is tightly pressed to the pipe;
- The pipe wall is drilled through the hole in the clamp, the drill diameter is 6-8 mm.
Now you need to place something, any container, under the clamp, and very slowly turn the valve on the mixer. After this, the water that was in the pipe will flow out of the hole. If you open the tap abruptly, water can shoot out and flood everything around. When the water has drained, you need to carefully clean the hole in the pipe from shavings, fix the new tap and check for leaks.
Advice. If the pipes are not metal, but metal-plastic, a special tee - fitting - is used instead of a clamp. Installation is quite simple: turn off the water, apply a fitting and mark the cut locations, cut out a piece of pipe. A fitting with sealing gaskets is inserted into the resulting opening and a ball valve is connected.
Connection to mixer
This option involves installation between the mixer and the eccentric of the walk-through valve. As a rule, the faucet is equipped with a special hose extension for hot water. This connection method is quite popular because it does not require much effort and time, however, due to the fact that the structure with the outgoing hose is in plain sight, it does not look very aesthetically pleasing.
If the mixer is of a European type, connection will take a few minutes: disconnect the cold water supply hose, screw the tee tap onto the eccentric, connect the mixer hose to one hole, and the hose from the washing machine to the other. If the mixer is of domestic production, then after disconnecting it you need to unscrew the eccentrics and install a walk-through valve with an extension.
In this case, a pipe under the sink leading to the mixer was used.
Connection to taps to a tank or mixer
Connecting the washing machine to the mixer (photo)
The most practical and convenient way. The taps are mounted on pipe-hose connections used to supply water to the flush tank, water heater or mixer. The faucet for the machine is usually installed between the water pipe and the faucet for the tank or mixer, although here its position does not play a special role, and can be placed on any side. But if the connection is made in the area of the water heater, the pass-through tap is mounted only between the pipe and the tap, otherwise, when the hot water is turned off, there will be no opportunity to wash clothes.
How to connect:
- shut off the water;
- unscrew the cold water supply tap;
- take a tee tap, wrap FUM tape around the external thread and screw it in place of the removed tap;
- The mixer hose is connected to one hole of the walk-through tap, and the hose from the washing machine is connected to the other.
The washing machine can also be connected to a separate outlet from the riser, if it was provided for it in advance
Top loading machines
A very convenient option if you don’t have a lot of space, but you definitely want to place the washing machine in the bathroom. Such machines are specially designed for bathrooms, for small spaces. They take up minimal space while being very functional. In terms of functionality, they are absolutely not inferior to traditional models.
Most often they are installed next to shower stalls. The only downside is that the space above it cannot be used in any way.
During installation, it is necessary to measure the distance of the bathroom to which the opening top-loading lid rises, that is, above the washing machine. This is important when planning the placement of cabinets - do not hang cabinets below this limit.
Organization of drainage
Draining waste water from the tank is one of the main functions of any SMA, so it is very important to provide the drain pump with the ability to clean the machine of excess water. The pump must quietly discharge the waste liquid without additional loads in such a way as to avoid its return into the unit system. To do this, you must correctly connect the washing machine to the sewer.
Simple waste disposal
This method is the simplest, however, not entirely user-friendly. The principle of operation of the drainage system in this case will be primitive: one end of the hose is attached to a special hole on the body of the machine, the other is directed to the sink, bathtub or toilet.
This method has one advantage - minimal time and effort. On the contrary, there are many disadvantages. Firstly, the drain hose is not securely fixed, so there is a possibility that it could fall and flood the room with dirty water. Secondly, you cannot use plumbing during the washing process. Thirdly, the waste liquid contaminates the surface of the bathtub and sink; this method of discharging water is unhygienic.
We connect to the side fitting of the siphon
If the washing machine is located in close proximity to the washbasin, the drain pipe can be connected to a siphon. The regular siphon will have to be replaced with a special one equipped with an additional pipe. Then simply attach the tip of the washing machine hose to the nozzle. The outlet is located in the upper part of the structure and at a slight angle, so waste water from the sink will not enter the drain system of the machine.
If we talk about the disadvantages of this method, there are two of them: the possibility of an unpleasant odor from the sewer system getting into the tank of the machine (to avoid this, it is recommended to use a water seal), and the likelihood that with excessively strong pressure, the waste water will not go into the sewer, but will rise into the sink and overflows over the edges.
We connect directly to the sewer
This method, although the most labor-intensive, is significantly superior to the previous ones in reliability. What needs to be prepared? A tee of the required diameter, having an oblique outlet and a check valve for the SMA. One part of the valve is connected to the drain pipe, the second, through a tee valve, is attached to the sewage system.
The inlet for the drain hose should be at a slight angle and located from top to bottom, this will prevent drains from plumbing fixtures from entering it, which can emit a nasty smell.
Description of the installation process
To begin with, the SMA must be freed from the manufacturer's packaging and the locking bolts that prevent the drum from loosening during transportation must be removed. It is very important not to forget to remove the stoppers; they can lead to failure of the chassis. You can unscrew the bolts using an open-end wrench. They are pulled out of the washing machine body along with the bushings, and plugs specially provided for this are inserted into the resulting holes.
The locking bolts must be preserved throughout the warranty period of the automatic machine, as well as in case you need to transport the unit for personal purposes.
- Place the SMA in the chosen place, and place a level on the upper wall of the housing. If the equipment is not level, you should adjust it according to the level of its legs. There is no need to place the washing machine close to the wall, as well as furniture and plumbing fixtures, if they are located on the sides of the unit, be sure to leave a small gap.
- Pull the machine forward a little, this will make it easier to connect it to the communications.
- Connect the drain and inlet hoses to the house utilities by choosing any of the methods described above.
- Thread all the hoses into the specially provided recesses of the washing machine, this will prevent them from kinking.
After all the actions have been completed, the unit moves to its original position, is installed in a permanent place, and is again adjusted for level. In the end, all that remains is to plug the machine into the network and check its functionality by running the test mode.
Placement in a niche
Sometimes initially, and sometimes “man-made and planned,” a niche is created in the wall in the bathroom during renovation. In all respects, this is the most convenient option for placing a washing machine. She is, as it were, in “her own room”, without interfering with the rest of the furniture, plumbing, or people in the bathroom.
Such a niche can be made either open or closed. In the latter case, the machine will be closed and not visible to visitors to the bathroom.
For closing use:
- Roller shutters;
- Conventional swing doors are not a very convenient option, as they require additional space when swinging open;
- Roller blinds;
- Textile;
- Regular blinds.
Checking for correct installation
Before you turn on your washing machine for a full wash, you should do a test run to make sure the installation is done correctly.
First, check that the water connection is correct: the machine must fill the tank within the time specified in the technical data sheet. Leaks at the hose connections are not allowed. 5-7 minutes after starting the unit, you need to touch the glass of the hatch and make sure that the water has heated up.
It is important that the car stands in its place, does not “jump” or move. Also, during the test wash there should be no extraneous noise. If you hear the machine knocking or grinding, stop working as soon as possible; there may be a shipping bolt left inside.
After checking the connection of the washing machine, you can load laundry into the drum and start washing
So, installing a washing machine is a task that you can do yourself without turning to specialists. Carefully read the instructions for the equipment, follow the recommendations outlined in our article, and you will succeed!
Closet placement
One large cabinet is made from floor to ceiling. At the bottom there is a washing machine. The entire upper part is a storage room for household goods.
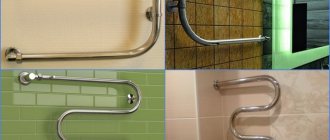
Bathroom rod - tips on the correct selection, installation and adjustment of modern rods (100 photos)
Glass for the bathroom: advantages of use, main disadvantages and recommendations for choosing glass elements for the bathroom (125 photos)
Wiring in the bathroom - 115 design photos, selection of the best schemes and optimal placement ideas
It turns out to be a “closet” in the bathroom in the form of a cabinet. And there is a washing machine in it. The cabinet can be either open or closed. Who likes it more?
Washing machine on the wall
Perhaps the most exotic way to place a washing machine in the bathroom. Most often, such placement is used when there are no other places.
Designing a bathroom with a washing machine on the wall is the height of out-of-the-box thinking. You need to place the car on a pre-made wall. In this case, you cannot make compromises and try to install the machine on low-strength materials.
If installed correctly, there is no need to be afraid that the machine will fall. The only drawback will be the limited choice of washing machine - you will have to buy a model with a small tank.
Alignment
It is very important that the unit stands level relative to the floor surface, otherwise overloads will occur and the machine may quickly fail. To prevent it from “jumping” due to the imbalance of the drum, it is also important to set the technique correctly.
The machine should not swing under any circumstances; all four legs should be firmly installed on the surface. You can determine whether the washing machine is tilted relative to the floor by looking at the level by simply placing it on top of the unit.
To adjust the position of the equipment, do not use foreign objects, for example, wooden blocks or pieces of linoleum. The height of the unit is changed by twisting the legs.
The position of the washing machine relative to the floor is adjusted by changing the height of the legs