Three steps to the sculpture
Concept
We will immediately decide where our future creation will be located. To decorate the park, it is better to have something relaxing: figures of people, animals, or abstract decorations. Characters from fairy tales or cartoons are suitable for the playground.
If a concrete sculpture can be used in a game, great!
Sketch
Drawing of the future sculpture. If you can do it accurately and in detail, good. If it’s also on a scale, it’s absolutely wonderful. If not, at least in the most general form, primitively, as long as it is clear to yourself. Or pick up a ready-made one on the Internet. The main thing is to decide on the dimensions (Fig. 1), at least the basic ones, this is mandatory.
Determining the size of the future sculpture
Scale model
The sketch has been made, but it’s too early to start work. The next step is a model of the future sculpture.
We make the model from clay or plasticine. In fine details, say the tail and paws of a cat from Fig. 1 insert a wire for rigidity.
If you don’t have sculpting skills and the desire to master them, we look for a suitable model in a toy store, at a flea market, or create it on a 3D printer.
Advice.
Sometimes an element looks great on a tiny model, but does not look enlarged. To avoid this, try to select the size of the model on a scale of about 1:5. Let's say, for a meter-long sculpture, a 20 cm model is just right.
What is the model for? Let's explain with an example.
To copy a finished drawing, there is one way: the original is drawn with a grid of identical cells, and then small simple “pieces” are transferred to the same or proportionally enlarged (reduced) grid (see photo).
Transferring a drawing across cells
A sculpture can be copied in a similar way. The only thing is that we will transfer not a plane, but a volume, so the original needs a volumetric one.
I recommend: How to make decorative finishing tiles from gypsum with your own hands
Sculptures for Beginners
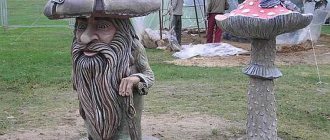
For those who have never made concrete figures with their own hands, you can start with the simplest thing - making a concrete mushroom yourself. Painted in bright colors, it will be appropriate in the garden, on the playground, and near the entrance of an apartment building.
Concrete for crafts should be like butter: not so liquid that it drips, but not so thick that you can sculpt from it.
Fungus is the easiest concrete sculpture for beginners.
If the work will be done in the summer, then it is recommended to make a depression in the sand for the mushroom cap (preferably with a bowl resembling a cap), and place a burdock leaf on its bottom. The leaf will give the future sculpture wrinkles and irregularities, reminiscent of the real structure of the cap. If a concrete sculpture is made in winter, then you can simply wrap a suitable bowl in cellophane and fill it with concrete. After about half an hour, you need to insert several nails or a piece of pipe into the center of the cap if the cap is very large. This will improve the ligament and make the figure stronger. Now you can work on the leg, and leave the finished product until completely dry.
For the leg, we first make a mold: old roofing felt, linoleum, a plastic bottle, any other, a variety of materials that can be rolled into a tube and filled with solution will do. The reinforcement will also have to be buried in the middle of the leg. When both halves are dry, sprinkle the stem of the mushroom with wet sand, compacting it well, fill the joint with mortar, and install the cap. After 3-4 days, the simplest sculpture is ready. All that remains is to paint it and install it in the right place.
How to make a foundation for a house with your own hands? Features of pouring concrete. What is crushed stone? More details>>
How to transfer model dimensions
To mark and transfer dimensions from the model to the original, we will make a simple device.
It represents two rectangular “gazebos” made of rods, with a roof in the form of a mesh, with stretched threads or thin wire, or welded mesh. This device is called a copy frame. A small one is placed above the model, and a proportionally enlarged one is placed at the place where the sculpture is made. Using a plumb line, measure the size on the model with a tape measure and transfer it. First on the frame, then on the sculpture. How to do this is clear from Fig. 2.
Using a plumb line, measure the size on the model using a tape measure and transfer it to the sculpture.
The main thing is not to move the marking machines during the marking process, and if necessary, return them to exactly the same place.
Plaster sculptures
To make a product from plaster, you must have:
- Dry plaster
- Water
- PVA glue
- Moisture resistant glue
- Paraffin or Vaseline
- sifted clay
- Waterproof paints (preferably acrylic)
Plaster is well suited for “cloning” existing sculptures. First, a mixture is made from clay and water into which the existing product will be pressed. Adjust its thickness so that the mixture is elastic, does not flow and is not too dry. Make an impression of the desired product on both sides and leave to dry for a day.
Do not place clay casts in the sun - rapid drying will cause the clay to burst, which will render the cast unusable. If small cracks occur, you can cover them with plasticine.
After the clay has dried, it is necessary to prepare a gypsum solution with the consistency of thick sour cream. So that the figure can please you much longer, replace 10-20% of the water with PVA glue - this will make the solution much stronger. Lubricate both casts from the inside with paraffin or Vaseline (this will help you easily pull out the halves of the sculpture), then pour plaster there.
Leave the plaster to dry in a warm room for a day. Afterwards, treat the unevenness and roughness at the joints and connect them with waterproof glue. After this, you can start decorating the figure.
How to make a sculpture frame
For a concrete sculpture, the frame is 80% of the work. It sets its general appearance and proportions, gives the sculpture strength, and holds the concrete in place during the sculpting process.
We start with the main frame. → We weld (the link tells about welding with an inverter) from durable elements - pipes, rolled steel, thick reinforcement. While the concrete hardens, this frame has to bear its weight, that is, practically the weight of the entire sculpture.
The “primary” skeleton serves as a support for the “secondary” frame, which:
- holds concrete during the molding process, transferring the load from its weight to the main frame;
- serves as the basis of a mesh holding concrete;
- defines the main elements of the sculpture, excluding the smallest details;
We bend the secondary frame from 6-8 mm smooth reinforcement and connect it by welding and twisting wire. A-II “corrugated tape” is also suitable; A-III. It is more difficult to bend, but for relatively straight parts it is even better.
Finally, we close the large gaps between the rods of the secondary frame with mesh or wrap it with wire, securing it with twists. Leave the distance between the turns or mesh cells at approximately 2.5-3 cm.
As a result, we get a wire sculpture, 2-6 cm in size “thinner” than the future concrete one.
The components of the frame are visible in the example of a sculpture of a dolphin for a fountain (Fig. 3).
Components of the sculpture frame
Laying concrete on the frame
To lay the mixture you will need a pair of spatulas, a trowel, and a plaster ladle. To protect the concrete from drying out, we stock up on opaque plastic film.
A sculpture 1.5 m high and higher cannot be made without a → trestle, or at least → a stepladder (the links tell you how to make a trestle or a stepladder with your own hands).
The pedestal of the sculpture, if necessary, is cast from ordinary concrete in formwork, and three to four days before the start of work on the sculpture, so that it has time to set.
I recommend: How to make a topiary, green sculpture for a garden or cottage
We prepare the mixture for the body of the sculpture (see section “Concrete for sculpting”) and begin laying it on the frame from the simplest places.
We lay the mixture by throwing or spreading it onto the frame using a trowel. For large portions we use a ladle.
In one go, you need to try to complete any element of the sculpture that stands out due to its relief or some other boundaries. We will outline such areas on the model in advance.
Having filled a certain area, we smooth the mixture, shape its surface with spatulas, templates or simply with our fingers.
If you have to make a lot of repeating parts, you should cut out a suitable stamp from wood in advance.
In addition, templates and stamps sometimes accommodate a wide variety of items. For example, a texture that imitates short hair can be created with a short, hard brush, the furrows “under the bark” can be pressed with a fine-toothed comb, and the animal’s fur can be made with a metal comb.
Interesting patterns are obtained by knurling with textured rollers.
Repeating relief can be made with a textured roller
Advice.
Concrete thicker than 2-2.5 cm does not hold on vertical and “reverse” surfaces. The desired array is obtained by laying the mixture in several layers. Take your time though. After half an hour or an hour, the mixture may seem quite “sticky” (especially with the addition of gypsum), and when laying a new portion, it will fall off in a whole layer.
Other concrete figures
If the sculpture is supposed to be small in size, then it can be made in a workshop, and if a large structure is planned, then it is better to make it at the installation site.
Such products can be of different sizes. Large ones can completely replace a sculpture in a garden plot. Little ones can decorate a house or apartment. In order to make an interesting shape out of concrete with your own hands, you will need:
- spray for concrete. It is expensive, so you can buy non-stick kitchen spray instead;
- container for the mold. Important: if the finished flowerpot cannot be removed from the mold, it will have to be broken. This is why it is not recommended to use exclusive vessels to create statues;
- rod for compacting concrete.
Simple manufacturing technologies differ little from the previous one. The mold is sprayed with non-stick spray, filled with the solution, tamping it with a metal rod so that all air bubbles come out. After drying, the flowerpot is removed from the mold and painted. Flowerpots made in the form of sculptures look great. To produce them, you can use shaped hollow vessels as molds: plastic or glass bottles of different shapes.
Final finishing of the sculpture
We begin finishing the surface of the mixture the very next day after installation. Concrete has not yet gained strength and can be cut even with a knife. This is the last opportunity to correct the mistakes made without much difficulty.
We smooth the concrete in this state to the state of a planed board, correct and complement the texture, make → ironing.
Let the decorative concrete sit for at least a week before grinding it. If you start earlier, particles of crushed stone and sand will turn out, forming shells and furrows.
We grind large parts and flat surfaces with a grinder with an attachment in the form of an abrasive cup. Fine relief - with petal nozzles made of sandpaper, nozzles with a soft base and manually - with regular sandpaper.
We polish using the “wet” method, wetting both the abrasives and the concrete itself with water.
Very tiny details or ornamentation are rarely required for concrete sculptures. If, however, your plan requires hair-breadth precision, we do the processing using the set concrete. We work with small “grinder” cutting discs, a hammer drill, a hammer and thin chisels of various shapes.
Removing material
The removal method can be applied to almost any material, and is a classic approach used for wood sculpture, stone (the most common material is marble, as well as granite) and even ingot-cast metals. Totem poles are a great example of wooden sculptures, while the ancient Greeks and Romans used marble.
Wood sculptures
Wood is relatively easy to work with steel tools. Modern technologies help us quickly process wood using lathes or CNC machines. Then the artist could work out the details and finish the surface by hand. The disadvantage of wood is that it has a short service life compared to other materials, but in some cases aging can add to the attractiveness.
Marble
The material (which is essentially calcium carbonate) is difficult to process. Given the value of the material, most sculptors created clay models, then preforms, and tried to find the right proportions and textures before working on a piece of marble.
Modern technologies help us process forms with machines with water jets (universal and slow), or diamond tools (less universal and fast). It is a soft stone and easier to work with than others. Marble has a wide range of colors available.
Marble is durable, but not too durable and soluble in water. Never make fountains out of marble or travertine.
Granite
A material that is much more difficult to process than marble due to its abrasion resistance and abrasive structure. When working with stone, the only alternative is abrasive cutting and finishing. A sculpture made from this material will last a very long time. The material is resistant to climate change and water, but it is much more expensive than marble. There are granite quarries all over the world, and the variety of this material is impressive. Modern processing is performed with diamond tools.
Metals
Almost any metal can be processed from an ingot. This is a common way of making statues from titanium, nickel alloys, steel, copper, bronze, brass, silver, gold. Once cast, the metal can be deformed through the forging process and then finished by hand. High quality components for mission critical applications are typically forged and heat treated for CNC molding. The same can be done for the statue. If you have the money to afford it. Imagine a beautiful titanium statue. Almost immortal, shiny and with a slightly yellowish sheen.
Concrete composition
For modeling, you need a plastic concrete mixture that adheres well to the metal of the frame and to the already laid layers.
Its base is ordinary or decorative → concrete plus additives (the link tells about making concrete with your own hands). Decorative concrete is different in that instead of the usual gray cement, we use white, and colored chips as crushed stone (marble, granite, synthetic stones, etc.).
I recommend: How to make decorative finishing tiles from gypsum with your own hands
The main additives are slaked lime and clay. They turn building concrete into sculptural concrete, which does not spread, but retains the shape that we give it.
It is better to take kaolin clay. Fireclay clay or bentonite will give a grayish tint, which may be undesirable in decorative concrete.
As plasticizers that reduce the need for concrete in water, we use CMC glue and (or) PVA emulsion. They are also good because CMC increases the viscosity of concrete, and PVA increases adhesion (“stickiness”). You can also add special plasticizers for concrete.
We will also add polypropylene fiber to the concrete for the first layers. It will improve the adhesion of layers, reduce the risk of cracks to almost zero, and increase frost resistance.
Adding a gypsum mixture for plaster will speed up setting and make modeling easier. Its disadvantage is that it reduces the resistance of concrete to atmospheric influences, so it must be used with caution, without exceeding the dosage.
One of the composition options for sculptural concrete:
| Item no. | Name | Quantity | Notes | |
| In volume fractions | In kg per m³ of mixture | |||
| 1 | Cement PC M500 | 12 | 260 | For decorative concrete, cement PB500, quartz sand, marble or other decorative chips |
| 2 | Washed sand | 22 | 520 | |
| 3 | Crushed stone fraction 3-5 mm | 39 | 990 | |
| 4 | Water | 8 | 110 | |
| 5 | Slaked lime | 5 | 70 | |
| 6 | Clay | 5 | 120 | for decorative concrete kaolin |
| 7 | Polypropylene fiber 6-10 mm | 6 | 25 | For lower layers |
| 8 | Gypsum plaster (putty) mixture | 2 | 20 | Not for use with quick-setting cement |
| 9 | KMC | 0,5 | 3 | |
| 10 | PVA | 0,5 | 9 | |
| 11 | Color pigments | Until you get the desired shade | ||
| Total: | 100 | 2127 | ||
Mix CMC and PVA in water in advance. Mix gypsum, fiber and cement in dry form. We add lime and clay along with sand and crushed stone.
The consistency should be something between soft butter and thick sour cream.
DIY garden sculpture
Every owner of a garden plot dreams of being different and standing out with an original design around the house. Decorative decorations like garden sculptures are a great help in this matter, especially since now you can make them yourself from scrap materials.
Creating and creating with your own hands is a great way to relax and express your imagination. You can make sculptures with your own hands that will delight the eye for many years decorating the garden.
And it is not necessary to expect a work of art right away from the first product; practice and invested soul are important in this matter. The material can be absolutely any, some prefer classic durable products, while others have a desire to create from plastic, old tires and bottles.
In any of the options, the main thing is to follow safety precautions and not to overdo it with the number of statues. After all, sometimes it is not the large number that is important, but the quality of the figure.